2018 MERCEDES-BENZ E-CLASS WAGON wiper blades
[x] Cancel search: wiper bladesPage 132 of 506
#1b Wipes with washer fluid
#2 ISwit ches on intermittent wiping
#3 0Switches off intermittent wiping
#4 b Wipes with washer fluid
Changing the windshield wiper blades
&
WARNING Risk of becoming trapped if
th e windshield wipers are switched on
while wiper blades are being replaced
If th e windshield wipers begin tomo vewhile
yo u are changing the wiper blades, you can
be trapped bythe wiper arm.
#Alw ays switch off the windshield wipers
and the ignition before changing the
wiper blades.
Moving the wiper arms toave rtical position
#Set the windshield wiper tothe° slow
continuous wiping position on the combina‐
tion switch.
#As soon as the wiper arms are vertical rela‐
tive tothe hood, switch off the ignition.
#Fo ldthe wiper arm away from the windshield.
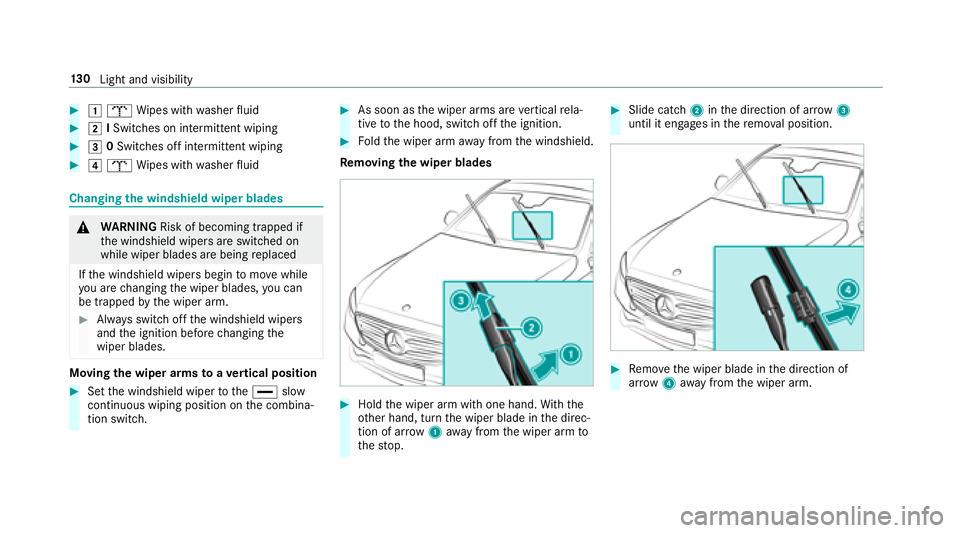
Re moving the wiper blades
#Hold the wiper arm with one hand. With th e
ot her hand, turn the wiper blade in the direc‐
tion of ar row1away from the wiper arm to
th estop.
#Slide catch 2inthe direction of ar row 3
until it engages in there mo val position.
#Re mo vethe wiper blade in the direction of
ar row 4away from the wiper arm.
13 0
Light and visibility
Page 133 of 506

Installingthe wiper blades
#Insert the new wiper blade into the wiper
arm in the direction of ar row1.
#Slide catch 2inthe direction of ar row 3
until it engages in the locking position.
#Make sure that the wiper blade sits cor rectly.
#Fo ldthe wiper arm back onto the windshield. Maintenance display
#Re
mo veprotective film 1 ofthe mainte‐
nance display on the tip of the newly ins tal‐
led wiper blade.
If th e color of the maintenance display changes
from black to yellow, the wiper blades should be
re placed.
Light and visibility 13
1
Page 134 of 506
%The duration of the color change varies
depending on the usage conditions.
Re placing the rear window wiper blades
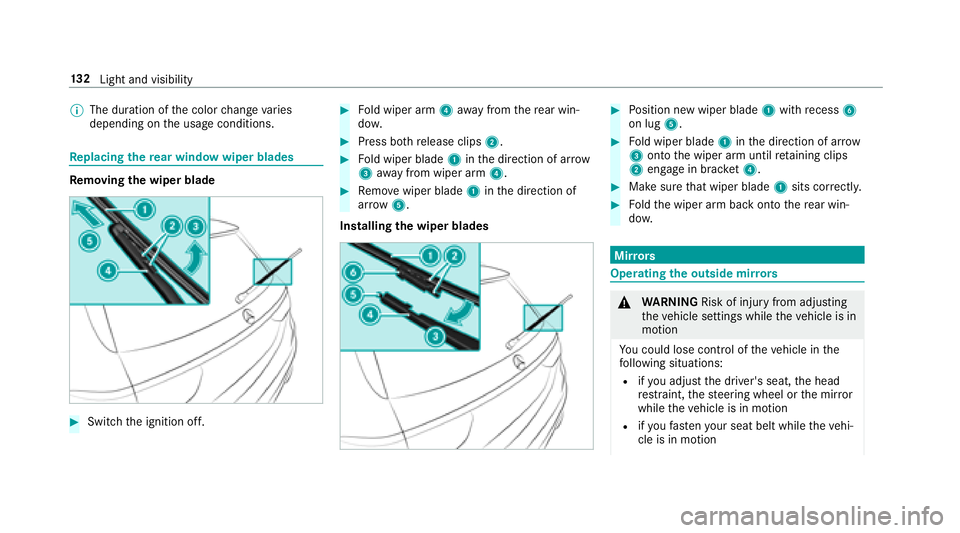
Re moving the wiper blade
#Switch the ignition off.
#Fo ld wiper arm 4away from there ar win‐
do w.
#Press bo threlease clips 2.
#Fold wiper blade 1inthe direction of ar row
3 away from wiper arm 4.
#Remo vewiper blade 1inthe direction of
ar row 5.
Installing the wiper blades
#Po sition new wiper blade 1with recess 6
on lug 5.
#Fold wiper blade 1inthe direction of ar row
3 onto the wiper arm until retaining clips
2 engage in brac ket4.
#Make surethat wiper blade 1sits cor rectl y.
#Foldthe wiper arm back onto there ar win‐
do w.
Mir rors
Operating the outside mir rors
&
WARNING Risk of injury from adjusting
th eve hicle settings while theve hicle is in
motion
Yo u could lose cont rol of theve hicle in the
fo llowing situations:
Rifyo u adjust the driver's seat, the head
re stra int, thesteering wheel or the mir ror
while theve hicle is in motion
Rifyo ufa sten your seat belt while theve hi‐
cle is in motion
13 2
Light and visibility
Page 338 of 506
Notes on care of vehicle parts
&
WARNING Risk of entrapment if the
windshield wipers are switch ed on while
th e windshield is being cleaned
If th e windshield wipers are set in motion
while you are cleaning the windshield or
wiper blades, you can betrapped bythe
wiper arm.
#Alw ays switch off the windshield wipers
and the ignition before cleaning the
windshield or wiper blades.
& WARNING Risk of burn s fromtailpipes
and tailpipe trim
The tailpipe and tailpipe trim can become
ve ry hot. If you come into contact withth ese
parts of theve hicle, you could burn yourself.
#Alw ays be particular lycareful around
th eta ilpipe and theta ilpipe trim.
#Allow theve hicle parts tocool down
before youto uch them.
Obser vethefo llowing information:
Information on cleaning and car eAvoiding vehicle damage
Wheels/rims Usewate r and acid-free wheel cleaners.
RDo not use acidic wheel cleaners toremo vebrake dust.
This could damage wheel bolts and brake components.
RTo avoid cor rosion of the brake discs and brake linings,
drive theve hicle for a few minutes af ter cleaning before
parking it. The brake discs and brake linings warm up and
dried out.
Wi ndo ws
Cleanthe windo wsonthe inside and outside using a damp
clo thand cleaning products recommended byMercedes-
Benz. Do not use dry clo
ths, abrasive products or cleaning agents
containing sol vents toclean the inside of the windo ws.
336
Maintenance and care
Page 339 of 506
Information on cleaning and careAvoiding vehicle damage
Wi per blades
Fold out the wiper blades and clean them using a damp clo th.D o not clean the wiper blades too of ten.
Ex terior lighting
Cleanthe lens with a wet sponge and mild de terg ent, e.g. car
shampoo. Only use cleaning agents or cleaning clo
thsth at are suitable
fo r plast ic lenses.
AIRPANEL Ifth eve hicle is very dusty or there are salt deposits in the
AIRPA NEL mechanics, the adjustment range of the shutters in
th era diator trim may be restricted.
RSwitch on the ignition, and the shutters open automati‐
cally af ter app roxima tely 12 0 seconds.
RClean the bearing points of the shutters with a high-pres‐
sure water jet. When using a high-pre
ssurewater jet, maintain a minimum
dis tance of 11.8 in (30 cm).
Senso rs
Cleanthe sensors in the front and rear bumpers and in the
ra diator grille with a soft clo thand car shampoo. When using a high-pressure
water jet, maintain a minimum
dis tance of 11.8 in (30 cm).
Re ar view camera
and 360° Camera
ROpen the camera co ver with the multimedia sys‐
te m(→pa ge 199) .
RUse clear water and a soft clo thtoclean the camera lens. Do not use a high-pressure
water jet.
Ta ilpipes
Clean with cleaning agent sre commend
edbyMercedes-Benz,
particular lyin the winter and af terwa shing theve hicle. Use acid-free cleaning agents.
Maintenance and care
337
Page 505 of 506
DOT,Tire Identification Number (TIN)
.............................................................3 73
Flat tire ................................................ 340
Inter changing ...................................... 382
Load ind ex........................................... 375
Load-bearing capacity ......................... 375
Maximum tire load ...............................3 74
Maximum tire pressure ........................ 374
MOExtended tires ................................ 341
Mounting ............................................. 387
No ise .................................................. .360
No tes on mounting .............................. 380
Overview of tire labeling ......................3 72
Re moving ............................................ 387
Re placing ............................................ 380
Re starting the tire pressure monitor‐
ing sy stem .......................................... .367
Selection ............................................. 380
Snow chains ........................................ 361
Speed rating ........................................ 375
St oring ................................................ 383
Te mp erature grade .............................. 372
Ti re and Loading Info rmation placard .. 367
Ti re characteristics .............................. 375
Ti re
pressure (n
ote s) ............................3 61Ti
re pressure monitoring sy stem
(function) ............................................. 365
Ti re pressure table .............................. 363
Ti re Quality Grading ............................. 372
Ti re size designation ............................3 75
TIREFIT kit ...........................................3 42
Tr action grade .................................... .372
Tr ead wear grade ................................ .372
Un usual handling characteristics ........ 360
Wi -Fi
Overview ............................................. 249
Setting ................................................. 249
Setting up a hotspot ............................ 250
Setting up an Internet connection ....... 297
Wi ndow airbag ...........................................3 8
Wi ndow lif ter
see Side windo ws
Wi ndo ws
see Side windo ws
Wi ndo ws(Care) ...................................... .336
Wi ndshield
Defrosting ............................................ 136
Infrared reflective ................................ 135
Re placing the wiper blades .................. 130 Wi
ndshield heater .................................... 141
Wi ndshield heating
see Windshield hea ter
Wi ndshield washer fluid .........................3 98
No tes ........................ .......................... 398
Wi ndshield w
a sher sy stem
Re filling .............................................. .332
Wi ndshield wipers
Re placing the wiper blades .................. 130
Switching on/off ................................. 129
Wi nter operation
Snow chains ........................................ 361
Wi nter tires
Setting the permanent speed limit ...... 177
Wi per blades
Ca re .................................................... 336
Changing ............................................. 130
Wire lesscharging
Fu nction/no tes ................................... 120
Mobile phone ....................................... 122
Wire lessvehicle co mponents
Declaration of con form ity ...................... 23
Index 503