2018 MERCEDES-BENZ CLA COUPE ignition
[x] Cancel search: ignitionPage 257 of 326
Compass
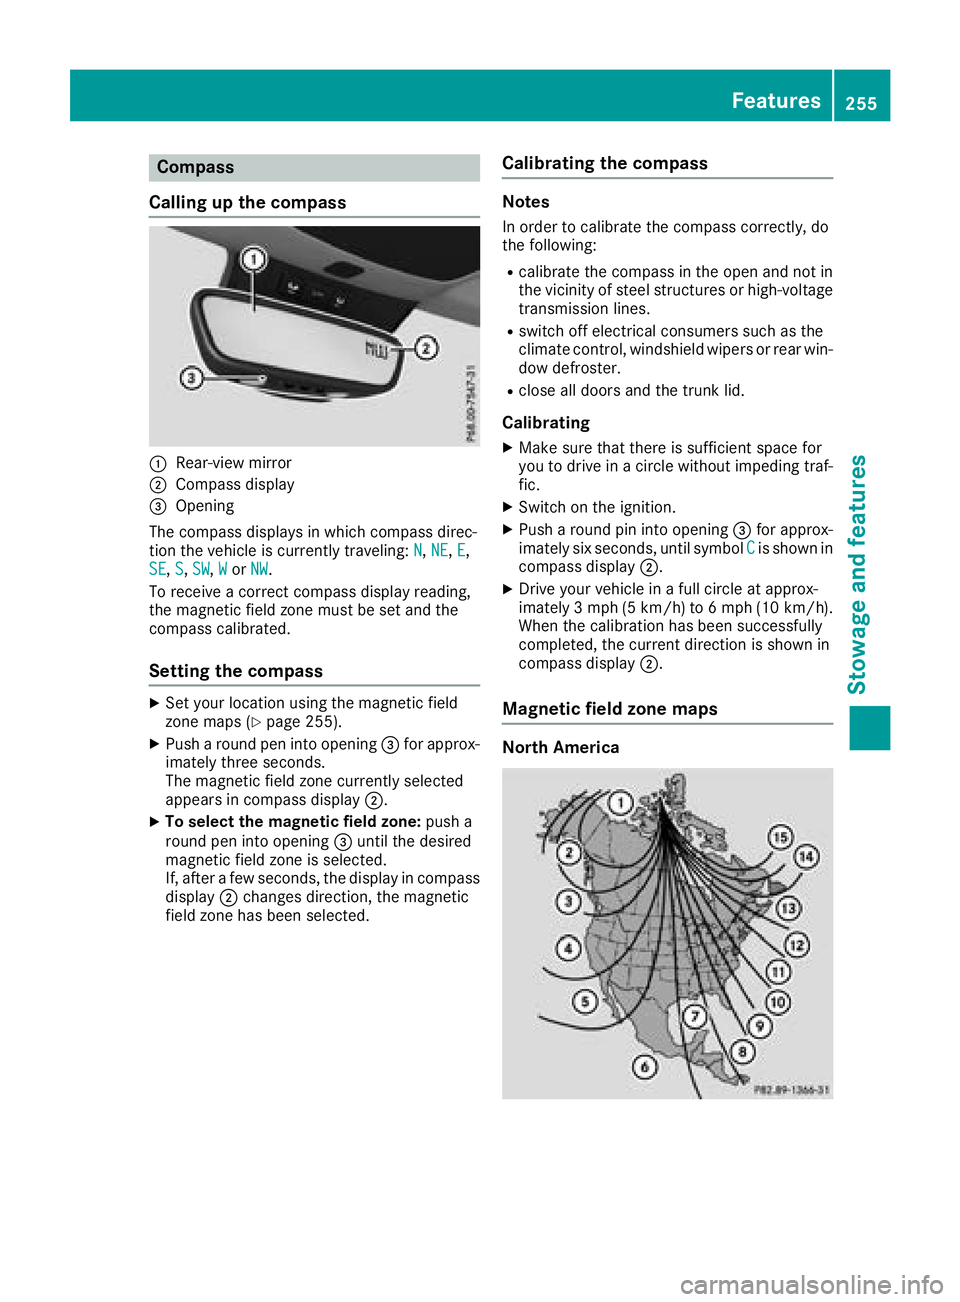
Callin gupthe compass
:Rear-view mirror
;Compass display
=Opening
The compass displays in whichc ompass direc-
tio nt he vehicle is currently traveling: N
,NE,E,
SE, S,SW,Wor NW.
To receive acorrec tcompass display reading,
th em agnetic fiel dzonem ust be set and the
compass calibrated.
Settin gthe compass
XSet your locatio nusingt hemagnetic field
zone maps (Ypage 255).
XPush aroun dpen int oopening =for approx-
imately three seconds.
The magnetic fiel dzonec urrently selected
appearsinc ompass display ;.
XTo select themagnetic field zone: push a
roun dpen int oopening =until th edesired
magnetic fiel dzoneiss elected.
If,a fter afew seconds, th edisplay in compass
display ;changes direction,t hemagnetic
fiel dzoneh as been selected.
Calibratin gthe compass
Notes
In order to calibrat ethe compass correctly, do
th ef ollowing:
Rcalibrat ethe compass in th eopen and no tin
th ev icinity of steel structures or high-voltage
transmission lines.
Rswitch off electrical consumers suchast he
climate control, windshield wipersorr ear win-
dow defroster.
Rclose all doorsa nd thetrunk lid.
Calibrating
XMakes ure that there is sufficient spacef or
you to driv einacircle without impedingt raf-
fic.
XSwitch on th eignition.
XPush aroun dpin int oopening =for approx-
imately six seconds, until symbol Cis shown in
compass display ;.
XDrive your vehicle in afull circle at approx-
imately 3mph (5 km/h )to6mph (10 km/h).
When th ecalibration has been successfully
completed, th ecurren tdirection is shown in
compass display ;.
Magnetic field zone maps
North America
Features255
Stowage and features
Z
Page 259 of 326
Engine compartment
Hood
Important safety notes
GWARNING
If th ehood is unlatched, it may open up when
th ev ehicle is in motion and blocky our view.
Thereisar isk of an accident.
Never unlatch th ehood while driving .Before
ever ytrip, ensure that th ehood is locked.
GWARNING
When opening and closingt hehood,itm ay
suddenly fall int othe closed position.T hereis
ar isk of injury to personsw ithin range of
movementoft hehood.
Open and close th ehood only when no onei s
within its range of movement.
GWARNING
Opening th ehood when th eengine is over-
heated or when there is afireint heengine
compartmen tcoul de xpose you to hot gases
or other servic eproducts. Thereisar isk of
injury.
Let an overheate dengine coo ldown before
opening th ehood.Ift here is afireint he
engine compartment, keep th ehood closed
and contac tthe fired epartment.
GWARNING
The engine compartmen tcontain smoving
components. Certain components, sucha s
th er adiator fan ,may continue to run or start
again suddenly when th eignition is off .There
is ar isk of injury.
If you nee dtodoany work inside th eengine
compartment:
Rswitch off th eignition
Rnever reac hintot he area wheret here is a
risk of danger from moving components,
suchast hefan rotatio narea
Rremove jewelry and watches
Rkeep items of clothing and hair, for exam-
ple, away from moving parts
GWARNING
The ignition system and th efuel injection sys-
te mw ork unde rhigh voltage. If you touch
component swhicha re unde rvoltage, you
coul dget an electric shock. Thereisar isk of
injury.
Never touch component softheignition sys-
te morf uel injection system when th eignition
is switched on.
Opening th ehood
GWARNING
Certain component sintheengine compart-
ment, suchast heengine ,radiator and parts
of th eexhaust system, can become ver yhot.
Workin gintheengine compartmen tposesa
risk of injury.
Wherep ossible, let th eengine coo ldown and
touch only th ecomponent sdescribe dinthe
following.
GWARNING
When th ehood is open and th ewindshield
wipersa re set in motion,y ou can be injured by
th ew iper linkage. Thereisar isk of injury.
Always switch off th ewindshield wipersa nd
th ei gnition before opening th ehood.
!Makes ure that th ewindshield wipersa re
no tfolded away from th ewindshield. You
coul dotherwise damag ethe windshield wip-
ers or th ehood.
Engine compartment257
Maintenance and care
Z
Page 262 of 326
Checking and addingother service
products
Checking coolan tlevel
GWARNING
The coolings ystem is pressurized, particularly
when th emotor is warm .Ifyou open th ecap,
you coul dbescalded if hot coolant sprays out.
Thereisar iskofi njury.
Let th eenginec ooldown before you open the
cap. Wear gloves and eye protection.S lowly
open th ecap to relieve pressure.
!The coolant may only be checked and cor-
recte dwhen th eengineisc ool(coolantt em-
peratur ebelow 10 4‡(40 †) .Checkin gthe
coolantw hen thecoolantt emperatur eis
above1 04‡(40 †) ma yresult in damage to
th ee ngineortot heengin ecoolings ystem.
XPar kthe vehicl eonal evel surface.
Only chec kthe coolan tlevel when th evehicl e
is on alevel surfac eand th eengineh as cooled
down .
XTurn th eSmartKey to position 2in th eigni-
tion loc k(Ypage 122).
XCheckthe coolan ttem perature display in th e
instrumen tcluster.
The coolan ttem perature mus tbebelow
10 4‡ (40 †).
XTurn th eSmartKey to position g
(Ypage 122) in th eignition loc k.
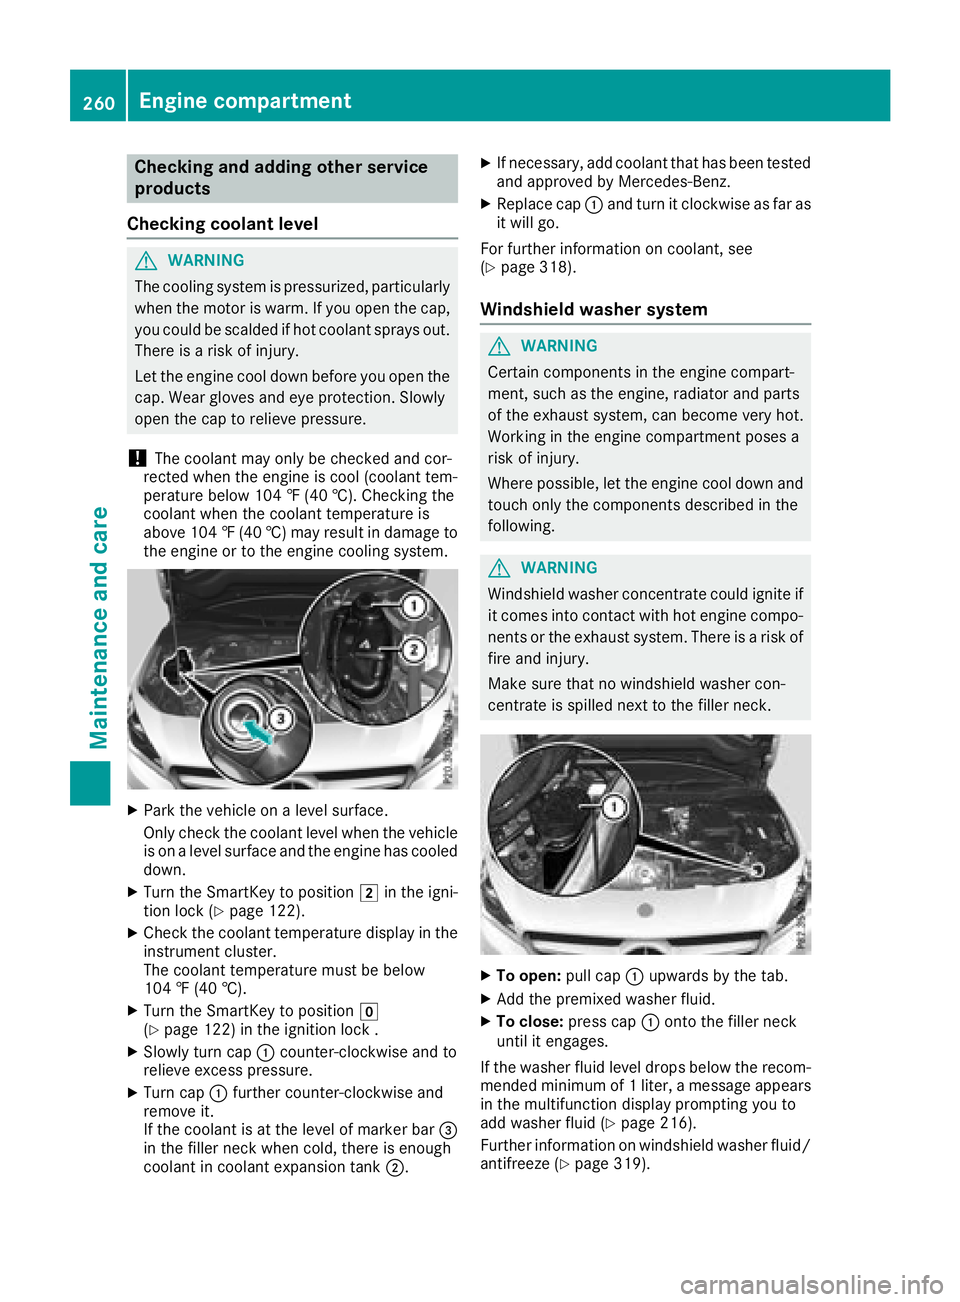
XSlowly turncap : counter-clockwise and to
reliev eexces spressure.
XTurn cap :further counter-clockwise and
remove it .
If th ecoolan tisatt helevel of marke rbar=
in th efiller neck when cold, there is enough
coolan tincoolan texpansion tan k;.
XIf necessary, add coolan ttha thas been tested
and approve dbyMercedes-Benz.
XReplacecap : and tur nitclockwise as far as
it will go.
Fo rfurther information on coolant, see
(
Ypage 318).
Windshiel dwasher system
GWARNIN G
Certain component sintheengin ecom part-
ment, suc hastheengine, radiato rand part s
of th eexhaust system, can become ver yhot.
Working in th eenginec om partmen tposes a
ris kofi njury.
Where possible, let th eenginec ooldown and
touch only th ecom ponent sdescribed in th e
following.
GWARNIN G
Windshield washer concentrate could ignit eif
it comes into contact wit hhot engin ecom po-
nent sort heexhaust system. There is arisko f
fir ea nd injury.
Mak esuret hatnow indshield washer con-
centrat eisspilled next to th efiller neck .
XTo open: pull cap:upwards by th etab.
XAd dthe premixed washer fluid.
XTo close: press cap :onto th efiller neck
until it engages.
If th ewasher flui dlevel drops belo wthe recom-
mended minimum of 1liter, amessage appears
in th emultifunction display promptin gyou to
add washer flui d(
Ypage 216).
Further information on windshield washer fluid/
antifreez e(
Ypage 319).
260Engine compartment
Maintenance and care
Page 263 of 326
ASSYSTPLUS
Service message
The ASSYS TPLUSs ervic einterval display
inform syou of th enexts ervic edue date.
You can fin dinformation on th etypeofs ervice
and servic eintervals in th eMaintenance Book -
let .
You can obtain further information from an
authorize dMercedes-Benz Cente rorat
http://www.mbusa.co m(USAo nly).
iThe ASSYS TPLUSs ervic einterval display
does no tsho wa ny information on th eengine
oil level. Observ ethe note sont heengin eoil
level (
Ypage 258).
The multifunction display shows aservic emes-
sage for several seconds, e.g. :
RServiceAin..d ays
RServic eAdue
RServic eAoverdueby..d ays
Dependin gontheoperating condition softhe
vehicle, th eremaining time or distanc euntil th e
next servic edue dat eisdisplayed.
The lette rA
or B,possibl yinconnectio nwitha
number or another letter, indicates th etypeo f
service. A
standsfor am inor servic eand Bfor a
major service.
You can obtain further information from an
authorize dMercedes-Benz Center.
The ASSYS TPLUSs ervic einterval display does
no ttak eintoa ccoun tany periods of time during
whic hthe battery is disconnected.
Maintainin gthe time-dependen tservic esched-
ule:
XNot edown th eservic edue dat edisplayed in
th em ultifunction display before disconnect -
ing th ebattery.
or
XAfte rreconnecting th ebattery, subtrac tthe
battery disconnection periods from th eser-
vic ed ates hown on th edisplay.
Hiding aservice message
XPress th ea or% buttononthesteering
wheel.
Displaying service messages
XSwitc hont heignition .
XPress th e= or; buttontos elect th e
Serv.menu.
XPress th e9 or: buttontos elect th e
ASSYSTPLU Ssubmen uand confirm by press-
ing th ea button.
The servic edue dat eappear sinthemulti-
function display.
Infor mation abou tService
Resetting th eASSYSTP LUS service
interval display
!If th eASSYSTP LUSs ervic einterval display
has been inadvertentl yreset ,thiss etting can
be correcte dataqualified specialist work-
shop.
Hav eservic eworkc arrie dout as described in
th eM aintenance Booklet .This may otherwise
lead to increased wear and damag etothe
major assemblies or th evehicle.
Aq ualified specialist workshop ,e.g.ana uthor-
ized Mercedes-Benz Center, will reset th e
ASSYS TPLUSs ervic einterval display after th e
servic eworkh as been carrie dout.Y ou can also
obtain further information on maintenance
work, for example.
Special service requirements
The specifie dmaintenance interval takes only
th en orma loperation of th evehicl einto
account. Under arduous operating condition sor
increased load on th evehicle, maintenance
wor km ustbec arriedout mor efrequently, for
example:
Rregular cit ydrivin gwithf requen tintermediat e
stops
Rif th evehicl eisp rimarily used to travel short
distances
Ruse in mountainous terrain or on poor road
surfaces
Rif th eengineiso ften lef tidlin gfor lon gperiods
Rin particularly dust yconditi ons, or if air-recir-
culation mod eisfrequentl yused
In these or similar operating conditions, hav e
th ei nterior filter, engin eair cleaner, engin eoil
and oil filter, for example, changed mor efre-
ASSYST PLUS261
Maintenance and care
Z
Page 266 of 326
XUseasuitablet ouch-up stick, e.g. MB Touch-
Up Stick,tor epair slight damage to the paint-
work quickly and provisionally.
Mattef inish care
!Never polish the vehicle or the light alloy
wheels. Polishing causes the finish to shine.
!The following may cause the paint to
become shiny and thus reduce the matte
effect:
Rstrong rubbing of the paintwork with
unsuitablem aterials
Rfrequent use of automatic car washes
Rwashing the vehicle in direct sunlight
!Never use paint cleaner, buffing or polishing
products, or gloss preserver, e.g. wax, for the
purpose of paintwork care. These products
are only suitablef or high-gloss surfaces. Their
use on vehicles with matte paintwork leads to considerable surface damage or, more spe-
cifically,tos hiny, spotted areas.
Alwaysh ave paintwork repairs carried out at a
qualified specialist workshop.
!Do not use wash programs with ahot wax
treatment under any circumstances.
Observe these notes if your vehicle has aclear
matte finish. This will help you to avoid damage to the paintwork due to incorrect treatment.
These notes also apply to light alloy wheels with
ac lear matte finish.
The vehicle should ideally be washed by hand
using asoft sponge, car shampoo and plenty of
water.
Use only insect remover and car shampoo from
the range of approved Mercedes-Benz care
products.
Cleaning the vehiclep arts
Cleaning the wheels
GWARNING
The water jet from acircular jet nozzle (dirt
blasters) can cause invisible exterior damage
to the tires or chassis components. Compo-
nentsd amagedint his way may fail unexpect-
edly.T here is arisk of an accident.
Do not use power washers with circular jet
nozzles to clean the vehicle. Have damaged
tires or chassis componentsr eplaced imme-
diately.
!Do not use acidic wheel cleaning products
to remove brake dust. This could damage
wheel bolts and brake components.
!Do not park your vehicle for along period of
time directly after cleaning, particularlya fter
cleaning the wheel rim with wheel cleaner.
Wheel cleaner can lead to the increased cor-
rosion of the brake discs and pads. Therefore, drive for afew minutes after cleaning. By
heating up the brakes, the brake discs and
pads dry. The vehicle can then be parked for a
long period of time.
Cleaning the windows
GWARNING
You could become trapped by the windshield wipers if they start moving while cleaning the
windshieldorw iper blades. There is arisk of
injury.
Alwayss witch off the windshieldw ipers and
the ignition before cleaning the windshieldo r
wiper blades.
!Only fold the windshieldw ipers awayfrom
the windshieldw hen vertical. Otherwise, you
will damage the hood.
!Do not use dry cloths, abrasive products,
solvents or cleaning agents containing sol-
vents to clean the inside of the windows. Do
not touch the insides of the windows with
hard objects, e.g. an ice scraper or ring. There
is otherwise arisk of damaging the windows.
!Cleant he water drainage channels of the
windshielda nd the rear window at regular
intervals. Deposits such as leaves, petals and
pollen may under certain circumstances pre-
vent water from draining away. This can lead
to corrosion damage and damage to elec-
tronic components.
XCleant he inside and outside of the windows
with adamp cloth and acleaning product that
is recommended and approved by Mercedes-
Benz.
264Care
Maintenance and care
Page 267 of 326
Cleaning wiper blades
GWARNING
You coul dbecome trapped by th ewindshield
wipersift heys tart moving while cleanin gthe
windshield or wiper blades.T hereisarisko f
injury.
Always switch off th ewindshield wipersa nd
th ei gnition before cleanin gthe windshield or
wiper blades.
!Only fold th ewindshield wipersa way from
th ew indshield when vertical. Otherwise, you
will damaget hehood.
!Do no tpull th ewiper blade. Otherwise, the
wiper blade coul dbedamaged.
!Do notclean wiper blades to ooften and do
no trub them to ohard .Otherwise, th egraph-
ite coatin gcoul dbed amaged. This could
caus ewiper noise.
!Holdthe wiper arm securely when folding
back .The windshield coul dbedamaged if the
wiper arm smacks against it suddenly.
XFol dthe windshield wiper arm saway from the
windshield.
XCarefully clean th ewiper blades withad amp
cloth.
XFol dthe windshield wiper arm sback again
before switching on th eignition.
Cleaning th eexterior lighting
!Only use cleanin gagents or cleanin gcloths
whicha re suitable for plastic light lenses.
Unsuitable cleanin gagents or cleanin gcloths
coul dscratch or damag ethe plastic light len-
ses.
XClean th eplastic lenses of th eexteri or lights
withaw et sponge and amild cleanin gagent,
e.g .M ercedes-Ben zcar shampoo or cleaning
cloths.
Cleaning th emirror turn signals
!Only use cleanin gagents or cleanin gcloths
that are suitable for plastic lenses.U nsuitable
cleanin gagents or cleanin gcloth scould
scratch or damaget heplastic lenses of the
mirror tur nsignals.
XClean th eplastic lenses of th emirror tur nsig-
nals in th eexteri or mirror housing usingaw et
sponge and mild cleanin gagent, e.g.
Mercedes-Ben zcar shampoo or cleaning
cloths.
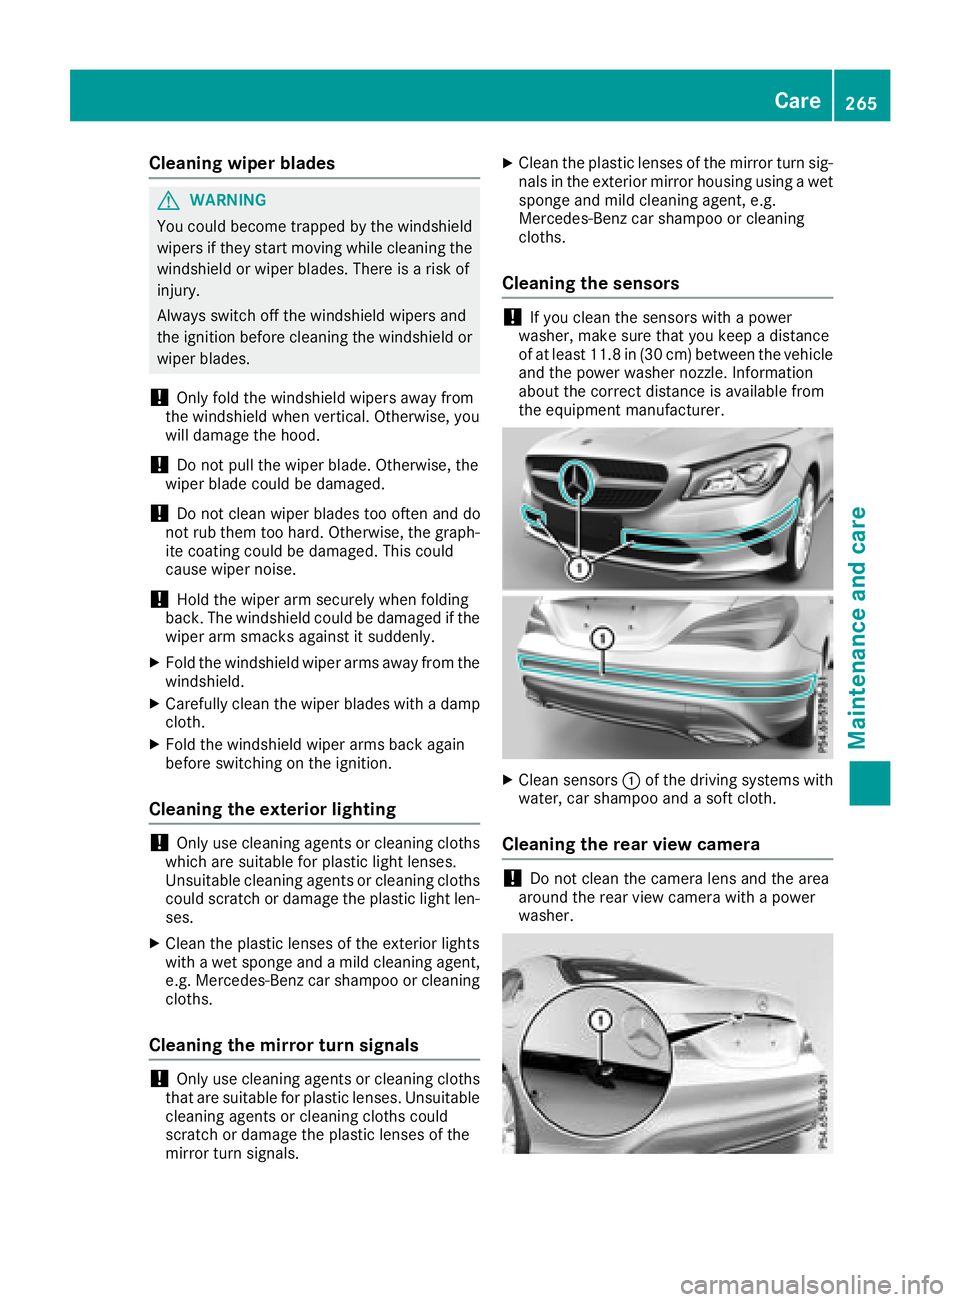
Cleaning th esensors
!If you clean th esensorsw ithapower
washer, mak esure that you keep adistance
of at least 11.8 in (30 cm)between the vehicl e
and th epower washer nozzle. Information
about th ecorrec tdistanc eisavailabl efrom
th ee quipment manufacturer.
XClean sensors :of th edriving systems with
water, car shampoo and asoftc loth.
Cleaning th erearv iew camera
!Do no tclean th ecamera lensa nd thearea
aroun dthe rear view camera with apower
washer.
Care265
Maintenance and care
Z
Page 268 of 326
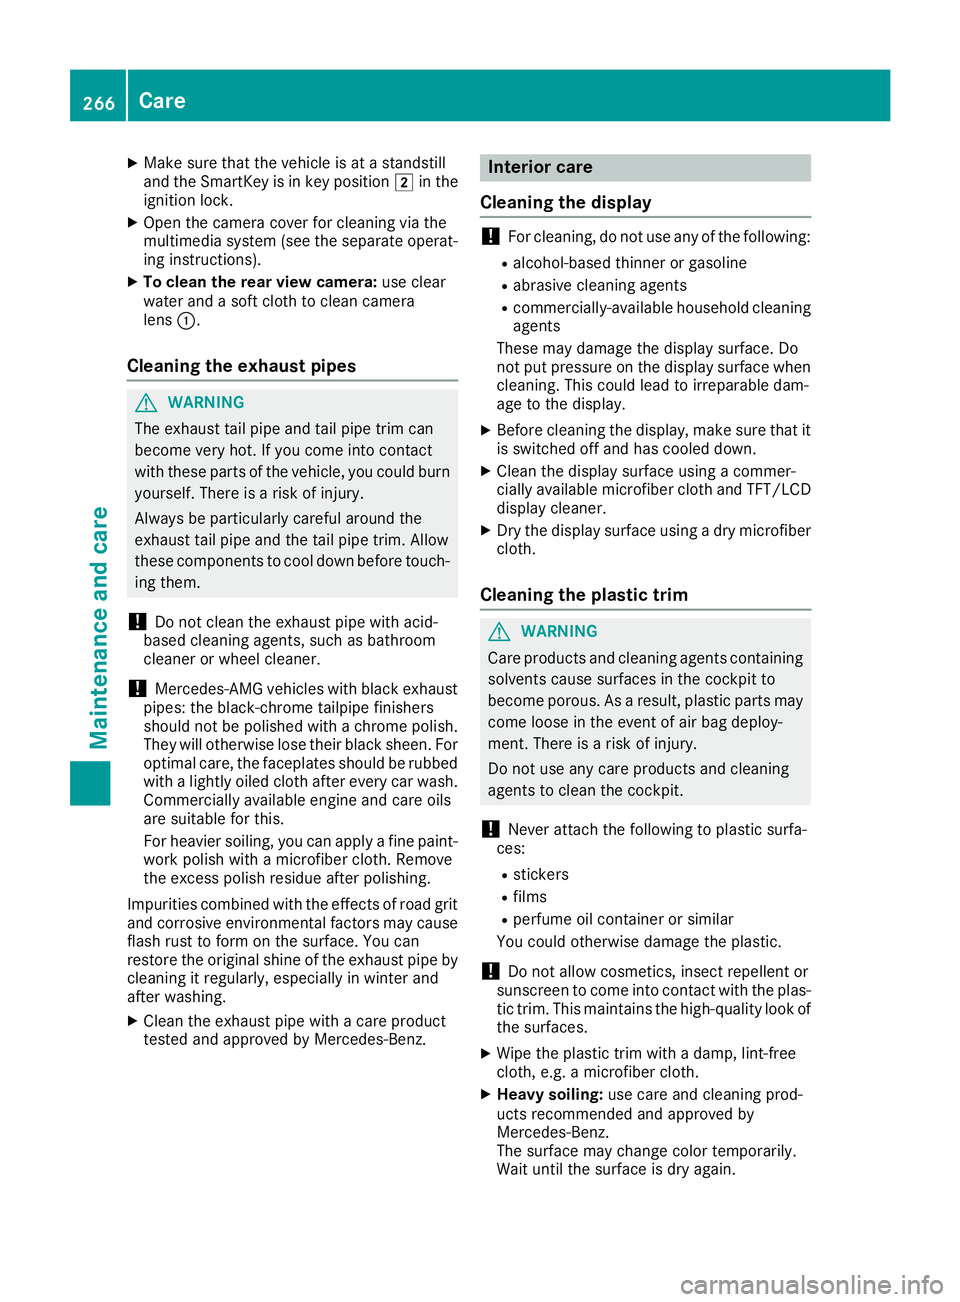
XMake sure that the vehicle is atastandstill
and the SmartKey is in key position 2in the
ignition lock.
XOpen the camera cover for cleaning via the
multimedia system (see the separate operat-
ing instructions).
XTo clean the rear view camera: use clear
water and asoft cloth to clean camera
lens :.
Cleaningt he exhaust pipes
GWARNING
The exhaust tail pipe and tail pipe trim can
become very hot. If you come into contact
with these parts of the vehicle, you could burn
yourself. There is arisk of injury.
Always be particularly careful around the
exhaust tail pipe and the tail pipe trim. Allow
these components to cool down before touch-
ing them.
!Do not clean the exhaust pipe with acid-
based cleaning agents, such as bathroom
cleaner or wheel cleaner.
!Mercedes-AMG vehicles with black exhaust
pipes: the black-chrome tailpipe finishers
should not be polished with achrome polish.
They will otherwise lose their black sheen. For
optimal care, the faceplates should be rubbed with alightly oiled cloth after every car wash.
Commercially available engine and care oils
are suitable for this.
For heavier soiling, you can apply afine paint-
work polish with amicrofiber cloth. Remove
the excess polish residue after polishing.
Impurities combined with the effectsofr oad grit
and corrosive environmental factors may cause
flash rust to form on the surface. You can
restore the original shine of the exhaust pipe by
cleaning it regularly,e specially in winter and
after washing.
XClean the exhaust pipe with acare product
tested and approved by Mercedes-Benz.
Interior care
Cleaningt he display
!For cleaning, do not use any of the following:
Ralcohol-based thinner or gasoline
Rabrasive cleaning agents
Rcommercially-availableh ousehold cleaning
agents
These may damage the display surface. Do
not put pressure on the display surface when cleaning. This could lead to irreparable dam-
age to the display.
XBefore cleaning the display,m ake sure that it
is switched off and has cooled down.
XClean the display surface using acommer-
cially available microfiber cloth and TFT/LCD
display cleaner.
XDry the display surface using adry microfiber
cloth.
Cleaningt he plastic trim
GWARNING
Care products and cleaning agents containing solvents cause surfaces in the cockpit to
become porous. As aresult, plastic parts may
come loose in the event of air bag deploy-
ment. There is arisk of injury.
Do not use any care products and cleaning
agents to clean the cockpit.
!Never attach the following to plastic surfa-
ces:
Rstickers
Rfilms
Rperfume oil container or similar
You could otherwise damage the plastic.
!Do not allow cosmetics, insect repellent or
sunscreen to come into contact with the plas-
tic trim. This maintains the high-quality look of
the surfaces.
XWipe the plastic trim with adamp, lint-free
cloth, e.g. amicrofiber cloth.
XHeavy soiling: use care and cleaning prod-
ucts recommended and approved by
Mercedes-Benz.
The surface may change color temporarily.
Wait until the surface is dry again.
266Care
Maintenance and care
Page 279 of 326
the householdrubbish .They
must be collected separately and recycle dtoprotect the
environment.
Dispose of batteries in an
environmentall yfriendly
manner. Take discharged
batteries to aquali fied spe-
cialist workshop or aspecial
collectio npoint for used bat-
teries.
!Hav ethe battery checked regularly at a
qualified specialis tworkshop.
Observe the service intervals in the Mainte-
nanc eBookle torcontact aquali fied specialist
workshop for mor einformation.
!Yo us houl dhavea llwork involvin gthe bat-
tery carrie doutataq uali fied specialis twork-
shop. In the exceptiona lcas et hatiti sneces-
sary for yo utodisconnect the battery your-
self, make sure that:
Ryo us witch off the engine and remove the
key .Onv ehicles with KEYLESS-GO, ensure
thatt he ignition is switched off .Check that
al lt he indicator lamps in the instrument
clustera reoff .O therwise, electronic com-
ponents ,suc hast he alternator, mayb e
damaged.
Ryo uf irst remove the negative terminal
clamp and thent he positive terminal
clamp. Never swap the termina lclamps.
Otherwise, the vehicle' selectronic system
maybed amaged.
Rin vehicles with automatic transmission,
the transmission is locked in position P
after disconnecting the battery .The vehicle
is secur ed a
gainst rolling away
.You can
thennol ongerm ovet he vehicle.
The battery and the cove rofthe positive ter-
minal clamp must be installe dsecurel yduring
operation.
Compl ywiths afety precautions and take pro-
tective measures when handling batteries.
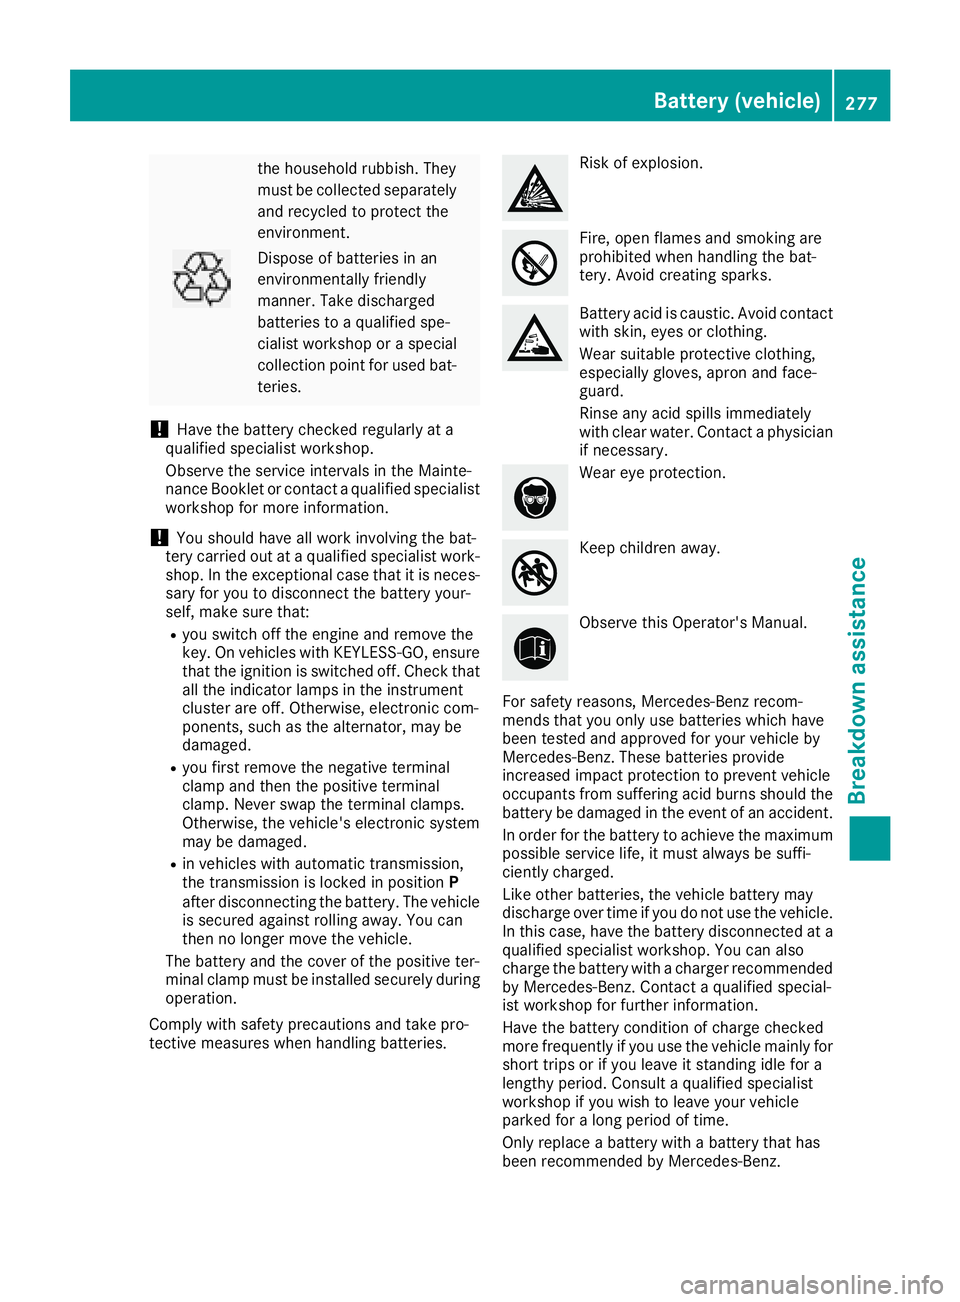
Risk of explosion.
Fire, open flames and smoking are
prohibited when handling the bat-
tery .Avoi dc reating sparks.
Battery aci discaustic. Avoidc ontact
with skin, eyes or clothing.
Wear suitabl eprotective clothing,
especiall ygloves, apron and face-
guard.
Rinse any aci dspills immediately
with clear water. Contact aphysician
if necessary.
Wear ey eprotection.
Kee pchildren away.
Observe thisO perator' sManual.
For safety reasons, Mercedes-Benz recom-
mend sthaty ouonlyusebatteries which have
been tested and approved for your vehicl eby
Mercedes-Benz. Thes ebatteries provide
increasedi mpactprotection to prevent vehicle
occupants froms ufferin gacidb urns shoul dthe
battery be damage dinthe event of an accident.
In order for the battery to achieve the maximum
possibl eservice life, it must always be suffi-
ciently charged.
Like othe rbatteries ,the vehicl ebattery may
discharge ove rtim eify oudo not us ethe vehicle.
In thisc ase, have the battery disconnecte data
qualified specialis tworkshop .You can also
charge the battery with acharge rrecommended
by Mercedes-Benz. Contact aquali fied special-
is tw orkshop for furtheri nformation.
Hav ethe battery condition of charge checked
mor efrequentl yifyouuset he vehicl emainl yf or
short trip sorifyouleav eits tanding idle for a
lengthyp eriod. Consult aquali fied specialist
workshop if yo uwishtol eave your vehicle
parked for alon gp eriodoft ime.
Onlyr eplace abattery with abattery thath as
been recommended by Mercedes-Benz.
Battery (vehicle)277
Breakdow nassistance
Z