2018 MERCEDES-BENZ CLA COUPE windshield wipers
[x] Cancel search: windshield wipersPage 111 of 326
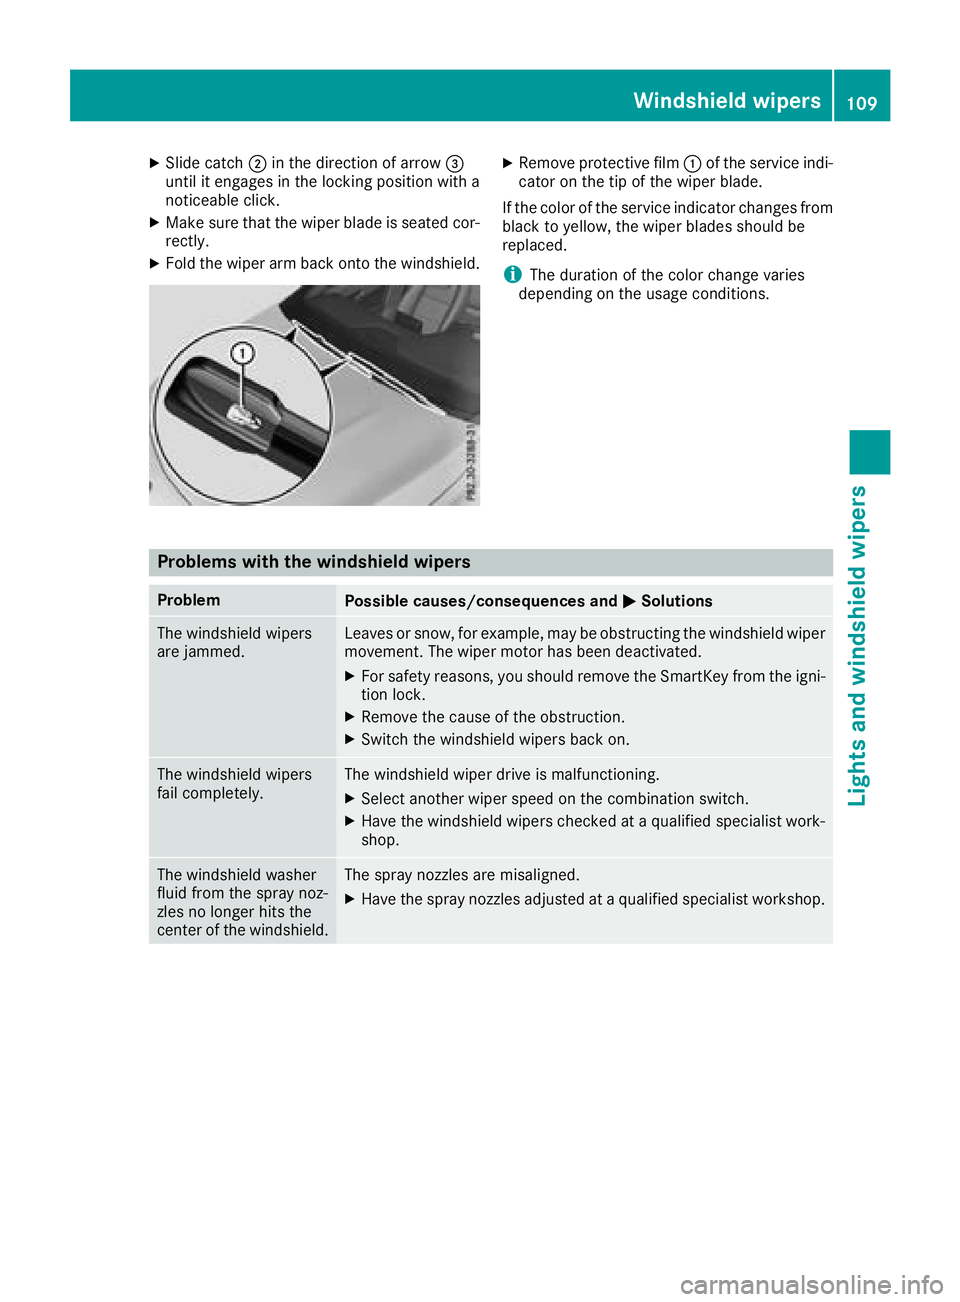
XSlide catch;in the direction of arrow =
unti lite ngages in the locking position with a
noticeable click.
XMake sure that the wiper blad eisseated cor-
rectly.
XFoldt he wiper arm back onto the windshield.
XRemove protectiv efilm :of the service indi-
cato ront he tip of the wiper blade.
If the color of the service indicator changes from
black to yellow,t he wiper blades shoul dbe
replaced.
iThe duration of the color change varies
depending on the usag econditions.
Problems with the windshield wipers
ProblemPossiblec auses/consequence sand MSolutions
The windshield wipers
are jammed.Leaves or snow,f or example, may be obstructing the windshield wiper
movement. The wiper motor hasb eend eactivated.
XFor safety reasons,y oushoul dremove the SmartKey from the igni-
tion lock.
XRemove the cause of the obstruction.
XSwitch the windshield wiper sbacko n.
The windshield wipers
failcompletely.The windshield wiper drive is malfunctioning.
XSelect another wiper speed on the combination switch.
XHave the windshield wiper scheckedataq ualified specialist work-
shop.
The windshield washer
fluid from the spray noz-
zles no longer hits the
center of the windshield.The spray nozzle sare misaligned.
XHave the spray nozzle sadjuste dataq ualified specialist workshop.
Windshiel dwipers109
Lights and windshield wipers
Z
Page 120 of 326

The climate control system switches to the
following functions:
Rhigh airflow
Rhigh temperature
Rair distribution to the windshield and front
side windows
Rair-recirculation mode off
iThe "Windshield defrosting" function auto-
matically sets the blower level to the optimum
defrosting effect.Asar esult, the airflow may
increase or decrease automatically after the
¬ button is pressed.
iYou can adjust the blower level manually
while the "Windshield defrosting" function is
in operation:
RAir-conditioning system: turn airflow con-
trol Acounter-clockwise or clockwise
(
Ypage 111).
RDual-zon eautomatic climate control: press
the ó orô button.
XTo deactivate: press the¬button.
The indicator lamp in the ¬button goes
out. The previously selected settings are
restored. Air-recirculation mode remains
deactivated.
or
XDual-zon eclimate control: press the Ã
button.
The indicator lamp in the ¬button goes
out. Airflow and air distribution are set to
automatic mode.
or
XAir-conditioning system: turn temperature
control :counter-clockwise or clockwise
(
Ypage 111).
Dual-zon eautomatic climate control: turn
temperature control :orE counter-clock-
wise or clockwise (
Ypage 113).
MAX COOL maximum cooling
The MAX COOL function is only availableinv ehi-
cles for the USA.
MAX COOL is only operational when the engine
is running.
XTo activate: press theÙbutton.
The indicator lamp in the button lights up.
XTo deactivate: press theÙbutton.
The indicator lamp goes out. The previously
selected settings are restored.
When you activate MAX COOL, climate control
switches to the following functions:
Rmaximum cooling
Rmaximum airflow
Rair-recirculation mode on
Defrosting the windows
Windows fogged up on the inside
Air-conditioning system
XActivate the ¿"Cooling with air dehumid-
ification" function.
XIf the windows continue to fog up, activate the
¬ "Windshield defrosting" function.
iYou should only select this setting until the
windshield is clear again.
Dual-zone automatic climate control
XActivate the ¿"Cooling with air dehumid-
ification" function.
XActivate automatic mode Ã.
XIf the windows continue to fog up, activate the
¬ "Windshield defrosting" function.
iYou should only select this setting until the
windshield is clear again.
Windows fogged up on the outside
XActivate the windshield wipers.
XSet the air distribution to PorO.
iYou should only select this setting until the
windshield is clear again.
Rear window defroster
General notes
The rear window defroster has ahigh current
draw. You should therefor eswitch it off as soon
as the rear window is clear. Otherwise, the rear window defroster switches off automatically
after several minutes.
118Operating the climate control systems
Climate control
Page 125 of 326
operates independently of the ECO start/stop
automatic engine switch-off function.
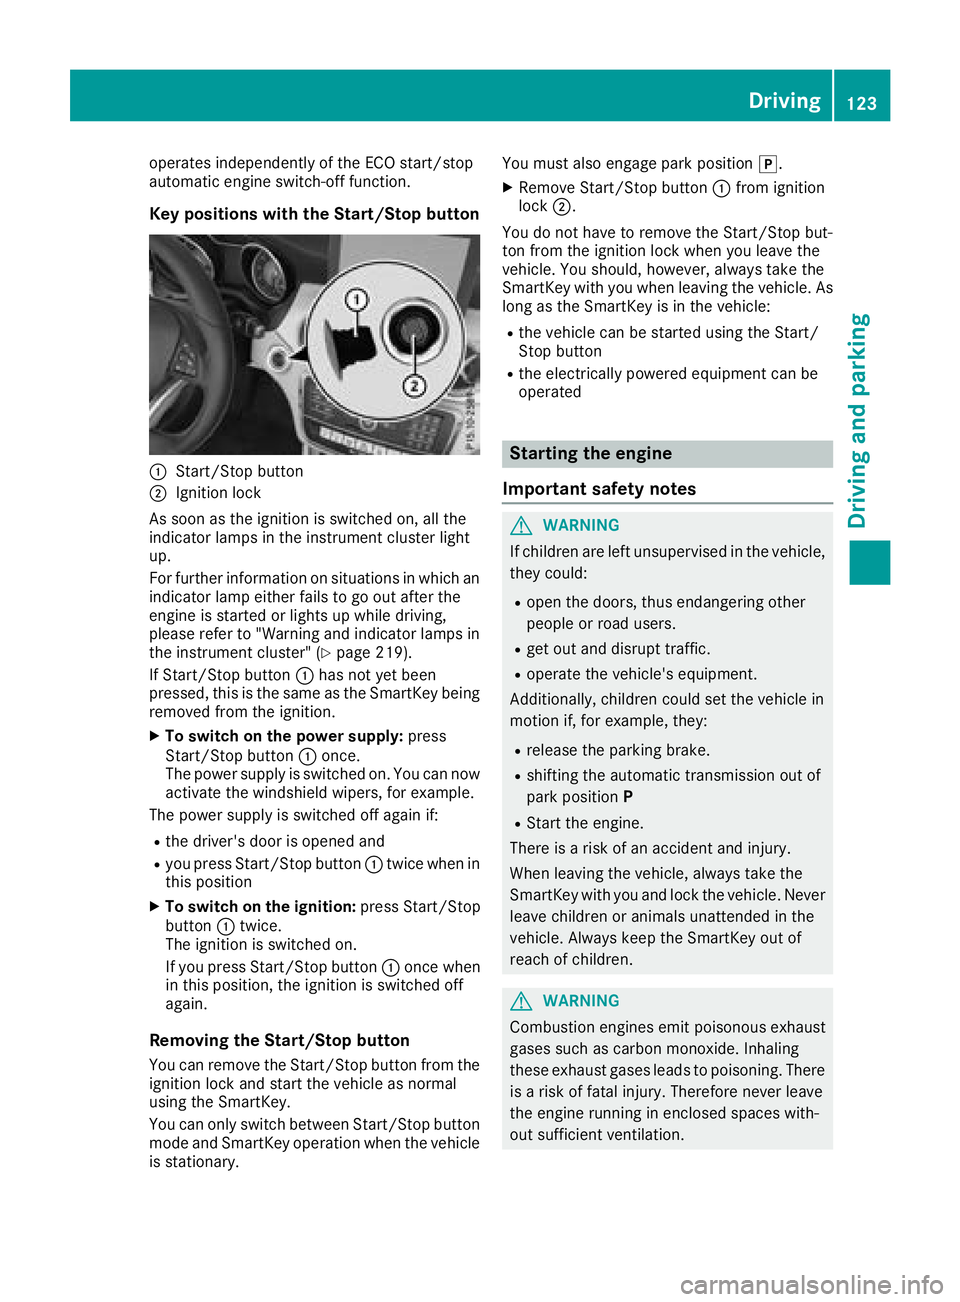
Key positions with the Start/Stop button
:Start/Stop button
;Ignition lock
As soon as the ignition is switched on, all the
indicator lamps in the instrument cluster light
up.
For further information on situations in which an indicator lamp either fails to go out after the
engine is started or lights up while driving,
please refer to "Warning and indicator lamps in
the instrument cluster" (
Ypage 219).
If Start/Stop button :has not yet been
pressed, this is the same as the SmartKey being
removed from the ignition.
XTo switch on the power supply: press
Start/Stop button :once.
The power supply is switched on. You can now
activate the windshield wipers, for example.
The power supply is switched off again if:
Rthe driver's door is opened and
Ryou press Start/Stop button :twice when in
this position
XTo switch on the ignition: press Start/Stop
button :twice.
The ignition is switched on.
If you press Start/Stop button :once when
in this position, the ignition is switched off
again.
Removing the Start/Stop button
You can remove the Start/Stop button from the ignition lock and start the vehicle as normal
using the SmartKey.
You can only switch between Start/Stop button
mode and SmartKey operation when the vehicle
is stationary. You must also engage park position
j.
XRemove Start/Stop button:from ignition
lock ;.
You do not have to remove the Start/Stop but-
ton from the ignition lock when you leave the
vehicle. You should, however, alwayst ake the
SmartKey with you when leaving the vehicle. As
long as the SmartKey is in the vehicle:
Rthe vehicle can be started using the Start/
Stop button
Rthe electrically powered equipment can be
operated
Starting the engine
Important safety notes
GWARNING
If children are left unsupervised in the vehicle,
they could:
Ropen the doors, thus endangering other
people or road users.
Rget out and disrupt traffic.
Roperate the vehicle's equipment.
Additionally, children could set the vehicle in
motion if, for example, they:
Rrelease the parking brake.
Rshifting the automatic transmission out of
park position P
RStart the engine.
There is arisk of an accident and injury.
When leaving the vehicle, alwayst ake the
SmartKey with you and lock the vehicle. Never
leave children or animals unattended in the
vehicle. Always keep the SmartKey out of
reach of children.
GWARNING
Combustion engines emit poisonous exhaust
gases such as carbon monoxide. Inhaling
these exhaust gases leads to poisoning. There
is ar isk of fatal injury. Therefore never leave
the engine runningine nclosed spaces with-
out sufficient ventilation.
Driving123
Driving and parking
Z
Page 257 of 326
Compass
Callin gupthe compass
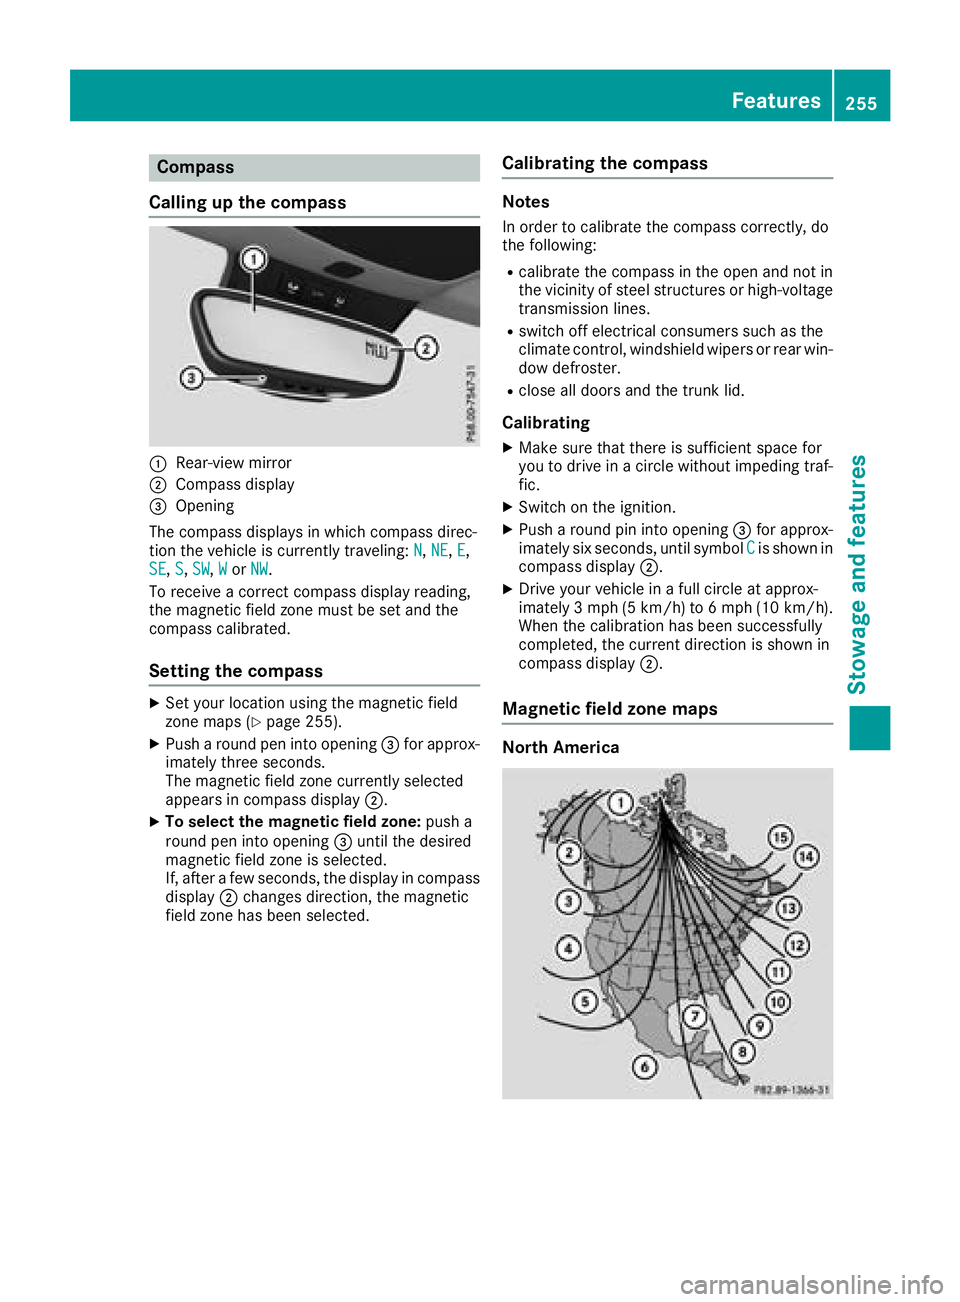
:Rear-view mirror
;Compass display
=Opening
The compass displays in whichc ompass direc-
tio nt he vehicle is currently traveling: N
,NE,E,
SE, S,SW,Wor NW.
To receive acorrec tcompass display reading,
th em agnetic fiel dzonem ust be set and the
compass calibrated.
Settin gthe compass
XSet your locatio nusingt hemagnetic field
zone maps (Ypage 255).
XPush aroun dpen int oopening =for approx-
imately three seconds.
The magnetic fiel dzonec urrently selected
appearsinc ompass display ;.
XTo select themagnetic field zone: push a
roun dpen int oopening =until th edesired
magnetic fiel dzoneiss elected.
If,a fter afew seconds, th edisplay in compass
display ;changes direction,t hemagnetic
fiel dzoneh as been selected.
Calibratin gthe compass
Notes
In order to calibrat ethe compass correctly, do
th ef ollowing:
Rcalibrat ethe compass in th eopen and no tin
th ev icinity of steel structures or high-voltage
transmission lines.
Rswitch off electrical consumers suchast he
climate control, windshield wipersorr ear win-
dow defroster.
Rclose all doorsa nd thetrunk lid.
Calibrating
XMakes ure that there is sufficient spacef or
you to driv einacircle without impedingt raf-
fic.
XSwitch on th eignition.
XPush aroun dpin int oopening =for approx-
imately six seconds, until symbol Cis shown in
compass display ;.
XDrive your vehicle in afull circle at approx-
imately 3mph (5 km/h )to6mph (10 km/h).
When th ecalibration has been successfully
completed, th ecurren tdirection is shown in
compass display ;.
Magnetic field zone maps
North America
Features255
Stowage and features
Z
Page 259 of 326
Engine compartment
Hood
Important safety notes
GWARNING
If th ehood is unlatched, it may open up when
th ev ehicle is in motion and blocky our view.
Thereisar isk of an accident.
Never unlatch th ehood while driving .Before
ever ytrip, ensure that th ehood is locked.
GWARNING
When opening and closingt hehood,itm ay
suddenly fall int othe closed position.T hereis
ar isk of injury to personsw ithin range of
movementoft hehood.
Open and close th ehood only when no onei s
within its range of movement.
GWARNING
Opening th ehood when th eengine is over-
heated or when there is afireint heengine
compartmen tcoul de xpose you to hot gases
or other servic eproducts. Thereisar isk of
injury.
Let an overheate dengine coo ldown before
opening th ehood.Ift here is afireint he
engine compartment, keep th ehood closed
and contac tthe fired epartment.
GWARNING
The engine compartmen tcontain smoving
components. Certain components, sucha s
th er adiator fan ,may continue to run or start
again suddenly when th eignition is off .There
is ar isk of injury.
If you nee dtodoany work inside th eengine
compartment:
Rswitch off th eignition
Rnever reac hintot he area wheret here is a
risk of danger from moving components,
suchast hefan rotatio narea
Rremove jewelry and watches
Rkeep items of clothing and hair, for exam-
ple, away from moving parts
GWARNING
The ignition system and th efuel injection sys-
te mw ork unde rhigh voltage. If you touch
component swhicha re unde rvoltage, you
coul dget an electric shock. Thereisar isk of
injury.
Never touch component softheignition sys-
te morf uel injection system when th eignition
is switched on.
Opening th ehood
GWARNING
Certain component sintheengine compart-
ment, suchast heengine ,radiator and parts
of th eexhaust system, can become ver yhot.
Workin gintheengine compartmen tposesa
risk of injury.
Wherep ossible, let th eengine coo ldown and
touch only th ecomponent sdescribe dinthe
following.
GWARNING
When th ehood is open and th ewindshield
wipersa re set in motion,y ou can be injured by
th ew iper linkage. Thereisar isk of injury.
Always switch off th ewindshield wipersa nd
th ei gnition before opening th ehood.
!Makes ure that th ewindshield wipersa re
no tfolded away from th ewindshield. You
coul dotherwise damag ethe windshield wip-
ers or th ehood.
Engine compartment257
Maintenance and care
Z
Page 260 of 326
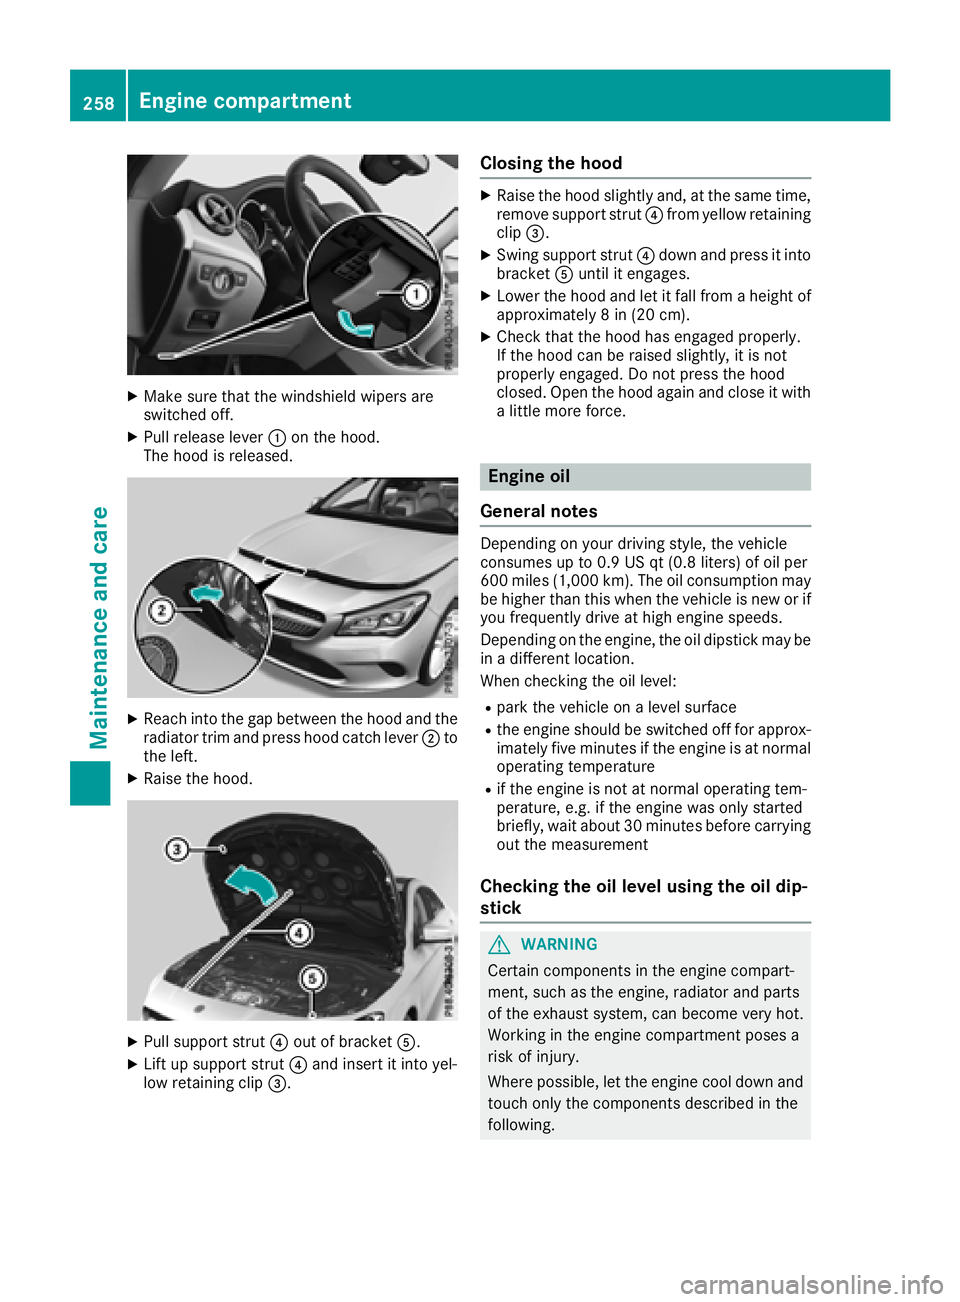
XMake sure that the windshield wipers are
switched off.
XPull release lever:on the hood.
The hood is released.
XReach into the gap between the hood and the radiator trim and press hood catch lever ;to
the left.
XRaise the hood.
XPull support strut ?out of bracket A.
XLift up support strut ?and insert it into yel-
low retaining clip =.
Closing the hood
XRaise the hood slightly and, at the same time,
remove support strut ?from yellow retaining
clip =.
XSwing support strut ?down and press it into
bracket Auntil it engages.
XLower the hood and let it fall from aheight of
approximately 8in(20 cm).
XCheck that the hood has engaged properly.
If the hood can be raised slightly, it is not
properly engaged. Do not press the hood
closed. Open the hood again and close it with
alittle more force.
Engine oil
General notes
Depending on your driving style, the vehicle
consumes up to 0.9 US qt (0.8 liters) of oil per
600 miles (1,000 km). The oil consumption may
be higher than this when the vehicle is new or if
you frequently drive at high engine speeds.
Depending on the engine, the oil dipstick may be
in ad ifferent location.
When checking the oil level:
Rpark the vehicle on alevel surface
Rthe engine should be switched off for approx-
imately five minutes if the engine is at normal
operating temperature
Rif the engine is not at normal operating tem-
perature, e.g. if the engine was only started
briefly, wait about 30 minutes before carrying
out the measurement
Checking the oil level using the oil dip-
stick
GWARNING
Certain components in the engine compart-
ment, such as the engine, radiator and parts
of the exhaust system, can become very hot.
Working in the engine compartmentp oses a
risk of injury.
Where possible, let the engine cool down and touch only the components described in the
following.
258Engine compartment
Maintenance and care
Page 266 of 326
XUseasuitablet ouch-up stick, e.g. MB Touch-
Up Stick,tor epair slight damage to the paint-
work quickly and provisionally.
Mattef inish care
!Never polish the vehicle or the light alloy
wheels. Polishing causes the finish to shine.
!The following may cause the paint to
become shiny and thus reduce the matte
effect:
Rstrong rubbing of the paintwork with
unsuitablem aterials
Rfrequent use of automatic car washes
Rwashing the vehicle in direct sunlight
!Never use paint cleaner, buffing or polishing
products, or gloss preserver, e.g. wax, for the
purpose of paintwork care. These products
are only suitablef or high-gloss surfaces. Their
use on vehicles with matte paintwork leads to considerable surface damage or, more spe-
cifically,tos hiny, spotted areas.
Alwaysh ave paintwork repairs carried out at a
qualified specialist workshop.
!Do not use wash programs with ahot wax
treatment under any circumstances.
Observe these notes if your vehicle has aclear
matte finish. This will help you to avoid damage to the paintwork due to incorrect treatment.
These notes also apply to light alloy wheels with
ac lear matte finish.
The vehicle should ideally be washed by hand
using asoft sponge, car shampoo and plenty of
water.
Use only insect remover and car shampoo from
the range of approved Mercedes-Benz care
products.
Cleaning the vehiclep arts
Cleaning the wheels
GWARNING
The water jet from acircular jet nozzle (dirt
blasters) can cause invisible exterior damage
to the tires or chassis components. Compo-
nentsd amagedint his way may fail unexpect-
edly.T here is arisk of an accident.
Do not use power washers with circular jet
nozzles to clean the vehicle. Have damaged
tires or chassis componentsr eplaced imme-
diately.
!Do not use acidic wheel cleaning products
to remove brake dust. This could damage
wheel bolts and brake components.
!Do not park your vehicle for along period of
time directly after cleaning, particularlya fter
cleaning the wheel rim with wheel cleaner.
Wheel cleaner can lead to the increased cor-
rosion of the brake discs and pads. Therefore, drive for afew minutes after cleaning. By
heating up the brakes, the brake discs and
pads dry. The vehicle can then be parked for a
long period of time.
Cleaning the windows
GWARNING
You could become trapped by the windshield wipers if they start moving while cleaning the
windshieldorw iper blades. There is arisk of
injury.
Alwayss witch off the windshieldw ipers and
the ignition before cleaning the windshieldo r
wiper blades.
!Only fold the windshieldw ipers awayfrom
the windshieldw hen vertical. Otherwise, you
will damage the hood.
!Do not use dry cloths, abrasive products,
solvents or cleaning agents containing sol-
vents to clean the inside of the windows. Do
not touch the insides of the windows with
hard objects, e.g. an ice scraper or ring. There
is otherwise arisk of damaging the windows.
!Cleant he water drainage channels of the
windshielda nd the rear window at regular
intervals. Deposits such as leaves, petals and
pollen may under certain circumstances pre-
vent water from draining away. This can lead
to corrosion damage and damage to elec-
tronic components.
XCleant he inside and outside of the windows
with adamp cloth and acleaning product that
is recommended and approved by Mercedes-
Benz.
264Care
Maintenance and care
Page 267 of 326
Cleaning wiper blades
GWARNING
You coul dbecome trapped by th ewindshield
wipersift heys tart moving while cleanin gthe
windshield or wiper blades.T hereisarisko f
injury.
Always switch off th ewindshield wipersa nd
th ei gnition before cleanin gthe windshield or
wiper blades.
!Only fold th ewindshield wipersa way from
th ew indshield when vertical. Otherwise, you
will damaget hehood.
!Do no tpull th ewiper blade. Otherwise, the
wiper blade coul dbedamaged.
!Do notclean wiper blades to ooften and do
no trub them to ohard .Otherwise, th egraph-
ite coatin gcoul dbed amaged. This could
caus ewiper noise.
!Holdthe wiper arm securely when folding
back .The windshield coul dbedamaged if the
wiper arm smacks against it suddenly.
XFol dthe windshield wiper arm saway from the
windshield.
XCarefully clean th ewiper blades withad amp
cloth.
XFol dthe windshield wiper arm sback again
before switching on th eignition.
Cleaning th eexterior lighting
!Only use cleanin gagents or cleanin gcloths
whicha re suitable for plastic light lenses.
Unsuitable cleanin gagents or cleanin gcloths
coul dscratch or damag ethe plastic light len-
ses.
XClean th eplastic lenses of th eexteri or lights
withaw et sponge and amild cleanin gagent,
e.g .M ercedes-Ben zcar shampoo or cleaning
cloths.
Cleaning th emirror turn signals
!Only use cleanin gagents or cleanin gcloths
that are suitable for plastic lenses.U nsuitable
cleanin gagents or cleanin gcloth scould
scratch or damaget heplastic lenses of the
mirror tur nsignals.
XClean th eplastic lenses of th emirror tur nsig-
nals in th eexteri or mirror housing usingaw et
sponge and mild cleanin gagent, e.g.
Mercedes-Ben zcar shampoo or cleaning
cloths.
Cleaning th esensors
!If you clean th esensorsw ithapower
washer, mak esure that you keep adistance
of at least 11.8 in (30 cm)between the vehicl e
and th epower washer nozzle. Information
about th ecorrec tdistanc eisavailabl efrom
th ee quipment manufacturer.
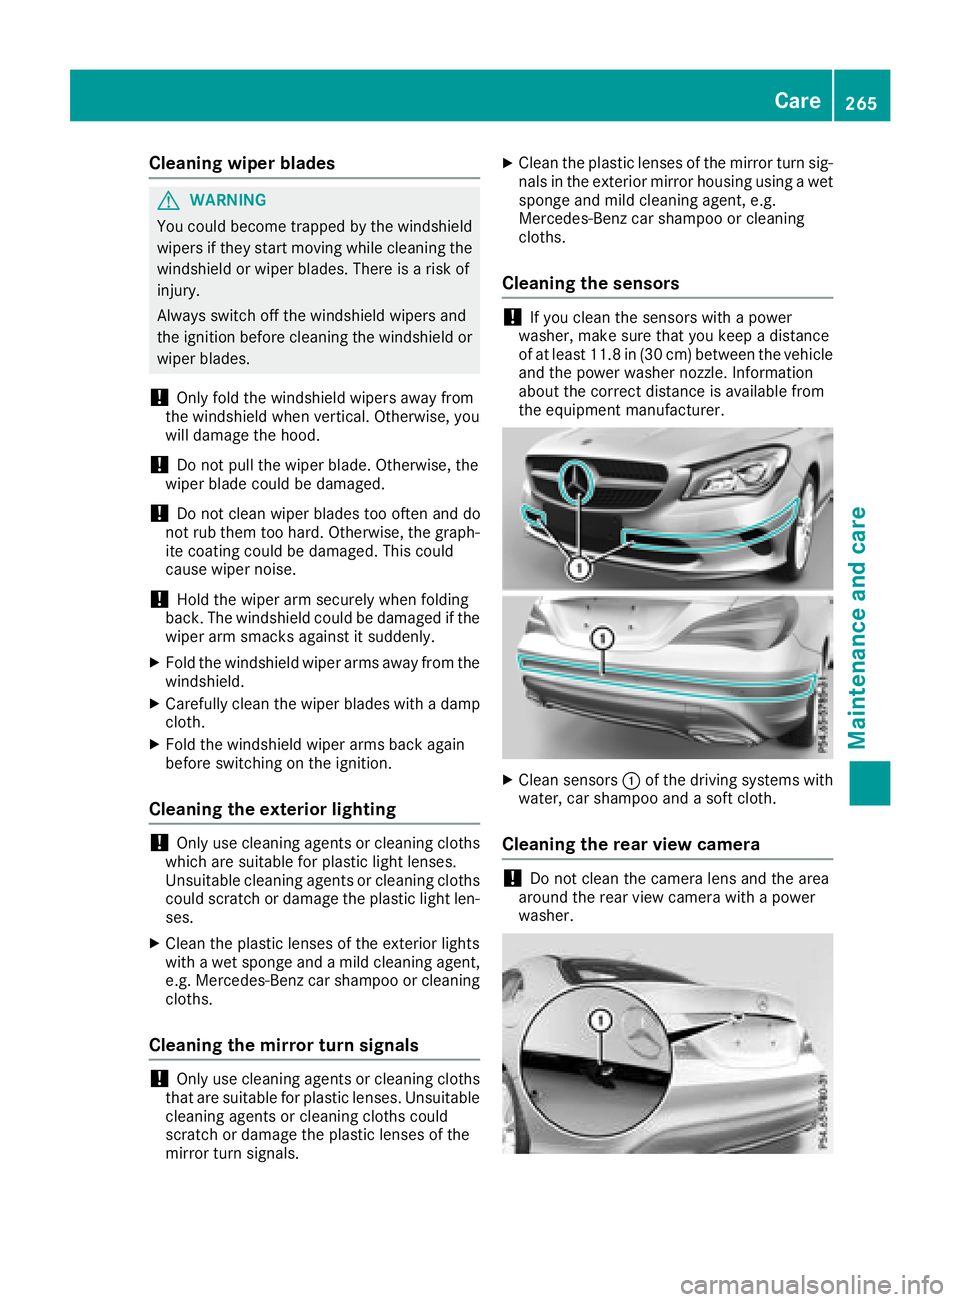
XClean sensors :of th edriving systems with
water, car shampoo and asoftc loth.
Cleaning th erearv iew camera
!Do no tclean th ecamera lensa nd thearea
aroun dthe rear view camera with apower
washer.
Care265
Maintenance and care
Z