2018 MERCEDES-BENZ CLA COUPE windshield wipers
[x] Cancel search: windshield wipersPage 4 of 326
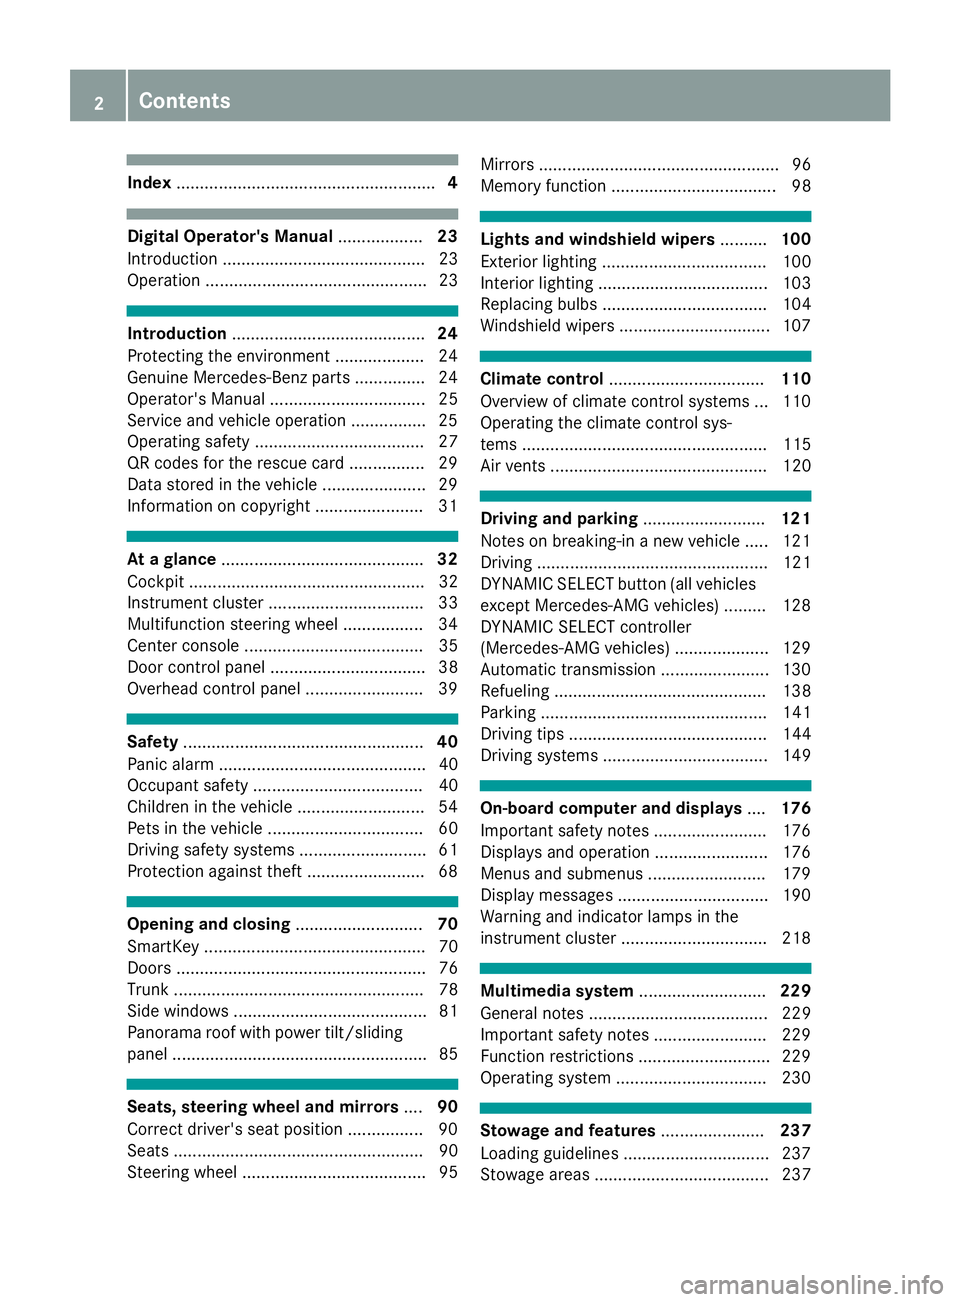
Index....................................................... 4
Digital Operator's Manual..................23
Introductio n........................................... 23
Operation ............................................... 23
Introduction ......................................... 24
Protecting the environment ...................2 4
Genuine Mercedes-Ben zparts............... 24
Operator's Manual ................................. 25
Service and vehicle operation ................2 5
Operating safety .................................... 27
QR codes for the rescue card ................2 9
Data stored in the vehicl e...................... 29
Informatio noncopyright ....................... 31
Atag lance ........................................... 32
Cockpi t.................................................. 32
Instrument cluster. ................................ 33
Multifunctio nsteering whee l................. 34
Center consol e...................................... 35
Doorc ontrolpan el ................................. 38
Overhead contro lpan el .........................3 9
Safety................................................... 40
Panic alarm ............................................ 40
Occupant safety .................................... 40
Children in the vehicle ........................... 54
Pets in the vehicle ................................. 60
Driving safety systems ........................... 61
Protection against theft .........................6 8
Opening and closing...........................70
SmartKey ............................................... 70
Doors ..................................................... 76
Trunk ..................................................... 78
Side windows ......................................... 81
Panorama roof with power tilt/sliding
panel ...................................................... 85
Seats, steering wheel and mirrors ....90
Correct driver's seat position ............... .90
Seats ..................................................... 90
Steering wheel ....................................... 95 Mirrors.
.................................................. 96
Memory function ................................... 98
Lights and windshield wipers ..........100
Exterior lighting ................................... 100
Interior lighting .................................... 103
Replacing bulb s................................... 104
Windshield wipers ................................ 107
Climate control ................................. 110
Overview of climate control systems ... 110
Operating the climate control sys-
tems .................................................... 115
Air vents .............................................. 120
Drivin gand parking .......................... 121
Notesonb reaking-inanew vehicl e..... 121
Driving ................................................. 121
DYNAMIC SELECT button (all vehicles
excep tMercedes-AMGv ehicles) ......... 128
DYNAMIC SELECT controller
(Mercedes-AMGv ehicles) .................... 129
Automati ctransmissio n....................... 130
Refueling ............................................. 138
Parking ................................................ 141
Driving tip s.......................................... 144
Driving systems ................................... 149
On-board computer and displays ....176
Important safety notes ........................ 176
Displays and operation ........................ 176
Menusa nd submenus ......................... 179
Displa ymessages ................................ 190
Warning and indicator lamps in the
instrument cluster ............................... 218
Multimedi asystem ........................... 229
Generaln otes ...................................... 229
Important safety notes ........................ 229
Function restrictions ............................ 229
Operating system ................................ 230
Stowag eand features ...................... 237
Loading guideline s............................... 237
Stowag eareas ..................................... 237
2Contents
Page 23 of 326

Lowering ........................................ 311
Maintenance .................................... 26
Parking foralong period. ............... 143
Pulling awa y................................... 125
Raising ........................................... 309
Reporting problems ......................... 28
Securing from rolling away ............ 309
Transporting .................................. 283
Unlocking (i nanemergency) ........... 77
Unlocking (SmartKey). ..................... 70
Vehicl edata. .................................. 320
Vehicl edata
Roof load (maximum) ..................... 320
Trunk load (maximum) ................... 320
Vehicl edimensions ........................... 320
Vehicl eemergencyl ocking ................ 77
Vehicl eidentificatio nnumber
see VIN
Vehicl eidentificatio nplate .............. 314
Vehicl etoolkit.................................. 270
Ventilation
Setting the vents ........................... 120
Video
Operating the DVD ......................... 183
see also Digital Operator's Man-
ual.................................................. 229
VIN
Seat. .............................................. 315
Type plate ...................................... 314
W
Warning and indicator lamps
ABS ................................................ 220
Active Brake Assist ........................ 227
Brakes ........................................... 219
Check Engine ................................. 224
Coolant .......................................... 225
Distance warning ........................... 227
ESP
®.............................................. 221
ESP®OFF ....................................... 222
Fue ltank ........................................ 224
Overview .......................................... 33
PASSENGER AIR BAG ...................... 41
Reserve fue l................................... 224
Restraint system ............................ 224
Seatb elt. ....................................... 218
SPORTh andling mode. .................. 222 Tire pressure monitor .................... 228
Warning triangle ................................ 270
Warranty .............................................. 25
Washer fluid
Displa ymessage ............................ 216
Weather display (COMAND)
see also Digital Operator's Man-
ual.................................................. 229
Wheel and tire combinations
Tires ............................................... 312
Wheel bolt tightenin gtorque ........... 311
Wheel chock ...................................... 309
Wheels
Changing awheel .......................... 307
Checking ........................................ 287
Cleaning ......................................... 264
Important safety notes .................. 287
Information on driving .................... 287
Interchanging/changing ................ 307
Mounting anew wheel. .................. 310
Removing awheel .......................... 310
Storing ........................................... 308
Tightening torque ........................... 311
Wheel size/tire size ....................... 312
Wheel sand tires
Changing awheel .......................... 308
Window curtai nair bag
Displa ymessage ............................ 199
Operation ......................................... 47
Windows
see Sid ewindows
Windshield
Defrosting ...................................... 117
Windshiel dwasher system
Adding washerf luid ....................... 260
Important safety notes .................. 319
Windshiel dwipers
Displa ymessage ............................ 216
Problem (malfunction) ................... 109
Replacing the wipe rblade s............ 108
Switching on/off. .......................... 107
Winter driving
Slippery roads urfaces ................... 148
Snow chains .................................. 290
Winter operation
Genera lnotes ................................ 289
Wi
nter tires
M+S tire s....................................... 289
Index21
Page 102 of 326
Exteriorlighting
General notes
For reasonsofs afety, Mercedes-Ben zrecom-
mends that you driv ewith th elightss witched on
even durin gthe daytime. In somec ountries,
operatio noftheheadlamps varies due to legal
requirement sand self-imposedo bligations.
Settingthe exterio rlighting
Settin goptions
Exterior lighting can be set usingt he:
Rlight switch
Rcombinatio nswitch (Ypage 101)
Ron-board compute r(Ypage 187)
Light switch
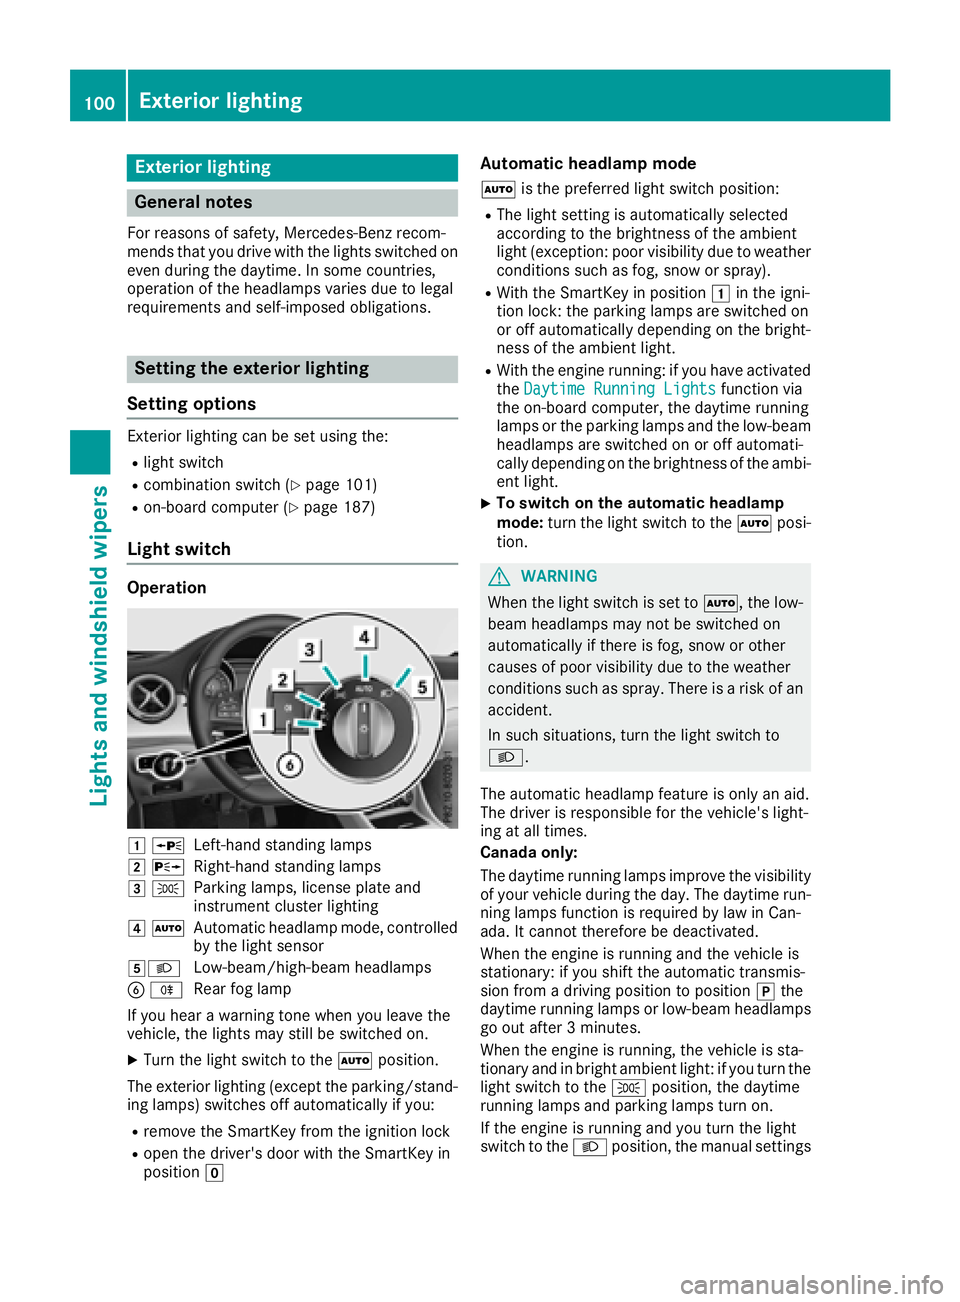
Operation
1WLeft-hands tanding lamps
2 XRight-hand standing lamps
3TParking lamps ,licens eplatea nd
instrumen tcluste rlighting
4 ÃAutomatic headlampm ode, controlled
by th elight sensor
5LLow-beam/high-beam headlamps
B RRear fog lamp
If you hear awarning tone when you leave the
vehicle ,the lightsm ay still be switched on.
XTurn thelight switch to the Ãposition.
The exteriorl ighting (excep tthe parking/stand-
ing lamps )switches off automaticall yifyou:
Rremove th eSmartKey from th eignition lock
Ropen th edriver'sd oor with th eSmartKey in
position g
Automatic headlamp mode
Ãis thepreferred light switch position:
RThe light settin gisautomaticall yselected
according to th ebrightnes softheambient
light (exception: poor visibilityd ue to weather
conditionss uchasfog,sno wors pray).
RWiththeSmartKey in position 1in th eigni-
tio nlock: th eparking lamps are switched on
or off automaticall ydependingont hebright-
nes soft heambient light.
RWitht heengine running: if you have activated
the DaytimeR unningLightsfunction via
th eo n-board computer, th edaytime running
lamps or th eparking lamps and th elow-beam
headlamps are switched on or off automati-
cally dependingont hebrightnes softheambi-
ent light.
XTo switch on th eautomatic headlamp
mode: turnthe light switch to the Ãposi-
tion.
GWARNING
When th elight switch is set to Ã,thelow-
beam headlamps may no tbeswitched on
automaticall yifthere is fog ,sno woro ther
causes of poor visibilityd ue to theweather
conditionss uchasspray. Thereisar isk of an
accident.
In suchs ituations,tur nt he light switch to
L.
The automatic headlampf eature is only an aid.
The driver is responsible for th evehicle's light-
ing at all times.
Canada only:
The daytime runnin glamps improve th evisibility
of your vehicle durin gthe day. The daytime run-
nin glamps function is required by law in Can-
ada. It canno tthe refore be deactivated.
When th eengine is runnin gand th evehicle is
stationary: if you shiftt heautomatic transmis-
sion from adriving position to position jthe
daytime runnin glamps or low-beam headlamps
go out after 3minutes.
When th eengine is running, th evehicle is sta-
tionar yand in bright ambient light:ify ou turnthe
light switch to the Tposition,t hedaytime
runnin glamps and parking lamps tur non.
If th eengine is runnin gand you tur nthe light
switch to the Lposition,t hemanual settings
100Exterior lighting
Lightsa nd windshield wipers
Page 106 of 326
Interior lighting control
General notes
In order to preven tthe vehicle's battery from
discharging ,the interio rlighting function sare
automatically deactivated after som etime
except when th eSmartKey is in position 2in
th ei gnition lock.
The color and brightness for th eambien tlighting
may be set via th emultimedia system; see th e
separat eoperating instructions.
Automati cinterior lighting control
XTo switch on: set theswitch to center posi-
tion B.
XTo switch off :set th eswitch to th e|
position .
The interio rlighting automatically switches on if
you:
Runlock th evehicl e
Ropen adoor
Rremove th eSmartKey from th eignition loc k
The interio rligh tisa ctivated for ashort while
when th eSma rtKey is remove dfromt heignition
lock. This delaye dswitch-off can be adjusted via
th em ultimedia system; see th eseparat eoper -
ating instructions.
Replacin gbulbs
Important safety notes
GWARNIN G
Bulbs, lamp sand connectors can get ver yhot
when operating .Ifyou chang eabulb, you
could burn yourself on these components.
Ther eisar iskofi njury.
Allow these component stocooldown before
changing abulb.
Do no tuse ab ulb if it has been dropped or if it s
glass tub ehas been scratched.
The bulb may explod eif:
Ryou touch it
Rit is hot
Ryou dro pit
Ryou scratch it Use bulbs only in closed lamp
sthath aveb een
designed for this purpose .Onlyi nstal lspar e
bulbs of th esam etypea nd th especifie dvolt-
age.
Mark sont heglass tub ereduce th eservic elife
of th ebulbs .Don ottouch th eglass tub ewith
your bare hands. If necessary, clean th eglass
tub ew hen cold wit halcohol or spirit and rub it
off wit halint-free cloth .
Protect bulbs from moisture during operation .
Do no tallow bulbs to come int ocontac twith
liquids.
Replac eonlyt he bulbs listed (
Ypage 104).
Hav ethe bulbs that you canno tchang ey ourself
replace dataq ualified specialist workshop.
If you require assistanc ereplacing bulbs ,con -
sult aqualified specialist workshop.
If th enew bulb still does no tligh tup, consult a
qualified specialist workshop.
Headlamps and lights are an important aspect of
vehicl esafety. You must therefor emakes ure
that these function correc tl
y
ata ll times .Have
th eh eadlamp setting checke dregularly.
Vehicles with LED headlamps: thef ront and
rear lamp clusters of your vehicl eare equipped
wit hL ED bulbs .Don otreplace th ebulbs your-
self .Contac taqualified specialist workshop
wit hthe necessar yspecialist knowledge and
tools to carry out th eworkr equired.
Overview of bul btypes
You can replace th efollowin gbulbs .The bulb
typ ecan be foun dinthelegend .
104Replacingb ulbs
Lightsand windshield wipers
Page 107 of 326
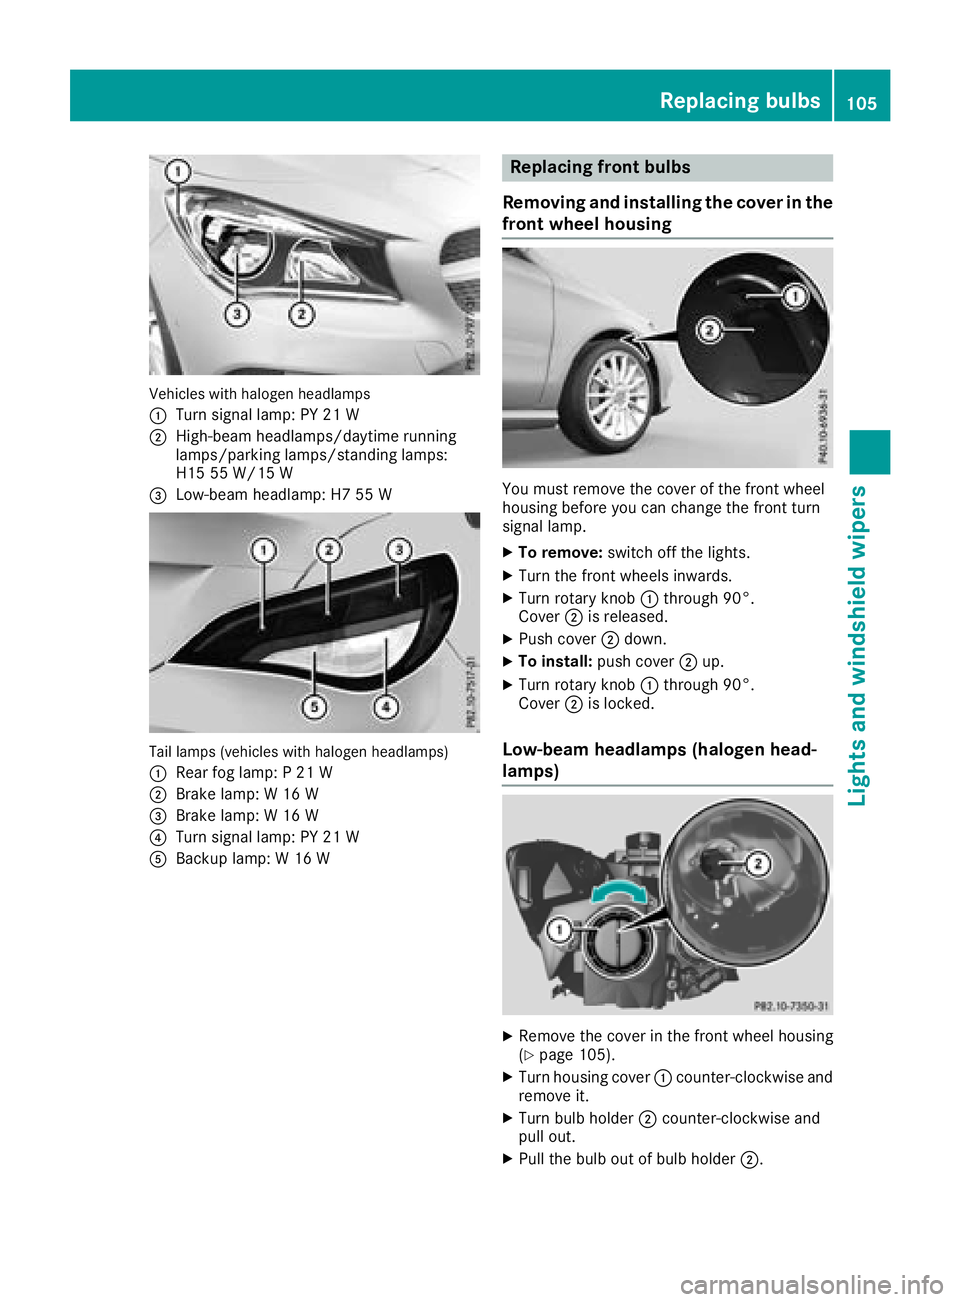
Vehicles with halogenheadlamps
:
Turn signal lamp: PY 21 W
;High-beam headlamps/daytime running
lamps/parking lamps/standing lamps:
H15 55 W/15 W
=Low-beam headlamp: H7 55 W
Tail lamps (vehicles with halogenh eadlamps)
:
Rearf og lamp: P21W
;Brake lamp: W16W
=Brake lamp:W16W
?Turn signal lamp: PY 21 W
ABackup lamp: W16W
Replacing front bulbs
Removing and installingt he coverinthe
front wheelh ousing
You must remove the cover of the front wheel
housing before you can change the front turn
signal lamp.
XTo remove:switch off the lights.
XTurn the front wheelsi nwards.
XTurn rotary knob:through 90°.
Cover ;is released.
XPush cover ;down.
XTo install: push cover ;up.
XTurn rotary knob :through 90°.
Cover ;is locked.
Low-beam headlamps (halogenh ead-
lamps)
XRemove the cover in the front wheel housing
(Ypage 105).
XTurn housing cover :counter-clockwise and
remove it.
XTurn bulb holder ;counter-clockwise and
pull out.
XPull the bulb out of bulb holder ;.
Replacing bulbs105
Lights and windshieldwipers
Z
Page 108 of 326
XInsert the new bulbinto bulbholder;.
XInsert bulbh older;and turn it clockwise.
XPress on housing cover :and turn it to the
right.
XReplace the cover in the front wheel housing
(Ypage 105).
High-beam headlamps/daytime run-
ning lamps/parking lamps and stand-
ing lamps (halogen headlamps)
XSwitch off the lights.
XOpen the hood.
XTurn housing cover :counter-clockwise and
remove it.
XTurn bulbh older;counter-clockwise and
pullo ut.
XInsert the new bulba nd engage it to the stop.
XPress on housing cover :and turn it to the
right.
Turn signals (halogen headlamps)
XSwitch off the lights.
XOpen the hood.
XTurn bulbh older:counter-clockwise and
pullo ut.
XTurn the bulbc ounter-clockwise and pulli t
out of bulbh older:.
XInsert the new bulbi nto bulbholder:.
XInsert bulbh older:and turn it clockwise
until it engages.
Replacing rear bulbs
Openinga nd closing the side trim pan-
els
View of right-hand side trim panel
You must open the side trim panel in the trunk
before you can replace the bulbs in the tail
lamps.
XTo open: release right or left side trim
panel :at the top and fold it down in the
direction of the arrow.
XTo close: insert side panel :.
Tail lamps
XSwitch off the lights.
XOpen the trunk.
XOpen the side trim panel (Ypage 106).
106Replacing bulbs
Lights and windshield wipers
Page 109 of 326

XPress retainingclips :at the same time in
the direction of the arrows.
XCarefully remove the bulb holder together
with the connected plug and the bulbs.
Bulb holder
;
Brake lamp
=Brake lamp
?Rear fog lamp
ABackup lamp
BTurn signals
XBrake lamp and backup lamp: remove the
corresponding bulb from the bulb holder.
XInsert the new bulb into the bulb holder.
XRear fog lamp and turns ignal:press the
bulb gently into the bulb holder, turn it coun-
ter-clockwise and remove it from the bulb
holder.
XInsert the new bulb into the bulb holder and
turn it clockwise.
XReinsert the bulb holder and engage on
retainin gclips :.
XClose the side trim panel (Ypage 106).
Windshield wipers
Switching the windshield wipers
on/off
!
Do not operate the windshield wipers when
the windshield is dry, as this could damage
the wiper blades. Moreover, dust that has col-
lected on the windshield can scratch the glass
if wiping takes place when the windshield is
dry.
If it is necessary to switch on the windshield
wipers in dry weather conditions, alwaysu se
washer fluid when operating the windshield
wipers.
!If the windshield wipers leave smears on the
windshield after the vehicle has been washed
in an automatic car wash, wax or other resi-
dues may be the reason for this. Clean the
windshield using washer fluid after washing
the vehicle in an automatic car wash.
Combination switch
1
$ Windshield wiper off
2ÄIntermittent wipe, low (rain sensor set
to low sensitivity)
3Å Intermittent wipe, high (rain sensor
set to high sensitivity)
4° Continuous wipe, slow
5¯Continuous wipe, fast
BíSingle wipe/î Wipes the wind-
shield using washer fluid
XSwitc hont he ignition.
XTurn the combination switch to the corre-
sponding position.
!Vehicles with arain sensor: if the windshield
becomes dirty in dry weather conditions, the
windshield wipers may be activated inadver-
tently. This could then damage the windshield
wiper blades or scratch the windshield.
For this reason, you should alwayss witch off
the windshield wipers in dry weather.
Vehicles with arain sensor: in the ÄorÅ
position, the appropriate wiping frequency is
automatically set accordingtot he intensity of
the rain. In the Åposition, the rain sensor is
more sensitive than in the Äposition, caus-
ing the windshield wiper to wipe more fre-
quently.
If the wiper blades are worn, the windshield will
no longer be wiped properly. This could prevent
you from observing the traffic conditions.
Windshield wipers107
Lights and windshield wipers
Z
Page 110 of 326
Replacing the wiper blades
Important safety notes
GWARNING
If the windshield wiper sbegin to move while
yo ua re changing the wiper blades, yo ucould
be trapped by the wiper arm .There is arisko f
injury.
Alway sswitch off the windshield wiper sand
ignition before changing the wiper blades.
!To avoid damaging the wiper blades, make
sure that yo utouch only the wiper arm of the
wiper.
!Nevero pent he hoodifaw indshield wiper
arm hasb eenf olded away from the wind-
shield.
Neverf oldawindshield wiper arm withouta
wiper blad ebacko nto the windshield.
Holdt he windshield wiper arm firmly when
yo uc hange the wiper blade. If yo urelease the
windshield wiper arm withoutaw iper blade
and it falls onto the windshield ,the windshield
may be damaged by the force of the impact.
Mercedes-Benz recommendst hat youhave
the wiper blades changed at aquali fied spe-
cialist workshop.
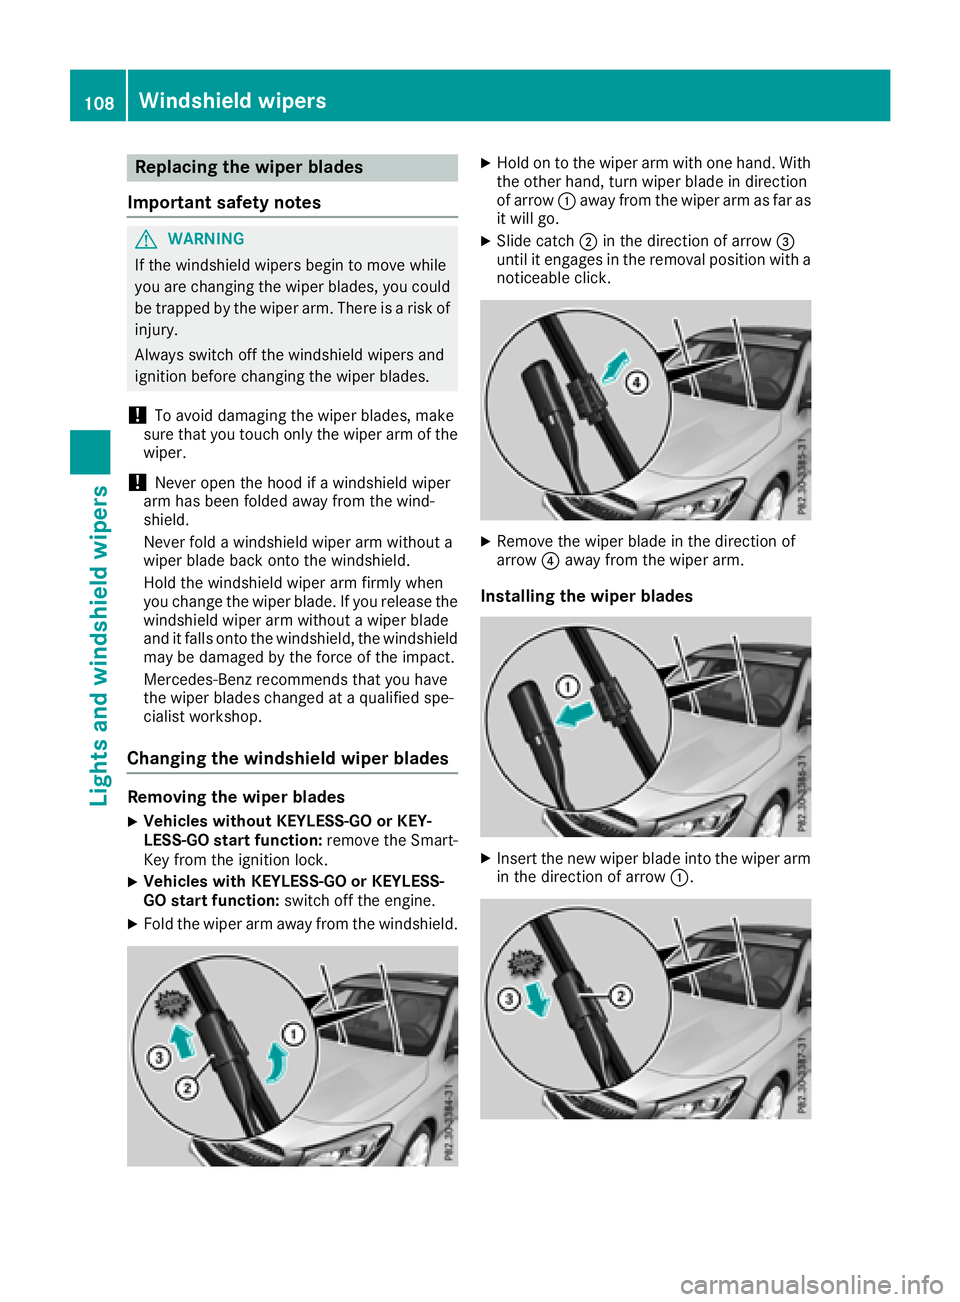
Changin gthe windshield wiper blades
Removin gthe wiper blades
XVehicles without KEYLESS-GO or KEY-
LESS-GOs tart function: remove the Smart-
Key from the ignition lock.
XVehicles with KEYLESS-GO or KEYLESS-
GO start function: switch off the engine.
XFoldthe wiper arm away from the windshield.
XHoldontot he wiper arm with one hand. With
the otherh and, turn wiper blad eindirection
of arrow :away from the wiper arm as far as
it will go.
XSlide catch ;in the direction of arrow =
unti lite ngages in the removal position with a
noticeable click.
XRemove the wiper blad einthe direction of
arrow ?away from the wiper arm.
Installing the wiper blades
XInsert the new wiper blad einto the wiper arm
in the direction of arrow :.
108Windshieldwipers
Lights and windshield wipers