2018 MERCEDES-BENZ CLA COUPE key
[x] Cancel search: keyPage 19 of 326

Service centersee Qualified specialist workshop
Service Center
see Qualified specialist workshop
Service menu (on-board com-
puter) .................................................. 186
Service message
see ASSYST PLUS
Service products
Brake fluid .....................................3 18
Coolant (engine) ............................ 318
Engine oil ....................................... 317
Fuel ................................................ 315
Important safety notes .................. 315
Refrigerant (air-conditioning sys-
tem) ............................................... 319
Washer fluid ................................... 319
Settingt he air distribution ...............116
Settingt he airflow ............................ 117
Settingt he date/time format
see also Digita lOperator's Man-
ua l..................................................2 29
Settingt he language
see also Digita lOperator's Man-
ua l..................................................2 29
Settingt he time
see also Digita lOperator's Man-
ua l..................................................2 29
Settings
Factory (on-board computer) ......... 188
On-board computer ....................... 186
SETUP (on-board computer,
Mercedes-AMG vehicles) .................. 188
Side impact air bag .............................4 7
Side marker lamp (display mes-
sage) ................................................... 204
Side windows
Cleaning ......................................... 264
Conveniencec losing feature ............ 83
Convenienceo pening feature ..........8 3
Important safety information ........... 81
Opening/closing .............................. 82
Problem( malfunction) .....................8 4
Resettin g......................................... 84
Reversin gfeature ............................ .82 SIRIUS
services
see also Digit al Operator's Man-
ual .................................................. 229
Sliding sunroof
see Panorama roof with power
tilt/sliding panel
SmartKey
Changing the battery ....................... 73
Changing the programming .............7 2
Checkin gthe battery ...................... .73
Convenience closingf eature ............ 83
Convenience opening feature .......... 83
Display message ............................ 216
Door central locking/unlocking ...... .70
Important safety notes .................... 70
KEYLESS-GO start function .............. 71
Loss .................................................7 4
Mechanical key ................................ 72
Positions (ignition lock) ................. 122
Problem (malfunction) ..................... 74
Starting the engine ........................ 124
SmartKey positions (ignition lock) .. 122
Smartphone
Starting the engine ........................ 124
SMS
see also Digital Operator's Man-
ual .................................................. 229
Snow chains ...................................... 290
Sound
Switching on/off ........................... 230
Special seat belt retractor .................. 55
Specialist workshop ............................28
Speed, controlling
see Cruise control
Speedometer
Activating/deactivating the addi-
tional speedometer ........................ 187
Digital ............................................ 181
In the Instrument cluster ................. 33
Segments. ..................................... 176
Selectingt he display unit ...... ......... 186
SPORT handling mode
Deactivating/activat
ing
(Mercedes-AMG vehicles) ................6 6
Warning lamp ................................. 222
Standing lamps
Display message ............................2 03
Switching on/off ........................... 101
Index17
Page 22 of 326
Traction (definition)....................... 307
Tread wear .....................................3 01
Uniform Tire Quality Grading
Standard s...................................... 301
Uniform Tire Quality Grading
Standard s(definition) .................... 306
Weari ndicator (definition) ............. 307
Wheelr im (definition) .................... 306
see Flat tire
Top Tether ............................................ 57
Tow-starting
Emergency engine starting ............ 284
Important safety notes .................. 281
Installing the towing eye. ............... 282
Removing the towing eye. ..............282
Towing atrailer
ESP
®(ElectronicS tability Pro-
gram) ............................................... 67
Towing away
Important safety guidelines ........... 281
Installing the towing eye. ............... 282
Notes for 4MATIC vehicles ............ 284
Removing the towing eye. ..............282
Transporting the vehicle ................ 283
With both axle sonthe ground ....... 283
With front axle raised ..................... 282
Towing eye ......................................... 270
Traffic reports
see also Digita lOperator's Man-
ua l..................................................2 29
Transmission
see Automatic transmission
Transmission position display
(DIRECT SELEC Tlever) ......................1 30
Transporting the vehicle .................. 283
Trim pieces (cleaning instruc-
tions) ..................................................2 67
Trip computer (on-board com-
puter) ..................................................1 80
Trip odometer
Calling up ....................................... 180
Resetting (on-board computer) ...... 181
Trunk
Emergency release .......................... 81
Emergency release button ...............8 1
Important safety notes .................... 78 Opening (automaticall
yfrom out-
side) .................................................7 9
Opening (from outside the vehi-
cle, HANDS-F REE ACCESS) ...
........... 79
Opening automaticallyf rom
inside ............................................... 80
Opening/closing (manually from
outside) ............................................ 78
Trunk lid
Display message ............................2 15
Opening dimensions ......................3 20
Trunk load (maximum) ......................320
Turn signals
Display message ............................ 202
Replacing bulbs (front) ................... 106
Switching on/off ........................... 101
Two-way radio
Frequencies ................................... 313
Installatio n..................................... 313
Transmissiono utput (maximum ).... 313
Type identification plate
see Vehicle identification plate
U
UnlockingEmergency unlocking ....................... 77
From insid ethe vehicle (central
unlocking button) .............................7 6
Upshifti ndicator (on-boardc om-
puter, Mercedes-AMG vehicles) .......188
USB devices
Connecting to the MediaI nter-
face ............................................... 236
V
Vanity mirror (in the sun visor) ........244
Vehicle
Correct use ...................................... 28
Data acquisition ............................... 29
Display message ............................ 213
Equipment ....................................... 25
Individua lsettings .......................... 186
Limited Warranty .............................2 9
Loading .......................................... 298
Locking (in an emergency) ............... 77
Locking (SmartKey) .......................... 70
20Index
Page 23 of 326

Lowering ........................................ 311
Maintenance .................................... 26
Parking foralong period. ............... 143
Pulling awa y................................... 125
Raising ........................................... 309
Reporting problems ......................... 28
Securing from rolling away ............ 309
Transporting .................................. 283
Unlocking (i nanemergency) ........... 77
Unlocking (SmartKey). ..................... 70
Vehicl edata. .................................. 320
Vehicl edata
Roof load (maximum) ..................... 320
Trunk load (maximum) ................... 320
Vehicl edimensions ........................... 320
Vehicl eemergencyl ocking ................ 77
Vehicl eidentificatio nnumber
see VIN
Vehicl eidentificatio nplate .............. 314
Vehicl etoolkit.................................. 270
Ventilation
Setting the vents ........................... 120
Video
Operating the DVD ......................... 183
see also Digital Operator's Man-
ual.................................................. 229
VIN
Seat. .............................................. 315
Type plate ...................................... 314
W
Warning and indicator lamps
ABS ................................................ 220
Active Brake Assist ........................ 227
Brakes ........................................... 219
Check Engine ................................. 224
Coolant .......................................... 225
Distance warning ........................... 227
ESP
®.............................................. 221
ESP®OFF ....................................... 222
Fue ltank ........................................ 224
Overview .......................................... 33
PASSENGER AIR BAG ...................... 41
Reserve fue l................................... 224
Restraint system ............................ 224
Seatb elt. ....................................... 218
SPORTh andling mode. .................. 222 Tire pressure monitor .................... 228
Warning triangle ................................ 270
Warranty .............................................. 25
Washer fluid
Displa ymessage ............................ 216
Weather display (COMAND)
see also Digital Operator's Man-
ual.................................................. 229
Wheel and tire combinations
Tires ............................................... 312
Wheel bolt tightenin gtorque ........... 311
Wheel chock ...................................... 309
Wheels
Changing awheel .......................... 307
Checking ........................................ 287
Cleaning ......................................... 264
Important safety notes .................. 287
Information on driving .................... 287
Interchanging/changing ................ 307
Mounting anew wheel. .................. 310
Removing awheel .......................... 310
Storing ........................................... 308
Tightening torque ........................... 311
Wheel size/tire size ....................... 312
Wheel sand tires
Changing awheel .......................... 308
Window curtai nair bag
Displa ymessage ............................ 199
Operation ......................................... 47
Windows
see Sid ewindows
Windshield
Defrosting ...................................... 117
Windshiel dwasher system
Adding washerf luid ....................... 260
Important safety notes .................. 319
Windshiel dwipers
Displa ymessage ............................ 216
Problem (malfunction) ................... 109
Replacing the wipe rblade s............ 108
Switching on/off. .......................... 107
Winter driving
Slippery roads urfaces ................... 148
Snow chains .................................. 290
Winter operation
Genera lnotes ................................ 289
Wi
nter tires
M+S tire s....................................... 289
Index21
Page 25 of 326
Introduction
The printedOperator's Manual provide sinfor-
mation about th esafeo peration of your vehicle.
The Digital Operator's Manual provide scom pre-
hensiv eand specifically adapted information on
your vehicle's equipmen tand multimedia sys-
tem. You can call up th eDigital Operator's Man -
ual via th emultimedia system.
iYou will no tincur any cost swhen calling up
th eD igital Operator's Manual. The Digital
Operator's Manual works without connecting
to th eInternet.
Ther eare three ways to access th etop icsoft he
Digital Operator's Manual:
RVisua lsearch
The visual search allows you to explor eyour
vehicl e"virtually". Starting from either th e
vehicl eexter iorv iewori nterio rview, you can
access man yofthedifferen ttop icsc overed
by th eDigital Operator's Manual. To access
th ev ehicl einterio rsection ,select th e"Vehi-
cle interior" view.
RKeywor dsearch
The keyword search allows you to search for a
keyword by enterin gcharacters.
RContent s
You can select individual section sinthecon-
tents.
iThe Digital Operator's Manual is deactiva-
te df or safet yreason swhile driving .
Operation
Calling up th eDigital Operator's Man-
ual
XPress th eØ buttoninthecenter console.
The overview relating to th evehicl eappears.
XSelec tthe "Operator's Manual" men uitemb y
turnin g3 or pressin g7 thec ontroll er.
XConfirm7 them essage about th ewarning
and safet ynotes .
The basic men ufor th eDigital Operator's
Manual appears.
Operating th eDigital Operator's Man-
ual
General notes
Pleas eobserv ethe information about th eoper -
ation of th econtroll er(Ypage 230).
Content pages
The conten tpages can be accessed by mean sof
av isual search ,akeyword search or usin gthe
contents .
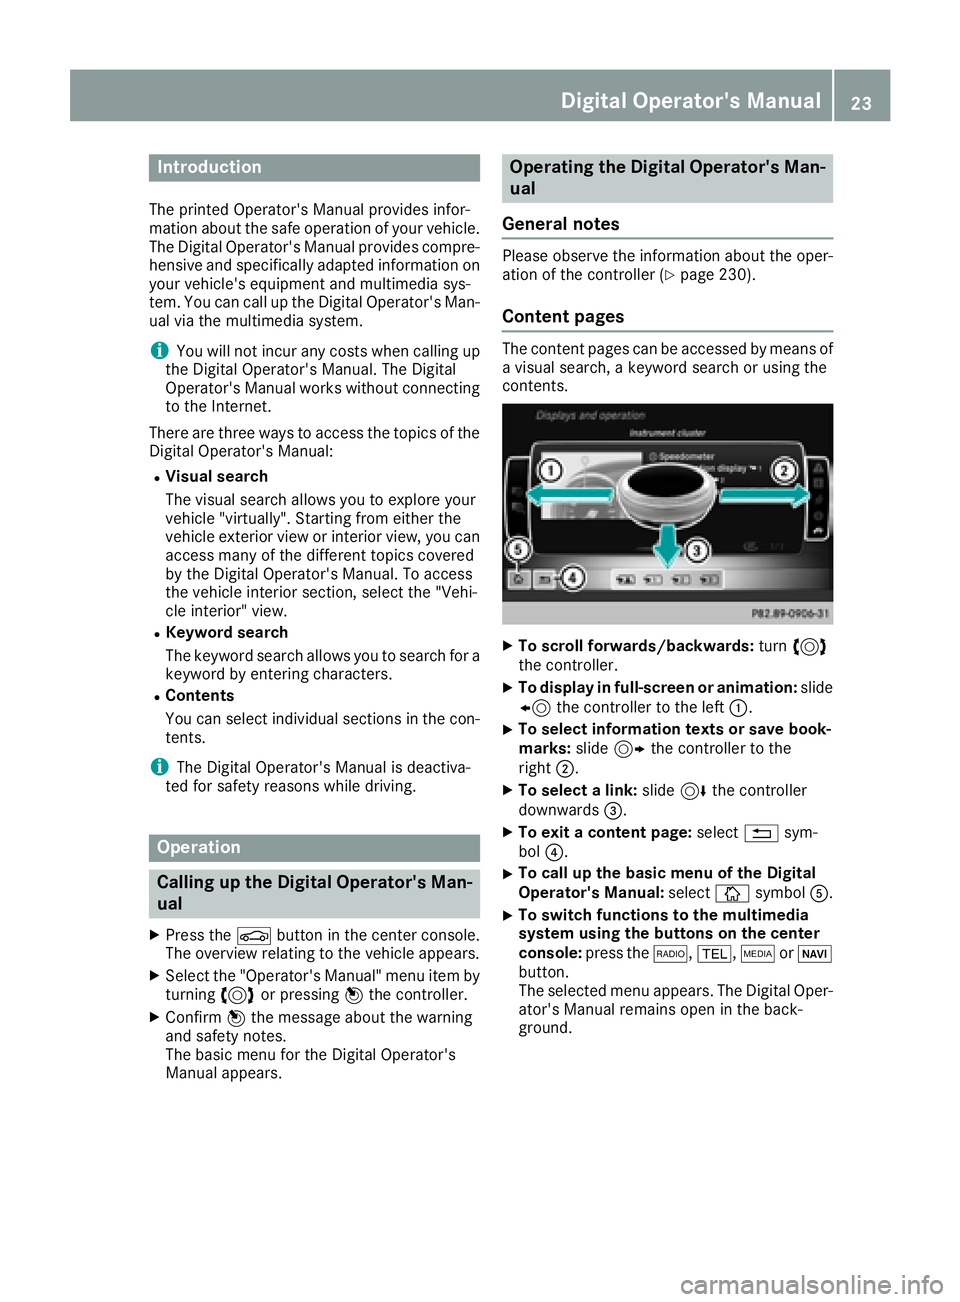
XTo scroll forwards/backwards: turn3
th ec ontroll er.
XTo displa yinfull-screen or animation: slide
8 thec ontroll er to th eleft:.
XTo select information texts or sav ebook -
marks: slide9 thec ontroll er to th e
right ;.
XTo select alink :slide 6thec ontroll er
downwards =.
XTo exitacontent page: select%sym-
bol ?.
XTo call up th ebasic men uoftheDigital
Operator's Manual: selectÞsymbol A.
XTo switch functions to th emultime dia
system using th ebutton sont hecenter
console: press the$, %,ÕorØ
button.
The selected men uappears. The Digital Oper -
ator's Manual remain sopen in th eback-
ground .
Digital Operator's Manual23
Page 42 of 326

Panic alarm
XTo activate:press and hold the
! button :for approx. one second.
Av isual and audible alarm is triggered if the
alarm system is armed.
XTo deactivate: press!button :again.
or
XInsert the SmartKey into the ignition lock.
or, in vehicles with KEYLESS-GO start-function
or KEYLESS ‑GO
XPress the Start/Stop button.
The SmartKey must be in the vehicle.
Occupant safety
Introduction to the restraint system
The restraint system can reduce the risk of vehi-
cle occupants coming into contact with parts of
the vehicle's interior in the event of an accident.
The restraint system can also reduce the forces to which vehicle occupants are subjected during
an accident.
The restraint system comprises:
RSeat belt system
RAir bags
RChild restraint system
RChild seat securing systems
The components of the restraint system work in
conjunction with each other. They can only
deploy their protective function if, at all times, all
vehicle occupants:
Rhave fastened their seat belts correctly
(Ypage 43)
Rhave the seat and head restraint adjusted
properly (Ypage 90) As the driver, you also have to make sure that
the steering wheel is adjusted correctly.
Observe the information relating to the correct
driver's seat position (
Ypage 90).
You also have to make sure that an air bag can
inflate properly if deployed(
Ypage 45).
An air bag supplements acorrectly worn seat
belt. As an additional safety device, the air bag
increases the level of protection for vehicle
occupants in the event of an accident. For exam-
ple, if, in the event of an accident, the protection
offered by the seat belt is sufficient, the air bags
are not deployed. When an accident occurs, only
the air bags that increase protection in that par- ticular accident situation are deployed. How-
ever, seat belts and air bags generally do not
protect against object spenetrating the vehicle
from the outside.
Information on restraint system operation can
be found under "Triggering of the Emergency
Tensioning Devices and air bags" (
Ypage 52).
See "Children in the vehicle" for information on
children traveling with you in the vehicle as well
as on child restraint systems (
Ypage 54).
Important safety notes
GWARNING
Modifications to the restraint system may
cause it to no longer work as intended. The
restraint system may then not perform its
intended protective function and may fail in an
accident or trigger unexpectedly, for example.
This poses an increased risk of injury or even fatal injury.
Never modify parts of the restraint system.
Never tamper with the wiring, the electronic
components or their software.
If it is necessary to modify components of the
restraint system to accommodate aperson with
disabilities, contact an authorized Mercedes-
Benz Center for details. USA only: for further
information contact our Customer Assistance
Center at 1-800-FOR-MERCedes
(1‑800‑367‑6372).
Mercedes-Benz recommends that you only use
driving aids which have been approved specifi-
cally for your vehicle by Mercedes-Benz.
40Occupant safety
Safety
Page 45 of 326
Ifac hild younger than twelve years old and
under 5ft(1.50m)inh eight is travelingint he
vehicle:
Ralways secur ethe child in achild restraint
system suitable for this Mercedes-Ben zvehi-
cle. The child restraint system must be appro-
priatetot he age, weight and size of the child
Ralways observe the instructions and safety
notes on "Children in the vehicle"
(
Ypage 54) in addition to the child restraint
system manufacturer'si nstallation and oper-
atin ginstructions
Ralways observe the instructions and safety
notes on the "Occupant classification system
(OCS)" (
Ypage 47)
GWARNING
The seat belts may not perform their intended protective function if:
Rthe yare damaged, modified, extremely
dirty, bleache dordyed
Rthe seat belt buckle is damaged or
extremely dirty
Rthe Emergency Tensionin gDevices, belt
anchoragesori nertia reels have been modi-
fied.
Seat belts may be damaged in an accident,
althoug hthe damage may not be visible, e.g.
due to splinters of glass. Modifiedord amaged
seat belts may tear or fail, e.g. in an accident.
ModifiedE mergency Tensionin gDevices
could accidentally trigger or fail to deploy
when necessary. This poses an increased risk
of injury or even fatal injury.
Never modifyt he seat belts,Eme rgency Ten-
sioning Devices, belt anchoragesa nd inertia
reels. Make sure that the seat belts are
undamaged, not worn out and clean .Follow-
ing an accident ,have the seat belts checked
immediately at aqualified specialist work-
shop.
Only use seat belts that have been approved for
your vehicle by Mercedes-Benz.
Sports seat or AMG Performance seat: this
seat is designed for the standard three-point
seat belt. If you install another multi-point seat
belt, e.g. sport or racin gseat belts ,the restraint system cannot provide the best level of protec-
tion.
GWARNING
If you feed seat belts through the opening in
the seat backrest,t he seat backrest may be
damaged or may even break in the eventofa n
accident .This poses an increased risk of
injury or even fatal injury.
Only use the standard three-point seat belt.
Never modifyt he seat belt system.
Proper use of th eseat belts
Observe the safetyn otes on the seat belt
(Ypage 42).
All vehicle occupant smust be wearingt he seat
belt correctly beforeb eginningthe journey. Also
make sure that all vehicle occupant sare always
wearing the seat belt correctly while the vehicle
is in motion.
When fastenin gthe seat belt, always make sure
that:
Rthe seat belt buckle tongue is inserted only
int ot he belt buckle belonging to that seat
Rthe seat belt is pulled tigh tacross your body
Avoid wearing bulky clothing ,e.g. aw inter
coat.
Rthe seat belt is not twisted
Only the ncan the forces which occur be dis-
tributed over the area of the belt.
Rthe shoulder section of the belt is routed
across the center of your shoulder
The shoulder section of the seat belt should
not touc hyour nec korber outed under your
arm or behindy our back.Where possible,
adjust the seat belt to the appropriate height.
Rthe lap belt is taut and passes across your lap as low down as possible
The lap belt must always be routed across
your hip joints and not across your abdomen.
This applies particularly to pregnant women.
If necessary, push the lap belt down to your
hip join tand pull it tigh tusing the shoulder
section of the belt.
Rthe seat belt is not routed across sharp, poin-
ted or fragile objects
If you have such item slocated on or in your
clothing ,e.g. pens ,keys or eyeglasses,s tore
these in asuitable place.
Ronly one personisu singaseat belt
Occupant safety43
Safety
Z
Page 50 of 326
Requirements
To be classifiedcorrectly ,the front passenger
mus tsit:
Rwith the seatb eltf astened correctly
Rin an almost upright position with theirb ack
against the seatb ackrest
Rwith theirf eetresting on the floor, if possible
If the front passenger doe snot observe these
conditions ,OCS may produce afalse classifica-
tion, e.g. because the front passenger:
Rtransfers theirw eightbys uppo rting them-
selves on avehicl earmrest
Rsits in such awaythat theirw eightisr aised
from the seatc ushion
If it is absolutely necessary to install achild
restraint system on the front-passenger seat, be
sure to observe the correct positioning of the
child restraint system. Neverp lace objects
under or behind the child restraint system, e.g. a
cushion. The entir ebaseoft he child restraint
system mus talway srestont he seatc ushionof
the front-passenger seat. The backrest of the
forward-facing child restraint system mus tlie as
fla tasp ossible against the backrest of the front-
passenger seat.
The child restraint system mus tnot touch the
rooforbes ubjecte dtoal oadbyt he head
restraint. Adjust the angle of the seatb ackrest
and the headr estraint position accordingly.
Only then can OCSbeg uaranteed to function
correctly .Alway sobserve the child restraint sys-
tem manufacturer'si nstallationand o
perating
instructions.
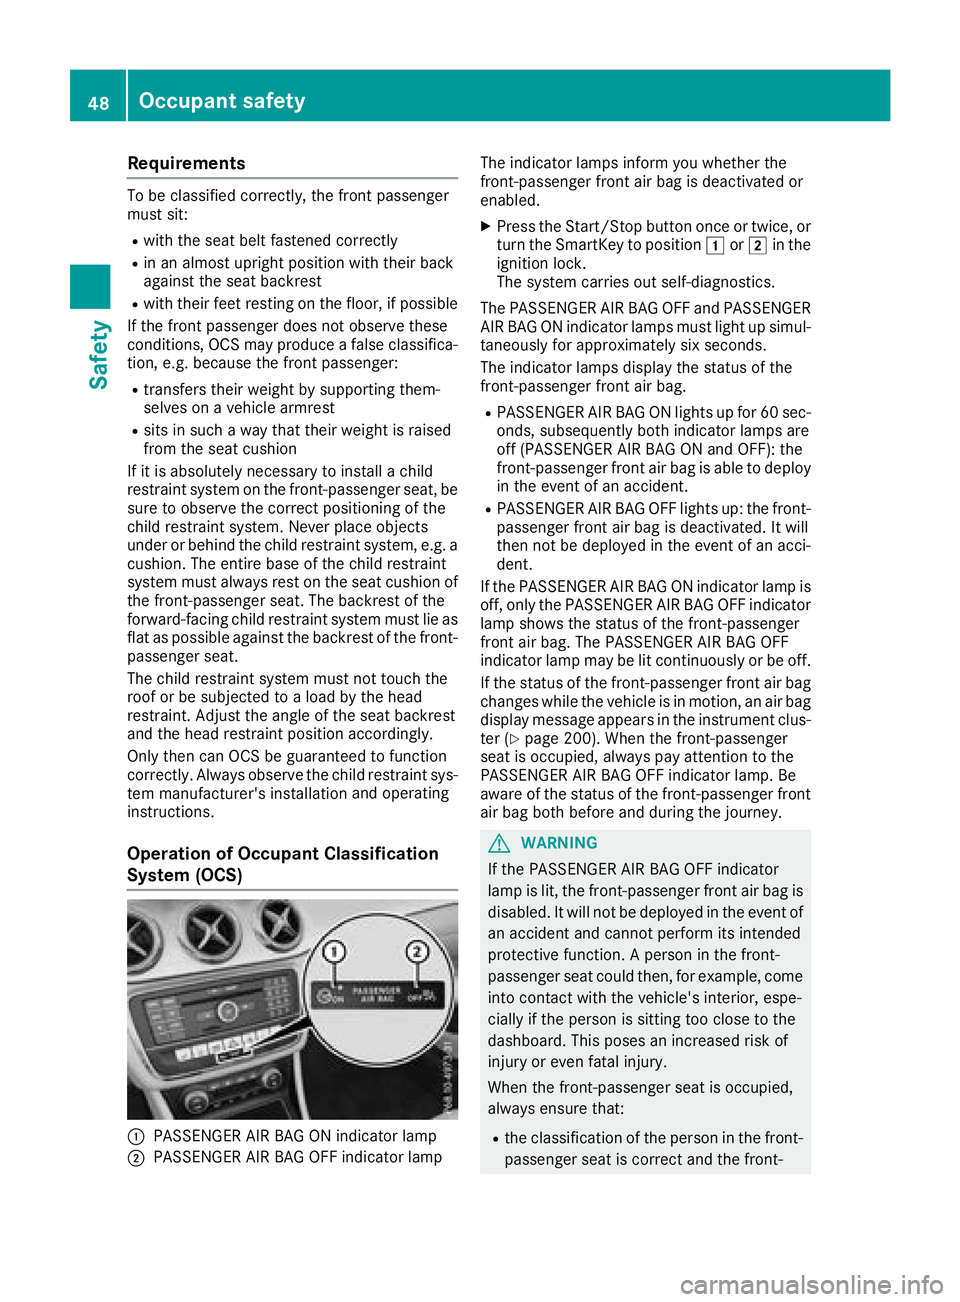
OperationofO ccupant Classification
System (OCS)
:PASSENGER AIR BAG ON indicator lamp
;PASSENGER AIR BAG OFF indicator lamp The indicator lamps inform yo
uwhethe rthe
front-passenger front ai rbag is deactivated or
enabled.
XPress the Start/Sto pbutton once or twice, or
turn the SmartKey to position 1or2 in the
ignition lock.
The system carrie soutself-diagnostics.
The PASSENGER AIR BAG OFF and PASSENGER
AIR BAG ON indicator lamps mus tlight up simul-
taneously for approximately six seconds.
The indicator lamps display the statu softhe
front-passenger front ai rbag.
RPASSENGER AIR BAG ON lights up for 60 sec-
onds ,sub sequently both indicator lamps are
off (PASSENGER AIR BAG ON and OFF):t he
front-passenger front ai rbag is able to deploy
in the event of an accident.
RPASSENGER AIR BAG OFF lights up :the front-
passenger front ai rbag is deactivated. It will
then not be deploye dinthe event of an acci-
dent.
If the PASSENGER AIR BAG ON indicator lamp is
off, only the PASSENGER AIR BAG OFF indicator lamp shows the statu softhe front-passenger
front ai rbag.T he PASSENGER AIR BAG OFF
indicator lamp may be li tcontinuously or be off.
If the statu softhe front-passenger front ai rbag
changes whil ethe vehicl eisinmotion, an ai rbag
display message appears in the instrument clus-
ter (
Ypage 200). Whent he front-passenger
seati soccupied, always pa yattention to the
PASSENGER AIR BAG OFF indica tor l
amp. Be
aware of the statu softhe front-passenger front
ai rb ag both before and during the journey.
GWARNING
If the PASSENGER AIR BAG OFF indicator
lamp is lit, the front-passenger front ai rbag is
disabled. It will not be deploye dinthe event of
an accident and canno tperform its intended
protectiv efunction. Aperson in the front-
passenger seatc ould then, for example, come
into contact with the vehicle's interior, espe-
ciall yift he person is sitting too close to the
dashboard. Thisp oses an increased ris kof
injury or evenf atalinjury.
Whent he front-passenger seati soccupied,
always ensure that:
Rthe classification of the person in the front- passenger seati scorrect and the front-
48Occupan tsafety
Safety
Page 57 of 326
GWARNING
If you leave children unsupervised in the vehi-
cle, they coul dset it in motion by, for example:
Rrelease the parking brake.
Rshift the automatic transmission out of the
parking position P.
Rstart the engine.
In addition, they may operate vehiclee quip-
ment and become trapped. There is arisk of
an accident and injury.
When leaving the vehicle, alway stake the
SmartKey with you and lock the vehicle. Never
leave children unsupervised in the vehicle.
GWARNING
If persons, particularl ychildren are subjected
to prolonged exposure to extreme heato r
cold, there is arisk of injury ,possibly even
fatal .Never leave children unattended in the
vehicle.
GWARNING
If the child restraint system is subjected to
direct sunlight, parts may get very hot. Chil-
dren may burn themselves on these parts,
particularl yonthe metal parts of the child
restraint system. There is arisk of injury.
If you leave the vehicle, taking the child with
you ,alway sensure that the child restraint
system is not exposedtod irect sunlight. Pro-
tect it with ablanket, for example. If the child
restraint system has been exposedtod irect
sunlight, let it cool downb efore securing the
child in it. Never leave children unattended in
the vehicle.
Always ensure that all vehicleo ccupants have
their seat belts fastened correctly and are sitting
properly.P articular attention must be pai dto
children.
Observe the safety notes on the seat belt
(
Ypage4 2) and the notes on correct use of seat
belts (Ypage4 3).
Ab ooster seat may be necessary to achieve
propers eat beltp ositioning for children over
41 lbs (18 kg )until they reach aheight where a three-point seat beltc
an be properly fastened
without abooster seat.
Special seatbelt retractor
GWARNING
If the seat beltisr eleased while driving, the
child restraint system wil lnolonger be
secure dproperly.T he special seat beltr etrac-
tor is disableda nd the inertia real draw sina
portion of the seat belt. The seat beltc annot
be immediatel yrefastened. There is an
increased risk of injury ,possibly even fatal.
Stop the vehiclei mmediately, paying atten-
tion to road and traffic conditions. Reactivate
the special seat beltr etractor and secure the
child restraint system properly.
All seat belts in the vehicle, except the driver's
seat belt, are equipped with aspecial seat belt
retractor. When activated, the special seat belt
retractor ensure sthat the seat beltc annot
slacken once the child seat is secured.
Installing achild restraint system:
XMake sure you observe the child restraint
system manufacturer's installation instruc-
tions.
XPul lthe seat belts moothly from the belto ut-
let.
XEngage seat beltt ongue in beltbuckle.
Activating the special seat beltr etractor:
XPullthe seat belto ut fullyand let the inertia
reel retract it again.
Whilet he seat beltisr etracting, you should
hear aratcheting sound .The special seat belt
retractor is enabled.
XPush the child restraint system downsot hat
the seat beltist ight and does not loosen.
Removing the child restraint system and deac-
tivating the special seat beltr etractor:
XMake sure you observe the child restraint
system manufacturer's installation instruc-
tions.
XPress the release button of the seat belt
buckle and guide the seat beltt ongue back
toward sthe belts ash guide.
The special seat beltr etractor is deactivated.
Children in the vehicle55
Safety
Z