2018 JEEP GRAND CHEROKEE battery
[x] Cancel search: batteryPage 222 of 368

CAUTION!
Do not run the booster vehicle engine
above 2000 rpm since it provides no
charging benefit, wastes fuel and can
damage booster vehicle engine.
6. Once the engine is started, remove the
jumper cables in the reverse sequence:
Cable Disconnection
1. Disconnect the negative(-)end of the
jumper cable from the remote negative(-)
post of the discharged vehicle.
2. Disconnect the opposite end of the nega-
tive(-)jumper cable from the negative(-)
post of the booster battery.
3. Disconnect the positive(+)end of the
jumper cable from the positive(+)post of
the booster battery.
4. Disconnect the opposite end of the posi-
tive(+)jumper cable from the remote
positive(+)post of the discharged
vehicle.5. Reinstall the protective cover over the
remote positive(+)post of the discharged
vehicle.
REFUELING IN EMERGENCY
The funnel for the Cap-Less Fuel System is
located in the spare tire storage area. If your
vehicle is out of fuel and an auxiliary fuel can
is needed, insert the funnel into the filler
neck and proceed to fill the vehicle.
For more information on the Cap-Less Fuel
System refer to “Refueling The Vehicle” in
“Starting And Operating”.
IF YOUR ENGINE
OVERHEATS
In any of the following situations, you can
reduce the potential for overheating by taking
the appropriate action.
• On the highways — slow down.
• In city traffic — while stopped, place the
transmission in NEUTRAL, but do not in-
crease the engine idle speed while prevent-
ing vehicle motion with the brakes.NOTE:
There are steps that you can take to slow
down an impending overheat condition:
• If your air conditioner (A/C) is on, turn it off.
The A/C system adds heat to the engine
cooling system and turning the A/C off can
help remove this heat.
• You can also turn the temperature control
to maximum heat, the mode control to floor
and the blower control to high. This allows
the heater core to act as a supplement to
the radiator and aids in removing heat from
the engine cooling system.
WARNING!
You or others can be badly burned by hot
engine coolant (antifreeze) or steam from
your radiator. If you see or hear steam
coming from under the hood, do not open
the hood until the radiator has had time to
cool. Never try to open a cooling system
pressure cap when the radiator or coolant
bottle is hot.
IN CASE OF EMERGENCY
220
Page 223 of 368

CAUTION!
Driving with a hot cooling system could
damage your vehicle. If the temperature
gauge reads HOT (H), pull over and stop
the vehicle. Idle the vehicle with the air
conditioner turned off until the pointer
drops back into the normal range. If the
pointer remains on HOT (H), and you hear
continuous chimes, turn the engine off
immediately and call for service.
MANUAL PARK RELEASE
WARNING!
Always secure your vehicle by fully apply-
ing the parking brake before activating the
Manual Park Release. In addition, you
should be seated in the driver’s seat with
your foot firmly on the brake pedal when
activating the Manual Park Release. Acti-
vating the Manual Park Release will allow
your vehicle to roll away if it is not secured
by the parking brake, or by proper connec-
tion to a tow vehicle. Activating the
WARNING!
Manual Park Release on an unsecured
vehicle could lead to serious injury or
death for those in or around the vehicle.
In order to move the vehicle in cases where
the transmission will not shift out of PARK
(such as a dead battery), a Manual Park
Release is available.
Follow these steps to use the Manual Park
Release:
1. Firmly apply the parking brake.
2. Open the center console and locate the
Manual Park Release cover, remove it by
snapping the cover away from the console
hinges.3. Press and maintain firm pressure on the
brake pedal.
4. Using a screwdriver or similar tool, push
the metal latch in towards the tether
strap.
5. While the metal latch is in the open posi-
tion, pull upward on the tether strap until
the lever clicks and latches in the released
position. The transmission is now out of
PARK and the vehicle can be moved.
Manual Park Release Cover Removed
221
Page 226 of 368
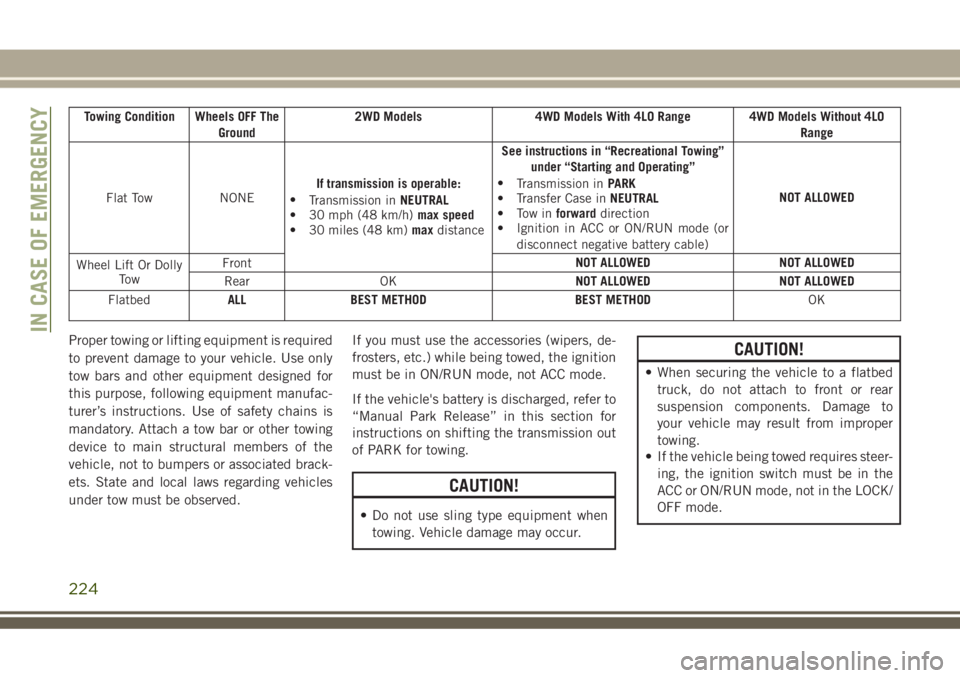
Towing Condition Wheels OFF The
Ground2WD Models 4WD Models With 4LO Range 4WD Models Without 4LO
Range
Flat Tow NONEIf transmission is operable:
•
Transmission inNEUTRAL
• 30 mph (48 km/h)max speed
• 30 miles (48 km)maxdistanceSee instructions in “Recreational Towing”
under “Starting and Operating”
•
Transmission inPARK
• Transfer Case inNEUTRAL
• Tow inforwarddirection
• Ignition in ACC or ON/RUN mode (or
disconnect negative battery cable)NOT ALLOWED
Wheel Lift Or Dolly
To wFrontNOT ALLOWED NOT ALLOWED
Rear OKNOT ALLOWED NOT ALLOWED
FlatbedALL BEST METHOD BEST METHOD
OK
Proper towing or lifting equipment is required
to prevent damage to your vehicle. Use only
tow bars and other equipment designed for
this purpose, following equipment manufac-
turer’s instructions. Use of safety chains is
mandatory. Attach a tow bar or other towing
device to main structural members of the
vehicle, not to bumpers or associated brack-
ets. State and local laws regarding vehicles
under tow must be observed.If you must use the accessories (wipers, de-
frosters, etc.) while being towed, the ignition
must be in ON/RUN mode, not ACC mode.
If the vehicle's battery is discharged, refer to
“Manual Park Release” in this section for
instructions on shifting the transmission out
of PARK for towing.
CAUTION!
• Do not use sling type equipment when
towing. Vehicle damage may occur.
CAUTION!
• When securing the vehicle to a flatbed
truck, do not attach to front or rear
suspension components. Damage to
your vehicle may result from improper
towing.
• If the vehicle being towed requires steer-
ing, the ignition switch must be in the
ACC or ON/RUN mode, not in the LOCK/
OFF mode.
IN CASE OF EMERGENCY
224
Page 231 of 368

SERVICING AND MAINTENANCE
SCHEDULED SERVICING......230
Scheduled Servicing — Non SRT. . . .230
Scheduled Servicing — SRT.......234
Scheduled Servicing — Diesel Engine .238
ENGINE COMPARTMENT.....242
3.6L Engine.................242
5.7L Engine.................243
6.2L Supercharged Engine........244
6.4L Engine.................245
3.0L Diesel Engine.............246
Checking Oil Level — Gasoline Engine .247
Checking Oil Level — 3.0 Diesel
Engine.....................247Adding Washer Fluid............247
Maintenance-Free Battery........248
DEALER SERVICE...........248
Air Conditioner Maintenance.......249
Windshield Wiper Blades.........251
Cooling System...............254
RAISING THE VEHICLE.......255
TIRES....................255
Tires — General Information.......255
Tire Types...................259
Spare Tires — If Equipped........260
Wheel And Wheel Trim Care.......262Tire Chains (Traction Devices) —
Non-SRT...................263
Tire Chains (Traction Devices) — SRT . .264
Tire Rotation Recommendations.....264
STORING THE VEHICLE.......265
BODYWORK...............266
Preserving The Bodywork.........266
INTERIORS................267
Seats And Fabric Parts...........267
Plastic And Coated Parts..........267
Leather Parts.................268
Glass Surfaces...............268
SERVICING AND MAINTENANCE
229
Page 232 of 368

SCHEDULED SERVICING
Scheduled Servicing — Non SRT
The scheduled services listed in this manual
must be done at the times or mileages speci-
fied to protect your vehicle warranty and
ensure the best vehicle performance and re-
liability. More frequent maintenance may be
needed for vehicles in severe operating con-
ditions, such as dusty areas and very short
trip driving. Inspection and service should
also be done anytime a malfunction is sus-
pected.
The oil change indicator system will remind
you that it is time to take your vehicle in for
scheduled maintenance.
In the instrument cluster an “Oil Change
Required” message will be displayed and a
single chime will sound, indicating that an oil
change is necessary.
The oil change indicator message will illuminate
approximately 7,000 miles (11,200 km) after
the most recent oil change was performed. Have
your vehicle serviced as soon as possible, within
500 miles (800 km).
NOTE:
•
The oil change indicator message will not moni-
tor the time since the last oil change. Change
your vehicles oil if it has been 12 months since
your last oil change even if the oil change
indicator message is NOT illuminated.
• Change your engine oil more often if you
drive your vehicle off-road for an extended
period of time.
• Under no circumstances should oil change
intervals exceed 7,500 miles (12,000 km)
or 12 months, whichever comes first.
Your authorized dealer will reset the oil
change indicator message after completing
the scheduled oil change. If this scheduled
oil change is performed by someone other
than your authorized dealer the message can
be reset by referring to the steps described
under ”Instrument Cluster Display” in “Get-
ting To Know Your Instrument Panel” for
further information.
At Each Stop for Fuel
• Check the engine oil level about 5 minutes
after a fully warmed engine is shut off.
Checking the oil level while the vehicle is
on level ground will improve the accuracy ofthe oil level reading. Add oil only when the
level is at or below the ADD or MIN mark.
• Check the windshield washer solvent and
add if required.
Once a Month
• Check tire pressure and look for unusual
wear or damage. Rotate tires at the first
sign of irregular wear.
• Inspect the battery and clean and tighten
the terminals as required.
• Check the fluid levels of the coolant reser-
voir, and brake master cylinder; add fluid as
needed.
• Check all lights and other electrical items
for correct operation.
At Each Oil Change
• Change the engine oil filter.
• Inspect the brake hoses and lines.
CAUTION!
Failure to perform the required maintenance
items may result in damage to the vehicle.
SERVICING AND MAINTENANCE
230
Page 236 of 368

Severe Duty Conditions
†† Change the engine oil and engine oil filter
at every 4500 miles (7,500 km) or
12 months if using your vehicle under any of
the following severe duty conditions:
• Stop and go driving.
• Driving in dusty conditions.
• Short trips of less than 10 miles (16 km).
• Trailer towing.
• Taxi, police, or delivery service (commercial
service).
• Off-road or desert operation.
Scheduled Servicing — SRT
The scheduled services listed in this manual
must be done at the times or mileages speci-
fied to protect your vehicle warranty and
ensure the best vehicle performance and re-
liability. More frequent maintenance may be
needed for vehicles in severe operating con-
ditions, such as dusty areas and very short
trip driving. Inspection and service should
also be done anytime a malfunction is sus-
pected.The oil change indicator system will remind
you that it is time to take your vehicle in for
scheduled maintenance.
The Instrument Cluster Display will display
an “Oil Change Required” message and a
single chime will sound, indicating that an oil
change is necessary.
Based on engine operation conditions, the oil
change indicator message will illuminate.
This means that service is required for your
vehicle. Have your vehicle serviced as soon as
possible, within the next 500 miles
(805 km).
NOTE:
• The oil change indicator message will not
monitor the time since the last oil change.
Change your vehicle's oil if it has been six
months since your last oil change, even if
the oil change indicator message is NOT
illuminated.
• Change your engine oil more often if you
drive your vehicle off-road for an extended
period of time.• Under no circumstances should oil change
intervals exceed 6,000 miles (10,000 km)
or six months, whichever comes first.
Your authorized dealer will reset the oil
change indicator message after completing
the scheduled oil change. If a scheduled oil
change is performed by someone other than
your authorized dealer, the message can be
reset by referring to the steps described un-
der “Instrument Cluster Display” in “Getting
To Know Your Instrument Panel” in this
guide.
At Each Stop For Fuel
• Check the engine oil level. Refer to “Engine
Compartment” in this section for further
information.
• Check the windshield washer solvent and
add if required.
Once A Month
• Check tire pressure and look for unusual
wear or damage.
• Inspect the battery, and clean and tighten
the terminals as required.
SERVICING AND MAINTENANCE
234
Page 241 of 368

tronic and mechanical tools that can help
prevent future costly repairs.
The maintenance intervals shown should be
performed as indicated in this section.
NOTE:
• Under no circumstances should oil change
intervals exceed12,500 miles (20,000 km)
or 12 months, whichever comes first.
•Flush and replace the engine coolant at
120 months or 150,000 miles (240,000 km)
whichever comes first.
At Each Stop for Fuel
• Check the engine oil level about 5 minutes
after a fully warmed engine is shut off.
Checking the oil level while the vehicle is
on level ground will improve the accuracy of
the oil level reading. Add oil only when the
level is at or below the ADD or MIN mark.• Check the windshield washer solvent and
add if required.
Once a Month
• Check tire pressure and look for unusual
wear or damage. Rotate tires at the first
sign of irregular wear, even if it occurs
before the oil indicator system turns on.
• Inspect the battery and clean and tighten
the terminals as required.
• Check the fluid levels of the coolant reser-
voir, and brake master cylinder; add as
needed.
• Check all lights and other electrical items
for correct operation.At Each Oil Change
• Change the engine oil filter.
• Inspect the brake hoses and lines.
• Inspect for the presence of water in the fuel
filter/water separator unit.
• Completely fill the AdBlue Fluid tank.
At Every Second Oil Change
• Replace fuel filter.
CAUTION!
Failure to perform the required mainte-
nance items may result in damage to the
vehicle.
239
Page 250 of 368

voir, take some washer fluid and apply it to a
cloth or towel and wipe clean the wiper
blades, this will help blade performance. To
prevent freeze-up of your windshield washer
system in cold weather, select a solution or
mixture that meets or exceeds the tempera-
ture range of your climate. This rating infor-
mation can be found on most washer fluid
containers.
WARNING!
Commercially available windshield washer
solvents are flammable. They could ignite
and burn you. Care must be exercised
when filling or working around the washer
solution.
Maintenance-Free Battery
Your vehicle is equipped with a maintenance-
free battery. You will never have to add water,
nor is periodic maintenance required.
WARNING!
• Battery fluid is a corrosive acid solution
and can burn or even blind you. Do not
WARNING!
allow battery fluid to contact your eyes,
skin, or clothing. Do not lean over a
battery when attaching clamps. If acid
splashes in eyes or on skin, flush the
area immediately with large amounts of
water. Refer to “Jump Starting Proce-
dure” in “In Case Of Emergency” for
further information.
• Battery gas is flammable and explosive.
Keep flame or sparks away from the
battery. Do not use a booster battery or
any other booster source with an output
greater than 12 Volts. Do not allow cable
clamps to touch each other.
• Battery posts, terminals, and related ac-
cessories contain lead and lead com-
pounds. Wash hands after handling.
CAUTION!
• It is essential when replacing the cables
on the battery that the positive cable is
attached to the positive post and the
negative cable is attached to the nega-
tive post. Battery posts are marked posi-
CAUTION!
tive (+) and negative (-) and are identi-
fied on the battery case. Cable clamps
should be tight on the terminal posts
and free of corrosion.
• If a “fast charger” is used while the
battery is in the vehicle, disconnect both
vehicle battery cables before connecting
the charger to the battery. Do not use a
“fast charger” to provide starting volt-
age.
DEALER SERVICE
An authorized dealer has the qualified ser-
vice personnel, special tools, and equipment
to perform all service operations in an expert
manner. Service Manuals are available which
include detailed service information for your
vehicle. Refer to these Service Manuals be-
fore attempting any procedure yourself.
NOTE:
Intentional tampering with emissions control
systems may void your warranty and could
result in civil penalties being assessed
against you.
SERVICING AND MAINTENANCE
248