2018 Hyundai Santa Fe display
[x] Cancel search: displayPage 20 of 570

Your vehicle at a glance
62
INSTRUMENT PANEL OVERVIEW
ODM014004❈The actual shape may differ from the illustration. 1. Lighting control lever .........................4-121
2. Audio remote control buttons ............4-177
3. Cruise control button ...........................5-67
4. LCD display control buttons ................4-77
5. Horn.....................................................4-59
6. Driver’s front air bag ............................3-66
7. Wiper and washer control lever .........4-130
8. Ignition switch/
Engine start/stop button ...............5-7, 5-10
9. Audio/Video/Navigation (AVN) system ...............................................4-178
10. Hazard warning flasher ...................4-119
11. Climate control system.........4-139, 4-149
12. Passenger’s front air bag ..................3-66
13. Glove box ........................................4-162
Page 105 of 570
Mirrors . . . . . . . . . . . . . . . . . . . . . . . . . . . . . . . . . . 4-60\
. . . . . . . . . . . . . . . . . . . . . . . . 4-60
. . . . . . . . . . . . . . . . . . . . . . . . . . . . 4-68
Instrument cluster . . . . . . . . . . . . . . . . . . . . . . . . . 4-72
. . . . . . . . . . . . . . . . . . . . . 4-73
. . . . . . . . . . . . . . . . . . . . . . . . . . . . . . . . . . . . \
. 4-73
. . . . . . . . . . . . . . . . . . . . . . 4-76
LCD display . . . . . . . . . . . . . . . . . . . . . . . . . . . . . . 4-77
. . . . . . . . . . . . . . . . . . . . . . . . . 4-77
. . . . . . . . . . . . . . . . . . . . . . . . . . . . . . . . . 4-77
. . . . . . . . . . . . . . . . . . . . . . . . . 4-78
Warning System (SCC/LDWS) Mode . . . . . . . . . . 4-78
. . . . . . . . . . . . . . . . . . . . . . . . . . . . . . . . . . . 4-\
79
. . . . . . . . . . . . . . . . . . . . . . . . . . . . . . . . 4-79
. . . . . . . . . . . . . . . . . . . . . . . . . . . 4-80
. . . . . . . . . . . . . . . . . . . . . . . . . . . . 4-86
Trip computer . . . . . . . . . . . . . . . . . . . . . . . . . . . . . 4-95
. . . . . . . . . . . . . . . . . . . . . . . . . . . . . . . 4-96
. . . . . . . . . . . . . . . . . . . . . . . . . . . . . . . . . . . . \
4-97
. . . . . . . . . . . . . . . . . . . . . . . . . . 4-98
Warning and indicator lights . . . . . . . . . . . . . . . 4-100
. . . . . . . . . . . . . . . . . . . . . . . . . . . . . . 4-100
. . . . . . . . . . . . . . . . . . . . . . . . . . . . . 4-108
Driver assist system . . . . . . . . . . . . . . . . . . . . . . . 4-113
. . . . . . . . . . . . . . . . . . . . 4-113
. . . . . . . . . . . . . . . . . . . . . . . . . . 4-117
. . . . . . . . . . . . . . . . . . . 4-118
Hazard warning flasher . . . . . . . . . . . . . . . . . . . . 4-119
Lighting . . . . . . . . . . . . . . . . . . . . . . . . . . . . . . . . . 4-120
. . . . . . . . . . . . . . . . . . . . . . . . . . . . . 4-120
. . . . . . . . . . . . . . . . . . . . . . . . . . . . . 4-121
. . . . . . . . . . . . . . . . . . . . . . . . . . . 4-126
. . . . . . . . 4-129
Wipers and washers . . . . . . . . . . . . . . . . . . . . . . . 4-130
. . . . . . . . . . . . . . . . . . . . . . . . . . . 4-130
. . . . . . . . . 4-132
Interior light . . . . . . . . . . . . . . . . . . . . . . . . . . . . . 4-133
. . . . . . . . . . . . . . . . . . . 4-133
. . . . . . . . . . . . . . . . . . . . . . . . . . . . . . . . . . 4-13\
3
. . . . . . . . . . . . . . . . . . . . . . . . . . . . . . . . . 4-134
. . . . . . . . . . . . . . . . . . . . . . . . . 4-135
. . . . . . . . . . . . . . . . . . . . . . . . . . 4-135
. . . . . . . . . . . . . . . . . . . . . . . . . . . . . 4-135
4
Page 137 of 570
Features of your vehicle
34
4
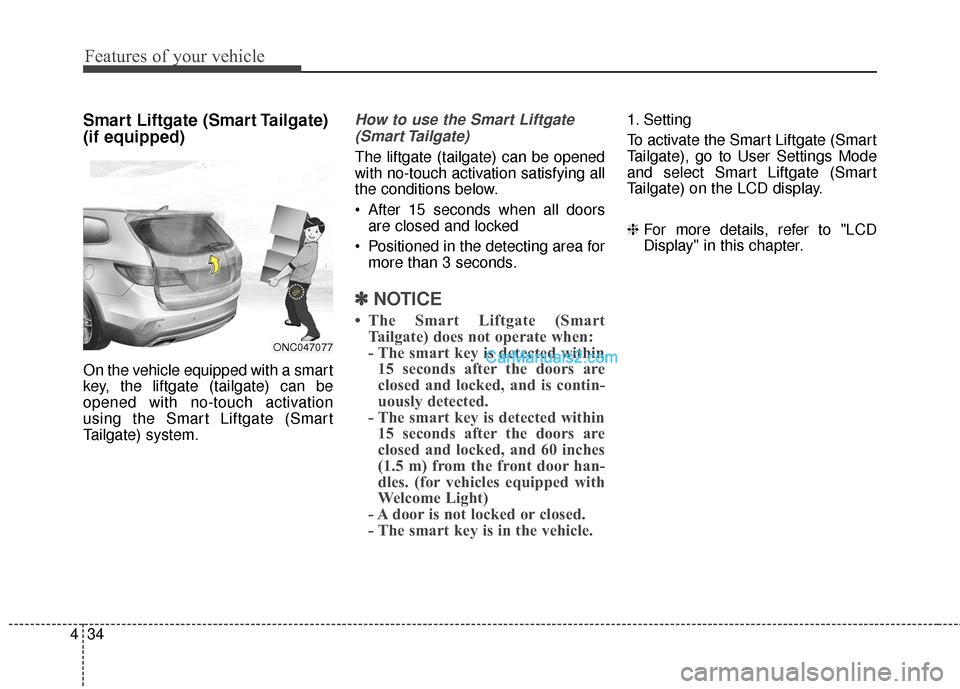
Smart Liftgate (Smart Tailgate)
(if equipped)
On the vehicle equipped with a smart
key, the liftgate (tailgate) can be
opened with no-touch activation
using the Smart Liftgate (Smart
Tailgate) system.
How to use the Smart Liftgate
(Smart Tailgate)
The liftgate (tailgate) can be opened
with no-touch activation satisfying all
the conditions below.
After 15 seconds when all doors are closed and locked
Positioned in the detecting area for more than 3 seconds.
✽ ✽ NOTICE
• The Smart Liftgate (Smart
Tailgate) does not operate when:
- The smart key is detected within15 seconds after the doors are
closed and locked, and is contin-
uously detected.
- The smart key is detected within 15 seconds after the doors are
closed and locked, and 60 inches
(1.5 m) from the front door han-
dles. (for vehicles equipped with
Welcome Light)
- A door is not locked or closed.
- The smart key is in the vehicle.
1. Setting
To activate the Smart Liftgate (Smart
Tailgate), go to User Settings Mode
and select Smart Liftgate (Smart
Tailgate) on the LCD display.
❈ For more details, refer to "LCD
Display" in this chapter.
ONC047077
Page 148 of 570
445
Features of your vehicle
Closing the hood
1. Before closing the hood, check thefollowing:
ment must be correctly installed.
bustible material must be
removed from the engine com-
partment.
2. Lower the hood halfway (lifted approximately 30cm from the
closed position) and push down to
securely lock in place. Then dou-
ble check to be sure the hood is
secure.WARNING
Before closing the hood,ensure that all obstructions
are removed from the hood
opening. Closing the hood
with an obstruction present in
the hood opening may result
in property damage or severe
personal injury.
Do not leave gloves, rags or any other combustible materi-
al in the engine compartment.
Doing so may cause a heat-
induced fire.
Always double check to be sure that the hood is firmly
latched before driving away.
Check there is no hood open
warning light displayed on the
instrument cluster. Driving
with the hood opened may
cause a total loss of visibility,
which might result in an acci-
dent.
Do not move the vehicle with the hood in the raised posi-
tion, as vision is obstructed
and the hood could fall or be
damaged.
Page 154 of 570
451
Features of your vehicle
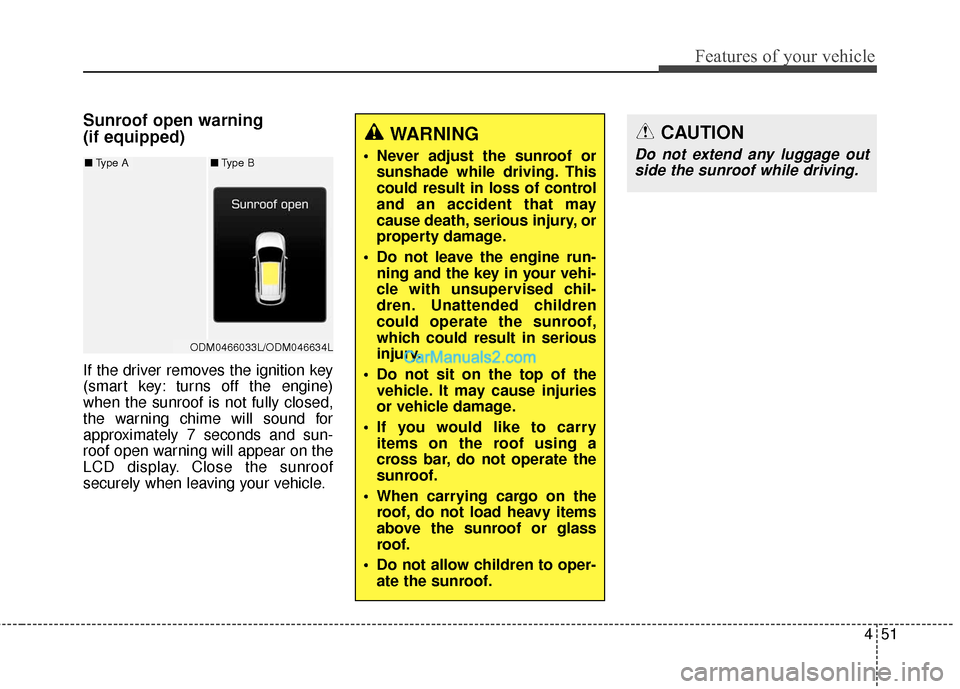
Sunroof open warning
(if equipped)
If the driver removes the ignition key
(smart key: turns off the engine)
when the sunroof is not fully closed,
the warning chime will sound for
approximately 7 seconds and sun-
roof open warning will appear on the
LCD display. Close the sunroof
securely when leaving your vehicle.
WARNING
Never adjust the sunroof orsunshade while driving. This
could result in loss of control
and an accident that may
cause death, serious injury, or
property damage.
Do not leave the engine run- ning and the key in your vehi-
cle with unsupervised chil-
dren. Unattended children
could operate the sunroof,
which could result in serious
injury.
Do not sit on the top of the vehicle. It may cause injuries
or vehicle damage.
If you would like to carry items on the roof using a
cross bar, do not operate the
sunroof.
When carrying cargo on the roof, do not load heavy items
above the sunroof or glass
roof.
Do not allow children to oper- ate the sunroof.
CAUTION
Do not extend any luggage outside the sunroof while driving.
ODM0466033L/ODM046634L
■ Type A■Type B
Page 161 of 570
Features of your vehicle
58
4
Heated steering wheel
(if equipped)
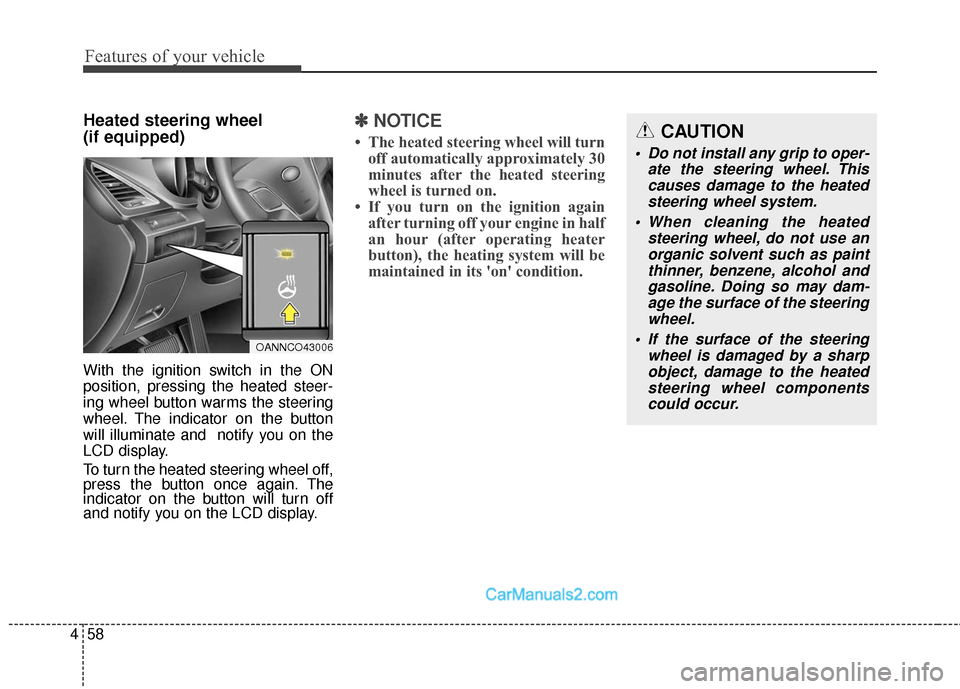
With the ignition switch in the ON
position, pressing the heated steer-
ing wheel button warms the steering
wheel. The indicator on the button
will illuminate and notify you on the
LCD display.
To turn the heated steering wheel off,
press the button once again. The
indicator on the button will turn off
and notify you on the LCD display.
✽ ✽
NOTICE
• The heated steering wheel will turn
off automatically approximately 30
minutes after the heated steering
wheel is turned on.
• If you turn on the ignition again after turning off your engine in half
an hour (after operating heater
button), the heating system will be
maintained in its 'on' condition.CAUTION
Do not install any grip to oper-
ate the steering wheel. Thiscauses damage to the heatedsteering wheel system.
When cleaning the heated steering wheel, do not use anorganic solvent such as paintthinner, benzene, alcohol andgasoline. Doing so may dam-age the surface of the steeringwheel.
If the surface of the steering wheel is damaged by a sharpobject, damage to the heatedsteering wheel componentscould occur.
OANNCO43006
Page 163 of 570
Features of your vehicle
60
4
MIRRORS
Inside rearview mirror
Adjust the rearview mirror so that the
center view through the rear window
is seen. Make this adjustment before
you start driving.
Day/night rearview mirror
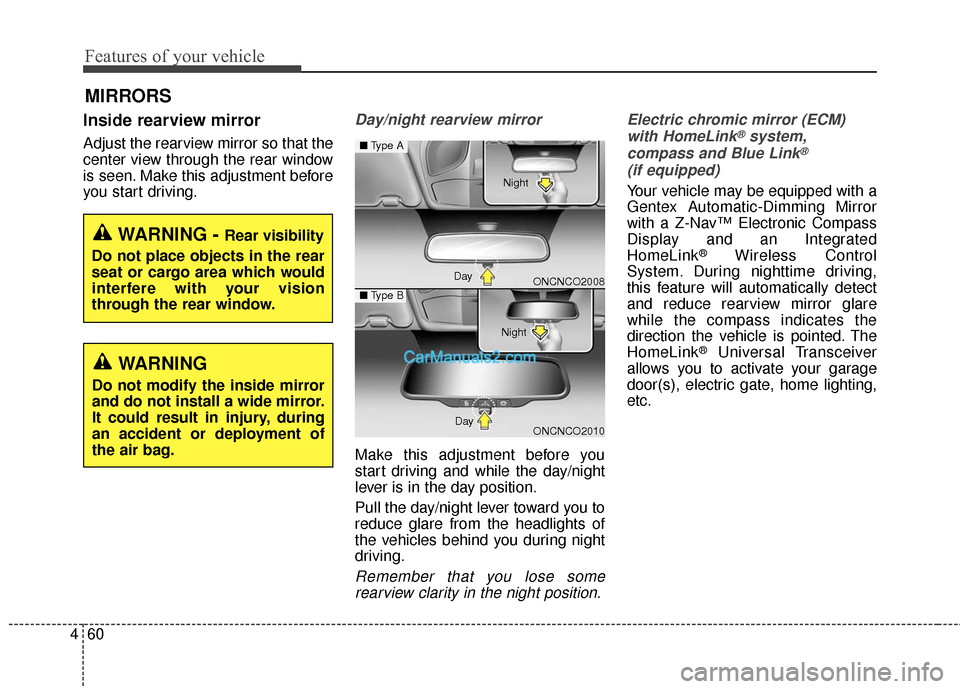
Make this adjustment before you
start driving and while the day/night
lever is in the day position.
Pull the day/night lever toward you to
reduce glare from the headlights of
the vehicles behind you during night
driving.
Remember that you lose some
rearview clarity in the night position. Electric chromic mirror (ECM)
with HomeLink
®system,
compass and Blue Link®
(if equipped)
Your vehicle may be equipped with a
Gentex Automatic-Dimming Mirror
with a Z-Nav™ Electronic Compass
Display and an Integrated
HomeLink
®Wireless Control
System. During nighttime driving,
this feature will automatically detect
and reduce rearview mirror glare
while the compass indicates the
direction the vehicle is pointed. The
HomeLink
®Universal Transceiver
allows you to activate your garage
door(s), electric gate, home lighting,
etc.
WARNING - Rear visibility
Do not place objects in the rear
seat or cargo area which would
interfere with your vision
through the rear window.
WARNING
Do not modify the inside mirror
and do not install a wide mirror.
It could result in injury, during
an accident or deployment of
the air bag.
ONCNCO2008
ONCNCO2010
■ Type A
■Type B
Day Night
Day Night
Page 164 of 570
461
Features of your vehicle
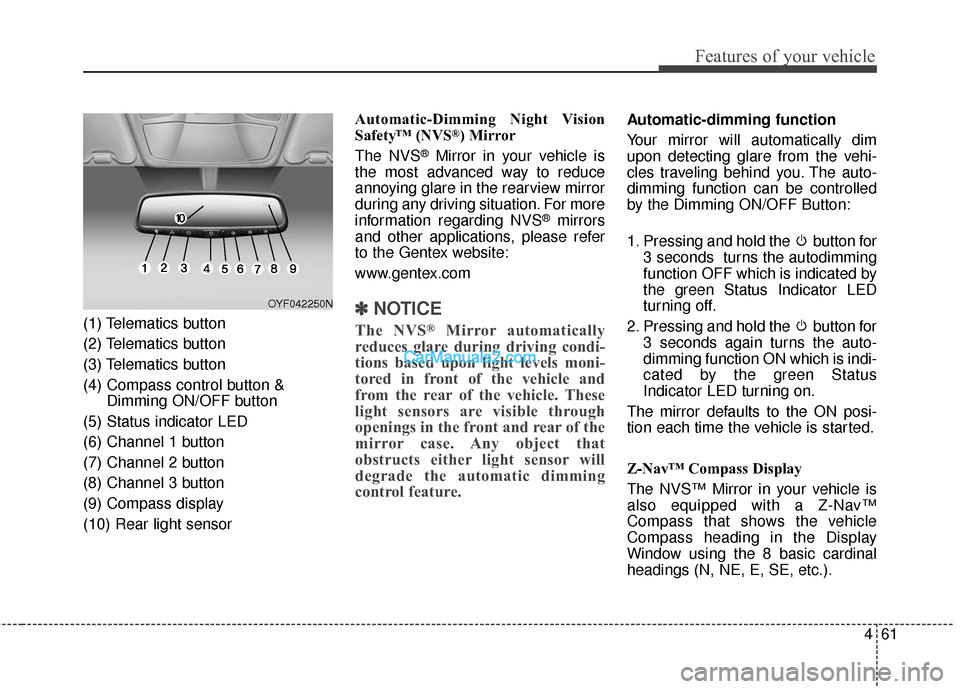
(1) Telematics button
(2) Telematics button
(3) Telematics button
(4) Compass control button &Dimming ON/OFF button
(5) Status indicator LED
(6) Channel 1 button
(7) Channel 2 button
(8) Channel 3 button
(9) Compass display
(10) Rear light sensor Automatic-Dimming Night Vision
Safety™ (NVS
®) Mirror
The NVS
®Mirror in your vehicle is
the most advanced way to reduce
annoying glare in the rearview mirror
during any driving situation. For more
information regarding NVS
®mirrors
and other applications, please refer
to the Gentex website:
www.gentex.com
✽ ✽ NOTICE
The NVS®Mirror automatically
reduces glare during driving condi-
tions based upon light levels moni-
tored in front of the vehicle and
from the rear of the vehicle. These
light sensors are visible through
openings in the front and rear of the
mirror case. Any object that
obstructs either light sensor will
degrade the automatic dimming
control feature.
Automatic-dimming function
Your mirror will automatically dim
upon detecting glare from the vehi-
cles traveling behind you. The auto-
dimming function can be controlled
by the Dimming ON/OFF Button:
1. Pressing and hold the button for
3 seconds turns the autodimming
function OFF which is indicated by
the green Status Indicator LED
turning off.
2. Pressing and hold the button for 3 seconds again turns the auto-
dimming function ON which is indi-
cated by the green Status
Indicator LED turning on.
The mirror defaults to the ON posi-
tion each time the vehicle is started.
Z-Nav™ Compass Display
The NVS™ Mirror in your vehicle is
also equipped with a Z-Nav™
Compass that shows the vehicle
Compass heading in the Display
Window using the 8 basic cardinal
headings (N, NE, E, SE, etc.).
OYF042250N