2018 HONDA CLARITY FUEL CELL lock
[x] Cancel search: lockPage 177 of 551
175
uuAdjusting the Seats uHead Restraints
Controls
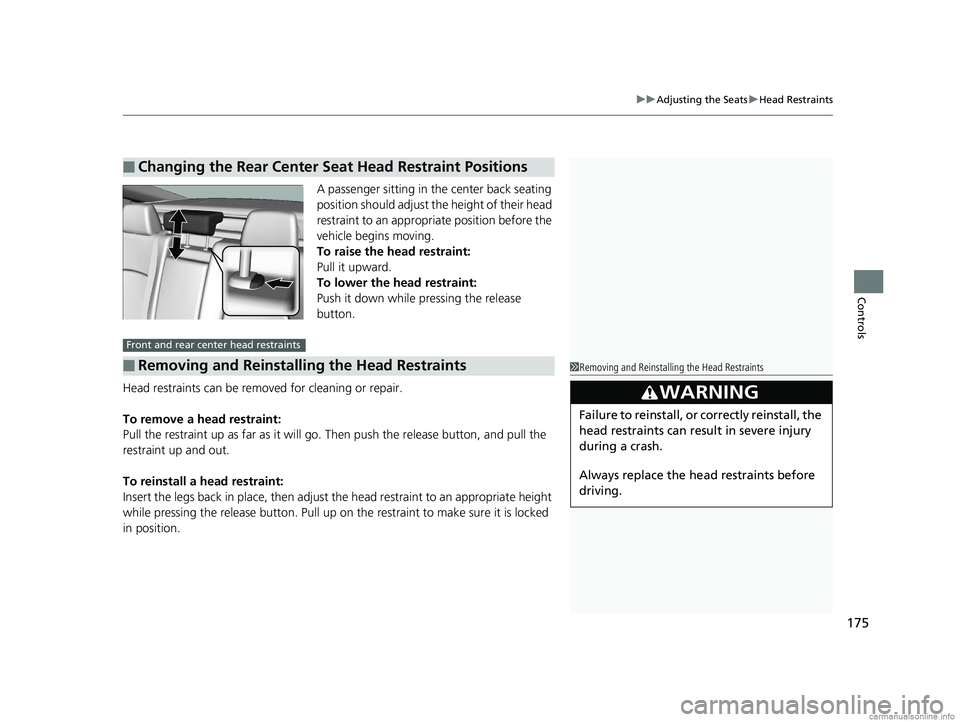
A passenger sitting in the center back seating
position should adjust the height of their head
restraint to an appropriate position before the
vehicle begins moving.
To raise the head restraint:
Pull it upward.
To lower the head restraint:
Push it down while pressing the release
button.
Head restraints can be removed for cleaning or repair.
To remove a head restraint:
Pull the restraint up as far as it will go. Then push the release button, and pull the
restraint up and out.
To reinstall a head restraint:
Insert the legs back in place, then adjust the head restraint to an appropriate height
while pressing the release button. Pull up on the restraint to make sure it is locked
in position.
■Changing the Rear Center Seat Head Restraint Positions
■Removing and Reinstalling the Head Restraints
Front and rear center head restraints
1 Removing and Reinstalling the Head Restraints
3WARNING
Failure to reinstall, or correctly reinstall, the
head restraints can result in severe injury
during a crash.
Always replace the he ad restraints before
driving.
18 CLARITY FUEL CELL PPO-31TRT6100.book 175 ページ 2017年11月21日 火曜日 午後3時3分
Page 180 of 551
178
Controls
Interior Lights/Interior Convenience Items
Interior Lights
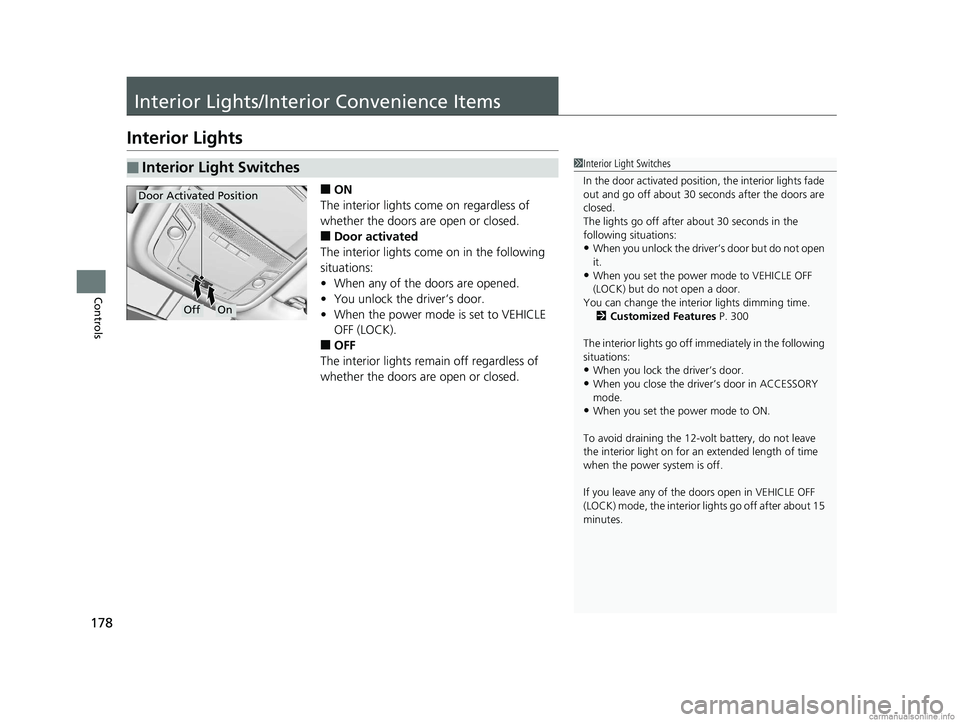
■ON
The interior lights come on regardless of
whether the doors are open or closed.
■Door activated
The interior lights come on in the following
situations:
• When any of the doors are opened.
• You unlock the driver’s door.
• When the power mode is set to VEHICLE
OFF (LOCK).
■OFF
The interior lights remain off regardless of
whether the doors are open or closed.
■Interior Light Switches1 Interior Light Switches
In the door activated position, the interior lights fade
out and go off about 30 se conds after the doors are
closed.
The lights go off after about 30 seconds in the
following situations:
•When you unlock the driver’s door but do not open
it.
•When you set the power mode to VEHICLE OFF
(LOCK) but do not open a door.
You can change the interi or lights dimming time.
2 Customized Features P. 300
The interior lights go off i mmediately in the following
situations:
•When you lock the driver’s door.
•When you close the driver’s door in ACCESSORY
mode.
•When you set the power mode to ON.
To avoid draining the 12-vo lt battery, do not leave
the interior light on for an extended length of time
when the power system is off.
If you leave any of the doors open in VEHICLE OFF
(LOCK) mode, the interior lights go off after about 15
minutes.
OffOn
Door Activated Position
18 CLARITY FUEL CELL PPO-31TRT6100.book 178 ページ 2017年11月21日 火曜日 午後3時3分
Page 192 of 551
uuClimate Control System uUsing Automatic Climate Control
190
Controls
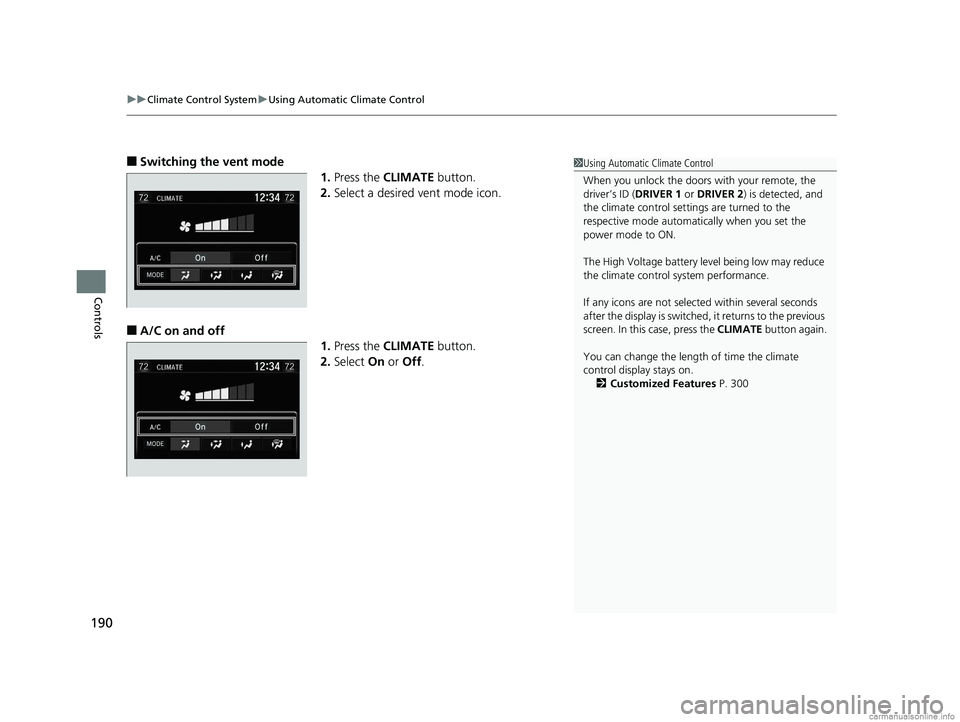
■Switching the vent mode
1.Press the CLIMATE button.
2. Select a desired vent mode icon.
■A/C on and off
1.Press the CLIMATE button.
2. Select On or Off .
1Using Automatic Climate Control
When you unlock the doors with your remote, the
driver’s ID (DRIVER 1 or DRIVER 2) is detected, and
the climate control settings are turned to the
respective mode automatically when you set the
power mode to ON.
The High Voltage battery level being low may reduce
the climate control system performance.
If any icons are not select ed within several seconds
after the display is switched, it returns to the previous
screen. In this case, press the CLIMATE button again.
You can change the length of time the climate
control display stays on. 2 Customized Features P. 300
18 CLARITY FUEL CELL PPO-31TRT6100.book 190 ページ 2017年11月21日 火曜日 午後3時3分
Page 197 of 551
195
uuClimate Control System uUsing Automatic Climate Control
Controls
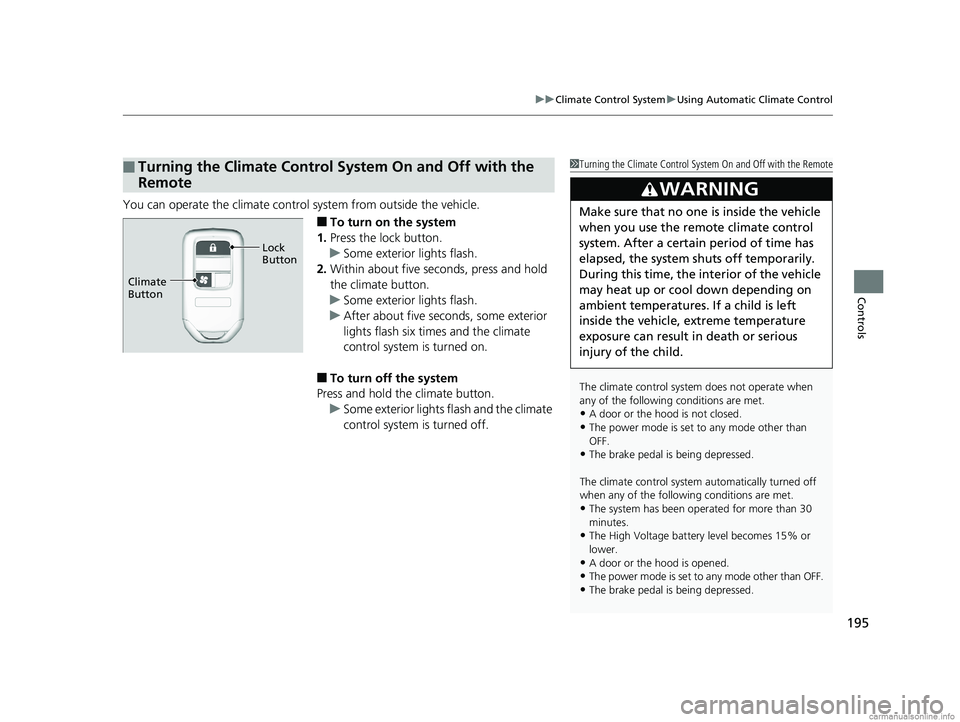
You can operate the climate control system from outside the vehicle.
■To turn on the system
1. Press the lock button.
u Some exterior lights flash.
2. Within about five seconds, press and hold
the climate button.
u Some exterior lights flash.
u After about five seconds, some exterior
lights flash six times and the climate
control system is turned on.
■To turn off the system
Press and hold th e climate button.
u Some exterior lights flash and the climate
control system is turned off.
■Turning the Climate Control System On and Off with the
Remote1Turning the Climate Control System On and Off with the Remote
The climate control system does not operate when
any of the following conditions are met.
•A door or the hood is not closed.
•The power mode is set to any mode other than
OFF.
•The brake pedal is being depressed.
The climate control system automatically turned off
when any of the following conditions are met.
•The system has been operated for more than 30
minutes.
•The High Voltage battery level becomes 15% or
lower.
•A door or the hood is opened.•The power mode is set to any mode other than OFF.
•The brake pedal is being depressed.
3WARNING
Make sure that no one is inside the vehicle
when you use the remote climate control
system. After a certain period of time has
elapsed, the system sh uts off temporarily.
During this time, the in terior of the vehicle
may heat up or cool down depending on
ambient temperatures. If a child is left
inside the vehicle, extreme temperature
exposure can result in death or serious
injury of the child.
Climate
Button Lock
Button
18 CLARITY FUEL CELL PPO-31TRT6100.book 195 ページ 2017年11月21日 火曜日 午後3時3分
Page 209 of 551
Continued207
uuAudio System Basic Operation uAudio/Information Screen
Features
■Info
Displays Trip Computer or Clock/Wallpaper . Select on the Info Menu screen
to see all available options: Trip Computer, Voice Info, Clock/Wallpaper ,
System/Device Information and Vehicle energy .
Trip Computer :
• Current Drive tab: Displays the current trip information.
• History of Trip A tab: Displays information for the three previous drives. The
information is stored every time you reset Trip A.
To delete the history manually, select Delete history on the History of Trip A
tab. The confirmation message appears on the screen, then select Yes.
Voice Info : Displays a list of all voice commands.
Clock/Wallpaper : Displays the clock and wallpaper.
System/Device Information :
• System Info : Displays the software version of the audio system.
• USB Info : Displays the memory usage of the USB device.
Vehicle energy :
Displays the ener gy flow screen.
2Energy flow screen P. 209
■Audio
Displays the current audio information.
1 Audio/Information Screen
Touchscreen operation
•Use simple gestures - in cluding touching, swiping
and scrolling - to operate certain audio functions.
•Some items may be grayed out during driving to
reduce the potential for distraction.
•You can select them when the vehicle is stopped or
use voice commands.
•Wearing gloves may limit or prevent touchscreen
response.
You can change the touchs creen sensitivity setting.
2 Customized Features P. 300
18 CLARITY FUEL CELL PPO-31TRT6100.book 207 ページ 2017年11月21日 火曜日 午後3時3分
Page 218 of 551
uuAudio System Basic Operation uAudio/Information Screen
216
Features
You can change, store, and delete the wallpaper on the audio/information screen.
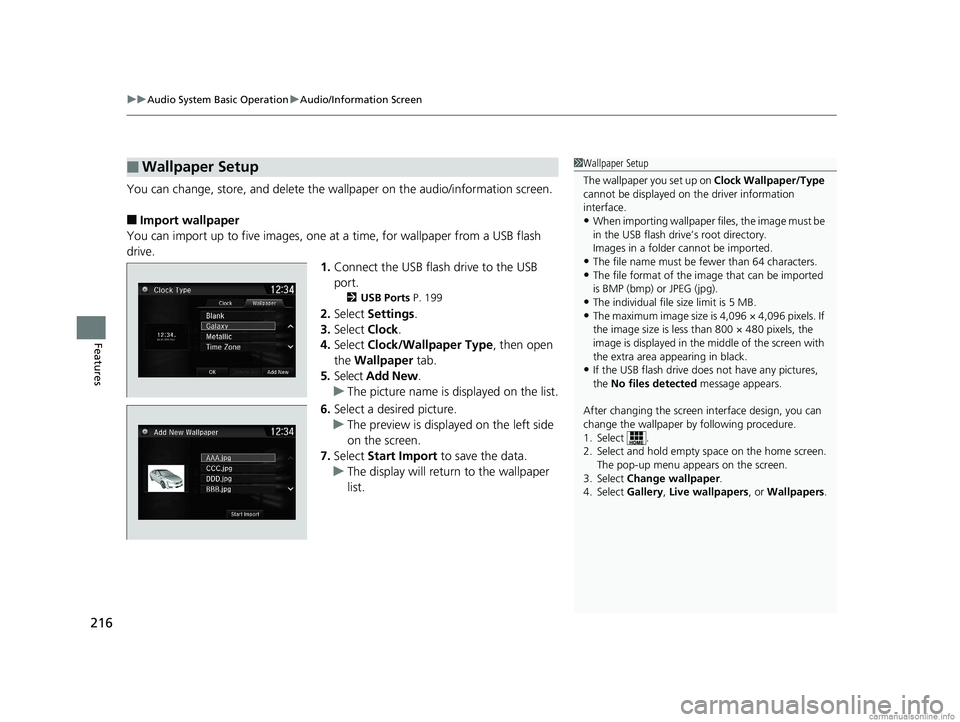
■Import wallpaper
You can import up to five images, one at a time, for wallpaper from a USB flash
drive.
1.Connect the USB flash drive to the USB
port.
2 USB Ports P. 199
2.Select Settings .
3. Select Clock.
4. Select Clock/Wallpaper Type , then open
the Wallpaper tab.
5. Select Add New .
u The picture name is displayed on the list.
6. Select a desired picture.
u The preview is displayed on the left side
on the screen.
7. Select Start Import to save the data.
u The display will return to the wallpaper
list.
■Wallpaper Setup1Wallpaper Setup
The wallpaper you set up on Clock Wallpaper/Type
cannot be displayed on th e driver information
interface.
•When importing wallpaper files, the image must be
in the USB flash driv e’s root directory.
Images in a folder cannot be imported.
•The file name must be fewer than 64 characters.•The file format of the im age that can be imported
is BMP (bmp) or JPEG (jpg).
•The individual file size limit is 5 MB.•The maximum image size is 4,096 × 4,096 pixels. If
the image size is less than 800 × 480 pixels, the
image is displayed in the middle of the screen with
the extra area appearing in black.
•If the USB flash drive doe s not have any pictures,
the No files detected message appears.
After changing the screen interface design, you can
change the wallpaper by following procedure.
1. Select .
2. Select and hold empty space on the home screen. The pop-up menu appears on the screen.
3. Select Change wallpaper .
4. Select Gallery, Live wallpapers , or Wallpapers.
18 CLARITY FUEL CELL PPO-31TRT6100.book 216 ページ 2017年11月21日 火曜日 午後3時3分
Page 219 of 551
Continued217
uuAudio System Basic Operation uAudio/Information Screen
Features
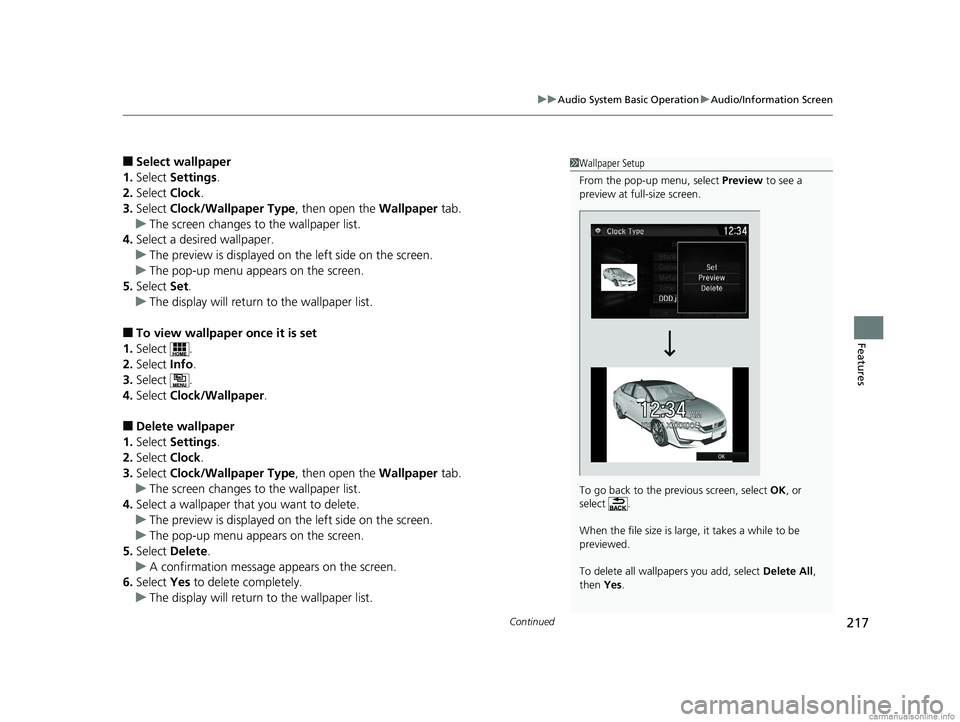
■Select wallpaper
1. Select Settings .
2. Select Clock.
3. Select Clock/Wallpaper Type , then open the Wallpaper tab.
u The screen changes to the wallpaper list.
4. Select a desired wallpaper.
u The preview is displayed on the left side on the screen.
u The pop-up menu appears on the screen.
5. Select Set.
u The display will return to the wallpaper list.
■To view wallpaper once it is set
1. Select .
2. Select Info.
3. Select .
4. Select Clock/Wallpaper .
■Delete wallpaper
1. Select Settings .
2. Select Clock.
3. Select Clock/Wallpaper Type , then open the Wallpaper tab.
u The screen changes to the wallpaper list.
4. Select a wallpaper that you want to delete.
u The preview is displayed on the left side on the screen.
u The pop-up menu appears on the screen.
5. Select Delete .
u A confirmation message appears on the screen.
6. Select Yes to delete completely.
u The display will return to the wallpaper list.
1Wallpaper Setup
From the pop-up menu, select Preview to see a
preview at full-size screen.
To go back to the previous screen, select OK, or
select .
When the file size is large, it takes a while to be
previewed.
To delete all wallpapers you add, select Delete All,
then Yes.
18 CLARITY FUEL CELL PPO-31TRT6100.book 217 ページ 2017年11月21日 火曜日 午後3時3分
Page 283 of 551
281Continued
Features
General Information on the Audio System
SiriusXM® Radio Service
1.You need your radio ID ready before registering for subscription. To see the ID on
the screen, select Channel 0.
2. Have your radio ID ready, and either call SiriusXM ® or visit the SiriusXM® website
to subscribe.
Switch to the SiriusXM ® mode by using the or button on the steering wheel,
or through the audio/information screen, and stay in this mode for about 30
minutes until the service is activated. Make sure your vehicle is in an open area with
good reception.
■Subscribing to SiriusXM ® Radio
■Receiving SiriusXM ® Radio
1 Subscribing to SiriusXM ® Radio
Contact Information for SiriusXM ® Radio:
SiriusXM ® Radio at www.siriusxm.com/
subscribenow , or 1-866-635-2349
1Receiving SiriusXM ® Radio
The SiriusXM ® satellites are in orbit over the equator;
therefore, objects south of the vehicle may cause
satellite reception interruptions. Sa tellite signals are
more likely to be blocked by tall buildings and
mountains the farther north you travel from the
equator.
You may experience rece ption problems under the
following circumstances:
•In a location with an obstruction to the south of
your vehicle.
•In tunnels
•On the lower level of a multi-tiered road•Large items carried on the roof rack
34
18 CLARITY FUEL CELL PPO-31TRT6100.book 281 ページ 2017年11月21日 火曜日 午後3時3分