Page 153 of 232
 To extract the spare wheel B fig. 252:with tool A fig. 251 completely undo
nut 5 fig. 252 (right side) and partially
undo nut 3 fig. 252 (left side) in order to
free the basket 4 fig. 252 from nut 3;")
To extract the spare wheel B fig. 252:with tool A fig. 251 completely undo
nut 5 fig. 252 (right side) and partially
undo nut 3 fig. 252 (left side) in order to
free the basket 4 fig. 252 from nut 3;
free the spare wheel.
Depending on the version, there is
documentation with the instructions
described above in the tool box.
To put spare tyre B fig. 252 back in
place, proceed in the reverse order.
Check that bracket 4 is positioned
correctly before tightening nuts 3 and 5
fig. 252.IMPORTANT In some cases (rear wheel
puncture, vehicle loaded with tow
system) you may need to lift the vehicle
up (from the closest lifting point to the
tyre concerned) to be able to access
the spare tyre.
Wheel plate
Remove wheel plate 9 using wrench 5
fig. 253, inserting the hook in one of the
plate's outside openings.
To refit the plate, position it with respect
to valve 10 fig. 253.
Insert the retaining hooks starting from
the side of valve A, then B and C,
ending with the side opposite valve D
fig. 253.Remove wheel plate 11 fig. 254 with
wrench 5 by inserting the hook in the its
peripheral opening.
To refit it, position the five wheel plate
fasteners corresponding to the 5 fixing
screws fig. 254 and press hard on the
centre of the wheel plate to hook it to
the wheel.
251T36688252T36689253T36693
254T36694
151
Page 154 of 232
 Replacing a wheel
Undo the wheel nuts with wrench 1
fig. 255.
Position the jack 2 fig. 256 horizontally
so that its head 3 fig. 256 coincides
with the hole under the chassis nearest
to the wheel conce")
Replacing a wheel
Undo the wheel nuts with wrench 1
fig. 255.
Position the jack 2 fig. 256 horizontally
so that its head 3 fig. 256 coincides
with the hole under the chassis nearest
to the wheel concerned.
Start raising the jack to rest the base
correctly (it should be slightly under the
vehicle and aligned with the jack head).
Undo the nuts and remove the tyre.
Position the spare tyre in the centre of
the hub.
Tighten the nuts and lower the jack.
When the tyre is on the ground, tighten
the screws hard and check their
tightness as soon as possible.IMPORTANT If you are using
tamper-proof screws, position them as
close as possible to the valve (it could
be impossible to fit the wheel plate).
WARNING
167)Activate hazard warning lights Park
the vehicle far from traffic on level, resistant
and not slippery ground. Pull up the
handbrake and engage a gear. Get all the
occupants out of the car and far from
traffic.
168)It is extremely dangerous to attempt
to change a wheel on the side of the
vehicle next to the driving lane: make sure
that the vehicle is at a sufficient distance
from the road, to avoid being run over.
169)Use your hazard lights, warning
triangle, etc to show that your vehicle is
stationary. Passengers should get out of
the vehicle, particularly if it is heavily
loaded, and wait for the wheel to be
changed away from the traffic.170)The spare tyre is not the same size as
the other four. Never fit more than one
spare tyre on the same vehicle. The
standard wheel is larger than the spare
wheel, so the vehicle will be lower. Replace
the spare tyre as soon as possible with a
tyre identical to the original. While in use,
which has to be temporary, your speed
should not exceed that indicated on the
wheel's label. If you have to use snow
chains, fit the spare tyre on the rear axle
and check the tyre pressures. Fitting this
tyre can alter the vehicle's normal
behaviour. Avoid accelerating or braking
abruptly and lower your speed on curves.
171)Never leave tools haphazardly in the
vehicle: if you brake suddenly, they could
scatter around the floorboards, causing a
hazard to the occupants. After use, be sure
to fasten the tools in the tool bag, then
place it correctly in its position: risk of
injuries. The jack must only be used for
changing a wheel. It should never be used
to raise the vehicle to perform a repair
underneath.
172)There should be no objects at the
driver's feet: in case of sharp braking, they
could slide under the pedals, preventing
their correct use.
255T36695
256T36696
152
IN AN EMERGENCY
Page 155 of 232
 TYRE INFLATION KIT
173)
32) 33) 34) 35) 36) 37) 38)
To take the kit out, move the seat as far
forward as possible and lower the
backrest.
Undo the tool bag fixing screw C
fig. 258 and then turn the ba")
TYRE INFLATION KIT
173)
32) 33) 34) 35) 36) 37) 38)
To take the kit out, move the seat as far
forward as possible and lower the
backrest.
Undo the tool bag fixing screw C
fig. 258 and then turn the bag to
remove it.Precautions for using the kit
The kit must not be used for more than
15 consecutive minutes.
With the engine started and the
handbrake engaged;unwind the hose from the canister;
connect compressor hose 3
fig. 259 to the canister 8,
depending on the versions, connect
or screw in canister 8 to the
compressor where there is a hollow 7
fig. 259;
unscrew the tyre valve cap involved
and screw the inflation hose 1 fig. 259;
disconnect all the accessories
previously connected to the accessory
socket;
only connect plug 2 fig. 259 to the
vehicle’s accessory socket;
press switch 4 fig. 259 to inflate the
tyre to the prescribed pressure (refer to
the "Tyre inflation pressure” paragraph
in the “Maintenance and care” chapter);
after 15 minutes at most, stop
inflating;
NOTE While emptying the canister
(about 30 seconds), the pressure gauge
5 fig. 259 briefly indicates a pressure of
up to 6 bar, then it goes back down
again.
adjust the pressure: to increase it,
continue inflating the tyre with the kit; to
lower it, press button 6 fig. 259.
If after 15 minutes a minimum pressure
of 1.8 bar has not been reached, it
means that you cannot repair the tyre;
do not drive and contact a Fiat
Dealership.
Once the tyre has been correctly
inflated, remove the kit: slowly unscrew
the inflation hose 1 fig. 259 so the
product does not spatter and replace
the canister in a plastic bag so that the
product does not leak out.
Attach the instruction label on the
dashboard where the driver can see it;
replace the kit in the tool bag and put
it back under the driver's seat;
when the first inflation has been
done, the tyre will continue to lose air
and you need to start driving again to
plug the hole;
leave immediately and drive at a
speed between 20 and 60 km/h to
uniformly distribute the product on the
tyre and, after 3 kilometres, stop to
check the pressure;
257T32788
258T36718
259T35749
153
Page 156 of 232
 if the pressure is greater than 1.3 bar
but less than prescribed, you need to
adjust it (see the label attached to the
driver's door pillar), otherwise see a Fiat
Dealership: you cannot repair it.")
if the pressure is greater than 1.3 bar
but less than prescribed, you need to
adjust it (see the label attached to the
driver's door pillar), otherwise see a Fiat
Dealership: you cannot repair it.
WARNING
173)There should be no objects at the
driver's feet: in case of sharp braking, they
could slide under the pedals, preventing
their correct use.
IMPORTANT
32)The kit can repair tyres whose treads A
fig. 257 are damaged by foreign objects
smaller than 4 millimetres. It cannot repair
all types of puncture, such as cuts larger
than 4 millimetres and those on side B
fig. 257 of the tyre. Also make sure the rims
are in good condition. Do not remove the
foreign object that caused the puncture if it
is implanted in the tyre.33)Do not use the inflation kit if the tyre is
damaged by driving with a puncture. Check
the tyre sides carefully before any
intervention. Travelling with partially or
completely deflated tyres (or punctured)
can cause safety problems and damage
the concerned tyre beyond repair. This
reparation is temporary. A tyre that has
been punctured must be examined (and
repaired if possible) by a specialist as soon
as possible. When replacing a tyre repaired
by the kit, always notify the tyre repairer.
When driving, you can feel vibrations
caused by the product being in the tyre.
34)The kit is approved only for inflating
tyres of vehicles that were originally
equipped with it. It should never be used to
inflate another vehicle's tyres or any other
object (life vests, inflatable mattresses,
etc.). Avoid splashing on skin when using
the repair canister. If the product comes in
contact with skin, rinse thoroughly. Keep
the kit out of the reach of children. Do not
leave empty canister in the environment.
Deliver it to a Fiat Dealership or to a
consortium specialised in its disposal. The
canister has an expiration date indicated on
the label. Check the expiration date. Go to
a Fiat Dealership to replace the inflation
hose and repair canister.
35)Before using the kit, park the vehicle so
it is sufficiently far from traffic, turn on the
emergency lights, pull up the handbrake
and get all the occupants out of the vehicle,
moving them far away from the traffic.
36)In case you are stopped by the
carriageway, warn other road users that
your vehicle is there by placing the warning
triangle or other device allowed by law in
the country you are driving in.37)Caution, a missing or badly screwed on
valve cap could impact the tyre's grip and
cause a loss of pressure. The valve caps
must all be identical to the original ones
and screwed tightly.
38)After repair using the kit, do not drive
farther than 200 km. In addition, lower your
speed, and in any case do not exceed
80 km/h. The label is to be attached in a
visible part of the dashboard. Depending
on the market country or local laws, a tyre
repaired with the inflation kit must be
replaced.
154
IN AN EMERGENCY
Page 157 of 232
 JUMP STARTING
174) 175) 176) 177) 178)
39)
Starting the engine that supplies
electrical power and keeping it at
medium speed.
To start, if you use the battery from
another vehicle, you need to have th")
JUMP STARTING
174) 175) 176) 177) 178)
39)
Starting the engine that supplies
electrical power and keeping it at
medium speed.
To start, if you use the battery from
another vehicle, you need to have the
right cables (large size) from a Fiat
Dealership or, if you already have them,
make sure they are in perfect condition.
The two batteries have to have nominal
identical voltage: 12 Volt The battery
that supplies the power has to have a
capacity (amperes/hour, Ah) that is at
least identical to the dead battery.
Make sure that there is no contact
between the two vehicles (risk of short
circuit at the moment the positive poles
are in contact) and that the dead
battery is well connected. Disengage
the starter device.Depending on the versions, unhook the
battery guard.
Connect positive cable A fig. 260 to
terminal 1 (+) fig. 260 then to terminal 4
(+) fig. 260 of the battery supplying the
power.
Connect negative cable B fig. 260 to
terminal 3 (-) fig. 260 from the battery
supplying power, then to terminal 2 (-)
fig. 260 of the dead battery.
Start the engine and as soon as it turns
over, disconnect cables A and B in
reverse order (2-3-4-1) .
WARNING
174)Check that the wires A and B are not
touching and that the positive cable A does
not touch any metal component of the
vehicle providing the current. You risk injury
and/or damage to the vehicle.175)Before opening the bonnet, make
sure that the engine is off and that the
ignition key is in the "S" (Stop) position.
Follow the indications on the plate
underneath the bonnet.
176)Do not get too close to the radiator
cooling fan: the electric fan may start;
danger of injury. Scarves, ties and other
loose clothing might be pulled by moving
parts.
177)Remove any metal objects (e.g. rings,
watches, bracelets), that might cause an
accidental electrical contact and cause
serious injury.
178)The batteries contain acid that can
burn skin or eyes. Batteries produce
hydrogen, which is easily flammable and
explosive. Therefore, keep away flames or
devices which may cause sparks.
IMPORTANT
39)Never use a fast battery-charger to
start the engine as this could damage the
electronic systems of your vehicle,
particularly the ignition and engine fuel
supply control units.
260T36708
261T36629
155
Page 158 of 232
 BATTERY
RECHARGING
179) 180) 181) 182)
40)
To avoid risk of sparks:Make sure the \"electrical users\"
(courtesy lights, etc.) are disconnected
before disconnecting or reconnecting a
battery.
if")
BATTERY
RECHARGING
179) 180) 181) 182)
40)
To avoid risk of sparks:Make sure the "electrical users"
(courtesy lights, etc.) are disconnected
before disconnecting or reconnecting a
battery.
if you want to recharge the battery,
turn off the battery charger before
connecting or disconnecting the
battery;
do not place metal objects on the
battery, to prevent a short circuit
between terminals;
wait at least one minute after turning
off the engine to disconnect the battery;
check that the terminals have been
reconnected correctly after refitting.
Connecting a battery charger
The battery charger has to be
compatible with a nominal voltage of
12 Volts.
Do not disconnect the battery while the
engine is started. Follow the battery
charger manufacturer's instructions for
the battery you plan to use.
WARNING
179)Handle the battery carefully, because
it contains sulphuric acid that must not
come into contact with eyes or skin. If that
happens, rinse thoroughly with water. If
necessary, see a doctor. Keep open
flames, incandescent items and sources of
sparks far from the battery's elements: risk
of explosion. When you intervene near the
engine, this last could be hot. Moreover,
the cooling fan could start up at any time.
Risk of injury.
180)Some batteries can have specific
recharging rules, please ask for information
at a Fiat Dealership. Avoid the risk of
sparks that could cause an immediate
explosion. Charge in a well ventilated
place. Danger of serious injury.
181)Battery fluid is poisonous and
corrosive: avoid contact with your skin and
eyes. The battery should be charged in a
well ventilated place, away from naked
flames or possible sources of sparks:
danger of explosion and fire.
182)Do not attempt to charge a frozen
battery: it must be thawed first, otherwise it
may explode. If freezing has occurred, the
battery should be checked by skilled
personnel to make sure that the internal
elements are not damaged and that the
body is not cracked, with the risk of leaking
poisonous and corrosive acid.
IMPORTANT
40)The engine must be stopped before
performing any operation in the engine
compartment.
156
IN AN EMERGENCY
Page 159 of 232
 TOWING THE
VEHICLE
183) 184) 185)
41) 42) 43)
The steering wheel should not be
locked; the starter device has to be in
position \"M\" (ignition) to allow signalling
(\"Stop\" lights, emerg")
TOWING THE
VEHICLE
183) 184) 185)
41) 42) 43)
The steering wheel should not be
locked; the starter device has to be in
position "M" (ignition) to allow signalling
("Stop" lights, emergency lights). At
night the outside vehicle lighting must
remain on.
Detach the trailer where there is one.
Moreover, you have to comply with the
towing conditions, defined by the
regulations in force in the country you
are in.
Contact a Fiat Dealership.
Never use the gear or drive shafts to
tow the vehicle.
Use the rings exclusively for towing; in
no case must they be used to lift the
vehicle up, directly or indirectly.
In the rear part use exclusively:
for vehicles without a tow hook, tow
point 2 fig. 262;
for vehicles with a tow hook, tow
point 3 fig. 263.
To mount the towing knob 3, please
see the installation instructions for the
equipment.In the front part use exclusively:The tow ring 6 fig. 264 (located in the
tool bag) and tow point 4.Front tow point
Use a screwdriver to release the
protection 5 fig. 264.
Fully tighten the tow ring 4 fig. 264: (first
by hand, then use the tyre wrench).
WARNING
183)Before towing, turn the starter device
to M position and then to S without
extracting it. The steering column will
automatically lock when the key is removed
and the wheels cannot be steered.
184)Before tightening the tow ring, clean
the relative threaded hole thoroughly. Make
sure that the ring is fully fastened in the
housing before towing the vehicle. Do not
start the engine whilst the vehicle is being
towed.
262T36697
263T36698
264T36699
157
Page 160 of 232
 185)When towing, remember that greater
effort is required on the brake pedal in
order to brake, since the brake servo is not
providing assistance. Do not use flexible
cables when towing and avoid jerk")
185)When towing, remember that greater
effort is required on the brake pedal in
order to brake, since the brake servo is not
providing assistance. Do not use flexible
cables when towing and avoid jerky
movements. During towing operations,
make sure that the fastened joint does not
damage adjoining components. When
towing the vehicle, it is necessary to obey
specific road regulations which relate both
to the towing device as well as to the
behaviour to adopt on the road. Do not
start the engine whilst the vehicle is being
towed.
IMPORTANT
41)With the engine stopped, the power
steering and power brakes no longer work.
42)Do not take the starter device from the
starter switch or reader while towing.
43)The front and rear tow hooks should be
used only for emergencies on the road. You
are allowed to tow the vehicle for short
distances using an appropriate device in
accordance with the highway code (a rigid
bar), to move the vehicle on the road in
readiness for towing or transport via a
breakdown vehicle. Tow rings MUST NOT
be used to tow vehicles off the road or
where there are obstacles and/or for
towing operations using cables or other
non-rigid devices. In compliance with the
above conditions, towing must take place
with the two vehicles (one towing, the other
towed) aligned as much as possible along
the same centre line.
158
IN AN EMERGENCY
 1
1 2
2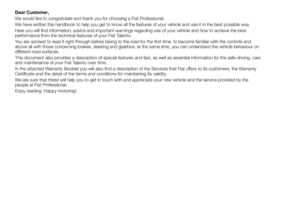 3
3 4
4 5
5 6
6 7
7 8
8 9
9 10
10 11
11 12
12 13
13 14
14 15
15 16
16 17
17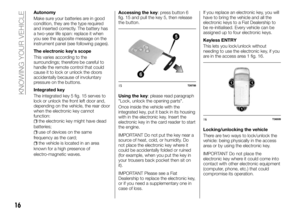 18
18 19
19 20
20 21
21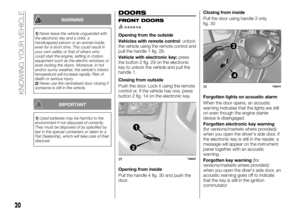 22
22 23
23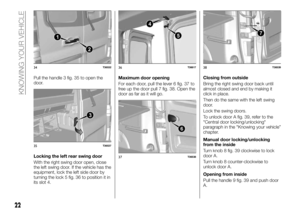 24
24 25
25 26
26 27
27 28
28 29
29 30
30 31
31 32
32 33
33 34
34 35
35 36
36 37
37 38
38 39
39 40
40 41
41 42
42 43
43 44
44 45
45 46
46 47
47 48
48 49
49 50
50 51
51 52
52 53
53 54
54 55
55 56
56 57
57 58
58 59
59 60
60 61
61 62
62 63
63 64
64 65
65 66
66 67
67 68
68 69
69 70
70 71
71 72
72 73
73 74
74 75
75 76
76 77
77 78
78 79
79 80
80 81
81 82
82 83
83 84
84 85
85 86
86 87
87 88
88 89
89 90
90 91
91 92
92 93
93 94
94 95
95 96
96 97
97 98
98 99
99 100
100 101
101 102
102 103
103 104
104 105
105 106
106 107
107 108
108 109
109 110
110 111
111 112
112 113
113 114
114 115
115 116
116 117
117 118
118 119
119 120
120 121
121 122
122 123
123 124
124 125
125 126
126 127
127 128
128 129
129 130
130 131
131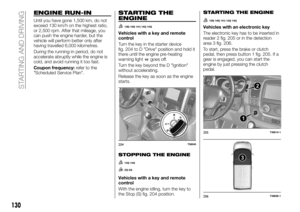 132
132 133
133 134
134 135
135 136
136 137
137 138
138 139
139 140
140 141
141 142
142 143
143 144
144 145
145 146
146 147
147 148
148 149
149 150
150 151
151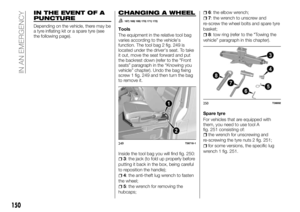 152
152 153
153 154
154 155
155 156
156 157
157 158
158 159
159 160
160 161
161 162
162 163
163 164
164 165
165 166
166 167
167 168
168 169
169 170
170 171
171 172
172 173
173 174
174 175
175 176
176 177
177 178
178 179
179 180
180 181
181 182
182 183
183 184
184 185
185 186
186 187
187 188
188 189
189 190
190 191
191 192
192 193
193 194
194 195
195 196
196 197
197 198
198 199
199 200
200 201
201 202
202 203
203 204
204 205
205 206
206 207
207 208
208 209
209 210
210 211
211 212
212 213
213 214
214 215
215 216
216 217
217 218
218 219
219 220
220 221
221 222
222 223
223 224
224 225
225 226
226 227
227 228
228 229
229 230
230 231
231