Page 57 of 302

CAUTION!
To avoid damage to the mirror during cleaning, never
spray any cleaning solution directly onto the mirror.
Apply the solution onto a clean cloth and wipe the
mirror clean.
Power Mirrors
The power mirror controls are located on the driver ’s door
trim panel.The power mirror controls consist of a mirror select switch
and a four-way mirror control switch. To adjust a mirror,
push the mirror select switch to either the L (left) or R
(right) to select the mirror you need to adjust.
Using the mirror control switch, push on any of the four
arrows for the direction that you want the mirror to move.WARNING!
Vehicles and other objects seen in the passenger side
convex mirror will look smaller and farther away than
they really are. Relying too much on your passenger
side convex mirror could cause you to collide with
another vehicle or other object. Use your inside mirror
when judging the size or distance of a vehicle seen in
the passenger side convex mirror.
Folding Mirrors
The exterior mirrors are hinged to allow the mirror to pivot
forward or rearward to help avoid damage. The mirror has
three detent positions: full forward, normal and full rear-
ward.
Power Mirror Switches
3
GETTING TO KNOW YOUR VEHICLE 55
Page 58 of 302
Spotter Mirror — If Equipped
Some models are equipped with a driver’s side spotter
mirror. The spotter mirror allows for a greater range of
visibility on the driver’s side of the vehicle.
Heated Mirrors — If Equipped
These mirrors are heated to melt frost or ice. This
feature will be activated whenever you turn on the
rear window defroster (if equipped). Refer to “Climate
Controls” in “Getting To Know Your Vehicle” for further
information.
EXTERIOR LIGHTS
Multifunction Lever
The multifunction lever, located on the left side of the
steering wheel, controls the operation of the headlights,
headlight beam selection, passing light and turn signals.
NOTE: The headlights can only be turned on with the
ignition in the ON/RUN position.
Headlights
Rotate the end of the multifunction lever upward
to the first detent for headlight operation.
Spotter Mirror
Headlight Operation
56 GETTING TO KNOW YOUR VEHICLE
Page 59 of 302

NOTE:When the headlights are turned on, the Daytime
Running Lights will be deactivated.
Daytime Running Lights
To activate the Daytime Running Lights (DRL), rotate the
end of the multifunction lever to the Osymbol.
NOTE: The low beams and side/taillights will not be on
with DRL.
If allowed by law in the country in which the vehicle was
purchased the DRL function can be turned on or off using
the display menus. Refer to “Uconnect Settings” in “Mul-
timedia” for further information.
High Beams
With the low beams activated, push the multifunc-
tion lever towards the instrument panel to turn on
the high beams. Pull the multifunction lever toward the
steering wheel to turn off the high beams.
Flash-To-Pass
You can signal another vehicle with your headlights by
partially pulling the multifunction lever toward the steer-
ing wheel. This will cause the high beam headlights to turn
on until the lever is released.
Parking Lights
To turn on the parking lights, remove the key or
turn the ignition to OFF/LOCK position and
turn on the headlights.
Follow Me Home/Headlight Delay
When this feature is selected, the driver can choose to have
the headlights remain on for a preset period of time.
Activation
Remove the key or turn the ignition to the STOP (OFF/
LOCK) position, and pull the multifunction lever toward
the steering wheel within two minutes. Each time the lever
is pulled, the activation of the lights will be extended by 30
seconds. The activation of the lights can be extended to a
maximum of 210 seconds.
Deactivation
Pull the multifunction lever toward the steering wheel and
hold it for more than two seconds.
Fog Lights — If Equipped
The fog light switch is located on the center stack of the
instrument panel, just below the radio.
3
GETTING TO KNOW YOUR VEHICLE 57
Page 60 of 302
Push the switch once to turn the front fog lights on. Push
the switch a second time to turn the front fog lights off.
Turn Signals
Push the multifunction lever upward to signal a right turn
or downward to signal a left turn. The corresponding
indicator in the instrument cluster display will blink to
indicate the operation of the turn signal.NOTE:
The indicators will automatically turn off when the
turn has been completed and the steering wheel is returned
to a straight position.Lane Change Assist
Tap the lever up or down once, without moving beyond
the detent, and the turn signal (right or left) will flash three
times. Then, the turn signal (right or left) will automatically
turn off.
Fog Light SwitchTurn Signal Operation
58 GETTING TO KNOW YOUR VEHICLE
Page 61 of 302

INTERIOR LIGHTS
The interior light switches are located in the overhead
console. The interior lights can be set to three different
positions (Off/Left Position, Center Position, On/Right
Position).
Using the switch on the left overhead, push the switch to
the right from its center position and the lights are always
on. Push the switch to the left from its center position and
the lights are always off. Leave the switch in the center
position, and the lights are turned on and off when the
doors are opened or closed. The switch on the right side of
the overhead console controls the map or reading function
of the lights. Push the switch to the right to turn on the
right light and push the switch to the left to turn on the left
light.
CAUTION!
Before getting out of the vehicle be sure that the switch
is in the center position or that the lights are off to
avoid draining the battery.
Interior Light Timing (Center Position)
There are four different modes of operation that can be
activated in this position:
•When one door is opened, a three minute timer is
activated.
• When the key is removed from the ignition (within two
minutes of the ignition being turned OFF), a 10 second
timer is activated.
• When the doors are unlocked with the key fob, a 10
second timer is activated.
• When the doors are locked with the key fob, the lights
will turn off.
Interior Light Timing (On/Right Position)
When all doors are closed a 15-minute timer is activated.
NOTE: The timer is deactivated when the key is moved
into the ON/RUN position.
3
GETTING TO KNOW YOUR VEHICLE 59
Page 62 of 302

Dimmer Control
The brightness of the instrument panel lighting can be
regulated by pushing the buttons on the right side of the
instrument cluster. The (+) button increases the brightness
and the (-) button decreases the brightness. You can control
brightness of the radio by itself or the entire instrument
panel. Refer to “Uconnect Settings” in “Multimedia” for
more information.
Ambient Light
The vehicle is equipped with ambient light on the center
stack. The ambient light will be on when the headlights are
turned on by rotating the end of the multifunction lever.
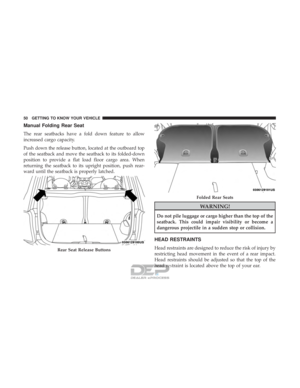
Cargo Area Lights
There is also a courtesy light located in the rear cargo area.
Whenever the rear lift gate is opened, the light will turn on
and then turn off when the lift gate is closed.
WIPERS AND WASHERS
The windshield wiper/washer lever is located on the right
side of the steering column.
NOTE:The windshield wipers/washers will only operate
with the ignition in the ON/RUN position.
Cargo Light Location
60 GETTING TO KNOW YOUR VEHICLE
Page 63 of 302
Front Windshield Wiper Operation
There are four different modes of operation for the front
windshield wipers. The windshield wiper lever can be
raised or lowered to access these modes:Low Speed
Push the lever downward to the second detent. The wipers
will operate at low speed.
High Speed
Push the lever downward to the third detent. The wipers
will operate at high speed.
Windshield Wiper Off
This is the normal position of the wiper lever.
Intermittent Wiper Operation
Push the lever downward to the first detent. The wipers
will operate intermittently.
NOTE:
The Intermittent function only has one detent, but
wiper delay will vary with changes in vehicle speed. As
vehicle speed increases, the delay time will decrease.
Windshield Wiper Operation
3
GETTING TO KNOW YOUR VEHICLE 61
Page 64 of 302

Front Windshield Washer Operation
Pull the windshield wiper/washer lever toward the steer-
ing wheel to activate the washers. The wipers will activate
automatically for three cycles after the lever is released.
CAUTION!
•Turn the windshield wipers off when driving
through an automatic car wash. Damage to the wind-
shield wipers may result if the wiper control is left in
any position other than off.
• In cold weather, always turn off the wiper switch and
allow the wipers to return to the park position before
turning off the vehicle. If the wiper switch is left on
and the wipers freeze to the windshield, damage to
the wiper motor may occur when the vehicle is
restarted.
• Always remove any buildup of snow that prevents
the windshield wiper blades from returning to the
off position. If the windshield wiper control is
turned off and the blades cannot return to the off
position, damage to the wiper motor may occur.
Manual High Speed/Mist
Push the lever upward from the off position. The wipers
will operate at high speed to clear off road mist or spray
from a passing vehicle. This operation will continue until
the lever is released. When the lever is released, the wipers
will return to the off position and automatically shut off.
Rear Windshield Wiper
Rotate the end of the windshield wiper/washer lever
upward to the first detent past the intermittent settings for
intermittent wipe operation. With the front windshield
wiper active, rotate the end of the windshield wiper/
washer lever upward. The rear wiper will operate in the
same mode as the front windshield wipers, but at half the
frequency. When the transmission is placed into REVERSE,
the rear wiper will automatically operate at Low Speed and
return to normal operation when the transmission is placed
out of REVERSE.
62 GETTING TO KNOW YOUR VEHICLE