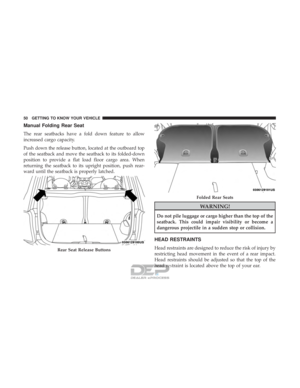
Page 169 of 302

Audible And Visual Signals Supplied By The Rear Park Assist System
SIGNALMEANING INDICATION
Obstacle Distance An obstacle is present within the
sensors’ field of view Audible Signal
(dashboard loudspeaker)
• Sound pulses emitted at a rate that increases as the dis-
tance decreases.
• Emits continuous tone at 12 inches (30 cm).
• Adjustable volume level. (Refer to “Instrument Cluster
Display” in “Getting To Know Your Instrument Panel” for further information).
Failure Sensor or System failures Visual Signal(instrument panel)
• Icon appears on display.
• Message is displayed on the instrument cluster display
(if equipped).
While audible signals are emitted, the audio system is not
muted.
The audible signal is turned off immediately if the distance
increases. The tone cycle remains constant if the distance
measured by the inner sensors is constant. If this condition
occurs for the external sensors, the signal is turned off after
3 seconds (stopping warnings during maneuvers parallel
to walls).
Failure Indications
A malfunction of the Rear Park Assist sensors or system is
indicated, during REVERSE gear engagement, by the in-
strument panel warning icon and message appearing on
the instrument cluster display. The warning icon is illuminated and a message
appears on the instrument cluster display. Refer
toInstrument Cluster Display in “Getting To
Know Your Instrument Panel” for further
information.
6
STARTING AND OPERATING 167
Page 170 of 302

The sensors and wiring are tested continuously when the
ignition is in the ON/RUN position. Failures are indicated
immediately if they occur when the system is on.
Even if the system is able to identify that a specific sensor
is in failure condition, the instrument cluster display shall
indicate that the Rear Park Assist system is unavailable,
without reference to the sensor in failure condition. If even
a single sensor fails, the entire system must be disabled.
The system is turned off automatically.
Cleaning The Rear Park Assist System
Clean the Rear Park Assist sensors with water, car wash
soap and a soft cloth. Do not use rough or hard cloths. In
washing stations, clean sensors quickly keeping the vapor
jet/high pressure washing nozzles at least 4 inches (10 cm)
from the sensors. Do not scratch or poke the sensors.
Otherwise, you could damage the sensors.
Park Assist System Usage Precautions
NOTE:
•Ensure that the outer surface and the underside of the
rear bumper is clean and clear of snow, ice, mud, dirt or
other obstruction to keep the Rear Park Assist system
operating properly. •
Jackhammers, large trucks, and other vibrations could
affect the performance of Rear Park Assist.
• Clean the Rear Park Assist sensors regularly, taking care
not to scratch or damage them. The sensors must not be
covered with ice, snow, slush, mud, dirt or debris.
Failure to do so can result in the system not working
properly. The Rear Park Assist system might not detect
an obstacle behind the fascia/bumper, or it could pro-
vide a false indication that an obstacle is behind the
fascia/bumper.
• Objects such as bicycle carriers, etc., must not be placed
within 12 inches (30 cm) from the rear fascia/bumper
while driving the vehicle. Failure to do so can result in
the system misinterpreting a close object as a sensor
problem, causing a failure indication to be displayed in
the instrument cluster display.
WARNING!
•Drivers must be careful when backing up even when
using ParkSense. Always check carefully behind
your vehicle, look behind you, and be sure to check
for pedestrians, animals, other vehicles, obstructions,
(Continued)
168 STARTING AND OPERATING
Page 171 of 302

WARNING!(Continued)
and blind spots before backing up. You are respon-
sible for safety and must continue to pay attention to
your surroundings. Failure to do so can result in
serious injury or death.
• Before using ParkSense, it is strongly recommended
that the ball mount and hitch ball assembly is
disconnected from the vehicle when the vehicle is
not used for towing. Failure to do so can result in
injury or damage to vehicles or obstacles because the
hitch ball will be much closer to the obstacle than the
rear fascia when the loudspeaker sounds the con-
tinuous tone. Also, the sensors could detect the ball
mount and hitch ball assembly, depending on its size
and shape, giving a false indication that an obstacle
is behind the vehicle.
CAUTION!
•ParkSense is only a parking aid and it is unable to
recognize every obstacle, including small obstacles.
Parking curbs might be temporarily detected or not
detected at all. Obstacles located above or below the
(Continued)
CAUTION! (Continued)
sensors will not be detected when they are in close
proximity.
• The vehicle must be driven slowly when using
ParkSense in order to be able to stop in time when an
obstacle is detected. It is recommended that the
driver looks over his/her shoulder when using
ParkSense.
PARKVIEW REAR BACK UP CAMERA
Your vehicle is equipped with the ParkView Rear Back Up
Camera that allows you to see an on-screen image of the
rear surroundings of your vehicle whenever the gear
selector is put into REVERSE. The image will be displayed
in the touchscreen display along with a caution note to
“check entire surroundings” across the top of the screen.
After five seconds, this note will disappear. The ParkView
camera is located on the rear of the vehicle above the rear
license plate.
When the vehicle is shifted out of REVERSE, the rear
camera mode is exited and the last selected touchscreen
appears again.
6
STARTING AND OPERATING 169
Page 172 of 302

If your vehicle is equipped with the Camera Delay feature
and it is turned on, the rear camera image will be displayed
for up to ten seconds after the vehicle is shifted out of
REVERSE unless one of the following conditions occurs:
•The vehicle speed exceeds 8 mph (13 km/h).
• The gear selector is moved to PARK.
• The soft button “Image defeat [X]” to disable the image
is pressed.
When enabled, active guidelines are overlaid on the image
to illustrate the width of the vehicle and its projected
backup path based on the steering wheel position. A
dashed center line overlay indicates the center of the
vehicle to assist with parking.
Different colored zones indicate the distance to the rear of
the vehicle.
The following table shows the approximate distances for
each zone:
Zone Distance To The Rear Of The Vehicle Red 0 - 1 ft (0 - 30 cm)
Yellow 1 ft - 3 ft (30 cm - 1 m)
Green 3 ft or greater (1 m or greater)
WARNING!
Drivers must be careful when backing up even when
using the ParkView Rear Back Up Camera. Always
check carefully behind your vehicle, and be sure to
check for pedestrians, animals, other vehicles, obstruc-
tions, or blind spots before backing up. You are re-
sponsible for the safety of your surroundings and must
continue to pay attention while backing up. Failure to
do so can result in serious injury or death.
CAUTION!
•To avoid vehicle damage, ParkView should only be
used as a parking aid. The ParkView camera is
unable to view every obstacle or object in your drive
path.
• To avoid vehicle damage, the vehicle must be driven
slowly when using ParkView to be able to stop in
time when an obstacle is seen. It is recommended
that the driver look frequently over his/her shoulder
when using ParkView.
NOTE: If snow, ice, mud, or any foreign substance builds
up on the camera lens, clean the lens, rinse with water, and
dry with a soft cloth. Do not cover the lens.
170 STARTING AND OPERATING
Page 173 of 302

VEHICLE LOADING
Certification Label
As required by National Highway Traffic Safety Adminis-
tration regulations, your vehicle has a certification label
affixed to the driver’s side door or pillar.
This label contains the month and year of manufacture,
Gross Vehicle Weight Rating (GVWR), Gross Axle Weight
Rating (GAWR) front and rear, and Vehicle Identification
Number (VIN). A Month-Day-Hour (MDH) number is
included on this label and indicates the Month, Day and
Hour of manufacture. The bar code that appears on the
bottom of the label is your VIN.
Gross Vehicle Weight Rating (GVWR)
The GVWR is the total permissible weight of your vehicle
including driver, passengers, vehicle, options and cargo.
The label also specifies maximum capacities of front and
rear axle systems (GAWR). Total load must be limited so
GVWR and front and rear GAWR are not exceeded.
Payload
The payload of a vehicle is defined as the allowable load
weight a truck can carry, including the weight of the driver,
all passengers, options and cargo.
Gross Axle Weight Rating (GAWR)
The GAWR is the maximum permissible load on the front
and rear axles. The load must be distributed in the cargo
area so that the GAWR of each axle is not exceeded.
Each axle GAWR is determined by the components in the
system with the lowest load carrying capacity (axle,
springs, tires or wheels). Heavier axles or suspension
components sometimes specified by purchasers for in-
creased durability does not necessarily increase the vehi-
cle’s GVWR.
Tire Size
The tire size on the Vehicle Certification Label represents
the actual tire size on your vehicle. Replacement tires must
be equal to the load capacity of this tire size.
Rim Size
This is the rim size that is appropriate for the tire size
listed.
Inflation Pressure
This is the cold tire inflation pressure for your vehicle for
all loading conditions up to full GAWR.
6
STARTING AND OPERATING 171
Page 174 of 302

Curb Weight
The curb weight of a vehicle is defined as the total weight
of the vehicle with all fluids at full capacity conditions, and
with no occupants or cargo loaded into the vehicle. The
front and rear curb weight values are determined by
weighing your vehicle on a commercial scale before any
occupants or cargo are added.
Loading
The actual total weight and the weight of the front and rear
of your vehicle at the ground can best be determined by
weighing it when it is loaded and ready for operation.
The entire vehicle should first be weighed on a commercial
scale to insure that the GVWR has not been exceeded. The
weight on the front and rear of the vehicle should then be
determined separately to be sure that the load is properly
distributed over the front and rear axle. Weighing the
vehicle may show that the GAWR of either the front or rear
axles has been exceeded but the total load is within the
specified GVWR. If so, weight must be shifted from front to
rear or rear to front as appropriate until the specified
weight limitations are met. Store the heavier items down
low and be sure that the weight is distributed equally. Stow
all loose items securely before driving.Improper weight distributions can have an adverse effect
on the way your vehicle steers and handles and the way
the brakes operate.
CAUTION!
Do not load your vehicle any heavier than the GVWR
or the maximum front and rear GAWR. If you do, parts
on your vehicle can break, or it can change the way
your vehicle handles. This could cause you to lose
control. Also overloading can shorten the life of your
vehicle.
TRAILER TOWING
Trailer towing with this vehicle is not recommended.
172 STARTING AND OPERATING
Page 175 of 302

RECREATIONAL TOWING (BEHIND MOTORHOME, ETC.)
Towing This Vehicle Behind Another Vehicle
Towing ConditionWheels OFF the Ground Single-Speed Transmission
Flat Tow NONENOT ALLOWED
Dolly Tow FrontOK
Rear NOT ALLOWED
On Trailer ALLOK
NOTE:
• When towing your vehicle, always follow applicable
state and provincial laws. Contact state and provincial
Highway Safety offices for additional details.
• This vehicle must be towed on a dolly or vehicle trailer
with the front wheels OFFthe ground.
CAUTION!
Towing this vehicle in violation of the above require-
ments can cause severe transmission damage. Damage
from improper towing is not covered under the New
Vehicle Limited Warranty.
DRIVING TIPS
Driving On Slippery Surfaces
Information in this section will aid in safe controlled
launches in adverse conditions.
Acceleration
Rapid acceleration on snow covered, wet, or other slippery
surfaces may cause the driving wheels to pull erratically to
the right or left. This phenomenon occurs when there is a
difference in the surface traction under the front (driving)
wheels.
6
STARTING AND OPERATING 173
Page 176 of 302

WARNING!
Rapid acceleration on slippery surfaces is dangerous.
Unequal traction can cause sudden pulling of the front
wheels. You could lose control of the vehicle and
possibly have a collision. Accelerate slowly and care-
fully whenever there is likely to be poor traction (ice,
snow, wet, mud, loose sand, etc.).
Traction
When driving on wet or slushy roads, it is possible for a
wedge of water to build up between the tire and road
surface. This is hydroplaning and may cause partial or
complete loss of vehicle control and stopping ability. To
reduce this possibility, the following precautions should be
observed:
•Slow down during rainstorms or when the roads are
slushy.
• Slow down if the road has standing water or puddles.
• Replace the tires when tread wear indicators first be-
come visible.
• Keep tires properly inflated. •
Maintain sufficient distance between your vehicle and
the vehicle in front of you to avoid a collision in a
sudden stop.
Driving Through Water
Driving through water more than a few inches/centimeters
deep will require extra caution to ensure safety and pre-
vent damage to your vehicle.
Flowing/Rising Water
WARNING!
Do not drive on or across a road or path where water is
flowing and/or rising (as in storm run-off). Flowing
water can wear away the road or path’s surface and
cause your vehicle to sink into deeper water. Further-
more, flowing and/or rising water can carry your ve-
hicle away swiftly. Failure to follow this warning may
result in injuries that are serious or fatal to you, your
passengers, and others around you.
174 STARTING AND OPERATING