Page 185 of 317

183
C4-cactus_en_Chap07_info-pratiques_ed01-2016
Advice on care and maintenance
Recommendations on the care and maintenance your vehicle are given in the maintenance and warranty guide.
T he headlamps have polycarbonate
l
enses, finished with a protective
l a c q u e r.
Do
not clean them with a dry or
a
brasive cloth, nor with detergent or
so
lvent
pro
ducts.
Use
a sponge and soapy water.
The
use of a high pressure jet wash
f
or cleaning the headlamps, lamps
a
nd their surrounds may damage the
l
acquer and seals.
Observe
the recommendations on
p
ressure and distance for jet washing.
First clean persistent stains with a
sponge
and warm soapy water.For
the care of the stickers in the rear
d
oor glasses, we recommend the
fo
llowing:
-
U
se a wide jet at a temperature of
b
etween 25°C and 40°C.
-
W
here possible, direct the jet at
r
ight angles to the stickers.
Leather
Care of the expressive stickers
These styling stickers are treated to give good resistance to ageing and tearing.
They
have been designed to allow you to
c
ustomise your vehicle's bodywork.
When
using a high pressure jet wash, keep the
e
nd of the lance at least 30 centimetres from
t
he stickers
Leather
is
a
natural
product.
Appropriate
r
egular
care
and
cleaning
is
essential
for
its
du
rability.
Refer
to
your
vehicle's
maintenance
and
w
arranty
guide
for
information
on
the
special
p
recautions
to
observe.
Headlamps and lampsCare of the AIRBUMP® panels
The AIRBUMP® panels require no particular care o
r m
aintenance.
They
are
cleaned simply using water or one of the
p
roducts
available from CITROËN dealers.
To
avoid
problems of premature ageing of the
A
IRBUMP
® panels, do not use polish on them.
7
Practical information
Page 186 of 317
184
C4-cactus_en_Chap08_En-cas-de-panne_ed01-2016
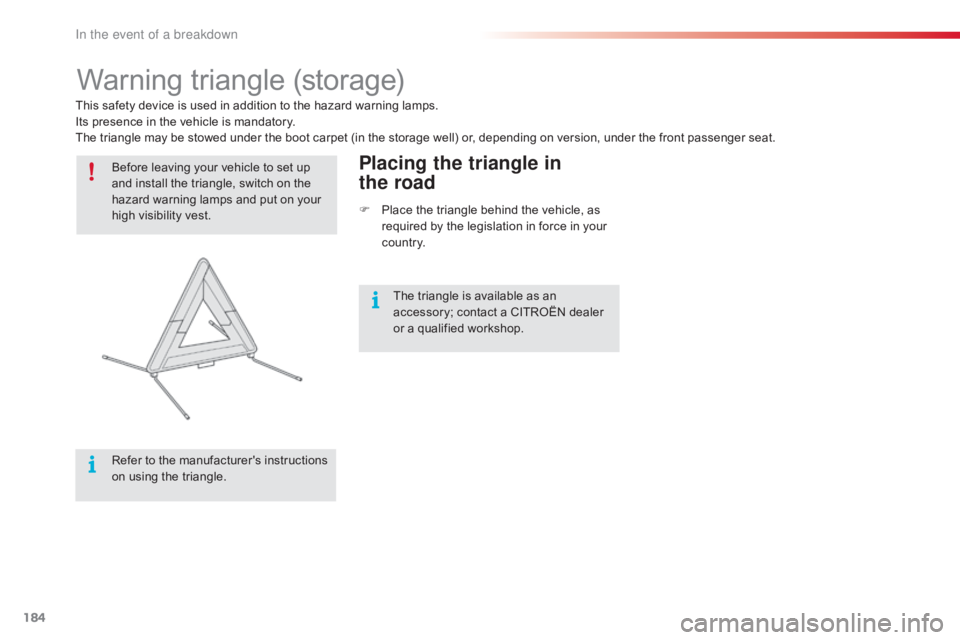
Warning triangle (storage)
Before leaving your vehicle to set up a
nd install the triangle, switch on the
h
azard warning lamps and put on your
h
igh visibility vest.
Refer
to the manufacturer's instructions
o
n using the triangle.Placing the triangle in
the road
F Place the triangle behind the vehicle, as r
equired by the legislation in force in your
c
o unt r y.
This
safety
device
is
used
in
addition
to
the
hazard
warning lamps.
Its
presence
in
the
vehicle
is
mandatory.
The
triangle
may
be
stowed
under
the
boot
carpet
(in the storage well) or, depending on version, under the front passenger seat.
The triangle is available as an
a
ccessory; contact a CITROËN dealer
o
r a qualified workshop.
In the event of a breakdown
Page 187 of 317
185
C4-cactus_en_Chap08_En-cas-de-panne_ed01-2016
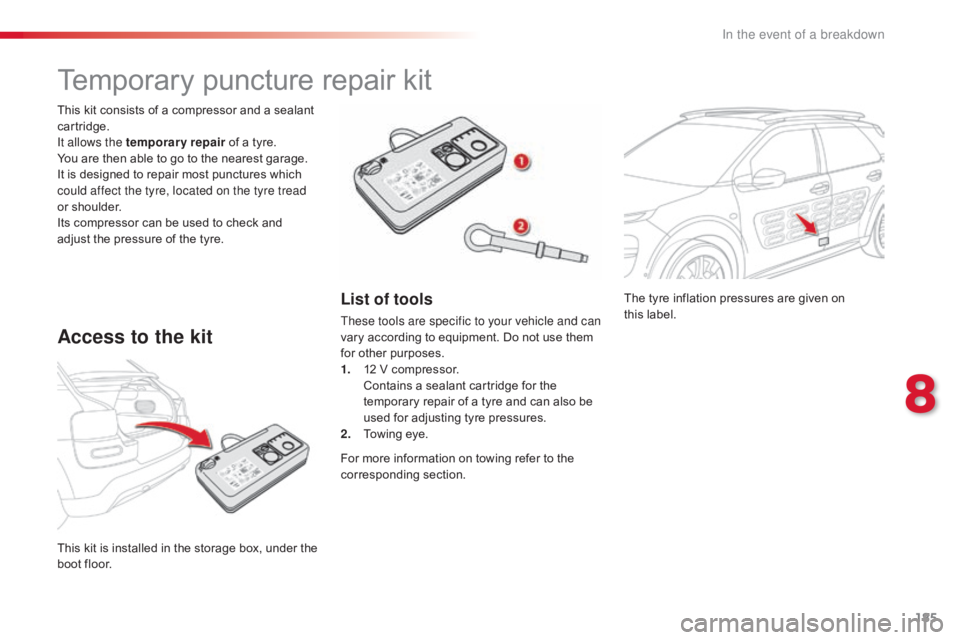
The tyre inflation pressures are given on this label.
This
k
it
i
s
i
nstalled
i
n
t
he
s
torage
b
ox,
u
nder
t
he
b
oot
floor.
This
kit
consists
of
a
compressor
and
a
sealant
c
artridge.
It allows the temporary repair
of
a
tyre.
You
are
then
able
to
go
to
the
nearest
garage.
It
is
designed
to
repair
most
punctures
which
c
ould affect the tyre, located on the tyre tread
or
shoulder.
Its
compressor
can
be
used
to
check
and
a
djust
the
pressure
of
the
tyre.
Temporary pu
ncture r epair k it
Access to the kit
List of tools
These tools are specific to your vehicle and can
vary
according to equipment. Do not use them
f
or other purposes.
1.
1
2 V compressor.
C
ontains a sealant cartridge for the
t
emporary repair of a tyre and can also be
u
sed for adjusting tyre pressures.
2.
T
owing eye.
For
more information on towing refer to the
c
orresponding
s
ection.
8
In the event of a breakdown
Page 188 of 317
186
C4-cactus_en_Chap08_En-cas-de-panne_ed01-2016
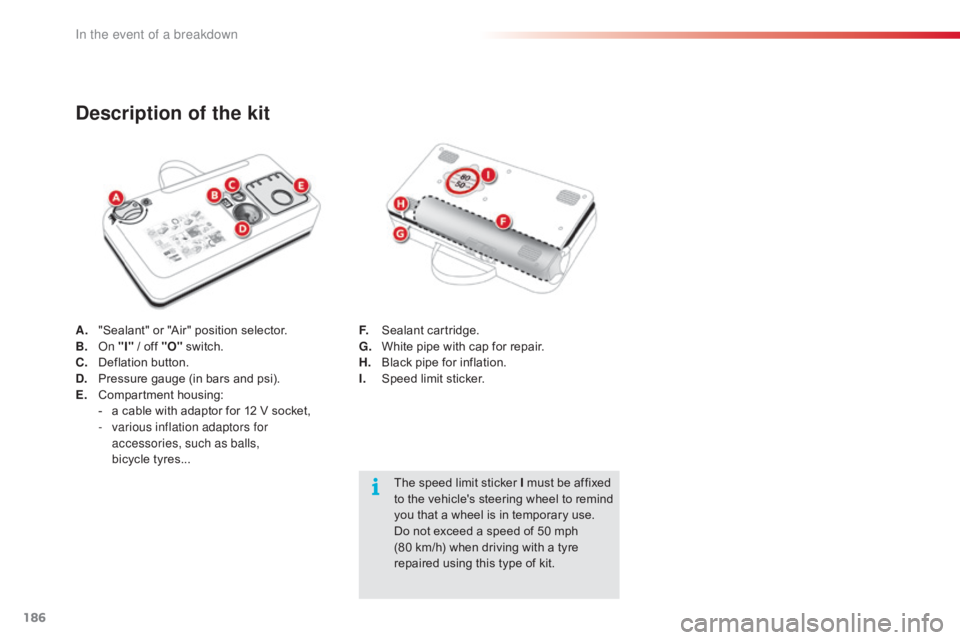
A. "Sealant" or "Air" position selector.
B. On "I"
/ off "O" s witch.
C.
D
eflation button.
D.
P
ressure gauge (in bars and psi).
E.
C
ompartment
h
ousing:
-
a
cable with adaptor for 12 V socket,
-
v
arious inflation adaptors for
accessories, such as balls,
bicycle tyres...
Description of the kit
The speed limit sticker I must be affixed t o the vehicle's steering wheel to remind
y
ou that a wheel is in temporary use.
Do
not exceed a speed of 50 mph
(
80 km/h) when driving with a tyre
r
epaired using this type of kit.
F.
S
ealant
c
artridge.
G.
W
hite pipe with cap for repair.
H.
B
lack pipe for inflation.
I.
S
peed limit sticker.
In the event of a breakdown
Page 189 of 317
187
C4-cactus_en_Chap08_En-cas-de-panne_ed01-2016
1. Sealing
Repair procedure
Avoid removing any foreign bodies which have penetrated into the tyre.F
U
ncoil the white pipe G
f
ully.
F
U
nscrew the cap from the white pipe.
F
C
onnect the white pipe to the valve of the
tyre to be repaired.
F
S
witch off the ignition.
F
T
urn the selector A to the
"Sealant"
p
osition.
F
C
heck that the switch B is in
position "O" . F
C
onnect the compressor's electric plug to
t
he vehicle's 12 V socket.
F
S
tart the vehicle and leave the engine
r
unning.
Take care, this product is harmful if s
wallowed and causes irritation to the eyes.
Keep this product out of the reach of
children.Do not start the compressor before c onnecting the white pipe to the tyre
v
alve: the sealant product would be
e
xpelled through the pipe.
8
In the event of a breakdown
Page 190 of 317

188
C4-cactus_en_Chap08_En-cas-de-panne_ed01-2016
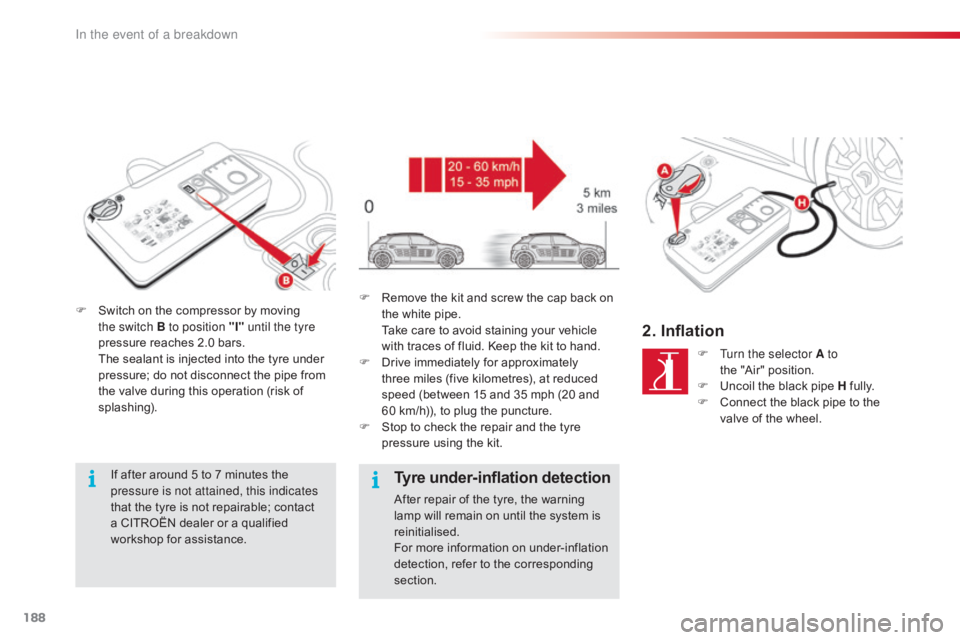
F Switch on the compressor by moving t
he switch B to position "I" until the tyre
pressure
reaches 2.0 bars.
T
he sealant is injected into the tyre under
p
ressure; do not disconnect the pipe from
t
he valve during this operation (risk of
sp
lashing).
If
after around 5 to 7 minutes the
p
ressure is not attained, this indicates
that
the tyre is not repairable; contact
a
CITROËN dealer or a qualified
w
orkshop for assistance. F
R emove the kit and screw the cap back on t
he white pipe.
T
ake care to avoid staining your vehicle
w
ith traces of fluid. Keep the kit to hand.
F
D
rive immediately for approximately
t
hree miles (five kilometres), at reduced
s
peed (between 15 and 35 mph (20 and
6
0 km/h)), to plug the puncture.
F
S
top to check the repair and the tyre
p
ressure using the kit.
Tyre under-inflation detection
After repair of the tyre, the warning lamp will remain on until the system is
r
einitialised.
For
more information on under-inflation
d
etection, refer to the corresponding
s
ection.
2. Inflation
F Turn the selector A to the "Air" position.
F
U
ncoil the black pipe H
f
ully.
F
C
onnect the black pipe to the
v
alve of the wheel.
In the event of a breakdown
Page 191 of 317

189
C4-cactus_en_Chap08_En-cas-de-panne_ed01-2016
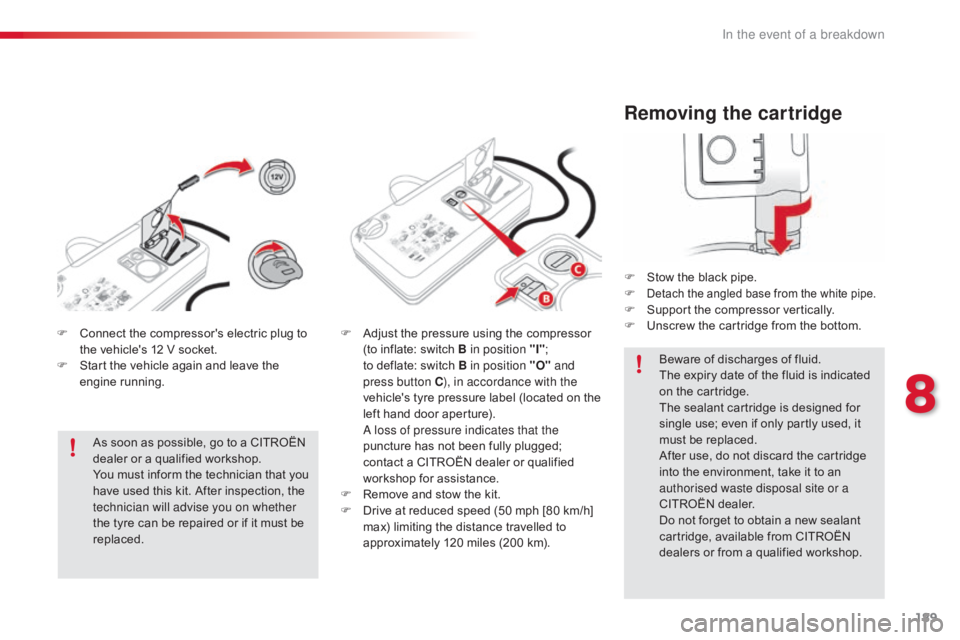
Removing the cartridge
F Stow the black pipe.
F Detach the angled base from the white pipe.F Support the compressor vertically.
F U nscrew the cartridge from the bottom.
Beware
of discharges of fluid.
The
expiry date of the fluid is indicated
o
n the cartridge.
The
sealant cartridge is designed for
s
ingle use; even if only partly used, it
m
ust be replaced.
After
use, do not discard the cartridge
i
nto the environment, take it to an
a
uthorised waste disposal site or a
CITROËN
dealer.
Do
not forget to obtain a new sealant
c
artridge, available from CITROËN
d
ealers or from a qualified workshop.
F
C
onnect
the
compressor's
electric
plug
to
t
he
vehicle's
12
V
socket.
F
S
tart
the
vehicle
again
and
leave
the
e
ngine
r
unning.
As
soon
as
possible,
go
to
a
CITROËN
d
ealer
or
a
qualified
workshop.
You
must
inform
the
technician
that
you
h
ave
used
this
kit.
After
inspection,
the
t
echnician will advise you on whether
the
tyre
can
be
repaired
or
if
it
must
be
r
eplaced. F
A
djust
the
pressure
using
the
compressor
(
to
inflate:
switch
B in position "I" ;
t
o deflate:
switch
B
in position "O" and
press button C ), in accordance with the
vehicle's
t
yre
pressure
label
(located
on
the
l
eft
hand
door
aperture).
A l
oss of pressure indicates that the
puncture
has
not
been
fully
plugged;
c
ontact
a
CITROËN
dealer
or
qualified
w
orkshop
for
assistance.
F
R
emove
and
stow
the
kit.
F
D
rive
at
reduced
speed
(50
mph
[80
km/h]
m
ax)
limiting
the
distance
travelled
to
a
pproximately
120
miles
(200
km).
8
In the event of a breakdown
Page 192 of 317

190
C4-cactus_en_Chap08_En-cas-de-panne_ed01-2016
Checking tyre pressures / inflating accessories
You can also use the compressor, without injecting any product, to:
-
c
heck or adjust the pressure of your tyres,
-
i
nflate other accessories (balls, bicycle
tyres...).
F
T
urn the selector A to the
"Air" position.
F
U
ncoil the black pipe H
f
ully.F
C onnect the compressor's electrical
c
onnector to the vehicle's 12 V socket.
F
S
tart the vehicle and let the engine run.
F
A
djust the pressure using the compressor
(
to inflate: switch B in position "I";
t
o deflate: switch B in position "O" and
press button C ),
according to the vehicle's
t
yre pressure label or the accessory's
p
ressure label.
F
R
emove the kit then stow it.Should
the pressure of one or more
t
yres be adjusted, it is necessary to
r
einitialise the under-inflation detection
system.
For
more information on under-inflation
d
etection, refer to the corresponding
s
ection.
F
C
onnect the black pipe to the valve of the
w
heel or accessory.
I
f necessary, fit one of the adaptors
supplied
with the kit first.
In the event of a breakdown