Page 76 of 614

WARNING!
•Adjusting a seat while driving may be dangerous.
Moving a seat while driving could result in loss of
control which could cause a collision and serious
injury or death.
• Seats should be adjusted before fastening the seat
belts and while the vehicle is parked. Serious injury
or death could result from a poorly adjusted seat belt.
• Do not ride with the seatback reclined so that the
shoulder belt is no longer resting against your chest.
In a collision you could slide under the seat belt,
which could result in serious injury or death.
CAUTION!
Do not place any article under a power seat or impede
its ability to move as it may cause damage to the seat
controls. Seat travel may become limited if movement
is stopped by an obstruction in the seat’s path.
Power Lumbar — If Equipped
Vehicles equipped with power driver or passenger seats
may be equipped with power lumbar. The power lumbar
switch is located on the outboard side of the power seat. Push the switch forward or rearward to increase or de-
crease the lumbar support. Push the switch upward or
downward to raise or lower the lumbar support.
Heated Seats
Front Heated Seats — If Equipped
The front heated seats control buttons are located within
the climate or controls screen of the touchscreen.
You can choose from HI, LO, or OFF heat settings. The
indicator lights in each switch indicate the level of heat in
use. Two indicator lights will illuminate for HI, one for LO
and none for OFF.
•
Press the heated seat button
once to turn the HI
setting ON.
• Press the heated seat buttona second time to turn
the LO setting ON.
• Press the heated seat buttona third time to turn the
heating elements OFF.
If the HI-level setting is selected, the system will automati-
cally switch to LO-level after approximately 60 minutes of
continuous operation. At that time, the display will change
from HI to LO, indicating the change. The LO-level setting
will turn OFF automatically after approximately 45 minutes.
74 GETTING TO KNOW YOUR VEHICLE
Page 99 of 614

Front Fog Lights — If Equipped
To activate the front fog lights, turn on the parking lights or
the low beam headlights and push in the headlight switch
control knob. Pushing the headlight switch control knob in
a second time will turn the front fog lights off.
Turn Signals
Move the multifunction lever up or down and the arrows
on each side of the instrument cluster flash to show proper
operation of the front and rear turn signal lights.NOTE:
If either light remains on and does not flash, or
there is a very fast flash rate, check for a defective outside
light bulb. If an indicator fails to light when the lever is
moved, it would suggest that the indicator bulb is defec-
tive.
Turn Signal Warning
If the vehicle electronics sense that the vehicle has traveled
for about 1 mile (1.6 km) with the turn signals on, a chime
will sound and a message will display in the cluster to alert
the driver.
Lane Change Assist — If Equipped
Tap the multifunction lever up or down once, without
moving beyond the detent, and the turn signal (right or
left) will flash three times then automatically turn off.
Battery Protection
This feature provides battery protection to avoid wearing
down the battery if the headlights or parking lights are left
on for extended periods of time when the ignition switch is
in the LOCK position. After eight minutes of the ignition
switch being in the LOCK position and the headlight
switch in any position other than OFF or AUTO, the lights
will turn off automatically until the next cycle of the
ignition switch or headlight switch.Fog Light Switch
3
GETTING TO KNOW YOUR VEHICLE 97
Page 102 of 614

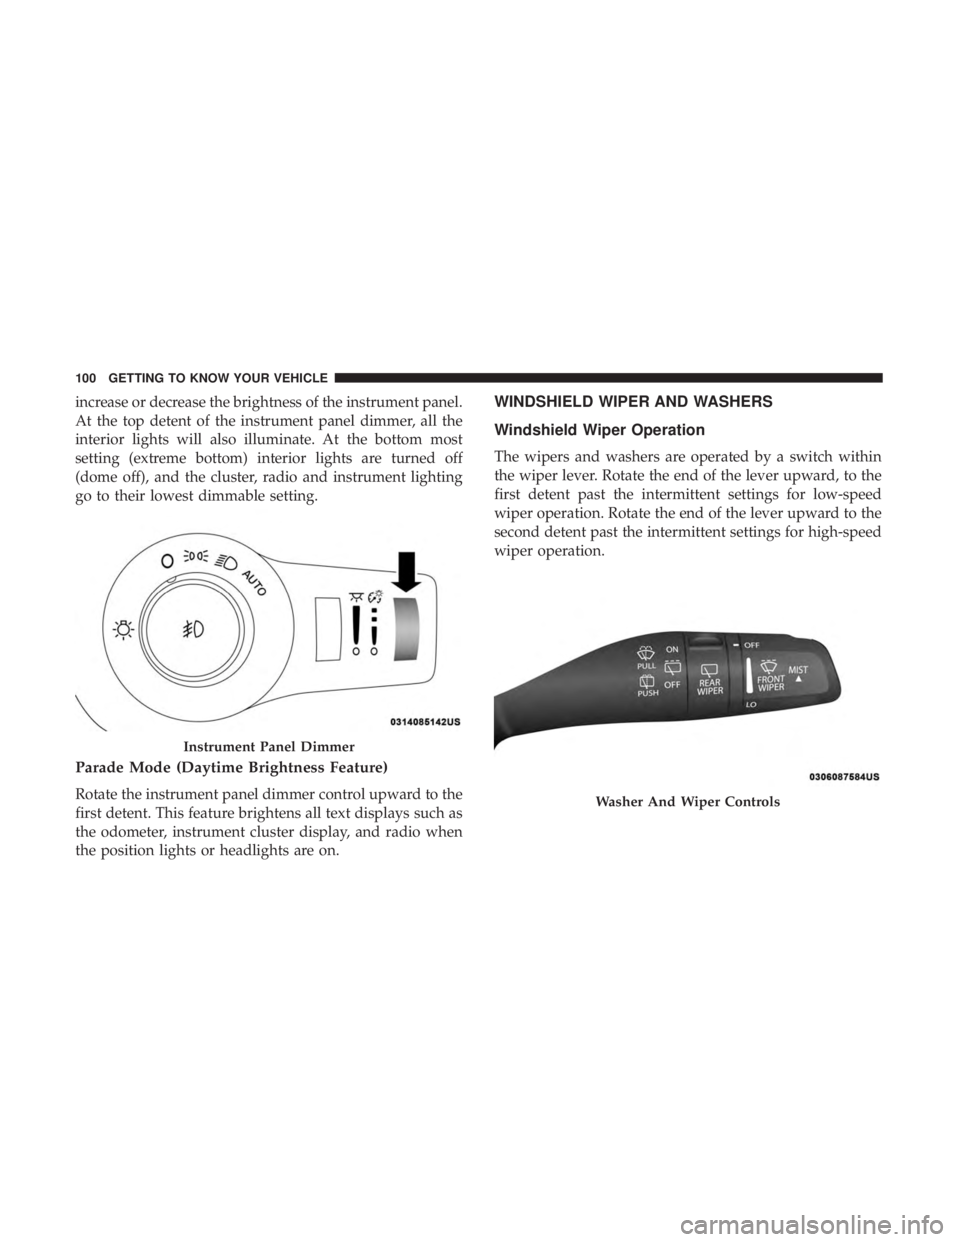
increase or decrease the brightness of the instrument panel.
At the top detent of the instrument panel dimmer, all the
interior lights will also illuminate. At the bottom most
setting (extreme bottom) interior lights are turned off
(dome off), and the cluster, radio and instrument lighting
go to their lowest dimmable setting.
Parade Mode (Daytime Brightness Feature)
Rotate the instrument panel dimmer control upward to the
first detent. This feature brightens all text displays such as
the odometer, instrument cluster display, and radio when
the position lights or headlights are on.
WINDSHIELD WIPER AND WASHERS
Windshield Wiper Operation
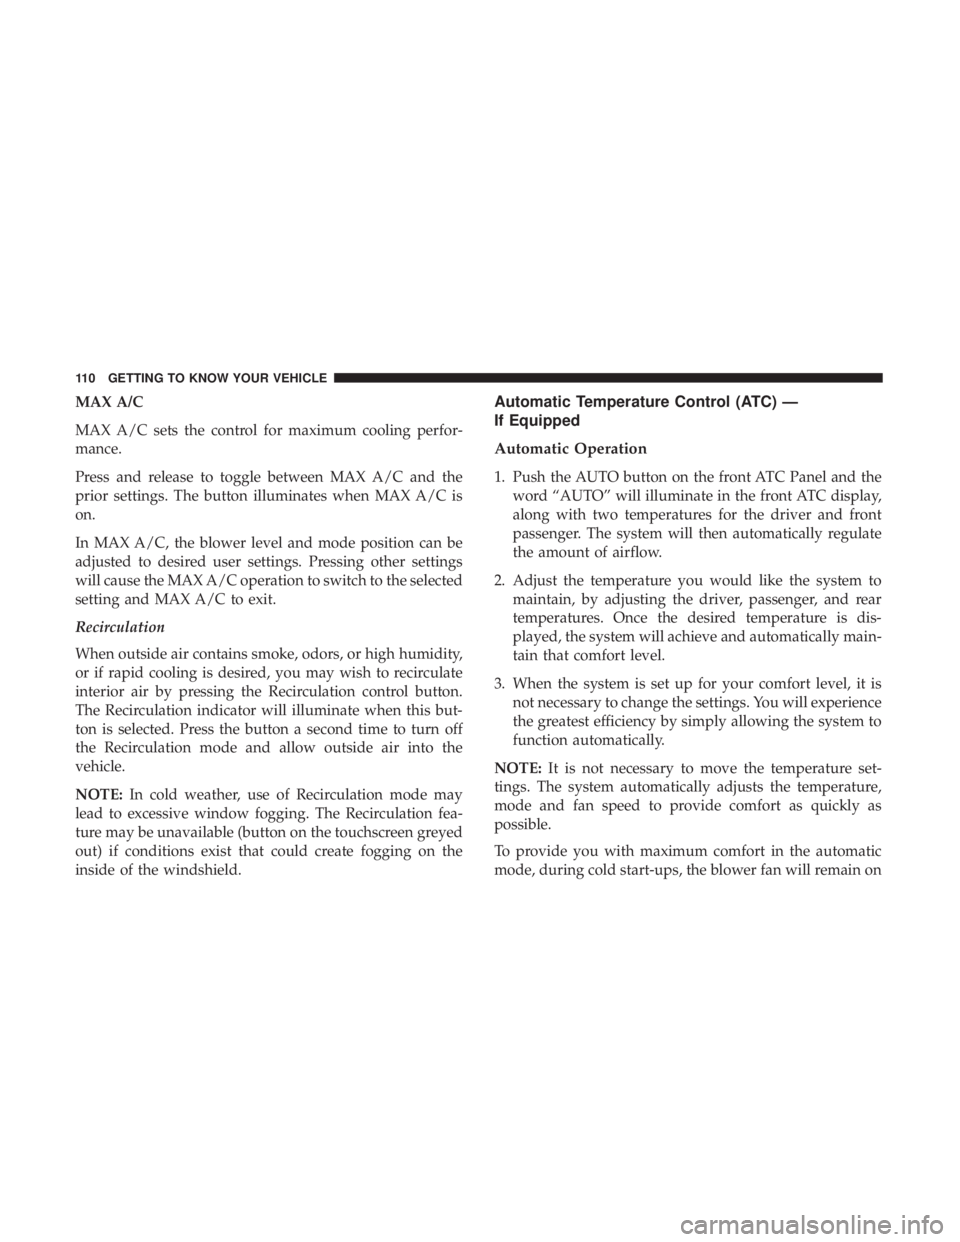
The wipers and washers are operated by a switch within
the wiper lever. Rotate the end of the lever upward, to the
first detent past the intermittent settings for low-speed
wiper operation. Rotate the end of the lever upward to the
second detent past the intermittent settings for high-speed
wiper operation.
Instrument Panel Dimmer
Washer And Wiper Controls
100 GETTING TO KNOW YOUR VEHICLE
Page 112 of 614

MAX A/C
MAX A/C sets the control for maximum cooling perfor-
mance.
Press and release to toggle between MAX A/C and the
prior settings. The button illuminates when MAX A/C is
on.
In MAX A/C, the blower level and mode position can be
adjusted to desired user settings. Pressing other settings
will cause the MAX A/C operation to switch to the selected
setting and MAX A/C to exit.
Recirculation
When outside air contains smoke, odors, or high humidity,
or if rapid cooling is desired, you may wish to recirculate
interior air by pressing the Recirculation control button.
The Recirculation indicator will illuminate when this but-
ton is selected. Press the button a second time to turn off
the Recirculation mode and allow outside air into the
vehicle.
NOTE:In cold weather, use of Recirculation mode may
lead to excessive window fogging. The Recirculation fea-
ture may be unavailable (button on the touchscreen greyed
out) if conditions exist that could create fogging on the
inside of the windshield.Automatic Temperature Control (ATC) —
If Equipped
Automatic Operation
1. Push the AUTO button on the front ATC Panel and the word “AUTO” will illuminate in the front ATC display,
along with two temperatures for the driver and front
passenger. The system will then automatically regulate
the amount of airflow.
2. Adjust the temperature you would like the system to maintain, by adjusting the driver, passenger, and rear
temperatures. Once the desired temperature is dis-
played, the system will achieve and automatically main-
tain that comfort level.
3. When the system is set up for your comfort level, it is not necessary to change the settings. You will experience
the greatest efficiency by simply allowing the system to
function automatically.
NOTE: It is not necessary to move the temperature set-
tings. The system automatically adjusts the temperature,
mode and fan speed to provide comfort as quickly as
possible.
To provide you with maximum comfort in the automatic
mode, during cold start-ups, the blower fan will remain on
110 GETTING TO KNOW YOUR VEHICLE
Page 113 of 614
low until the engine warms up. The fan will engage
immediately if the Defrost mode is selected, or by changing
the front blower knob setting.
Manual Operation Override
This system offers a full complement of manual override
features. The AUTO symbol in the front ATC display will
be turned off when the system is being used in the manual
mode.
Controlling The Rear Climate Controls From The
Front ATC Touchscreen
The Three-Zone ATC system allows for adjustment of the
rear climate controls from the front ATC touchscreen.
To change the rear system settings:
•Press the �REAR CLIMATE� button on the touchscreen
to change control to rear control mode, rear display
appears. Control functions now operate rear system.
• To return to the front screen on the Uconnect system,
press the �Front Climate� or “Done” button on the
touchscreen.Uconnect 4C/4C NAV Front ATC Panel Rear Control
Display
3
GETTING TO KNOW YOUR VEHICLE 111
Page 114 of 614

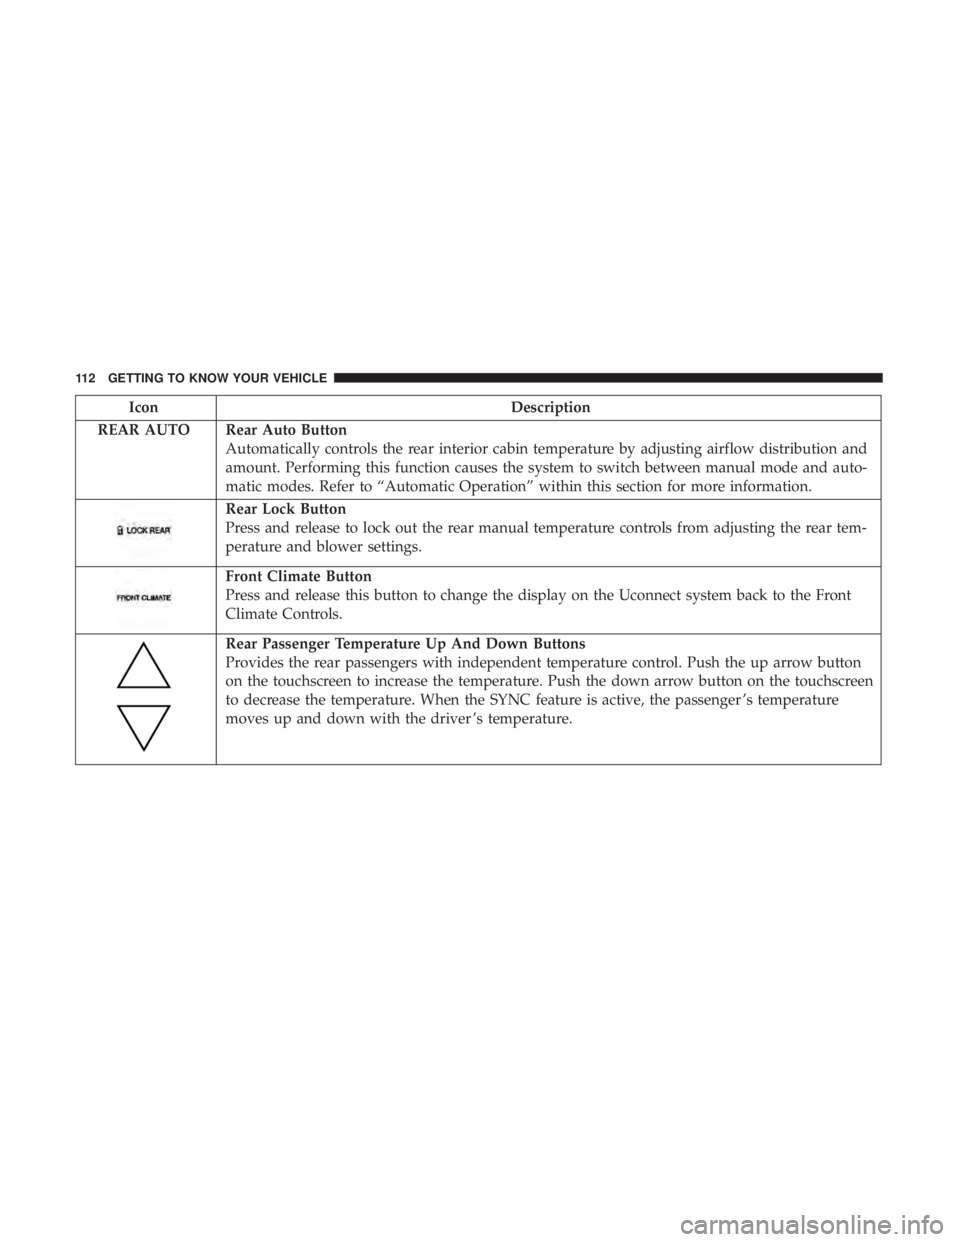
IconDescription
REAR AUTO Rear Auto Button Automatically controls the rear interior cabin temperature by adjusting airflow distribution and
amount. Performing this function causes the system to switch between manual mode and auto-
matic modes. Refer to “Automatic Operation” within this section for more information.
Rear Lock Button
Press and release to lock out the rear manual temperature controls from adjusting the rear tem-
perature and blower settings.
Front Climate Button
Press and release this button to change the display on the Uconnect system back to the Front
Climate Controls.
Rear Passenger Temperature Up And Down Buttons
Provides the rear passengers with independent temperature control. Push the up arrow button
on the touchscreen to increase the temperature. Push the down arrow button on the touchscreen
to decrease the temperature. When the SYNC feature is active, the passenger ’s temperature
moves up and down with the driver ’s temperature.
112 GETTING TO KNOW YOUR VEHICLE
Page 117 of 614
1. Adjust the rear blower, rear temperature and the rearmodes to suit your comfort needs.
2. ATC is selected by pushing the AUTO button. Once the desired temperature is displayed, the ATC System
will automatically achieve and maintain that comfort level.
When the system is set up for your comfort level, it is not
necessary to change the settings. You will experience the
greatest efficiency by simply allowing the system to func-
tion automatically.
NOTE:
•
It is not necessary to move the temperature settings. The
system automatically adjusts the temperature, mode and
fan speed to provide comfort as quickly as possible.
Rear Automatic Climate Controls
3
GETTING TO KNOW YOUR VEHICLE 115
Page 118 of 614
IconDescription
Rear Mode Control
Push this button on the Rear Climate Hard Controls to change the air distribution mode for the
rear passengers to one of the following:
Panel Mode
Panel Mode
Air comes from the outlets in the headliner. Each of these outlets can be individually adjusted to
direct the flow of air. Moving the air vanes of the outlets to one side will shut off the airflow.
Bi-Level Mode
Bi-Level Mode
Air comes from both the headliner outlets and the floor outlets.
NOTE: In many temperature positions, the Bi-Level mode is designed to provide cooler air out of
the headliner outlets and warmer air from the floor outlets.
Floor Mode
Floor Mode
Air comes from the floor outlets.
Rear Temperature Control
•Rear Passenger Temperature Up Button To change the temperature in the rear of the vehicle,
push temperature control up button to raise the temperature. The rear temperature settings are
displayed in control head.
116 GETTING TO KNOW YOUR VEHICLE