Page 146 of 614
Coat Hooks — If Equipped
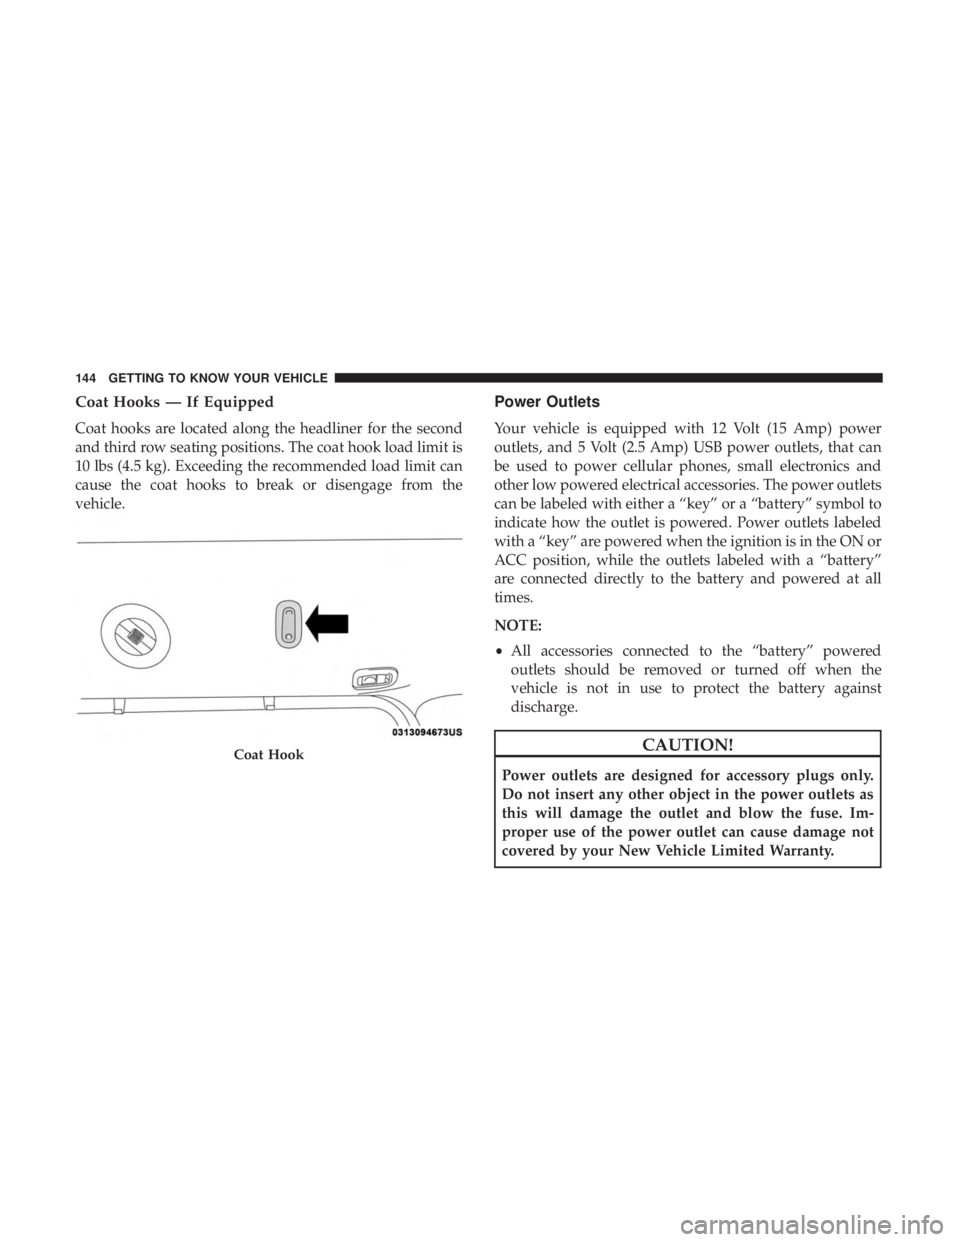
Coat hooks are located along the headliner for the second
and third row seating positions. The coat hook load limit is
10 lbs (4.5 kg). Exceeding the recommended load limit can
cause the coat hooks to break or disengage from the
vehicle.
Power Outlets
Your vehicle is equipped with 12 Volt (15 Amp) power
outlets, and 5 Volt (2.5 Amp) USB power outlets, that can
be used to power cellular phones, small electronics and
other low powered electrical accessories. The power outlets
can be labeled with either a “key” or a “battery” symbol to
indicate how the outlet is powered. Power outlets labeled
with a “key” are powered when the ignition is in the ON or
ACC position, while the outlets labeled with a “battery”
are connected directly to the battery and powered at all
times.
NOTE:
•All accessories connected to the “battery” powered
outlets should be removed or turned off when the
vehicle is not in use to protect the battery against
discharge.
CAUTION!
Power outlets are designed for accessory plugs only.
Do not insert any other object in the power outlets as
this will damage the outlet and blow the fuse. Im-
proper use of the power outlet can cause damage not
covered by your New Vehicle Limited Warranty.
Coat Hook
144 GETTING TO KNOW YOUR VEHICLE
Page 149 of 614
WARNING!(Continued)
•Close the lid when not in use and while driving the
vehicle.
• If this outlet is mishandled, it may cause an electric
shock and failure.
CAUTION!
• Many accessories that can be plugged in draw power
from the vehicle’s battery, even when not in use (i.e.,
cellular phones, etc.). Eventually, if plugged in long
enough, the vehicle’s battery will discharge suffi-
ciently to degrade battery life and/or prevent the
vehicle from starting.
• Accessories that draw higher power (i.e., coolers,
vacuum cleaners, lights, etc.) will degrade the battery
even more quickly. Only use these intermittently and
with greater caution.
• After the use of high power draw accessories, or long
periods of the vehicle not being started (with acces-
sories still plugged in), the vehicle must be driven a
(Continued)
CAUTION! (Continued)
sufficient length of time to allow the generator to
recharge the vehicle’s battery or plug the vehicle in
with EVSE charger.
• The vehicle uses a power inverter connected to the
HV battery to charge the 12V battery as well as
supports the 12V electrical loads, when the vehicle is
not ON.
Power Inverter — If Equipped
There is a 115 Volt, 150 Watt Power Inverter outlet located
on the right side of the vehicle, before the third row of seats
to convert DC current to AC current. The Power Inverter
can power cellular phones, electronics and other low
power devices requiring up to 150 Watts. Certain high-end
video game consoles will exceed this power limit, as will
most power tools.
3
GETTING TO KNOW YOUR VEHICLE 147
Page 223 of 614
Second Row Center (If Equipped) And Third Row
Center Seat Belt Operating Instructions
The second row center (if equipped) and third row center
seat belts feature a seat belt with a mini-latch plate and
buckle, which allows the seat belt to detach from the lower
anchor when the seat is folded. The mini-latch plate and
regular latch plate can then be stored out of the way in the
headliner for added convenience to open up utilization of
the storage areas behind the front seats when the seat is not
occupied.
1. Remove the mini-latch plate and regular latch platefrom its stowed position in the headliner slightly behind
the second or third row seat. 2. Grasp the mini-latch plate and pull the seat belt over the
seat.
Mini-Latch Stowage
5
SAFETY 221
Page 230 of 614
WARNING!
•The seat belt assembly must be replaced if the
switchable Automatic Locking Retractor (ALR) fea-
ture or any other seat belt function is not working
properly when checked according to the procedures
in the Service Manual.
• Failure to replace the seat belt assembly could in-
crease the risk of injury in collisions.
• Do not use the Automatic Locking Mode to restrain
occupants who are wearing the seat belt or children
who are using booster seats. The locked mode is only
used to install rear-facing or forward-facing child
restraints that have a harness for restraining the
child.
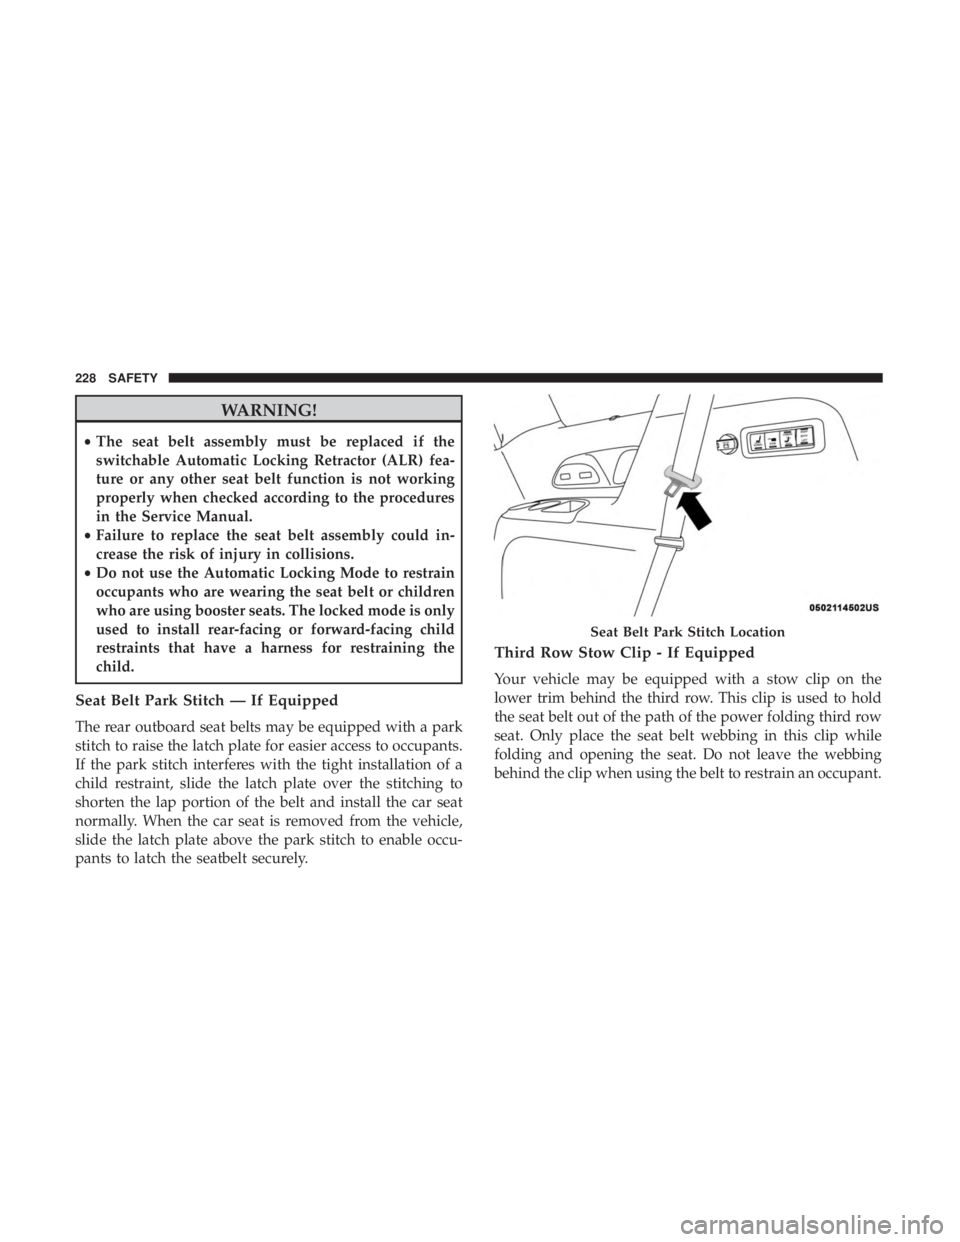
Seat Belt Park Stitch — If Equipped
The rear outboard seat belts may be equipped with a park
stitch to raise the latch plate for easier access to occupants.
If the park stitch interferes with the tight installation of a
child restraint, slide the latch plate over the stitching to
shorten the lap portion of the belt and install the car seat
normally. When the car seat is removed from the vehicle,
slide the latch plate above the park stitch to enable occu-
pants to latch the seatbelt securely.
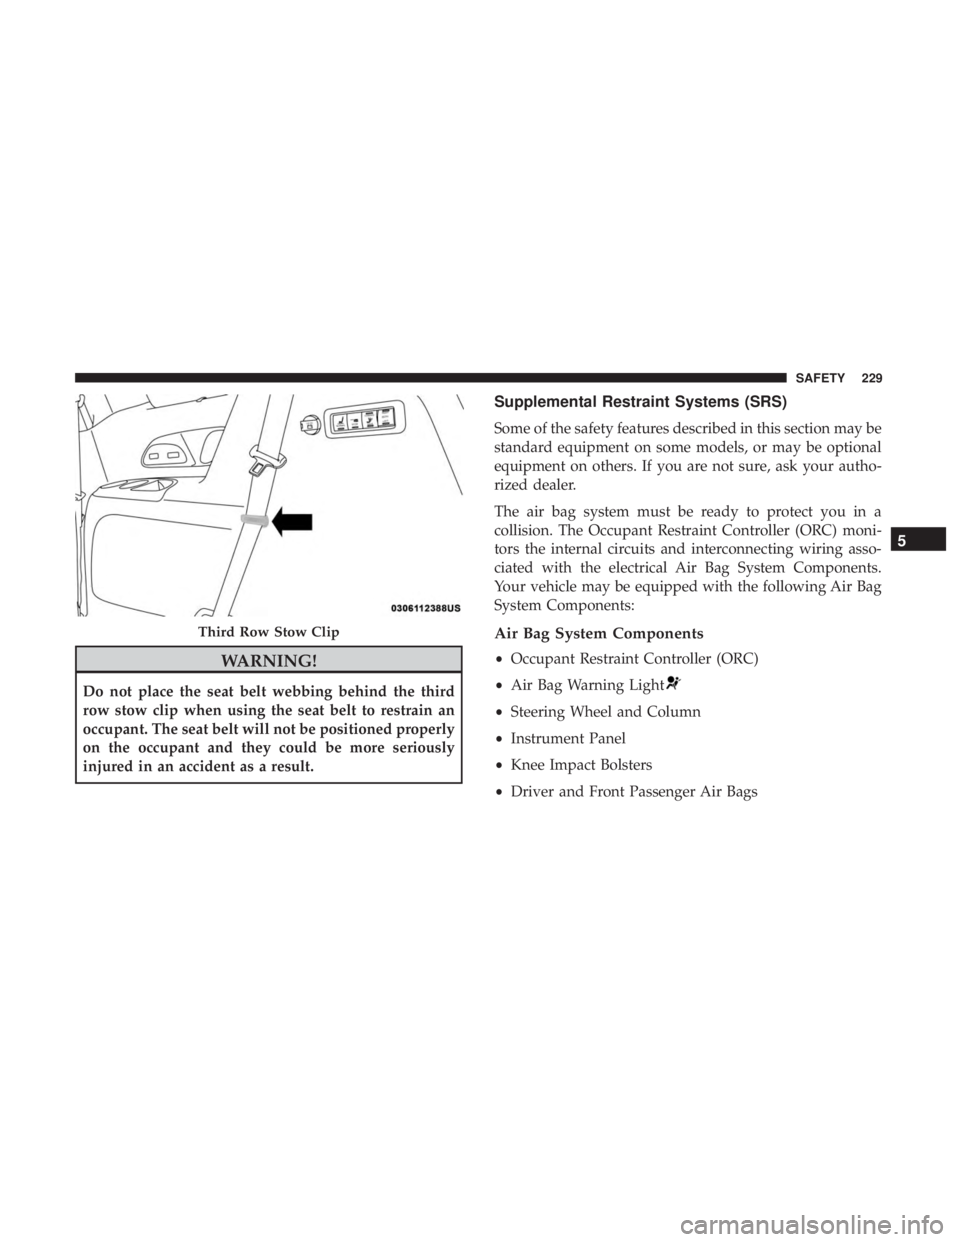
Third Row Stow Clip - If Equipped
Your vehicle may be equipped with a stow clip on the
lower trim behind the third row. This clip is used to hold
the seat belt out of the path of the power folding third row
seat. Only place the seat belt webbing in this clip while
folding and opening the seat. Do not leave the webbing
behind the clip when using the belt to restrain an occupant.
Seat Belt Park Stitch Location
228 SAFETY
Page 231 of 614
WARNING!
Do not place the seat belt webbing behind the third
row stow clip when using the seat belt to restrain an
occupant. The seat belt will not be positioned properly
on the occupant and they could be more seriously
injured in an accident as a result.
Supplemental Restraint Systems (SRS)
Some of the safety features described in this section may be
standard equipment on some models, or may be optional
equipment on others. If you are not sure, ask your autho-
rized dealer.
The air bag system must be ready to protect you in a
collision. The Occupant Restraint Controller (ORC) moni-
tors the internal circuits and interconnecting wiring asso-
ciated with the electrical Air Bag System Components.
Your vehicle may be equipped with the following Air Bag
System Components:
Air Bag System Components
•Occupant Restraint Controller (ORC)
• Air Bag Warning Light
•Steering Wheel and Column
• Instrument Panel
• Knee Impact Bolsters
• Driver and Front Passenger Air Bags
Third Row Stow Clip
5
SAFETY 229
Page 260 of 614
Locating The LATCH Anchorages
The lower anchorages are round bars that are
found at the rear of the seat cushion where it
meets the seatback, below the anchorage sym-
bols on the seatback. They are just visible when
you lean into the rear seat to install the child restraint. You
will easily feel them if you run your finger along the gap
between the seatback and seat cushion.
Locating The Upper Tether Anchorages
There are tether strap anchorages located behind
all second row seating positions. The third row
has a tether anchor on the 40% seat for the right
outboard position and in the center of the 60%
seat for either the center or left outboard seating position.
All tether anchorages are located on the back of the seat,
near the floor.
LATCH Anchorages (Second Row Anchorages Shown)
LATCH Anchorages (Third Row 60/40 Anchorages Shown)
258 SAFETY
Page 262 of 614
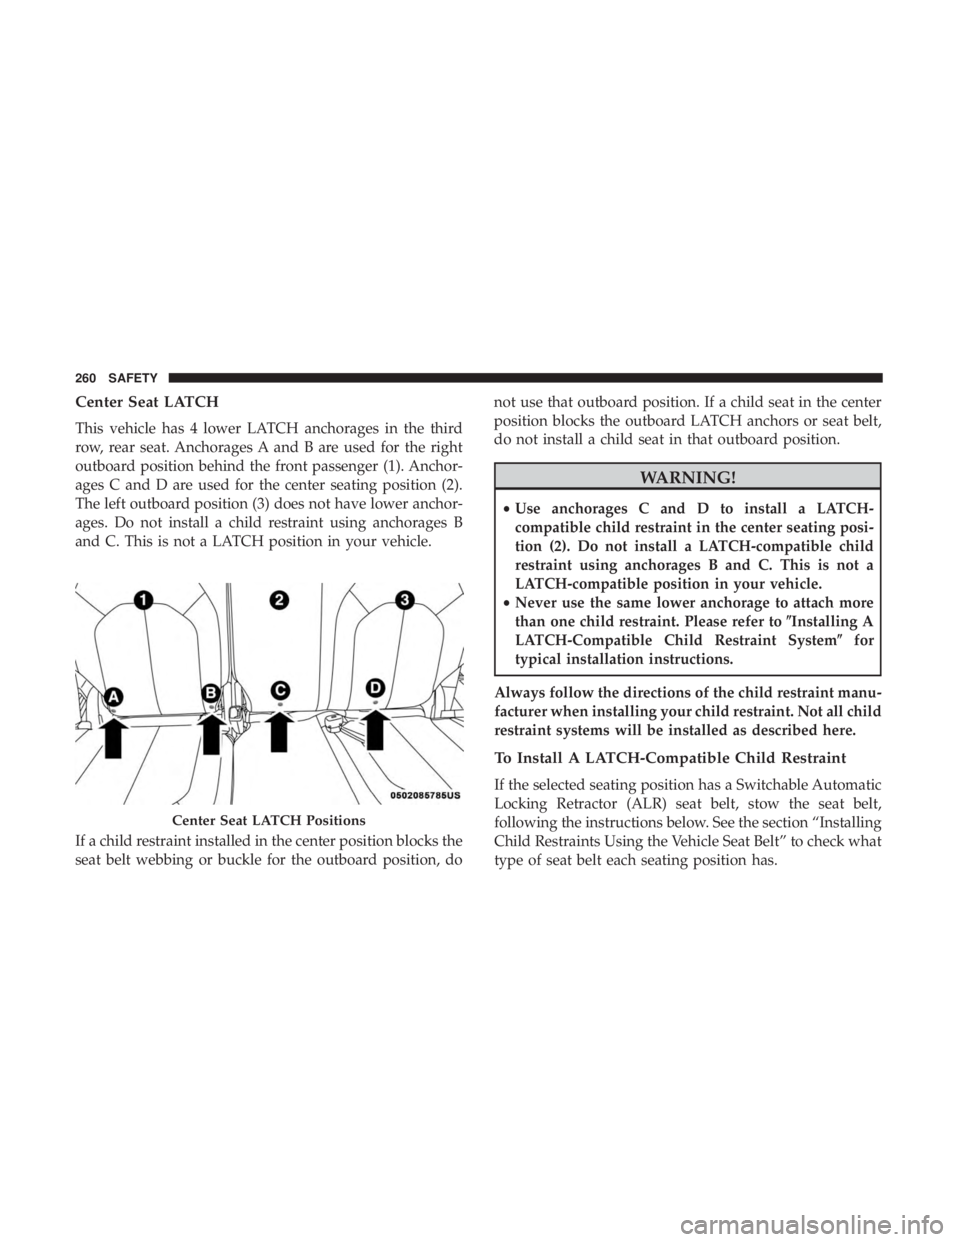
Center Seat LATCH
This vehicle has 4 lower LATCH anchorages in the third
row, rear seat. Anchorages A and B are used for the right
outboard position behind the front passenger (1). Anchor-
ages C and D are used for the center seating position (2).
The left outboard position (3) does not have lower anchor-
ages. Do not install a child restraint using anchorages B
and C. This is not a LATCH position in your vehicle.
If a child restraint installed in the center position blocks the
seat belt webbing or buckle for the outboard position, donot use that outboard position. If a child seat in the center
position blocks the outboard LATCH anchors or seat belt,
do not install a child seat in that outboard position.
WARNING!
•
Use anchorages C and D to install a LATCH-
compatible child restraint in the center seating posi-
tion (2). Do not install a LATCH-compatible child
restraint using anchorages B and C. This is not a
LATCH-compatible position in your vehicle.
• Never use the same lower anchorage to attach more
than one child restraint. Please refer to �Installing A
LATCH-Compatible Child Restraint System �for
typical installation instructions.
Always follow the directions of the child restraint manu-
facturer when installing your child restraint. Not all child
restraint systems will be installed as described here.
To Install A LATCH-Compatible Child Restraint
If the selected seating position has a Switchable Automatic
Locking Retractor (ALR) seat belt, stow the seat belt,
following the instructions below. See the section “Installing
Child Restraints Using the Vehicle Seat Belt” to check what
type of seat belt each seating position has.
Center Seat LATCH Positions
260 SAFETY
Page 271 of 614

4. Remove slack in the tether strap according to the childrestraint manufacturer ’s instructions.
WARNING!
•An incorrectly anchored tether strap could lead to
increased head motion and possible injury to the
child. Use only the anchorage position directly be-
hind the child seat to secure a child restraint top
tether strap.
(Continued)
WARNING! (Continued)
•If your vehicle is equipped with a split rear seat,
make sure the tether strap does not slip into the
opening between the seatbacks as you remove slack
in the strap.
Third Row Tether Attachment
The tether anchorage found on the back of the 60% seat in
the third row may be used by either the left outboard or the
center seating position. Only tether one child restraint to
the tether anchorage at a time.
To connect the tether strap hook to the tether anchorage for
either seating position on the 60% third row seat:
1. Route the tether strap to provide the most direct path for the strap between the anchor and the child seat.
2. If the car seat is in the center, raise the center head restraint and route the tether strap around the inboard
(left) side of the head restraint support posts, as shown
in the diagram.
3. Attach the tether strap hook of the child restraint to the top tether anchorage as shown in the diagram.
Rear Seat Tether Strap Attachment (Second Row
Anchorage Shown)
5
SAFETY 269