2018 Alfa Romeo Stelvio tow
[x] Cancel search: towPage 122 of 276
4. Position the lap belt so that it is snug
and lies low across your hips, below your
abdomen. To remove slack in the lap belt
portion, pull up on the shoulder belt. To
loosen the lap belt if it is too tight, tilt the
latch plate and pull on the lap belt. A snug
seat belt reduces the risk of sliding under
the seat belt in a collision.
5. Position the shoulder belt across the
shoulder and chest with minimal, if any
slack so that it is comfortable and not
resting on your neck. The retractor will
withdraw any slack in the shoulder belt.
6. To release the seat belt, push the red
button on the buckle. The seat belt will
automatically retract to its stowed
position. If necessary, slide the latch
plate down the webbing to allow the seat
belt to retract fully.
Lap/Shoulder Belt Untwisting
Procedure
Use the following procedure to untwist a
twisted lap/shoulder belt.
1. Position the latch plate as close as
possible to the anchor point.
2. At about 6 to 12 inches (15 to 30 cm)
above the latch plate, grasp and twist the
seat belt webbing 180 degrees to create
a fold that begins immediately above the
latch plate.
3. Slide the latch plate upward over the
folded webbing. The folded webbing
must enter the slot at the top of the latch
plate.
4. Continue to slide the latch plate up
until it clears the folded webbing and the
seat belt is no longer twisted.
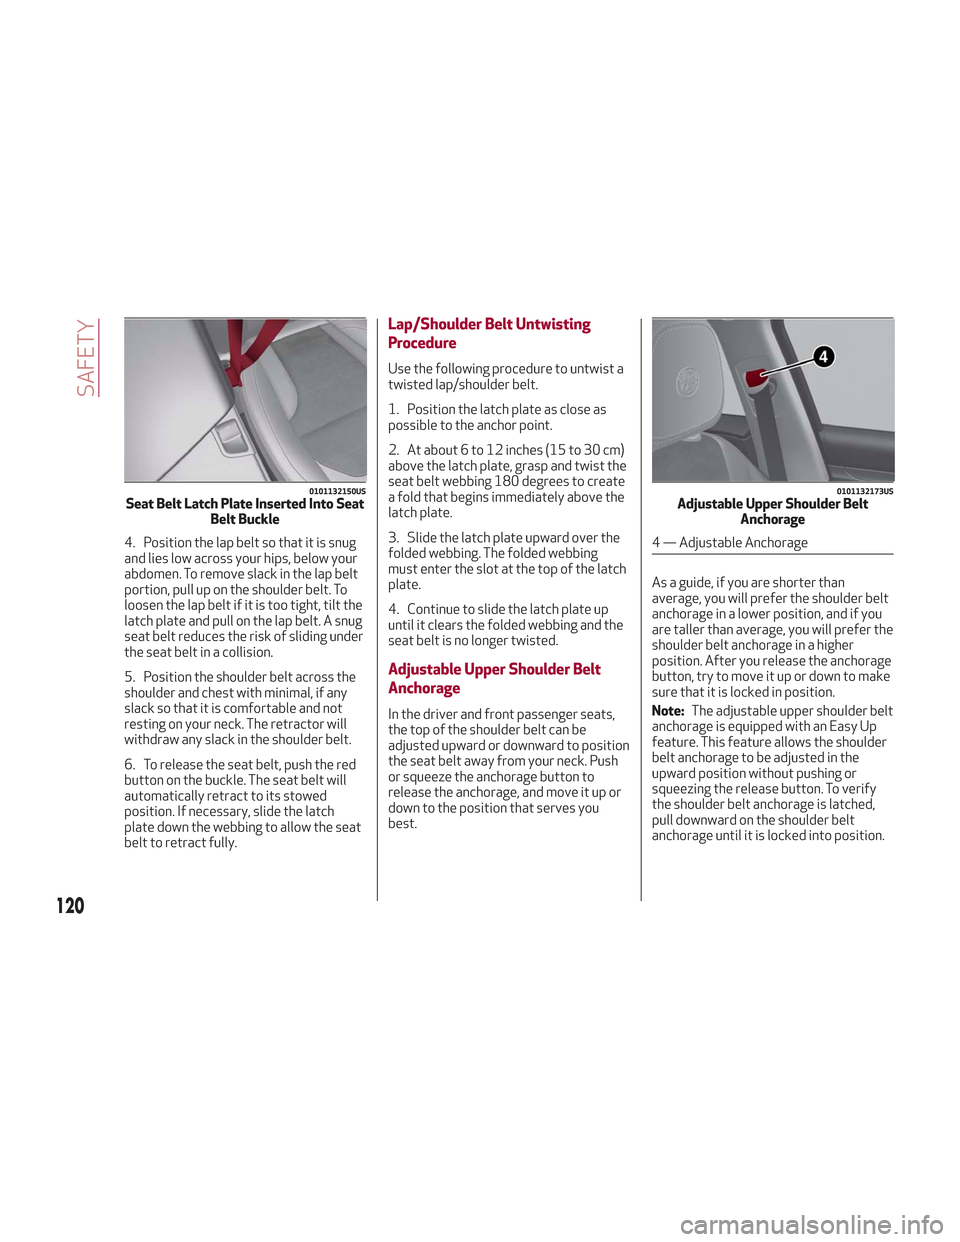
Adjustable Upper Shoulder Belt
Anchorage
In the driver and front passenger seats,
the top of the shoulder belt can be
adjusted upward or downward to position
the seat belt away from your neck. Push
or squeeze the anchorage button to
release the anchorage, and move it up or
down to the position that serves you
best.As a guide, if you are shorter than
average, you will prefer the shoulder belt
anchorage in a lower position, and if you
are taller than average, you will prefer the
shoulder belt anchorage in a higher
position. After you release the anchorage
button, try to move it up or down to make
sure that it is locked in position.
Note:
The adjustable upper shoulder belt
anchorage is equipped with an Easy Up
feature. This feature allows the shoulder
belt anchorage to be adjusted in the
upward position without pushing or
squeezing the release button. To verify
the shoulder belt anchorage is latched,
pull downward on the shoulder belt
anchorage until it is locked into position.
0101132150USSeat Belt Latch Plate Inserted Into Seat Belt Buckle0101132173USAdjustable Upper Shoulder BeltAnchorage
4 — Adjustable Anchorage
120
SAFETY
Page 139 of 276
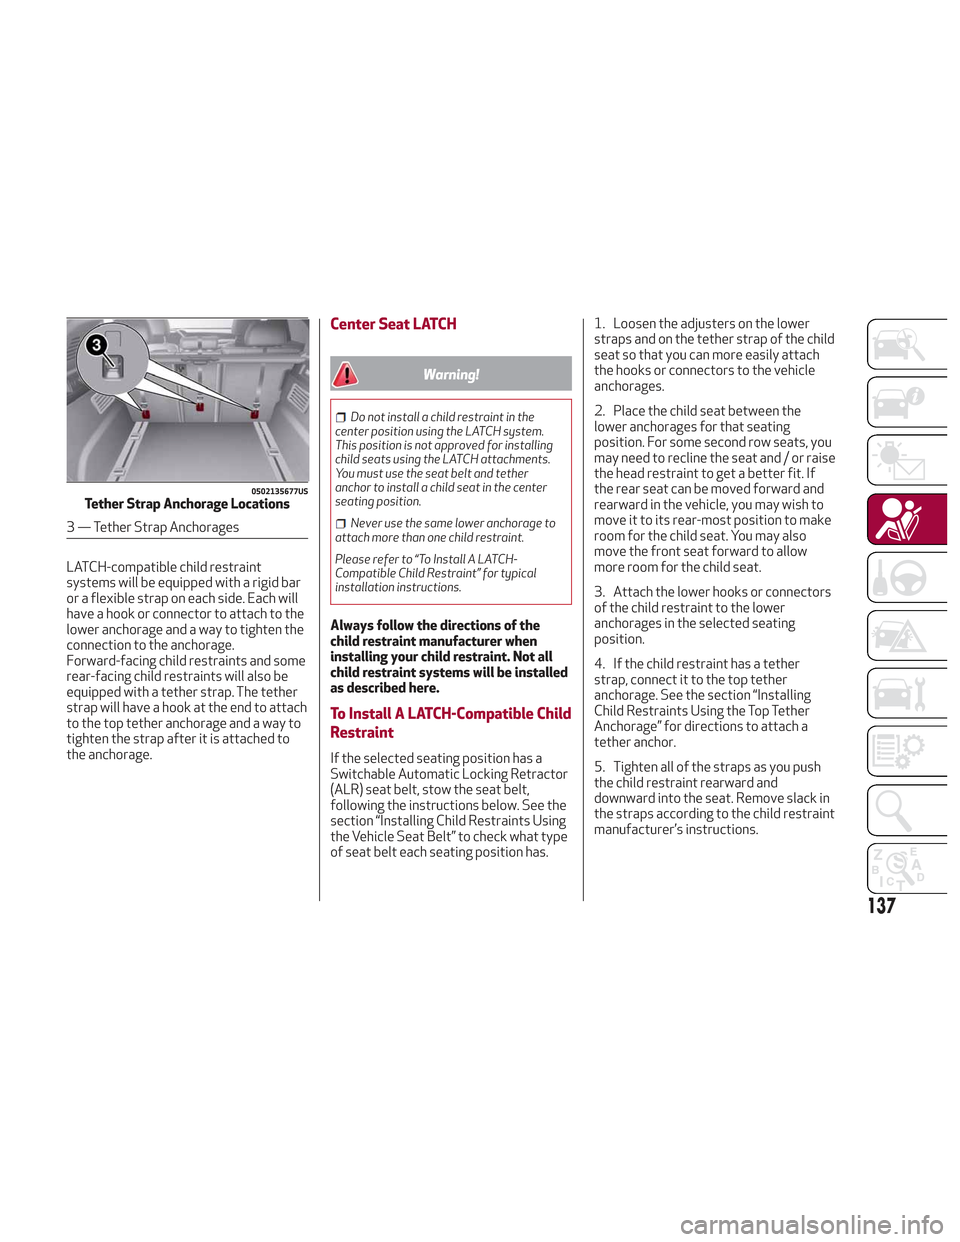
LATCH-compatible child restraint
systems will be equipped with a rigid bar
or a flexible strap on each side. Each will
have a hook or connector to attach to the
lower anchorage and a way to tighten the
connection to the anchorage.
Forward-facing child restraints and some
rear-facing child restraints will also be
equipped with a tether strap. The tether
strap will have a hook at the end to attach
to the top tether anchorage and a way to
tighten the strap after it is attached to
the anchorage.
Center Seat LATCH
Warning!
Do not install a child restraint in the
center position using the LATCH system.
This position is not approved for installing
child seats using the LATCH attachments.
You must use the seat belt and tether
anchor to install a child seat in the center
seating position.
Never use the same lower anchorage to
attach more than one child restraint.
Please refer to “To Install A LATCH-
Compatible Child Restraint” for typical
installation instructions.
Always follow the directions of the
child restraint manufacturer when
installing your child restraint. Not all
child restraint systems will be installed
as described here.
To Install A LATCH-Compatible Child
Restraint
If the selected seating position has a
Switchable Automatic Locking Retractor
(ALR) seat belt, stow the seat belt,
following the instructions below. See the
section “Installing Child Restraints Using
the Vehicle Seat Belt” to check what type
of seat belt each seating position has. 1. Loosen the adjusters on the lower
straps and on the tether strap of the child
seat so that you can more easily attach
the hooks or connectors to the vehicle
anchorages.
2. Place the child seat between the
lower anchorages for that seating
position. For some second row seats, you
may need to recline the seat and / or raise
the head restraint to get a better fit. If
the rear seat can be moved forward and
rearward in the vehicle, you may wish to
move it to its rear-most position to make
room for the child seat. You may also
move the front seat forward to allow
more room for the child seat.
3. Attach the lower hooks or connectors
of the child restraint to the lower
anchorages in the selected seating
position.
4. If the child restraint has a tether
strap, connect it to the top tether
anchorage. See the section “Installing
Child Restraints Using the Top Tether
Anchorage” for directions to attach a
tether anchor.
5. Tighten all of the straps as you push
the child restraint rearward and
downward into the seat. Remove slack in
the straps according to the child restraint
manufacturer’s instructions.
0502135677USTether Strap Anchorage Locations
3 — Tether Strap Anchorages
137
Page 140 of 276
6. Test that the child restraint is
installed tightly by pulling back and forth
on the child seat at the belt path. It should
not move more than 1 inch (25.4 mm) in
any direction.
How To Stow An Unused
Switchable-ALR (ALR) Seat Belt:
When using the LATCH attaching system
to install a child restraint, stow all ALR
seat belts that are not being used by
other occupants or being used to secure
child restraints. An unused belt could
injure a child if they play with it and
accidentally lock the seat belt retractor.
Before installing a child restraint using
the LATCH system, buckle the seat belt
behind the child restraint and out of the
child’s reach. If the buckled seat belt
interferes with the child restraint
installation, instead of buckling it behind
the child restraint, route the seat belt
through the child restraint belt path and
then buckle it. Do not lock the seat belt.
Remind all children in the vehicle that the
seat belts are not toys and that they
should not play with them.
Warning!
Improper installation of a child restraint
to the LATCH anchorages can lead to failure
of the restraint. The child could be badly
injured or killed. Follow the child restraint
manufacturer’s directions exactly when
installing an infant or child restraint.
Child restraint anchorages are designed
to withstand only those loads imposed by
correctly-fitted child restraints. Under no
circumstances are they to be used for adult
seat belts, harnesses, or for attaching other
items or equipment to the vehicle.
Installing Child Restraints Using
The Vehicle Seat Belt
Child restraint systems are designed to
be secured in vehicle seats by lap belts or
the lap belt portion of a lap/shoulder belt.
Warning!
Improper installation or failure to
properly secure a child restraint can lead to
failure of the restraint. The child could be
badly injured or killed.
Follow the child restraint manufacturer’s
directions exactly when installing an infant
or child restraint.
The seat belts in the passenger seating
positions are equipped with a Switchable
Automatic Locking Retractor (ALR) that
is designed to keep the lap portion of the
seat belt tight around the child restraint
so that it is not necessary to use a locking
clip. The ALR retractor can be “switched”
into a locked mode by pulling all of the
webbing out of the retractor and then
letting the webbing retract back into the
retractor. If it is locked, the ALR will make a clicking noise while the webbing is
pulled back into the retractor. Refer to
the “Automatic Locking Mode”
description in “Switchable Automatic
Locking Retractors (ALR)” under
“Occupant Restraint Systems” for
additional information on ALR.
Please see the table below and the
following sections for more information.
Lap/Shoulder Belt Systems For
Installing Child Restraints In This
Vehicle
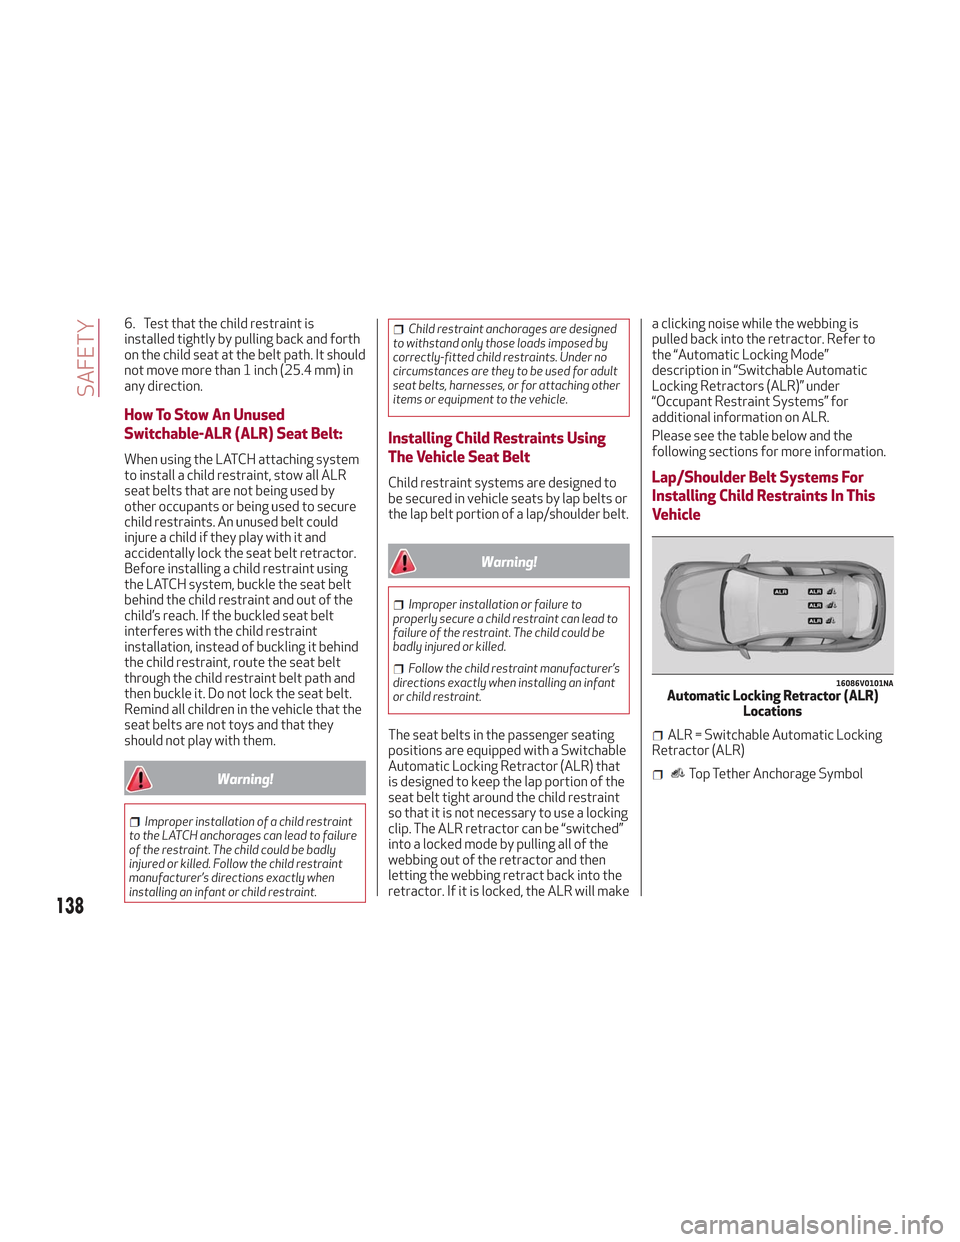
16086V0101NAAutomatic Locking Retractor (ALR)
Locations
ALR = Switchable Automatic Locking
Retractor (ALR)
Top Tether Anchorage Symbol
138
SAFETY
Page 145 of 276
Warning!
An improperly attached, damaged, folded, or
stacked floor mat, or damaged floor mat
fasteners may cause your floor mat to
interfere with the accelerator, brake, or
clutch pedals and cause a loss of vehicle
control. To prevent SERIOUS INJURY or
DEATH:
ALWAYS securely attachyour floor
mat using the floor mat fasteners. DO NOT
install your floor mat upside down or turn
your floor mat over. Lightly pull to confirm
mat is secured using the floor mat fasteners
on a regular basis.
ALWAYS REMOVE THE EXISTING FLOOR
MAT FROM THE VEHICLEbefore
installing any other floor mat. NEVER install
or stack an additional floor mat on top of an
existing floor mat.
ONLY install floor mats designed to fit
your vehicle. NEVER install a floor mat that
cannot be properly attached and secured to
your vehicle. If a floor mat needs to be
replaced, only use a FCA approved floor mat
for the specific make, model, and year of
your vehicle.
ONLY use the driver’s side floor mat on
the driver’s side floor area. To check for
interference, with the vehicle properly
parked with the engine off, fully depress the
accelerator, the brake, and the clutch pedal
(if present) to check for interference. If your
floor mat interferes with the operation of
any pedal, or is not secure to the floor,
remove the floor mat from the vehicle and
place the floor mat in your trunk.
ONLY use the passenger’s side floor mat
on the passenger’s side floor area.
ALWAYS make sure objects cannot fall or
slide into the driver’s side floor area when
the vehicle is moving. Objects can become
trapped under accelerator, brake, or clutch
pedals and could cause a loss of vehicle
control.
NEVER place any objects under the floor
mat (e.g., towels, keys, etc.). These objects
could change the position of the floor mat
and may cause interference with the
accelerator, brake, or clutch pedals.
If the vehicle carpet has been removed
and re-installed, always properly attach
carpet to the floor and check the floor mat
fasteners are secure to the vehicle carpet.
Fully depress each pedal to check for
interference with the accelerator, brake, or
clutch pedals then re-install the floor mats.
It is recommended to only use mild soap
and water to clean your floor mats. After
cleaning, always check your floor mat has
been properly installed and is secured to
your vehicle using the floor mat fasteners
by lightly pulling mat.
Periodic Safety Checks You Should
Make Outside The Vehicle
Tires
Examine tires for excessive tread wear
and uneven wear patterns. Check for
stones, nails, glass, or other objects
lodged in the tread or sidewall. Inspect
the tread for cuts and cracks. Inspect
sidewalls for cuts, cracks, and bulges.
Check the wheel nuts for tightness.
Check the tires (including spare) for
proper cold inflation pressure.
Lights
Have someone observe the operation of
brake lights and exterior lights while you
work the controls. Check turn signal and
high beam indicator lights on the
instrument panel.
Door Latches
Check for proper closing, latching, and
locking.
Fluid Leaks
Check area under the vehicle after
overnight parking for fuel, coolant, oil, or
other fluid leaks. Also, if gasoline fumes
are detected or if fuel, or brake fluid
leaks are suspected. The cause should be
located and corrected immediately.
143
Page 148 of 276

STARTING THE ENGINE
Before starting the engine, be sure to
adjust the seat, the interior rear view
mirrors, and the door mirrors, and fasten
the seat belt correctly.
Never press the accelerator pedal before
starting the engine.
If necessary, messages indicating the
starting procedure can be shown in the
display.
Warning!
When leaving the vehicle, always remove
the key fob from the vehicle and lock your
vehicle.
Never leave children alone in a vehicle, or
with access to an unlocked vehicle.
Allowing children to be in a vehicle
unattended is dangerous for a number of
reasons. A child or others could be seriously
or fatally injured. Children should be warned
not to touch the parking brake, brake pedal
or the transmission gear selector.
Do not leave the key fob in or near the
vehicle, or in a location accessible to
children. A child could operate power
windows, other controls, or move the
vehicle.
Do not leave children or animals inside
parked vehicles in hot weather. Interior heat
build-up may cause serious injury or death.
Starting Procedure
Proceed as follows:
1. Apply the electric park brake and set
the gear selector to PARK (P) or
NEUTRAL (N).
2. Fully depress the brake pedal without
touching the accelerator.
3. Briefly push the ignition button.
4. If the engine doesn't start within a few
seconds, you need to repeat the
procedure.
If the problem persists, contact an
authorized dealer.
Warning!
Never pour fuel or other flammable liquid
into the throttle body air inlet opening in an
attempt to start the vehicle. This could
result in flash fire causing serious personal
injury.
Do not attempt to push or tow your
vehicle to get it started. Vehicles equipped
with an automatic transmission cannot be
started this way. Unburned fuel could enter
the catalytic converter and once the engine
has started, ignite and damage the
converter and vehicle.
If the vehicle has a discharged battery,
booster cables may be used to obtain a
start from a booster battery or the battery
in another vehicle. This type of start can be
dangerous if done improperly. Refer to “Jump Starting” in “In Case Of Emergency”
for further information.
Caution!
To prevent damage to the starter, do not
continuously crank the engine for more than
25 seconds at a time. Wait 60 seconds
before trying again.
Remote Starting System
This system uses the key fob to start the
engine conveniently from outside the
vehicle while still maintaining security.
The system has a range of at least 300
feet (91 meters).
The remote starting system also
activates the climate control (if
equipped), the heated seats (if equipped),
and the heated steering wheel (if
equipped), depending on temperatures
outside and inside of the vehicle.
Note:
Obstructions between the vehicle
and key fob may reduce this range.
How To Use Remote Start
All of the following conditions must be
met before the engine will remote start:
Gear selector in PARK (P).
Doors closed.
Hood closed.
Liftgate closed.
Hazard switch off.
146
STARTING AND OPERATING
Page 150 of 276
Warning!
Never pour fuel or other flammable liquid
into the throttle body air inlet opening in an
attempt to start the vehicle. This could
result in flash fire causing serious personal
injury.
Do not attempt to push or tow your
vehicle to get it started. Vehicles equipped
with an automatic transmission cannot be
started this way. Unburned fuel could enter
the catalytic converter and once the engine
has started, ignite and damage the
converter and vehicle.
If the vehicle has a discharged battery,
booster cables may be used to obtain a
start from a booster battery or the battery
in another vehicle. This type of start can be
dangerous if done improperly. Refer to
“Jump Starting” in “In Case Of Emergency”
for further information.
Caution!
To prevent damage to the starter, do not
continuously crank the engine for more than
25 seconds at a time. Wait 60 seconds
before trying again.
After Starting — Warming Up The
Engine
Proceed as follows:
Travel slowly, letting the engine run at
a reduced RPM, without accelerating
suddenly.
It is recommended to wait until the
digital engine coolant temperature
indicator starts to rise for maximum
performance.
Stopping The Engine
To stop the engine, proceed as follows:
1. Park the vehicle in a position that is
not dangerous for oncoming traffic.
2. Engage the PARK (P) mode.
3. With engine idling, push the
START/STOP button on the steering
wheel to STOP the engine.
Note: Do not leave the ignition in ON
mode when the engine is off.
To shut off the engine with vehicle speed
greater than 5 mph (8 km/h), you must
push and hold the ignition or push the
START/STOP button three times
consecutively within a few seconds. The
engine will shut down, and the ignition will
be placed in the ON mode
With the keyless ignition system, it is
possible to go away from the vehicle
taking the key fob with you, without the
engine switching off. The vehicle will inform about the absence of the key on
board, only if the doors are closed.
Stopping the engine (cycling from the ON
to the STOP position) the accessories are
still powered for about three minutes, or
until a door is opened.
When the ignition is in the STOP/OFF
mode, the window switches remain active
for three minutes. Opening a front door
will cancel this function.
After severe driving, idle the engine to
allow the temperature inside the engine
compartment to cool before shutting off
the engine.
Turbocharger Cool Down
It is recommended before switching the
vehicle off, to keep the engine idling for a
few minutes so that the turbocharger can
be suitably lubricated. This procedure is
particularly recommended after severe
driving.
After a full load operation, keep the
engine idling for three to five minutes
before switching it off.
This time allows the lubricating oil and
the engine coolant to eliminate the
excessive heat from combustion
chamber, bearings, inner components and
turbocharger.
148
STARTING AND OPERATING
Page 151 of 276
ENGINE BLOCK HEATER — IF
EQUIPPED
The engine block heater warms the
engine and permits quicker starts in cold
weather.
Connect the cord to a 110-115 Volt AC
electrical outlet with a grounded,
three-wire extension cord.
For ambient temperatures below 0°F
(-18°C), the engine block heater is
recommended. For ambient
temperatures below -20°F (-29°C), the
engine block heater is required.
The engine block heater cord is routed
under the hood, behind to the driver’s
side headlamp. Follow the steps below to
properly use the engine block heater:
1. Locate the engine block heater cord
(access door on the passenger side wiper
cowl).
2. Pull the cord to the front of the
vehicle and plug it into a grounded,
three-wire extension cord.
3. After the vehicle is running, properly
stow away behind access door on the
passenger side wiper cowl.Note:
The engine block heater cord is a
factory installed option. If your vehicle is
not equipped, heater cords are available
from your authorized dealer.
The engine block heater will require
110 Volts AC and 6.5 Amps to activate
the heater element.
The engine block heater must be
plugged in at least 1 hour to have a
warming effect on the engine and at
least 4 hours to have a warming effect
when ambient temperatures are below
-20 F (-29 C)
Warning!
Remember to disconnect the engine block
heater cord before driving. Damage to the
110-115 Volt electrical cord could cause
electrocution.
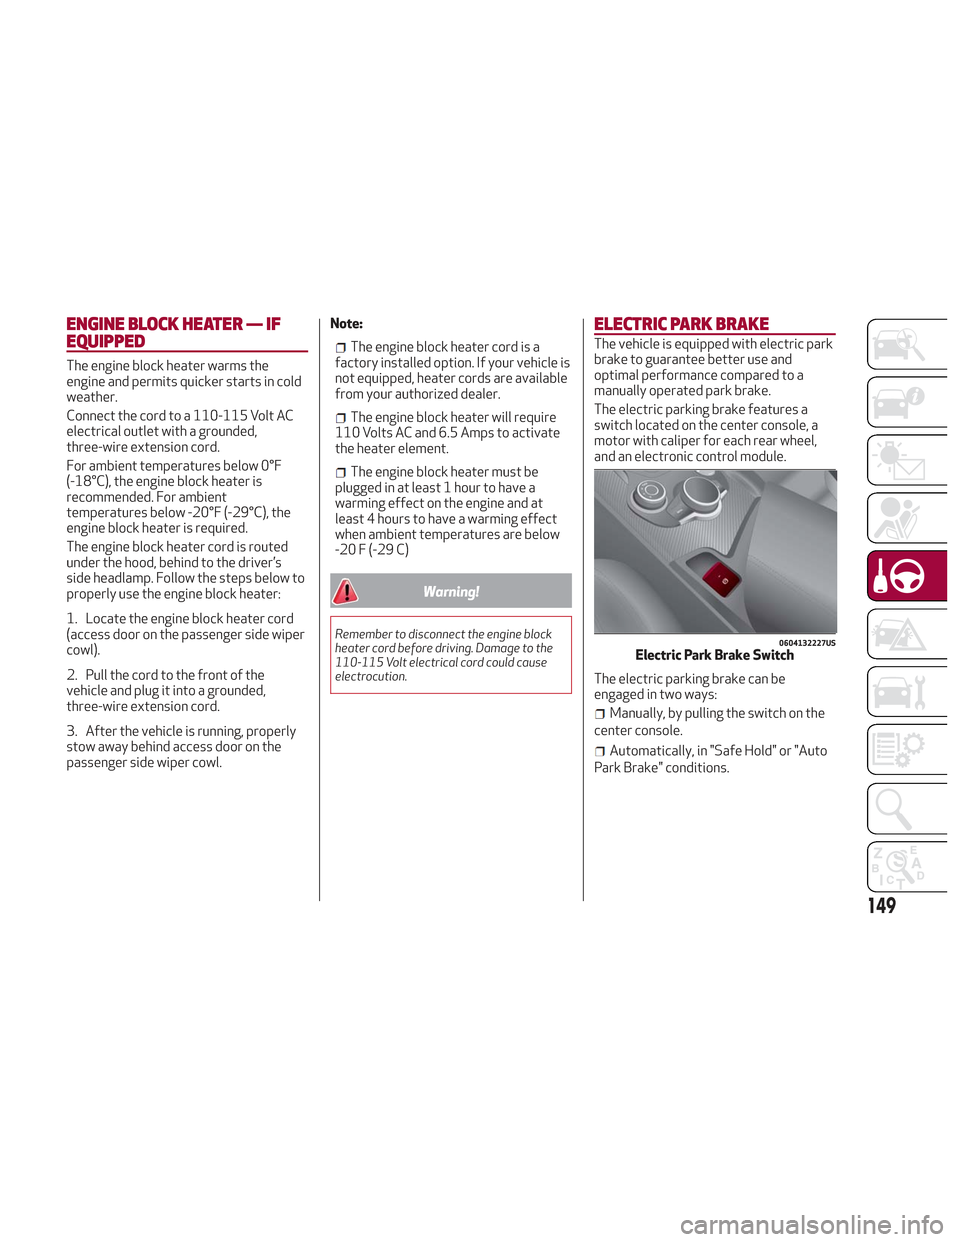
ELECTRIC PARK BRAKE
The vehicle is equipped with electric park
brake to guarantee better use and
optimal performance compared to a
manually operated park brake.
The electric parking brake features a
switch located on the center console, a
motor with caliper for each rear wheel,
and an electronic control module.
The electric parking brake can be
engaged in two ways:
Manually, by pulling the switch on the
center console.
Automatically, in "Safe Hold" or "Auto
Park Brake" conditions.
0604132227USElectric Park Brake Switch
149
Page 156 of 276

To transition the vehicle into REVERSE
(R) mode from DRIVE (D) mode, or into
DRIVE (D) mode from REVERSE (R)
mode, it is necessary to move the gear
selector by pushing the gear selector
button.
When using AutoStick, activate it by
moving the gear selector from DRIVE (D)
to the left and then forward toward the -
symbol or backward toward the + symbol
and the gear is changed.
To shift out of PARK (P), or to pass from
position NEUTRAL (N) to position DRIVE
(D) or REVERSE (R), the vehicle must be
moving at a low speed or stopped, and
the brake pedal must also be pressed.
Note:
DO NOT accelerate while shifting
from position PARK (P) or NEUTRAL (N)
to another position.
After selecting a gear, wait a few
seconds before accelerating. This
precaution is particularly important with
engine cold.
It is not possible to select NEUTRAL
(N) mode from PARK (P) mode.
Transmission Operating Modes
PARK (P)
The transmission is locked in this mode.
The engine can be started in this mode.
Note: Never try to engage PARK (P)
mode when the vehicle is moving. Before
leaving the vehicle, make sure this mode is engaged (letter P shown on the display
and gear selector) and that the park
brake is engaged.
When parking on a flat surface, first
engage the PARK (P) mode and then
engage the electric park brake.
When parking uphill, before activating
the PARK (P) mode, engage the electric
park brake. Otherwise, it could be
difficult to engage the (P) mode.
To check that the PARK (P) mode is actually
engaged, make sure (P) is illuminated on
the display and on the gear selector.
Warning!
Never use the PARK position as a
substitute for the park brake. Always apply
the park brake fully when parked to guard
against vehicle movement and possible
injury or damage.
Your vehicle could move and injure you
and others if it is not in PARK. Check by
trying to move the gear selector out of
PARK with the brake pedal released. Make
sure the transmission is in PARK before
leaving the vehicle.
It is dangerous to shift out of PARK or
NEUTRAL if the engine speed is higher than
idle speed. If your foot is not firmly pressing
the brake pedal, the vehicle could
accelerate quickly forward or in reverse.
You could lose control of the vehicle and hit
someone or something. Only shift into gear
when the engine is idling normally and your
foot is firmly pressing the brake pedal.
Unintended movement of a vehicle could
injure those in or near the vehicle. As with all
vehicles, you should never exit a vehicle
while the engine is running. Before exiting a
vehicle, always apply the park brake, shift
the transmission into PARK, and turn the
ignition STOP/OFF. When the ignition is in
the STOP/OFF mode, the transmission is
locked in PARK, securing the vehicle against
unwanted movement.
When leaving the vehicle, always make
sure the ignition is in the STOP/OFF mode,
remove the key fob from the vehicle, and
lock the vehicle.
Never leave children alone in a vehicle, or
with access to an unlocked vehicle. Allowing
children to be in a vehicle unattended is
dangerous for a number of reasons. A child
or others could be seriously or fatally
injured. Children should be warned not to
touch the park brake, brake pedal or the
transmission gear selector.
Do not leave the key fob in or near the
vehicle (or in a location accessible to
children), and do not leave the ignition in the
ON mode. A child could operate power
windows, other controls, or move the
vehicle.
154
STARTING AND OPERATING