2018 Alfa Romeo Stelvio tow
[x] Cancel search: towPage 157 of 276

Caution!
Before moving the transmission gear
selector out of PARK, you must push the
ignition button to cycle from STOP/OFF
mode to the ON mode, and also press the
brake pedal. Otherwise, damage to the gear
selector could result.
DO NOT race the engine when shifting
from PARK or NEUTRAL into another gear
range, as this can damage the drivetrain.
REVERSE (R)
Select this mode only with the vehicle at
a standstill.
NEUTRAL (N)
Use this range when the vehicle is
standing for prolonged periods with the
engine running. The engine may be
started in this range. Apply the electric
park brake and shift the transmission
into PARK (P) if you must leave the
vehicle.
Warning!
Do not coast in NEUTRAL and never turn off
the ignition to coast down a hill. These are
unsafe practices that limit your response to
changing traffic or road conditions. You
might lose control of the vehicle and have a
collision.
DRIVE (D)
Use this mode in normal driving
conditions.
Shifting from DRIVE (D) to PARK (P) or
REVERSE (R) modes must take place
only after releasing the accelerator
pedal, with vehicle at a standstill and
brake pedal pressed.
This mode ensures automatic
engagement of the most suitable gears
for driving needs and maximum fuel
economy in terms of consumption.
In this position, the transmission shifts
the gears automatically, selecting the
most suitable for forward driving among
those available as you go. In this way the
vehicle's optimal driving characteristics
are provided for all conditions.
AutoStick
In the case of frequent shifting (e.g. for
sport driving, when the vehicle is driven
with a heavy load, on slopes, when towing
heavy trailers), it is recommended to use
the AutoStick (sequential shifting) mode
to select and keep a lower fixed ratio.
In these conditions, the use of a lower
gear improves vehicle performance and
prevents overheating.
It is possible to shift from DRIVE (D)
mode to AutoStick mode regardless of
vehicle speed. Activation
Starting from DRIVE (D) mode, to
activate the sequential drive mode, move
the gear selector to the left (– and +
indication of the trim). The gear engaged
will be shown on the display.
Shifting is made by moving the gear
selector forward, toward symbol – or
backward, toward symbol +.
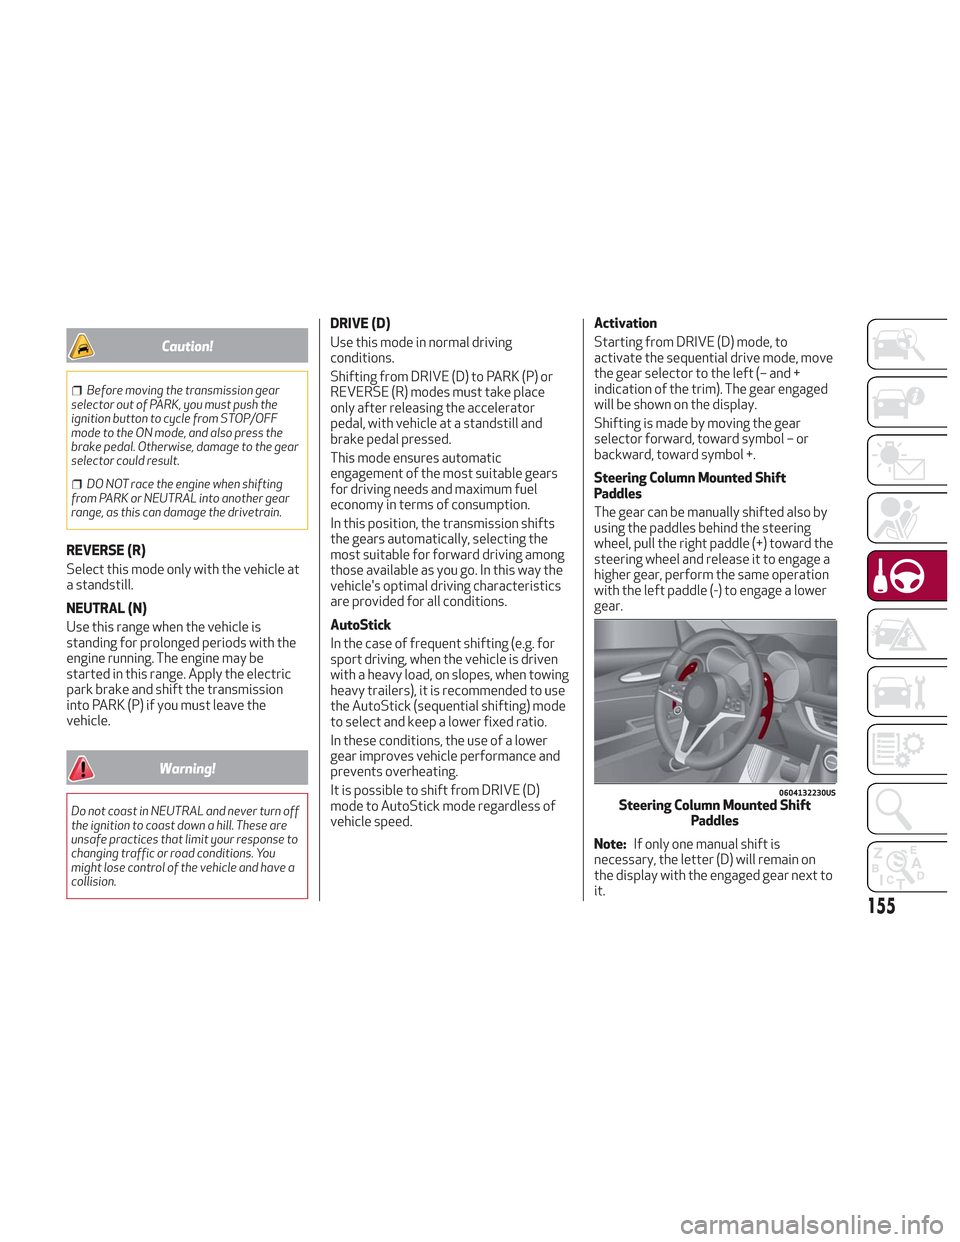
Steering Column Mounted Shift
Paddles
The gear can be manually shifted also by
using the paddles behind the steering
wheel, pull the right paddle (+) toward the
steering wheel and release it to engage a
higher gear, perform the same operation
with the left paddle (-) to engage a lower
gear.
Note:
If only one manual shift is
necessary, the letter (D) will remain on
the display with the engaged gear next to
it.
0604132230USSteering Column Mounted Shift Paddles
155
Page 168 of 276

you should accelerate until you are close
to that speed. Then, push and release the
RES button.
To Deactivate
Lightly pressing the brake pedal
deactivates the speed control without
deleting the set speed.
The speed control may also be
deactivated by applying the electric park
brake or when the braking system is
operated (e.g. operation of the ESC
system).
The set speed is deleted in the following
cases:
Pushing the on/off button twice
The ignition is cycled to the STOP
position
There is a malfunction with the Speed
Control.
ADAPTIVE CRUISE CONTROL
(ACC) — IF EQUIPPED
System Description
Adaptive Cruise Control (ACC) is a driver
assist system that combines the speed
control functions with maintaining the
distance from the vehicle ahead.
The system allows to set and hold the
vehicle at the desired speed without
needing to press the accelerator. It also
allows to set and hold a distance from the
vehicle ahead (these settings are set by
the driver).
The Adaptive Cruise Control (ACC)
system uses a radar sensor located
behind the front bumper and a camera
located in the center/upper part of the
windshield, to detect the presence of a
vehicle close ahead. This system enhances driving comfort
while on the highway or out of town with
light traffic.
If the sensor does not detect a vehicle
ahead, the system will maintain a fixed
set speed.
If the sensor detects a vehicle ahead, the
system automatically intervenes by
braking (or accelerating) slightly in order
keep the set distance while not
exceeding the original set speed, seeking
to adapt to the speed of the vehicle
ahead.
Note:
Adaptive Cruise Control
performance is not guaranteed under the
following circumstances, and it is
0403132300USFront Bumper Radar Location
0403132301USWindshield Camera Location
166
STARTING AND OPERATING
Page 177 of 276

Audio system not available: If the
display shows a message that the audio
system is not available, it means that the
acoustic signal will be emitted by the
instrument panel, and not through the
vehicles speakers.
Note: Some conditions may influence
the performance of the Park Sensors
System:
Reduced sensor sensitivity could be
due to the presence of ice, snow, mud, or
thick paint on the surface of the sensor.
The sensors may detect a false
obstacle (echo interference) due to
mechanical interference, for example
when washing the vehicle or in extreme
weather.
The signals sent by the sensors can
be altered by the presence of ultrasonic
systems (e.g. pneumatic brake systems
of trucks or pneumatic drills) near the
vehicle.
System performance can be
influenced by the position of the
sensors. For example, due to a change in
the ride setting (caused by wear to the
shock absorbers or suspension), by
changing tires, overloading the vehicle or
operations that require the vehicle to be
lowered.
Be sure not to place bumper stickers
or other adhesives over the sensors as
this will affect system performance.
Warning!
Before using the Park Sensors System, it
is strongly recommended that the ball
mount and hitch ball assembly is
disconnected from the vehicle when the
vehicle is not used for towing. Failure to do
so can result in injury or damage to vehicles
or obstacles because the hitch ball will be
much closer to the obstacle than the rear
fascia when the loudspeaker sounds the
continuous tone. Also, the sensors could
detect the ball mount and hitch ball
assembly, depending on its size and shape,
giving a false indication that an obstacle is
behind the vehicle.
Drivers must be careful when backing up
even when using the Park Sensors System.
Always check carefully behind your vehicle,
look behind you, and be sure to check for
pedestrians, animals, other vehicles,
obstructions, and blind spots before
backing up. You are responsible for safety
and must continue to pay attention to your
surroundings. Failure to do so can result in
serious injury or death.
Caution!
The Park Sensors System is only a
parking aid and it is unable to recognize
every obstacle, including small obstacles.
Parking curbs might be temporarily
detected or not detected at all. Obstacles
located above or below the sensors will not
be detected when they are in close
proximity.
The vehicle must be driven slowly when
using the Park Sensors System in order to
be able to stop in time when an obstacle is
detected. It is recommended that the driver
looks over his/her shoulder when using the
Park Sensors System.
175
Page 185 of 276

Curb Weight
The curb weight of a vehicle is defined as
the total weight of the vehicle with all
fluids, including vehicle fuel, at full
capacity conditions, and with no
occupants or cargo loaded into the
vehicle. The front and rear curb weight
values are determined by weighing your
vehicle on a commercial scale before any
occupants or cargo are added.
Loading
The actual total weight and the weight of
the front and rear of your vehicle at the
ground can best be determined by
weighing it when it is loaded and ready
for operation.The entire vehicle should first be weighed
on a commercial scale to insure that the
GVWR has not been exceeded. The
weight on the front and rear of the
vehicle should then be determined
separately to be sure that the load is
properly distributed over the front and
rear axle. Weighing the vehicle may show
that the GAWR of either the front or rear
axles has been exceeded but the total
load is within the specified GVWR. If so,
weight must be shifted from front to rear
or rear to front as appropriate until the
specified weight limitations are met.
Store the heavier items down low and be
sure that the weight is distributed
equally. Stow all loose items securely
before driving.
Improper weight distributions can have
an adverse effect on the way your vehicle
steers and handles and the way the
brakes operate.
Caution!
Do not load your vehicle any heavier than the
GVWR or the maximum front and rear
GAWR. If you do, parts on your vehicle can
break, or it can change the way your vehicle
handles. This could cause you to lose control.
Also overloading can shorten the life of your
vehicle.
SUGGESTIONS FOR DRIVING
Saving Fuel
Below are some suggestions which may
help you save fuel and lower the amount
of harmful emissions released into the
atmosphere.
Vehicle Maintenance
Checks and operations should be carried
out in accordance with the Maintenance
Plan. Refer to "Scheduled Servicing" in
"Servicing And Maintenance" for further
information.
Tires
Check the tire pressures at least once
every four weeks: if the pressure is too
low, consumption levels increase as
resistance to rolling is higher.
Note:
Tire pressure that is too high can
cause premature tire wear, reduced
control, etc.
Unnecessary Loads
Do not travel with an overloaded liftgate.
The weight of the vehicle and its
arrangement greatly affect fuel
consumption and stability.
183
Page 189 of 276

IN CASE OF EMERGENCY
Have a flat tire or a burnt-out bulb?
At times, a problem such as these may
interfere with your driving experience.
The section on emergencies can help you
to deal with critical situations
independently.
In an emergency, we recommend that you
call the phone number found in the
Warranty Book.
You may also consider contacting an
authorized dealer.HAZARD WARNING LIGHTS.....188
BULB REPLACEMENT .........188
FUSES .................. .193
TIRE SERVICE KIT ............198
JUMP STARTING ............201
ENGINE OVERHEATING ........203
TOWING A DISABLED VEHICLE . . .204
TOW EYES ............... .206
ENHANCED ACCIDENT RESPONSE
SYSTEM (EARS) .............207
EVENT DATA RECORDER (EDR) . . .207
187
Page 199 of 276

Luggage Compartment Fuse Box
FUNCTIONFUSEAMPERE
Receiver module (TTM/TTEBM) F0140
Hi-Fi
system F0830
I-Drive / USB Socket / AUX / USB Charger F2110
KL15/a 12V Power socket in the luggage compartment F2220
Trailer light control unit power supply (+30) F120
Trailer light control unit power supply (+30) F215
Trailer socket (only EMEA) (+30) F310
Tow bar (+15) F410
08036V0015EMLuggage Compartment Control Unit
197
Page 201 of 276

Inflation Procedure
Warning!
Do not attempt to seal a tire on the side of
the vehicle closest to traffic. Pull far enough
off the road to avoid the danger of being hit
when using the Tire Service Kit.
Do not use Tire Service Kit or drive the
vehicle under the following circumstances:
If the puncture in the tire tread is
approximately 1/4 inch (6 mm) or larger.
If the tire has any sidewall damage.
If the tire has any damage from driving
with extremely low tire pressure.
If the tire has any damage from driving on
a flat tire.
If the wheel has any damage.
If you are unsure of the condition of the
tire or the wheel.
Keep Tire Service Kit away from open
flames or heat sources.
A loose Tire Service Kit thrown forward in
a collision or hard stop could endanger the
occupants of the vehicle. Always stow the
Tire Service Kit in the place provided. Failure
to follow these warnings can result in
injuries that are serious or fatal to you, your
passengers, and others around you.
Take care not to allow the contents of Tire
Service Kit to come in contact with hair,
eyes, or clothing. Tire Service Kit sealant is
harmful if inhaled, swallowed, or absorbed through the skin. It causes skin, eye, and
respiratory irritation. Flush immediately
with plenty of water if there is any contact
with eyes or skin. Change clothing as soon
as possible, if there is any contact with
clothing.
Tire Service Kit Sealant solution contains
latex. In case of an allergic reaction or rash,
consult a physician immediately. Keep Tire
Service Kit out of reach of children. If
swallowed, rinse mouth immediately with
plenty of water and drink plenty of water.
Do not induce vomiting! Consult a physician
immediately.
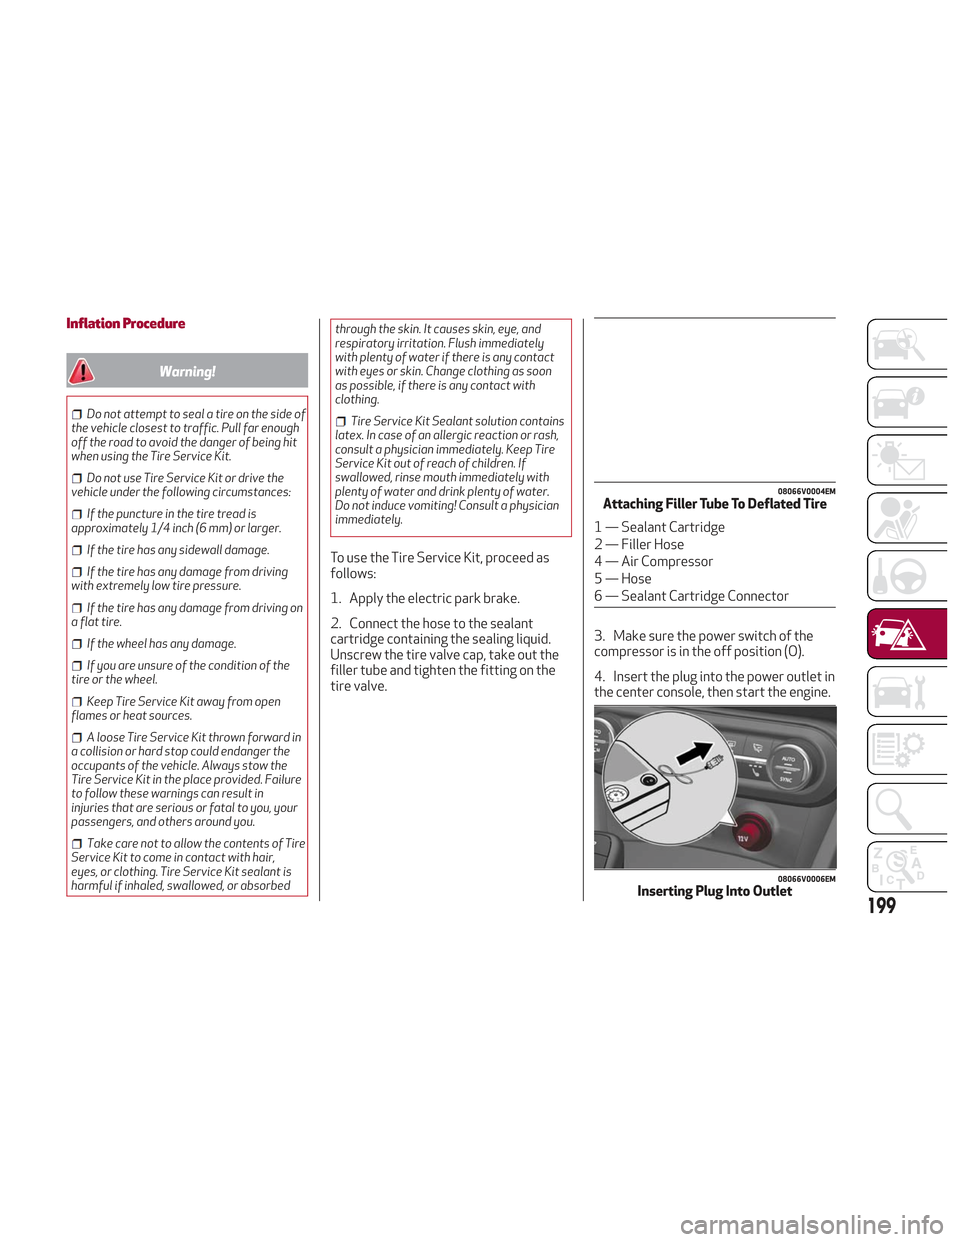
To use the Tire Service Kit, proceed as
follows:
1. Apply the electric park brake.
2. Connect the hose to the sealant
cartridge containing the sealing liquid.
Unscrew the tire valve cap, take out the
filler tube and tighten the fitting on the
tire valve. 3. Make sure the power switch of the
compressor is in the off position (O).
4. Insert the plug into the power outlet in
the center console, then start the engine.
08066V0004EMAttaching Filler Tube To Deflated Tire
1 — Sealant Cartridge
2 — Filler Hose
4 — Air Compressor
5 — Hose
6 — Sealant Cartridge Connector
08066V0006EMInserting Plug Into Outlet
199
Page 205 of 276

Cable Disconnection
Once the engine is started, remove the
connection cables in reverse sequence,
as described below:
1. Disconnect the negative (-) end of the
jumper cable from the remote negative (-)
post of the vehicle with the discharged
battery.
2. Disconnect the negative end (-) of the
jumper cable from the negative (-) post of
the booster battery.
3. Disconnect the opposite end of the
positive (+) jumper cable from the
positive (+) post of the booster battery.
4. Disconnect the positive (+) end of the
jumper cable from the positive (+) post of
the vehicle with the discharged battery.
If frequent jump starting is required to
start your vehicle, you should have the
battery and charging system inspected at
an authorized dealer.
Caution!
Accessories plugged into the vehicle power
outlets draw power from the vehicle’s
battery, even when not in use (i.e., cellular
phones, etc.). Eventually, if plugged in long
enough without engine operation, the
vehicle’s battery will discharge sufficiently
to degrade battery life and/or prevent the
engine from starting.
Bump Starting
Never jump start the engine by pushing,
towing or coasting downhill. You cannot
start a vehicle with an automatic
transmission by pushing it.
Caution!
Accessories plugged into the vehicle power
outlets draw power from the vehicle’s
battery, even when not in use (i.e., cellular
phones, etc.). Eventually, if plugged in long
enough without engine operation, the
vehicle’s battery will discharge sufficiently
to degrade battery life and/or prevent the
engine from starting.
ENGINE OVERHEATING
Engine overheating may occur in
situations such as (but not limited to)
extreme environmental temperatures or
frequent engine stops/starts. If the
engine becomes overheated, the Engine
Temperature Warning Light in the
instrument cluster will illuminate along
with a dedicated message. Refer to
"Warning Lights And Messages On The
Instrument Panel" in the "Getting To
Know Your Instrument Panel" for more
information.
In any of the following situations, you can
reduce the potential for overheating by
taking the appropriate action.
On the highways — slow down.
In city traffic — while stopped, place
the transmission in NEUTRAL, but do not
increase engine idle speed.
Note: There are steps that you can take
to slow down an impending overheat
condition:
If your air conditioner (A/C) is on, turn
it off. The A/C system adds heat to the
engine cooling system and turning the
A/C off can help remove this heat.
You can also turn the temperature
control to maximum heat, the mode
control to floor and the blower control to
high. This allows the heater core to act
as a supplement to the radiator and aids
in removing heat from the engine cooling
system.
203