2018 Alfa Romeo Stelvio clock
[x] Cancel search: clockPage 20 of 276

3. Remove the battery plug by rotating it
counter clockwise.
4. Remove the battery from its slot and
replace it with a new one of the same
type.Proceed in reverse order to reassemble
the key.
Caution!
The battery replacement operation must be
done with care, in order not to damage the
electronic key.
Request For Additional Keys
The system can recognize up to eight key
fobs with remote control.
To guarantee that the engine starts and
the vehicle operates correctly, use only
electronic key fobs specifically coded for
the vehicle’s electronics.
If an electronic key fob is coded for a
vehicle, it cannot be used on any other
vehicle.
General Information
The following regulatory statement
applies to all radio frequency (RF)
devices equipped in this vehicle:
This device complies with Part 15 of the
FCC Rules and with Industry Canada
license-exempt RSS standard(s).
Operation is subject to the following two
conditions:
1. This device may not cause harmful
interference, and
2. This device must accept any
interference received, including
interference that may cause undesired
operation.
Note:
Changes or modifications not
expressly approved by the party
responsible for compliance could void the
user’s authority to operate the
equipment.
04016S0004EMRemoving Battery Plug
04016S0005EMBattery Location
18
GETTING TO KNOW YOUR VEHICLE
Page 25 of 276

When the function is disabled, this is
indicated by the light on the
Volumetric/Anti-Lift Protection button
flashing for several seconds.
Any disabling of the Volumetric/Anti-Lift
Protection must be repeated each time
the ignition is cycled off.
To Disarm The Alarm Using Passive
Entry
To completely deactivate the alarm (e.g.
during a long period of vehicle inactivity),
insert the blade of the emergency key,
found inside the key fob, into the door
handle lock cylinder and turn the
emergency key to the right (clockwise) to
lock the door(s).
DOORS
Locking And Unlocking Doors From The
Inside
If all doors are closed properly, they will
automatically lock once the vehicle has
exceeded approximately 12 MPH
(20 km/h) (“Auto Relock” function active).
Push the interior lock button on the driver
or passenger side door panel trim to lock
the doors.
Push the interior lock button on the rear
door panel trim to lock the rear doors
only.
With doors locked, push the unlock
button on the interior trim panel to
unlock the doors.
Warning!
Do not leave children or animals inside
parked vehicles in hot weather. Interior heat
build-up may cause serious injury or death.
For personal security and safety in the
event of a collision, lock the vehicle doors as
you drive as well as when you park and leave
the vehicle.
Before exiting a vehicle, always shift the
automatic transmission into PARK, apply
the parking brake, turn the engine OFF,
remove the key fob from the vehicle and
lock your vehicle.
Never leave children alone in a vehicle, or
with access to an unlocked vehicle.
Allowing children to be in a vehicle
unattended is dangerous for a number of
reasons. A child or others could be seriously
or fatally injured. Children should be warned
not to touch the parking brake, brake pedal
or the gear selector.
Do not leave the key fob in or near the
vehicle, or in a location accessible to
children. A child could operate power
windows, other controls, or move the
vehicle.
04046S0002EMVolumetric/Anti-Lift Protection Button
0101132136USDoor Lock And Unlock Switch Panel
23
Page 26 of 276

Caution!
An unlocked vehicle is an invitation. Always
remove the key from the ignition and lock all
of the doors when leaving the vehicle
unattended.
Locking/Unlocking Doors From The
Outside
When locking the doors from the outside
with the doors closed, push the lock
button on the key fob.
The door lock can be activated with all
doors locked and the liftgate open. When
the lock button on the key fob is pushed,
all locks are activated, including the
liftgate if it is open. The liftgate will be
locked when it is closed.
When unlocking the doors from the
outside, push the unlock button on the
key fob.
Locking/Unlocking Doors From The
Outside In An Emergency
If the battery is discharged or the key fob
is inoperable, you can lock or unlock the
doors from the outside by inserting the
blade of the emergency key, found inside
the key fob, into the door handle lock
cylinder and turn the emergency key as
follows.
Lock — Turn the emergency key to the
right (clockwise)
Unlock — Turn the emergency key to
the left (counter clockwise)
Passive Entry
The Passive Entry system can identify
the presence of a key fob near the doors
and liftgate.
The system enables the doors and
liftgate to be locked or unlocked without
pushing any button on the key fob.
The key fob is detected only after the
system recognizes the presence of a
hand on one of the front door handles. If
the detected key fob is valid, the doors
and the liftgate are unlocked (refer to the
Information and Entertainment System
Owner’s Manual Supplement for Passive
Entry Settings).
Note: The key fob may not be able to be
detected by the vehicle keyless-go
system if it is located next to a mobile
phone, laptop, or other electronic device;
these devices may block the key fob’s
wireless signal and prevent the
keyless-go system from starting the
vehicle.
Grasping the handle of the driver's door
unlocks the driver's side door, or all doors
depending on the mode set using the
Information and Entertainment System
(refer to the Information and
Entertainment System Owner’s Manual
Supplement for Passive Entry Settings). Note:
If wearing gloves, or if it has rained
and the door handle is wet, the activation
sensitivity of the Passive Entry function
may be reduced, resulting in a longer
reaction time.
Door Locking
To lock the doors, proceed as follows:
1. Make sure that you have the key fob
and are close to the driver’s or
passenger’s side door handle.
2. Push the Passive Entry door handle
button or the Passive Entry liftgate
button, which is located next to the
external liftgate release button. This will
lock all doors and the liftgate. Door
locking will activate the alarm as well.
0101132144USPassive Entry Door Handle Button
24
GETTING TO KNOW YOUR VEHICLE
Page 27 of 276

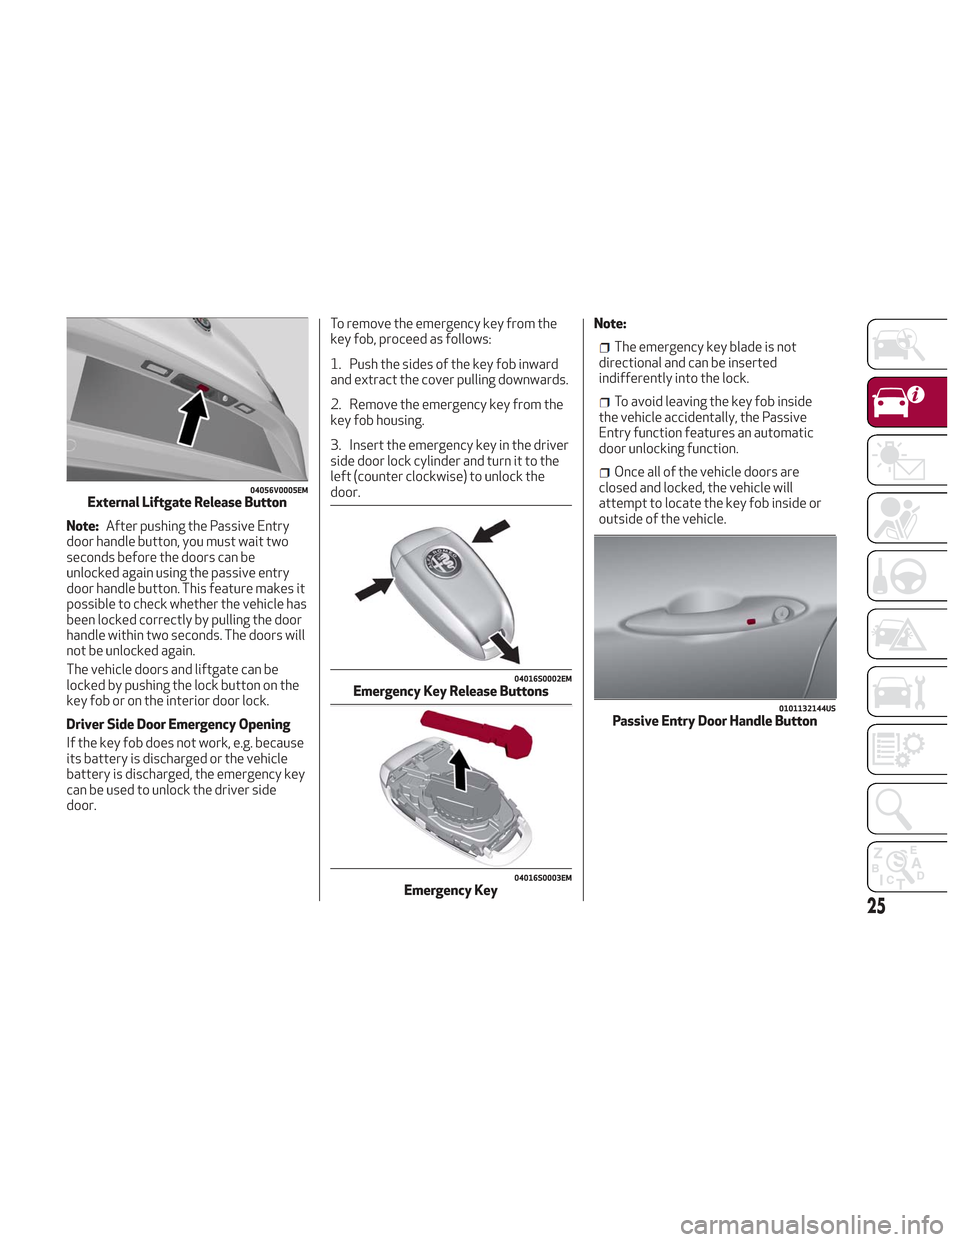
Note:After pushing the Passive Entry
door handle button, you must wait two
seconds before the doors can be
unlocked again using the passive entry
door handle button. This feature makes it
possible to check whether the vehicle has
been locked correctly by pulling the door
handle within two seconds. The doors will
not be unlocked again.
The vehicle doors and liftgate can be
locked by pushing the lock button on the
key fob or on the interior door lock.
Driver Side Door Emergency Opening
If the key fob does not work, e.g. because
its battery is discharged or the vehicle
battery is discharged, the emergency key
can be used to unlock the driver side
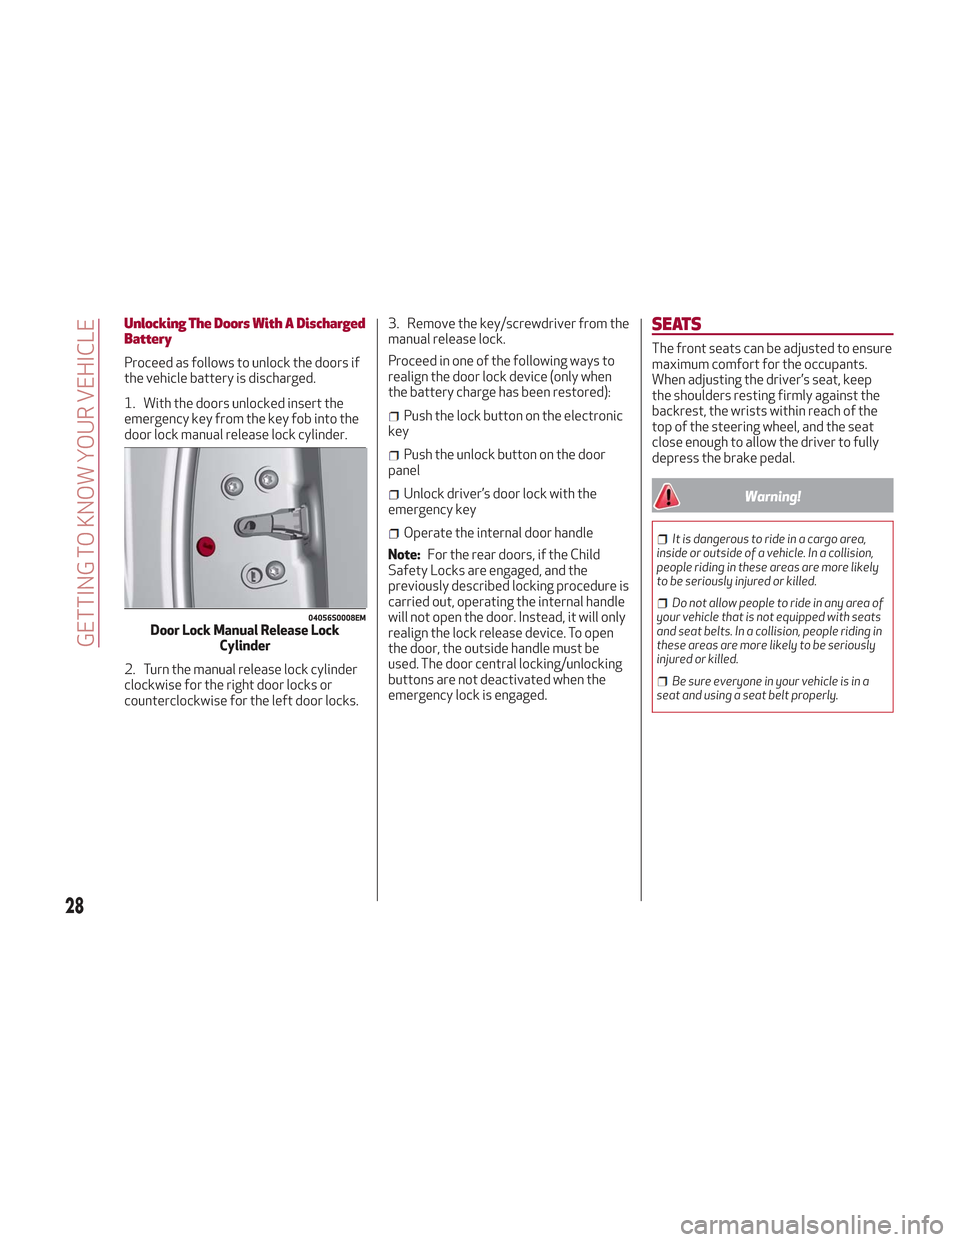
door. To remove the emergency key from the
key fob, proceed as follows:
1. Push the sides of the key fob inward
and extract the cover pulling downwards.
2. Remove the emergency key from the
key fob housing.
3. Insert the emergency key in the driver
side door lock cylinder and turn it to the
left (counter clockwise) to unlock the
door.
Note:
The emergency key blade is not
directional and can be inserted
indifferently into the lock.
To avoid leaving the key fob inside
the vehicle accidentally, the Passive
Entry function features an automatic
door unlocking function.
Once all of the vehicle doors are
closed and locked, the vehicle will
attempt to locate the key fob inside or
outside of the vehicle.
04056V0005EMExternal Liftgate Release Button
04016S0002EMEmergency Key Release Buttons
04016S0003EMEmergency Key
0101132144USPassive Entry Door Handle Button
25
Page 30 of 276

Unlocking The Doors With A Discharged
Battery
Proceed as follows to unlock the doors if
the vehicle battery is discharged.
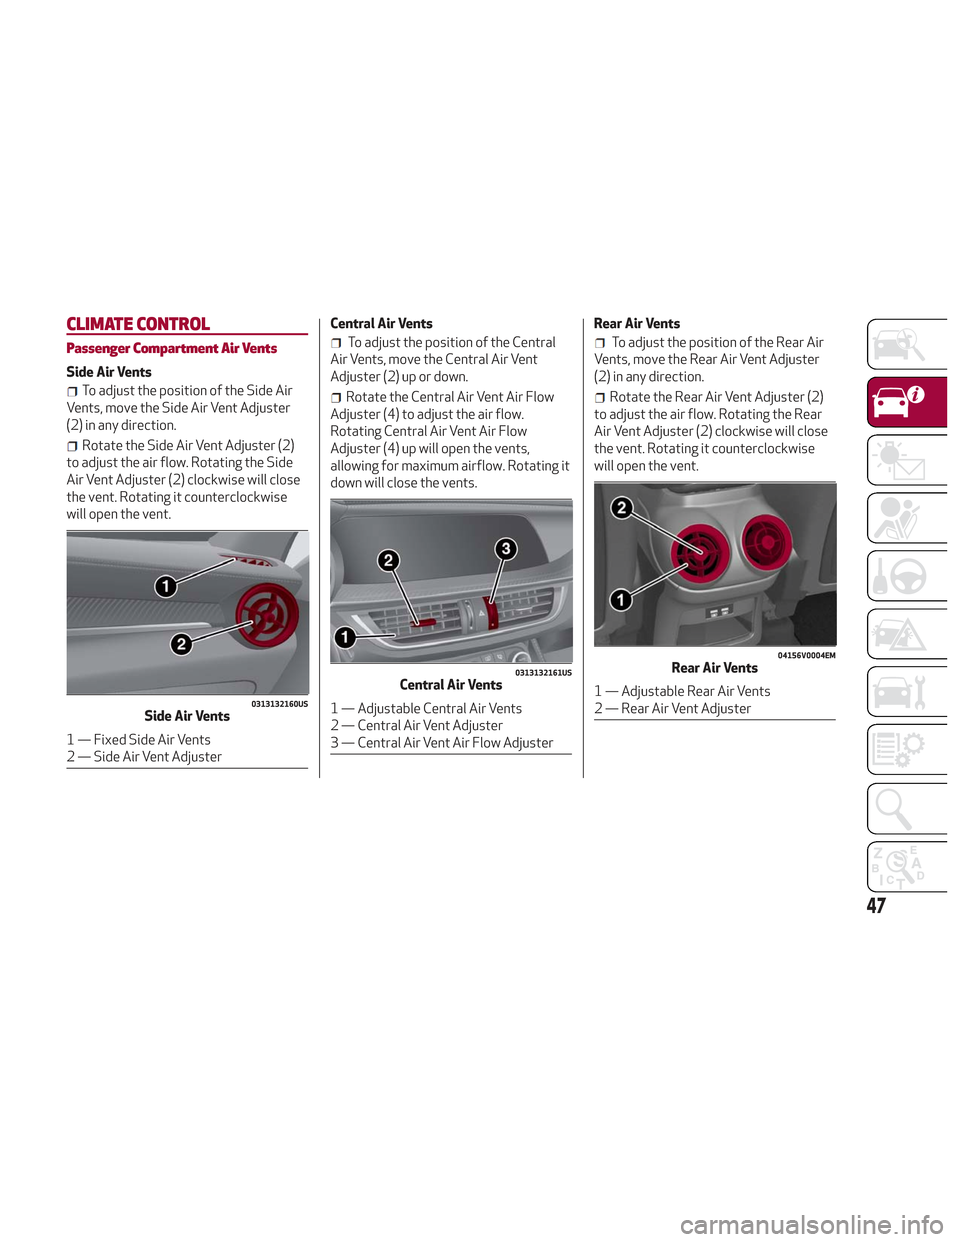
1. With the doors unlocked insert the
emergency key from the key fob into the
door lock manual release lock cylinder.
2. Turn the manual release lock cylinder
clockwise for the right door locks or
counterclockwise for the left door locks.3. Remove the key/screwdriver from the
manual release lock.
Proceed in one of the following ways to
realign the door lock device (only when
the battery charge has been restored):
Push the lock button on the electronic
key
Push the unlock button on the door
panel
Unlock driver’s door lock with the
emergency key
Operate the internal door handle
Note: For the rear doors, if the Child
Safety Locks are engaged, and the
previously described locking procedure is
carried out, operating the internal handle
will not open the door. Instead, it will only
realign the lock release device. To open
the door, the outside handle must be
used. The door central locking/unlocking
buttons are not deactivated when the
emergency lock is engaged.
SEATS
The front seats can be adjusted to ensure
maximum comfort for the occupants.
When adjusting the driver’s seat, keep
the shoulders resting firmly against the
backrest, the wrists within reach of the
top of the steering wheel, and the seat
close enough to allow the driver to fully
depress the brake pedal.
Warning!
It is dangerous to ride in a cargo area,
inside or outside of a vehicle. In a collision,
people riding in these areas are more likely
to be seriously injured or killed.
Do not allow people to ride in any area of
your vehicle that is not equipped with seats
and seat belts. In a collision, people riding in
these areas are more likely to be seriously
injured or killed.
Be sure everyone in your vehicle is in a
seat and using a seat belt properly.
04056S0008EMDoor Lock Manual Release Lock Cylinder
28
GETTING TO KNOW YOUR VEHICLE
Page 49 of 276

CLIMATE CONTROL
Passenger Compartment Air Vents
Side Air Vents
To adjust the position of the Side Air
Vents, move the Side Air Vent Adjuster
(2) in any direction.
Rotate the Side Air Vent Adjuster (2)
to adjust the air flow. Rotating the Side
Air Vent Adjuster (2) clockwise will close
the vent. Rotating it counterclockwise
will open the vent. Central Air Vents
To adjust the position of the Central
Air Vents, move the Central Air Vent
Adjuster (2) up or down.
Rotate the Central Air Vent Air Flow
Adjuster (4) to adjust the air flow.
Rotating Central Air Vent Air Flow
Adjuster (4) up will open the vents,
allowing for maximum airflow. Rotating it
down will close the vents. Rear Air Vents
To adjust the position of the Rear Air
Vents, move the Rear Air Vent Adjuster
(2) in any direction.
Rotate the Rear Air Vent Adjuster (2)
to adjust the air flow. Rotating the Rear
Air Vent Adjuster (2) clockwise will close
the vent. Rotating it counterclockwise
will open the vent.
0313132160USSide Air Vents
1 — Fixed Side Air Vents
2 — Side Air Vent Adjuster
0313132161USCentral Air Vents
1 — Adjustable Central Air Vents
2 — Central Air Vent Adjuster
3 — Central Air Vent Air Flow Adjuster
04156V0004EMRear Air Vents
1 — Adjustable Rear Air Vents
2 — Rear Air Vent Adjuster
47
Page 52 of 276

Climate Control Display Settings
The Climate Control settings are visible
on the Information and Entertainment
System radio screen.
The display on the Information and
Entertainment System is a pop up
window (1), which is activated by pushing
the buttons or turning the knobs on the
Climate Control system. The indicator
lights located on the buttons and knobs
indicate that the selected feature is
on/off. If no operation is performed for a
predetermined time, the pop-up will close
on the display.
Air Temperature Adjustment
Rotate the driver or passenger
Temperature Adjustment Knob clockwise
for warmer temperatures or
counterclockwise for cooler
temperatures. The set temperatures are
shown on the Information and
Entertainment System.
Push the SYNC button to sync the driver
and passenger air temperatures.
Rotate the passenger Temperature
Adjustment Knob to cancel the SYNC
function. This will set a new passenger
side temperature.
Rotate the Temperature Adjustment
Knob fully clockwise to engage the HI
(maximum heating) setting or fully
counterclockwise to engage the LO
(maximum cooling) setting. To deactivate
these functions, rotate the Temperature
Adjustment Knob to the desired
temperature.
Rear passengers’ temperature is linked
to driver side selection.
Air Distribution Selection
Push the Air Distribution Selection
button on the faceplate to change the
mode of air distribution. The follow
selectable option are explained below:
Air flow to the windshield and
demister window vents to
demist/defrost them.
Air flow at the central and side
dashboard vents to ventilate the
chest and the face.
Air flow to the front and rear floor
vents. This setting heats the
passenger compartment the
quickest.
Air flow distributed between the
floor vents (hotter air) and the
central and side dashboard vents
(cooler air). This air distribution
setting is useful on sunny days
during spring and autumn.
Air flow distributed between the
floor vents, windshield, and front
side window defrosting/demisting
vents. This distribution setting
warms the passenger compartment
while preventing the windows from
fogging up.0521128655USClimate Control Display Settings
1 — Climate Control Pop-up Display
50
GETTING TO KNOW YOUR VEHICLE
Page 53 of 276

Air flow distribution between the
windshield demisting/defrosting
vents, and side/central dashboard
vents. This distribution setting
sends air to the windshield in sunny
conditions.
Air flow distribution to all vents on
the vehicle.
In AUTO mode, the Climate Controls
automatically manage the air
distribution. When set manually, the
respective symbols on the Information
and Entertainment System indicate the
air distribution setting.
Fan Speed Adjustment
Turn the Blower Speed Knob to increase
or decrease the blower speed. The speed
is displayed with lighted indicators in the
Information and Entertainment System
display.
Maximum fan speed = all indicators
illuminated on the Information and
Entertainment System display
Minimum fan speed = one indicator
illuminated on the Information and
Entertainment System display
The fan can be turned off by rotating the
Blower Speed Knob clockwise to position
O (all segments on the Information and
Entertainment System display are turned
off).
Note: To restore automatic control of
the fan speed, push the AUTO button.
AUTO Button
When the AUTO button is pushed
(indicator illuminated), the Climate
Control system automatically adjusts the
following settings:
Quantity and distribution of air flow in
the passenger compartment
The air conditioner
Air recirculation
Cancels any manual settings
Selecting the AUTO function illuminates
the indicator on the A/C button.
If air distribution or the fan speed is
manual adjusted, the AUTO button
indicator will turn off to indicate that the
Climate Control system is no longer in
AUTO mode.
After a manual adjustment, push the AUTO
button to resume the automatic system.
SYNC Button
Push the SYNC button (indicator
illuminated) to sync the passenger side
air temperature with the driver side air
temperature.
This function makes temperature
regulation easier when the driver is
traveling alone.
Turn the passenger Temperature
Adjustment Knob or push the passenger
side Air Distribution Selection Button to
change the passenger side air
temperature and return to separate air
temperature management.
Air Recirculation And Air Quality
System (AQS)
Air Recirculation is managed according to
the following operating mode:
Automatic engagement: indicator is
illuminated above the “A” on the Air
Recirculation Button
Forced activation (air circulation
always activated): indicator illuminated
above the
icon on the Air
Recirculation Button
Forced deactivation (air recirculation
always off with intake of outside air):
both indicators not illuminated on the Air
Recirculation Button
The three operating conditions are
obtained by pushing the Air Recirculation
Button
in sequence.
Enabling The Air Quality System (AQS)
Function — If Equipped
When the automatic recirculation
function is selected, the AQS function
automatically activates internal air
recirculation when the outside air is
polluted (e.g. in heavy traffic and tunnels).
At low external temperatures or in high
humidity, the automatic function turns
off to avoid fogging up the windows. The
user can select the function again by
pushing the Air Recirculation Button.
51