2018 Alfa Romeo Stelvio height
[x] Cancel search: heightPage 31 of 276
Sparco Racing Seats — If Equipped
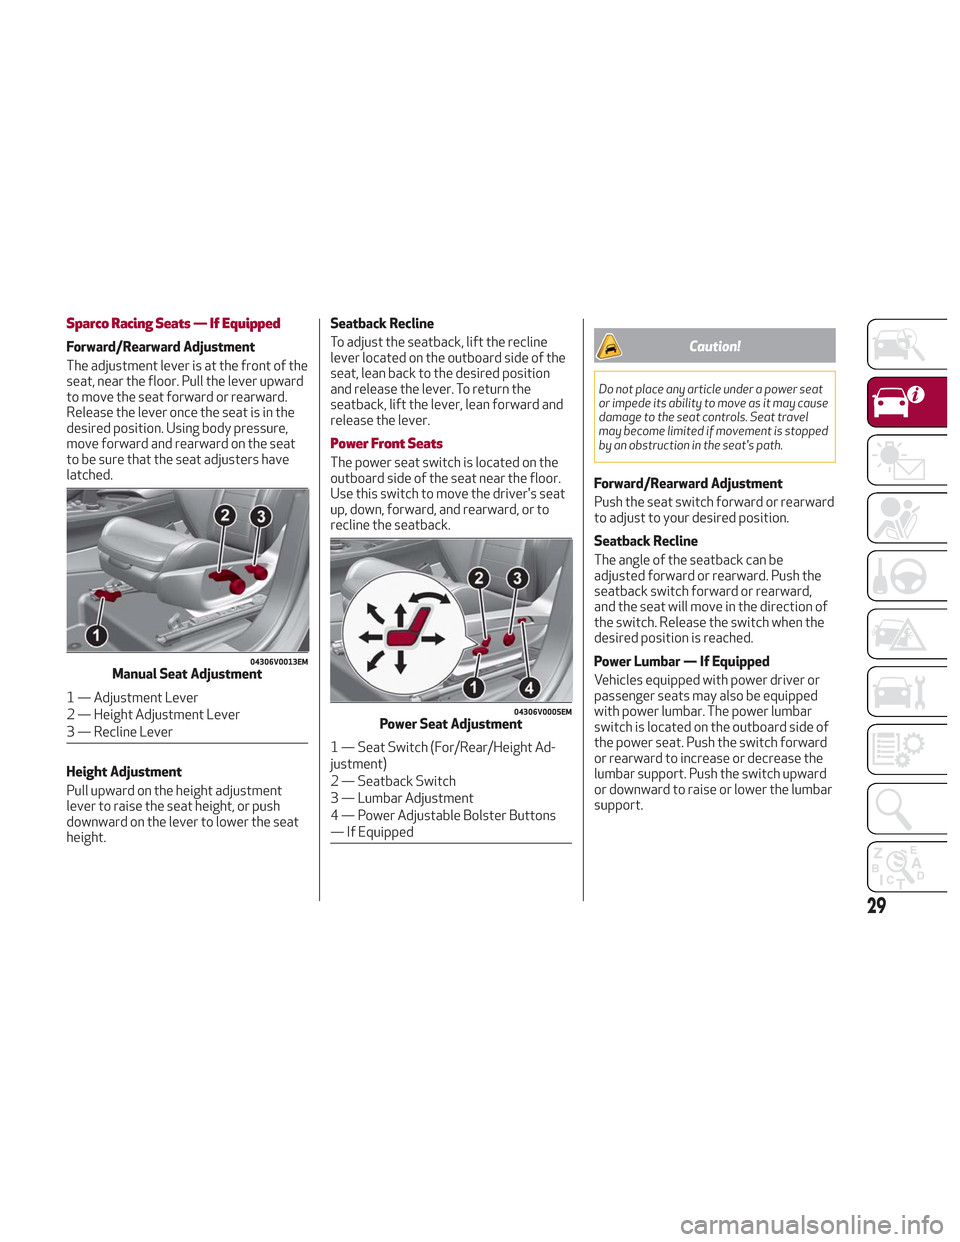
Forward/Rearward Adjustment
The adjustment lever is at the front of the
seat, near the floor. Pull the lever upward
to move the seat forward or rearward.
Release the lever once the seat is in the
desired position. Using body pressure,
move forward and rearward on the seat
to be sure that the seat adjusters have
latched.
Height Adjustment
Pull upward on the height adjustment
lever to raise the seat height, or push
downward on the lever to lower the seat
height.Seatback Recline
To adjust the seatback, lift the recline
lever located on the outboard side of the
seat, lean back to the desired position
and release the lever. To return the
seatback, lift the lever, lean forward and
release the lever.
Power Front Seats
The power seat switch is located on the
outboard side of the seat near the floor.
Use this switch to move the driver's seat
up, down, forward, and rearward, or to
recline the seatback.
Caution!
Do not place any article under a power seat
or impede its ability to move as it may cause
damage to the seat controls. Seat travel
may become limited if movement is stopped
by an obstruction in the seat's path.
Forward/Rearward Adjustment
Push the seat switch forward or rearward
to adjust to your desired position.
Seatback Recline
The angle of the seatback can be
adjusted forward or rearward. Push the
seatback switch forward or rearward,
and the seat will move in the direction of
the switch. Release the switch when the
desired position is reached.
Power Lumbar — If Equipped
Vehicles equipped with power driver or
passenger seats may also be equipped
with power lumbar. The power lumbar
switch is located on the outboard side of
the power seat. Push the switch forward
or rearward to increase or decrease the
lumbar support. Push the switch upward
or downward to raise or lower the lumbar
support.
04306V0013EMManual Seat Adjustment
1 — Adjustment Lever
2 — Height Adjustment Lever
3 — Recline Lever04306V0005EMPower Seat Adjustment
1 — Seat Switch (For/Rear/Height Ad-
justment)
2 — Seatback Switch
3 — Lumbar Adjustment
4 — Power Adjustable Bolster Buttons
— If Equipped
29
Page 32 of 276

Height Adjustment
The height of the seats can be adjusted
up or down. Pull upward or push
downward on the seat switch, and the
seat will move in the direction of the
switch. Release the switch when the
desired position is reached.
Seat Angle Adjustment (Tilting) — If
Equipped
The seat angle can be adjusted in four
directions. Lift or push the front part of
seat switch to move the front part of the
seat in the corresponding direction.
Release the seat switch when the seat
has reached the desired position.
Power Bolster Adjustment — If
Equipped
Push the power bolster adjustment
buttons to regulate the width of the
backrest through the lateral padding.
Seat Cushion Extension — If Equipped
Lift the adjustment lever and push the
front of the cushion forward or rearward
to extend the cushion by a few inches
(centimeters).Driver Memory Seat
The driver memory seat buttons can
store and recall three different driver’s
seat positions, as well as outside power
mirror positions. Storing and recalling
can be done with the ignition in the ON
mode, vehicle speed at 0 mph (0 km/h),
and the driver’s side door closed, or for
3 minutes after having opened the
driver's side door. An audible chime is
heard to confirm a memory profile is set
or recalled. To set a memory profile, first
adjust your seat (and power mirror
position if desired) until you are in the
desired position. Then, push the memory
button you want to assign the set
position to for 1.5 seconds. When a new
seat position is memorized, the
previously memorized position on the
same button is automatically
overwritten. Recalling a memorizedposition can also be done for
approximately 3 minutes after the doors
are opened and for approximately
1 minute after the engine is stopped. To
recall a memorized position, push the
assigned button briefly.
04306V0011EMSeat Cushion Extension
6 — Adjustment Lever
0403132208USDriver Memory Seat Buttons Location
30
GETTING TO KNOW YOUR VEHICLE
Page 36 of 276
HEAD RESTRAINTS
Head restraints are designed to reduce
the risk of injury by restricting head
movement in the event of a rear impact.
Head restraints should be adjusted so
that the top of the head restraint is
located above the top of your ear.
Warning!
A loose head restraint thrown forward in
a collision or hard stop could cause serious
injury or death to occupants of the vehicle.
Always securely stow removed head
restraints in a location outside the occupant
compartment.
ALL the head restraints MUST be
reinstalled in the vehicle to properly protect
the occupants. Follow the re-installation
instructions above prior to operating the
vehicle or occupying a seat.
Do not place items over the top of the
Reactive Head Restraint, such as coats,
seat covers or portable DVD players. These
items may interfere with the operation of
the Reactive Head Restraint in the event of
a collision and could result in serious injury
or death.
Front Head Restraints (Adjustments)
Note: If the vehicle is equipped with
Sparco Racing Seats, the head restraints
are not adjustable or removable.
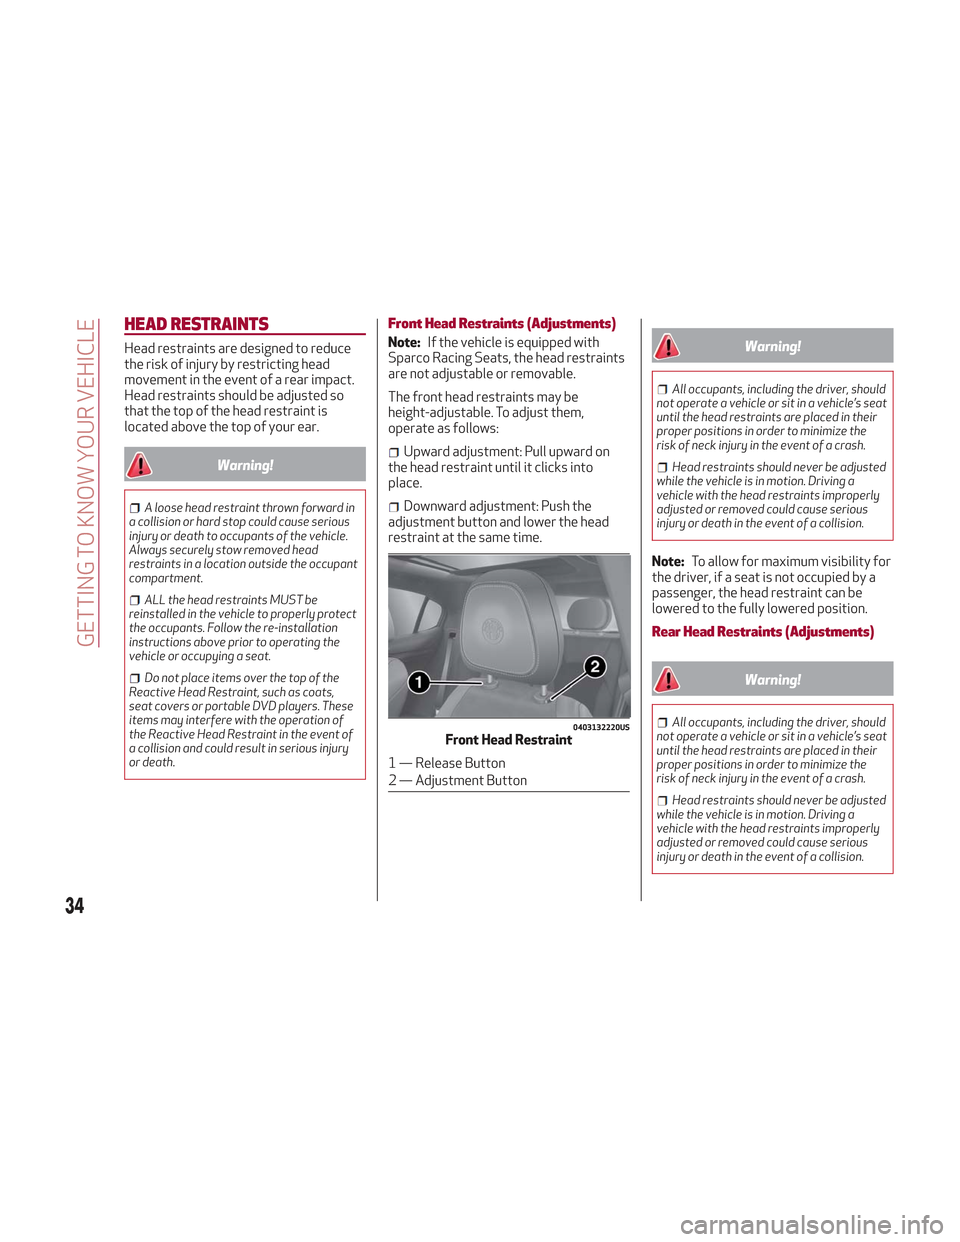
The front head restraints may be
height-adjustable. To adjust them,
operate as follows:
Upward adjustment: Pull upward on
the head restraint until it clicks into
place.
Downward adjustment: Push the
adjustment button and lower the head
restraint at the same time.
Warning!
All occupants, including the driver, should
not operate a vehicle or sit in a vehicle’s seat
until the head restraints are placed in their
proper positions in order to minimize the
risk of neck injury in the event of a crash.
Head restraints should never be adjusted
while the vehicle is in motion. Driving a
vehicle with the head restraints improperly
adjusted or removed could cause serious
injury or death in the event of a collision.
Note: To allow for maximum visibility for
the driver, if a seat is not occupied by a
passenger, the head restraint can be
lowered to the fully lowered position.
Rear Head Restraints (Adjustments)
Warning!
All occupants, including the driver, should
not operate a vehicle or sit in a vehicle’s seat
until the head restraints are placed in their
proper positions in order to minimize the
risk of neck injury in the event of a crash.
Head restraints should never be adjusted
while the vehicle is in motion. Driving a
vehicle with the head restraints improperly
adjusted or removed could cause serious
injury or death in the event of a collision.
0403132220USFront Head Restraint
1 — Release Button
2 — Adjustment Button
34
GETTING TO KNOW YOUR VEHICLE
Page 37 of 276
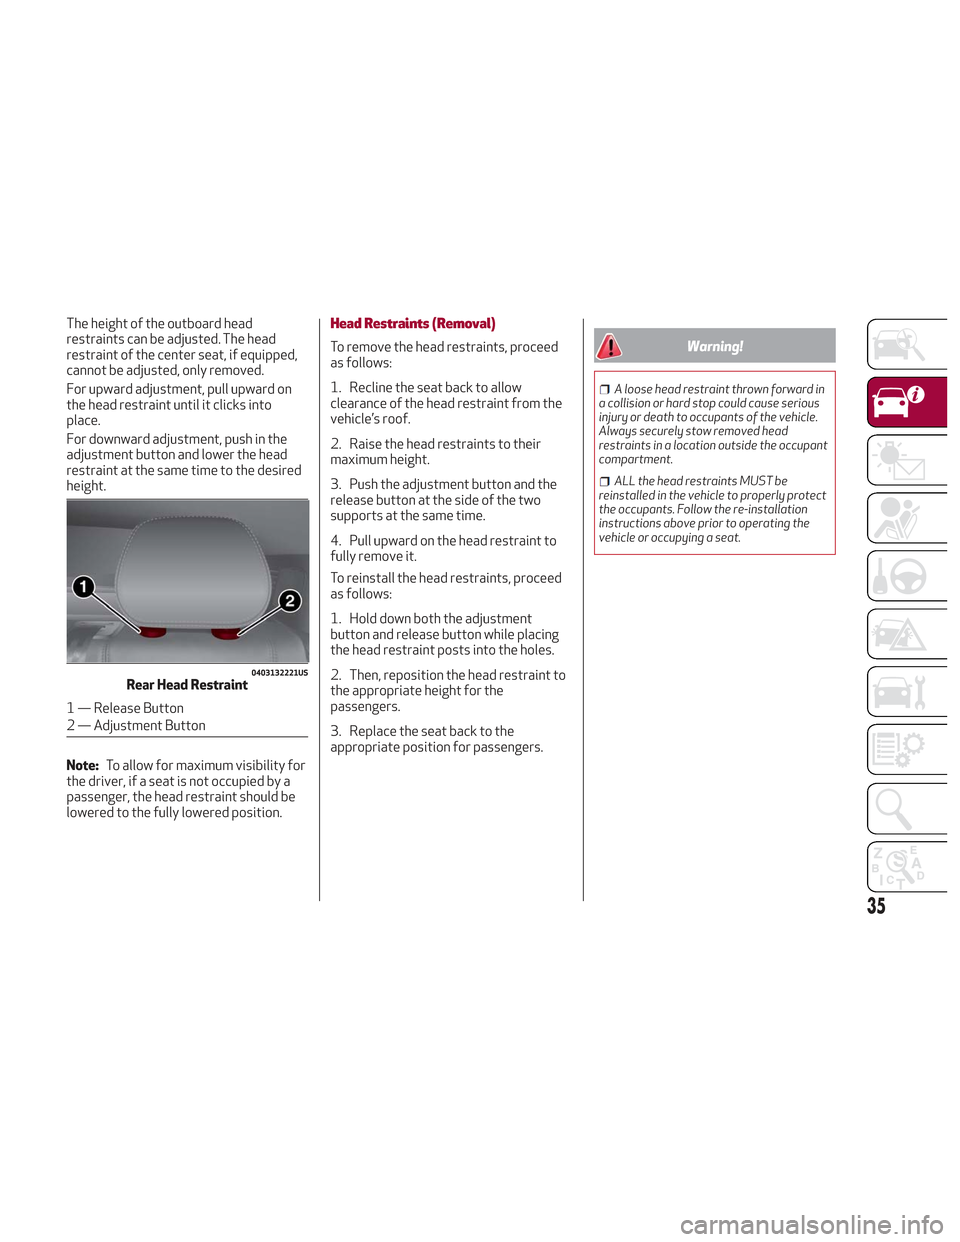
The height of the outboard head
restraints can be adjusted. The head
restraint of the center seat, if equipped,
cannot be adjusted, only removed.
For upward adjustment, pull upward on
the head restraint until it clicks into
place.
For downward adjustment, push in the
adjustment button and lower the head
restraint at the same time to the desired
height.
Note:To allow for maximum visibility for
the driver, if a seat is not occupied by a
passenger, the head restraint should be
lowered to the fully lowered position.Head Restraints (Removal)
To remove the head restraints, proceed
as follows:
1. Recline the seat back to allow
clearance of the head restraint from the
vehicle’s roof.
2. Raise the head restraints to their
maximum height.
3. Push the adjustment button and the
release button at the side of the two
supports at the same time.
4. Pull upward on the head restraint to
fully remove it.
To reinstall the head restraints, proceed
as follows:
1. Hold down both the adjustment
button and release button while placing
the head restraint posts into the holes.
2. Then, reposition the head restraint to
the appropriate height for the
passengers.
3. Replace the seat back to the
appropriate position for passengers.Warning!
A loose head restraint thrown forward in
a collision or hard stop could cause serious
injury or death to occupants of the vehicle.
Always securely stow removed head
restraints in a location outside the occupant
compartment.
ALL the head restraints MUST be
reinstalled in the vehicle to properly protect
the occupants. Follow the re-installation
instructions above prior to operating the
vehicle or occupying a seat.
0403132221USRear Head Restraint
1 — Release Button
2 — Adjustment Button
35
Page 60 of 276
POWER LIFTGATE
Unlocking of the liftgate is electrically
operated and is deactivated when the
vehicle is in motion.
If anything obstructs the power liftgate
while it is closing or opening, the liftgate
will automatically reverse to the closed
or open position, provided it meets
sufficient resistance.
The liftgate height is adjustable to avoid
difficulties in tight spaces. To customize
the liftgate opening position, proceed as
follows:
1. Open the liftgate.
2. Manually move the liftgate to the
desired position.
3. Push one of the closing buttons for at
least five seconds (successful
programming is indicated by the turn
signals flashing three times).
The liftgate is now programmed to open
to the set position.
This function can be selected on the
Information and Entertainment System.
To set the liftgate opening height, refer
to the Information and Entertainment
System Owner’s Manual Supplement for
further information.
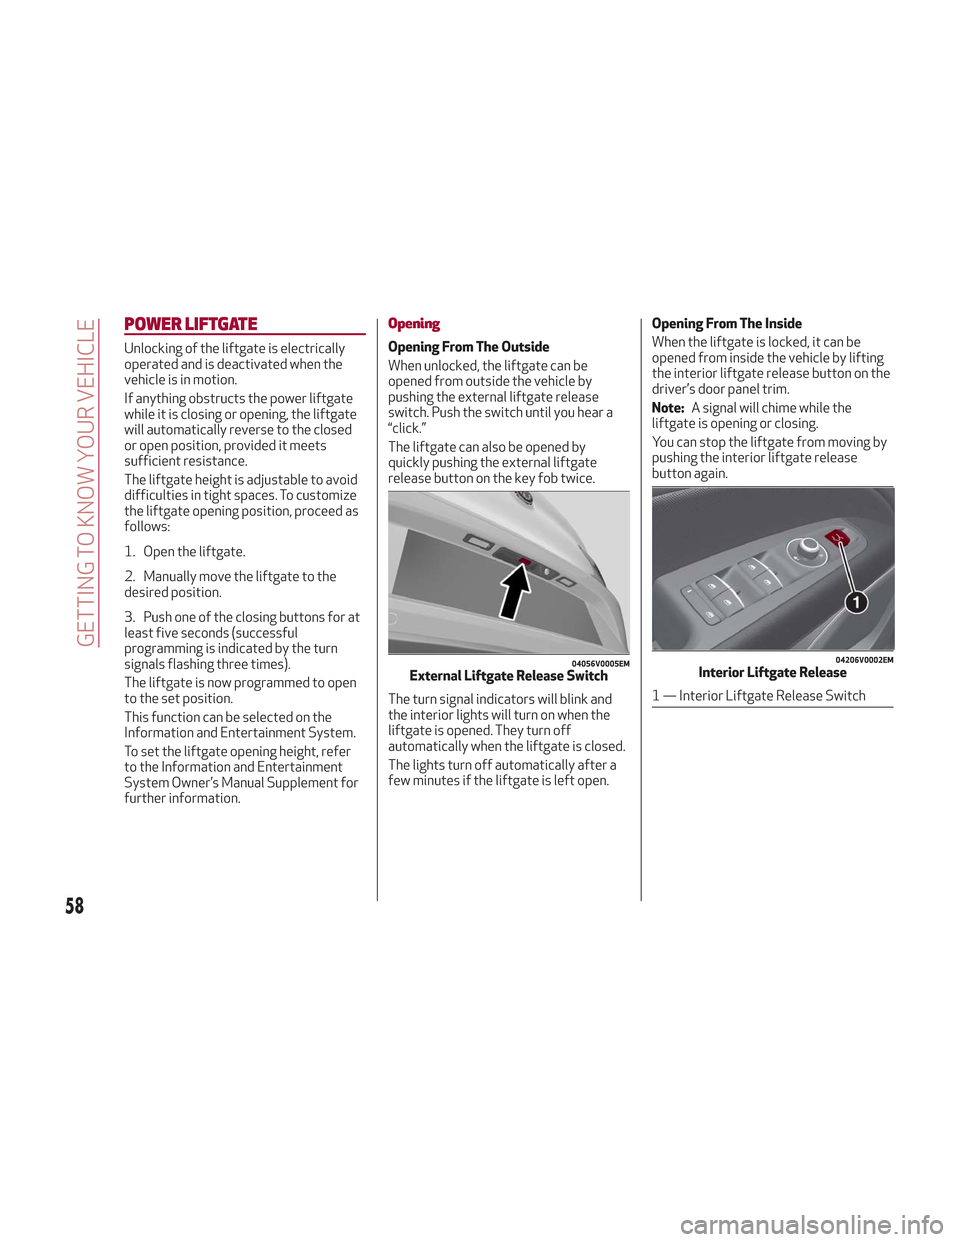
Opening
Opening From The Outside
When unlocked, the liftgate can be
opened from outside the vehicle by
pushing the external liftgate release
switch. Push the switch until you hear a
“click.”
The liftgate can also be opened by
quickly pushing the external liftgate
release button on the key fob twice.
The turn signal indicators will blink and
the interior lights will turn on when the
liftgate is opened. They turn off
automatically when the liftgate is closed.
The lights turn off automatically after a
few minutes if the liftgate is left open.Opening From The Inside
When the liftgate is locked, it can be
opened from inside the vehicle by lifting
the interior liftgate release button on the
driver’s door panel trim.
Note:
A signal will chime while the
liftgate is opening or closing.
You can stop the liftgate from moving by
pushing the interior liftgate release
button again.
04056V0005EMExternal Liftgate Release Switch
04206V0002EMInterior Liftgate Release
1 — Interior Liftgate Release Switch
58
GETTING TO KNOW YOUR VEHICLE
Page 61 of 276
Liftgate Emergency Opening
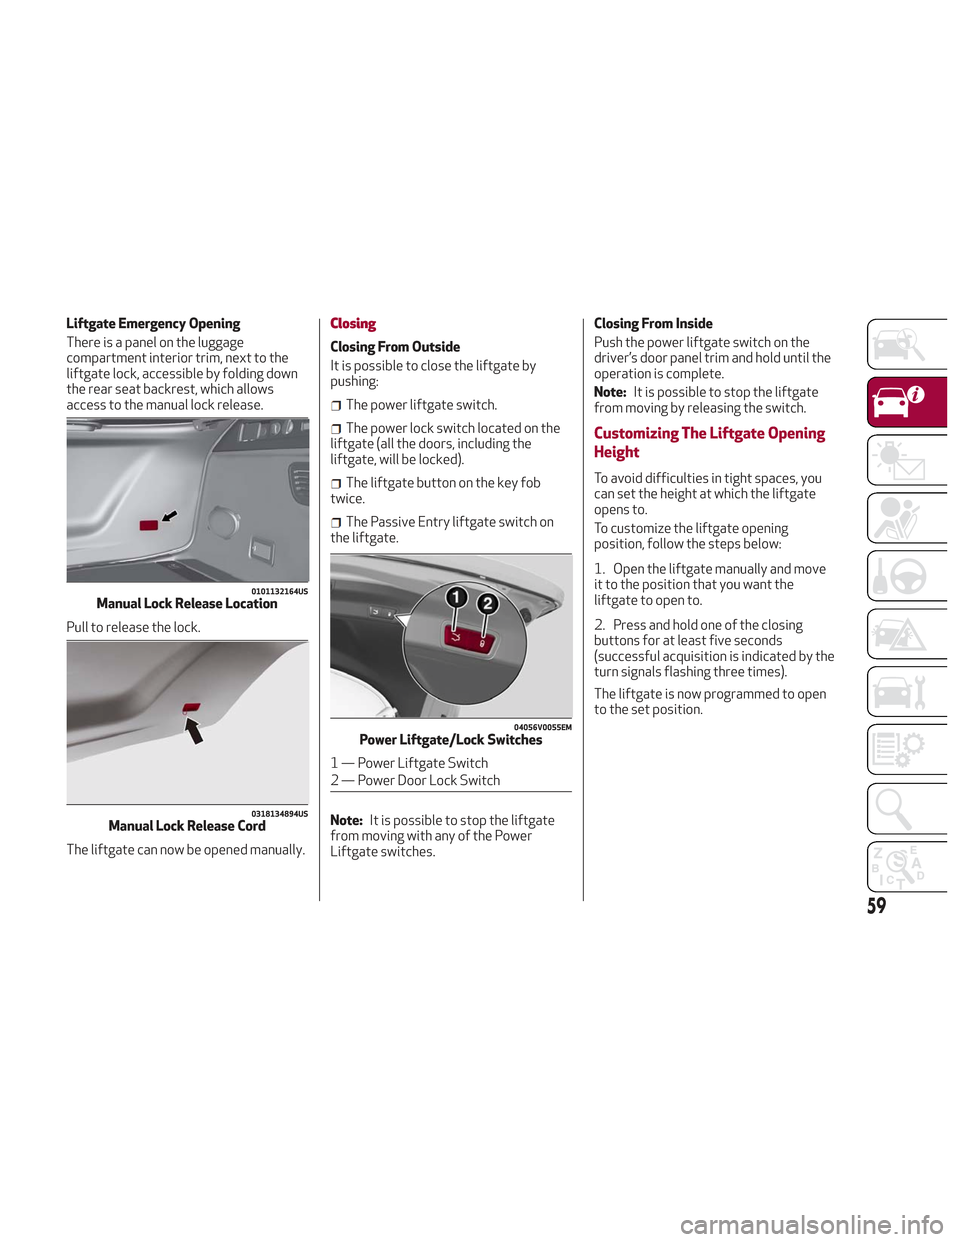
There is a panel on the luggage
compartment interior trim, next to the
liftgate lock, accessible by folding down
the rear seat backrest, which allows
access to the manual lock release.
Pull to release the lock.
The liftgate can now be opened manually.Closing
Closing From Outside
It is possible to close the liftgate by
pushing:
The power liftgate switch.
The power lock switch located on the
liftgate (all the doors, including the
liftgate, will be locked).
The liftgate button on the key fob
twice.
The Passive Entry liftgate switch on
the liftgate.
Note: It is possible to stop the liftgate
from moving with any of the Power
Liftgate switches. Closing From Inside
Push the power liftgate switch on the
driver’s door panel trim and hold until the
operation is complete.
Note:
It is possible to stop the liftgate
from moving by releasing the switch.
Customizing The Liftgate Opening
Height
To avoid difficulties in tight spaces, you
can set the height at which the liftgate
opens to.
To customize the liftgate opening
position, follow the steps below:
1. Open the liftgate manually and move
it to the position that you want the
liftgate to open to.
2. Press and hold one of the closing
buttons for at least five seconds
(successful acquisition is indicated by the
turn signals flashing three times).
The liftgate is now programmed to open
to the set position.
0101132164USManual Lock Release Location
0318134894USManual Lock Release Cord
04056V0055EMPower Liftgate/Lock Switches
1 — Power Liftgate Switch
2 — Power Door Lock Switch
59
Page 134 of 276
Warning!
In a collision, an unrestrained child can
become a projectile inside the vehicle. The
force required to hold even an infant on your
lap could become so great that you could not
hold the child, no matter how strong you are.
The child and others could be badly injured or
killed. Any child riding in your vehicle should
be in a proper restraint for the child’s size.
There are different sizes and types of
restraints for children from newborn size
to the child almost large enough for an
adult safety belt. Always check the child
seat Owner’s Manual to make sure you
have the correct seat for your child.
Carefully read and follow all the
instructions and warnings in the child
restraint Owner’s Manual and on all the
labels attached to the child restraint.
Before buying any restraint system,
make sure that it has a label certifying
that it meets all applicable Safety
Standards. You should also make sure
that you can install it in the vehicle where
you will use it.Note:
For additional information, refer to
www.safercar.gov/parents/index.htm or
call: 1–888–327–4236
Canadian residents should refer to
Transport Canada’s website for
additional information: http://
www.tc.gc.ca/eng/motorvehiclesafety/
safedrivers-childsafety-index-53.htm
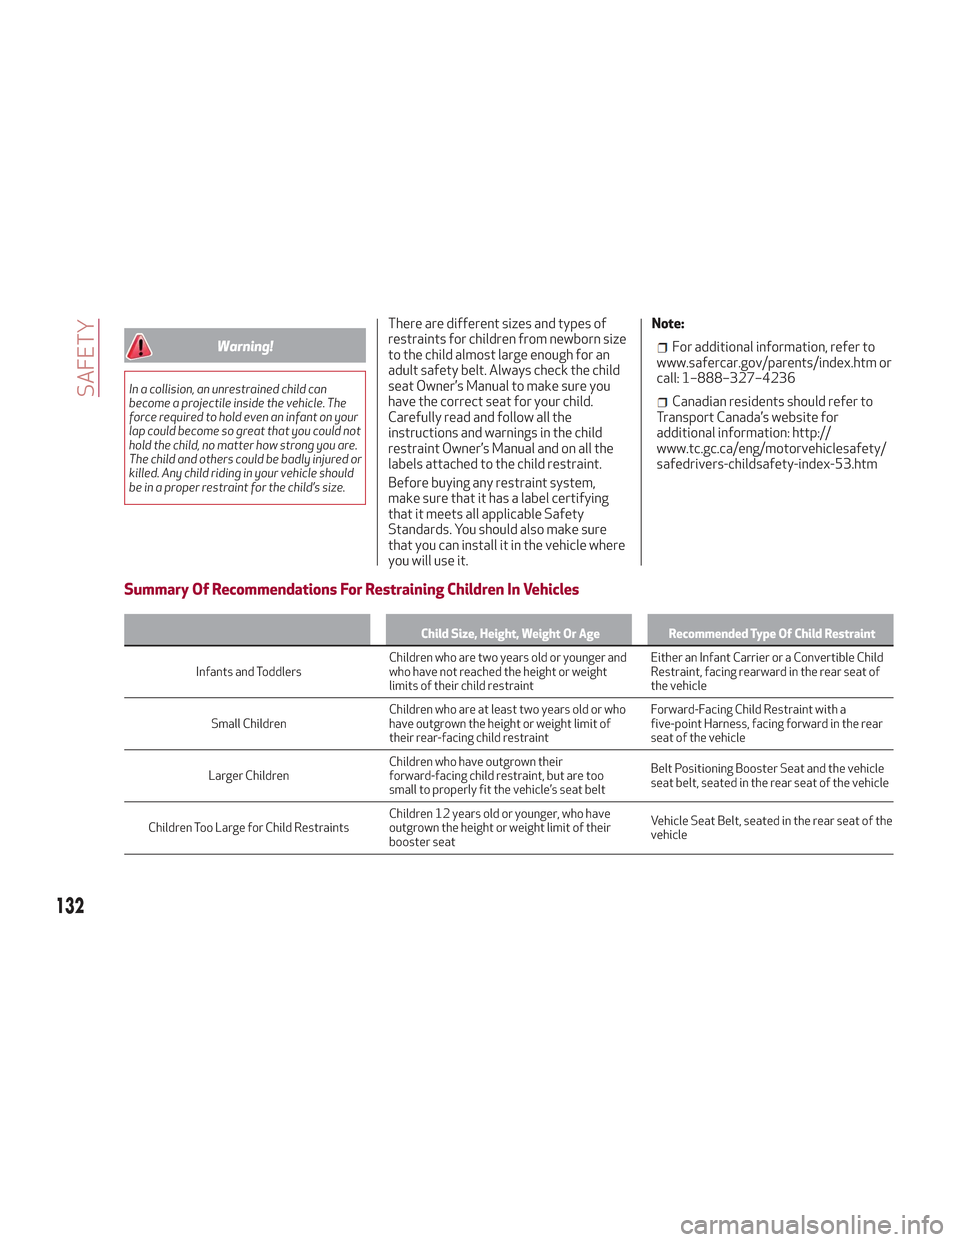
Summary Of Recommendations For Restraining Children In Vehicles
Child Size, Height, Weight Or Age Recommended Type Of Child Restraint
Infants and Toddlers Children
who are two years old or younger and
who have not reached the height or weight
limits of their child restraint Either an Infant Carrier or a Convertible Child
Restraint, facing rearward in the rear seat of
the vehicle
Small Children Children who are at least two years old or who
have outgrown the height or weight limit of
their rear-facing child restraint Forward-Facing Child Restraint with a
five-point Harness, facing forward in the rear
seat of the vehicle
Larger Children Children who have outgrown their
forward-facing child restraint, but are too
small to properly fit the vehicle’s seat belt Belt Positioning Booster Seat and the vehicle
seat belt, seated in the rear seat of the vehicle
Children Too Large for Child Restraints Children 12 years old or younger, who have
outgrown the height or weight limit of their
booster seat Vehicle Seat Belt, seated in the rear seat of the
vehicle
132
SAFETY
Page 135 of 276
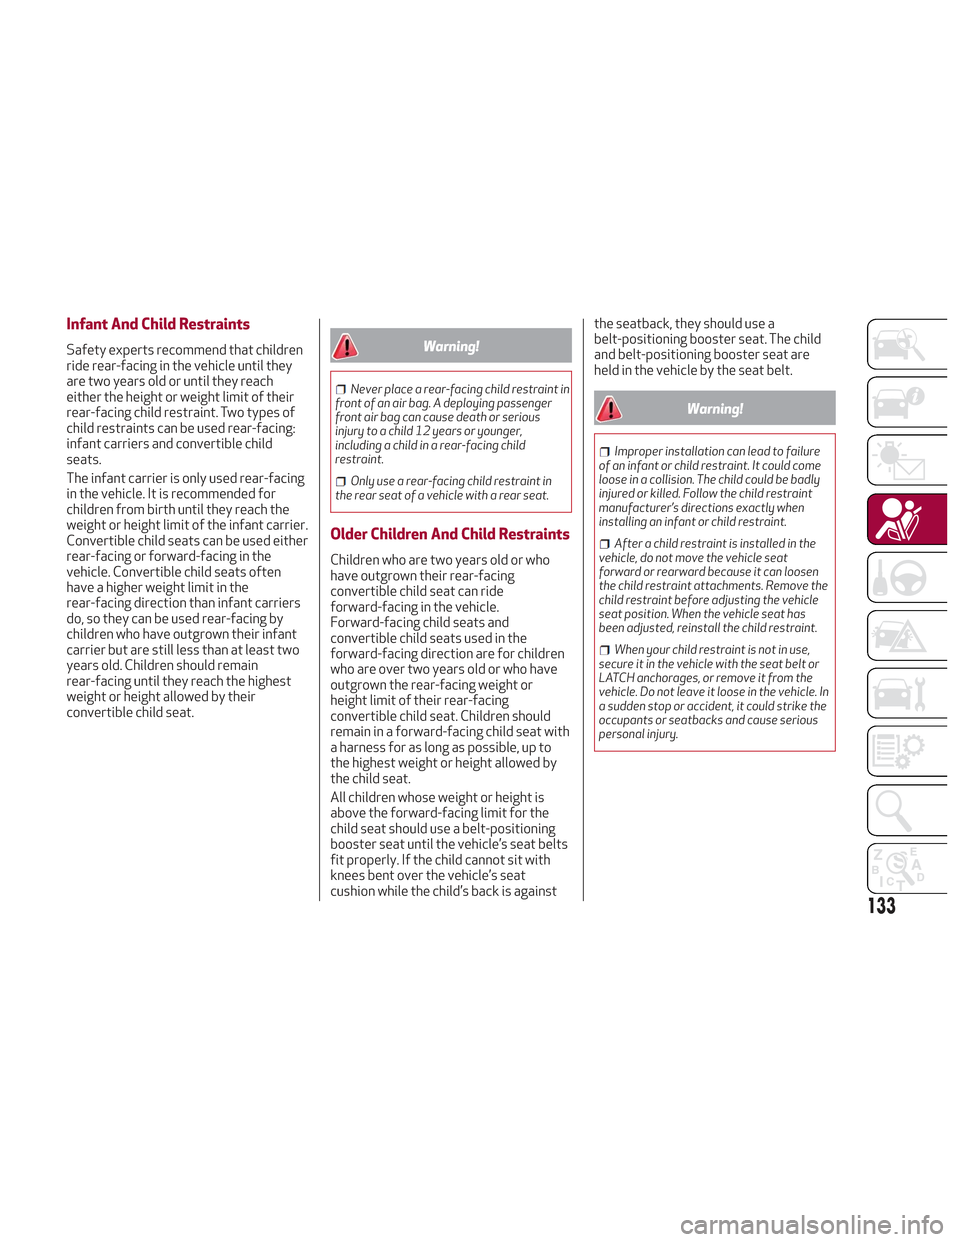
Infant And Child Restraints
Safety experts recommend that children
ride rear-facing in the vehicle until they
are two years old or until they reach
either the height or weight limit of their
rear-facing child restraint. Two types of
child restraints can be used rear-facing:
infant carriers and convertible child
seats.
The infant carrier is only used rear-facing
in the vehicle. It is recommended for
children from birth until they reach the
weight or height limit of the infant carrier.
Convertible child seats can be used either
rear-facing or forward-facing in the
vehicle. Convertible child seats often
have a higher weight limit in the
rear-facing direction than infant carriers
do, so they can be used rear-facing by
children who have outgrown their infant
carrier but are still less than at least two
years old. Children should remain
rear-facing until they reach the highest
weight or height allowed by their
convertible child seat.Warning!
Never place a rear-facing child restraint in
front of an air bag. A deploying passenger
front air bag can cause death or serious
injury to a child 12 years or younger,
including a child in a rear-facing child
restraint.
Only use a rear-facing child restraint in
the rear seat of a vehicle with a rear seat.
Older Children And Child Restraints
Children who are two years old or who
have outgrown their rear-facing
convertible child seat can ride
forward-facing in the vehicle.
Forward-facing child seats and
convertible child seats used in the
forward-facing direction are for children
who are over two years old or who have
outgrown the rear-facing weight or
height limit of their rear-facing
convertible child seat. Children should
remain in a forward-facing child seat with
a harness for as long as possible, up to
the highest weight or height allowed by
the child seat.
All children whose weight or height is
above the forward-facing limit for the
child seat should use a belt-positioning
booster seat until the vehicle’s seat belts
fit properly. If the child cannot sit with
knees bent over the vehicle’s seat
cushion while the child’s back is against the seatback, they should use a
belt-positioning booster seat. The child
and belt-positioning booster seat are
held in the vehicle by the seat belt.
Warning!
Improper installation can lead to failure
of an infant or child restraint. It could come
loose in a collision. The child could be badly
injured or killed. Follow the child restraint
manufacturer’s directions exactly when
installing an infant or child restraint.
After a child restraint is installed in the
vehicle, do not move the vehicle seat
forward or rearward because it can loosen
the child restraint attachments. Remove the
child restraint before adjusting the vehicle
seat position. When the vehicle seat has
been adjusted, reinstall the child restraint.
When your child restraint is not in use,
secure it in the vehicle with the seat belt or
LATCH anchorages, or remove it from the
vehicle. Do not leave it loose in the vehicle. In
a sudden stop or accident, it could strike the
occupants or seatbacks and cause serious
personal injury.
133