Page 145 of 276

Warning!
An improperly attached, damaged, folded, or
stacked floor mat, or damaged floor mat
fasteners may cause your floor mat to
interfere with the accelerator, brake, or
clutch pedals and cause a loss of vehicle
control. To prevent SERIOUS INJURY or
DEATH:
ALWAYS securely attachyour floor
mat using the floor mat fasteners. DO NOT
install your floor mat upside down or turn
your floor mat over. Lightly pull to confirm
mat is secured using the floor mat fasteners
on a regular basis.
ALWAYS REMOVE THE EXISTING FLOOR
MAT FROM THE VEHICLEbefore
installing any other floor mat. NEVER install
or stack an additional floor mat on top of an
existing floor mat.
ONLY install floor mats designed to fit
your vehicle. NEVER install a floor mat that
cannot be properly attached and secured to
your vehicle. If a floor mat needs to be
replaced, only use a FCA approved floor mat
for the specific make, model, and year of
your vehicle.
ONLY use the driver’s side floor mat on
the driver’s side floor area. To check for
interference, with the vehicle properly
parked with the engine off, fully depress the
accelerator, the brake, and the clutch pedal
(if present) to check for interference. If your
floor mat interferes with the operation of
any pedal, or is not secure to the floor,
remove the floor mat from the vehicle and
place the floor mat in your trunk.
ONLY use the passenger’s side floor mat
on the passenger’s side floor area.
ALWAYS make sure objects cannot fall or
slide into the driver’s side floor area when
the vehicle is moving. Objects can become
trapped under accelerator, brake, or clutch
pedals and could cause a loss of vehicle
control.
NEVER place any objects under the floor
mat (e.g., towels, keys, etc.). These objects
could change the position of the floor mat
and may cause interference with the
accelerator, brake, or clutch pedals.
If the vehicle carpet has been removed
and re-installed, always properly attach
carpet to the floor and check the floor mat
fasteners are secure to the vehicle carpet.
Fully depress each pedal to check for
interference with the accelerator, brake, or
clutch pedals then re-install the floor mats.
It is recommended to only use mild soap
and water to clean your floor mats. After
cleaning, always check your floor mat has
been properly installed and is secured to
your vehicle using the floor mat fasteners
by lightly pulling mat.
Periodic Safety Checks You Should
Make Outside The Vehicle
Tires
Examine tires for excessive tread wear
and uneven wear patterns. Check for
stones, nails, glass, or other objects
lodged in the tread or sidewall. Inspect
the tread for cuts and cracks. Inspect
sidewalls for cuts, cracks, and bulges.
Check the wheel nuts for tightness.
Check the tires (including spare) for
proper cold inflation pressure.
Lights
Have someone observe the operation of
brake lights and exterior lights while you
work the controls. Check turn signal and
high beam indicator lights on the
instrument panel.
Door Latches
Check for proper closing, latching, and
locking.
Fluid Leaks
Check area under the vehicle after
overnight parking for fuel, coolant, oil, or
other fluid leaks. Also, if gasoline fumes
are detected or if fuel, or brake fluid
leaks are suspected. The cause should be
located and corrected immediately.
143
Page 146 of 276
Warning!
To prevent SERIOUS INJURY or DEATH when
using “Track-Use” parts and equipment:
NEVER use any “Track-Use” equipment on
public roads. FCA US LLC does not authorize
the use of “Track-Use” equipment on public
roads.
The intended use of “Track-Use” parts is
for race vehicles on race tracks. To help
ensure the safety of the race driver,
engineers should supervise the installation
of “Track-Use” parts.
FCA US LLC does not authorize the
installation or use of any part noted as
“Track-Use” on any new vehicle prior to its
first retail sale.
Warning!
To prevent SERIOUS INJURY or DEATH:ALWAYS remove any “Track-Use”
equipment before driving on public roads.
ALWAYS properly use your three-point
seat belts when driving on public roads.
In a collision, you and your passengers can
suffer much greater injuries if you are not
properly buckled up. You can strike the
interior of your vehicle or other passengers,
or you can be thrown out of the vehicle.
144
SAFETY
Page 147 of 276
STARTING AND OPERATING
Let’s get to the core of the vehicle, and
see how you can explore its fullest
potential. We’ll look at how to drive
safely in any situation, making it a
welcome companion with our comfort
and wallets in mind.STARTING THE ENGINE........146
ENGINE BLOCK HEATER — IF
EQUIPPED ............... .149
ELECTRIC PARK BRAKE ........149
AUTOMATIC TRANSMISSION .....152
ALFA DNA PRO SELECTOR ......158
ALFA ACTIVE SUSPENSION (AAS) . .161
STOP/START SYSTEM .........161
SPEED LIMITER .............163
SPEED CONTROL
(CRUISE CONTROL) ..........164
ADAPTIVE CRUISE CONTROL (ACC) —
IF EQUIPPED .............. .166
PARK SENSORS SYSTEM .......173
LANE DEPARTURE WARNING (LDW)
SYSTEM — IF EQUIPPED .......176
REAR BACK-UP CAMERA / DYNAMIC
GRIDLINES .............. .179
REFUELING THE VEHICLE .......180
VEHICLE LOADING ...........182
SUGGESTIONS FOR DRIVING .....183
145
Page 148 of 276

STARTING THE ENGINE
Before starting the engine, be sure to
adjust the seat, the interior rear view
mirrors, and the door mirrors, and fasten
the seat belt correctly.
Never press the accelerator pedal before
starting the engine.
If necessary, messages indicating the
starting procedure can be shown in the
display.
Warning!
When leaving the vehicle, always remove
the key fob from the vehicle and lock your
vehicle.
Never leave children alone in a vehicle, or
with access to an unlocked vehicle.
Allowing children to be in a vehicle
unattended is dangerous for a number of
reasons. A child or others could be seriously
or fatally injured. Children should be warned
not to touch the parking brake, brake pedal
or the transmission gear selector.
Do not leave the key fob in or near the
vehicle, or in a location accessible to
children. A child could operate power
windows, other controls, or move the
vehicle.
Do not leave children or animals inside
parked vehicles in hot weather. Interior heat
build-up may cause serious injury or death.
Starting Procedure
Proceed as follows:
1. Apply the electric park brake and set
the gear selector to PARK (P) or
NEUTRAL (N).
2. Fully depress the brake pedal without
touching the accelerator.
3. Briefly push the ignition button.
4. If the engine doesn't start within a few
seconds, you need to repeat the
procedure.
If the problem persists, contact an
authorized dealer.
Warning!
Never pour fuel or other flammable liquid
into the throttle body air inlet opening in an
attempt to start the vehicle. This could
result in flash fire causing serious personal
injury.
Do not attempt to push or tow your
vehicle to get it started. Vehicles equipped
with an automatic transmission cannot be
started this way. Unburned fuel could enter
the catalytic converter and once the engine
has started, ignite and damage the
converter and vehicle.
If the vehicle has a discharged battery,
booster cables may be used to obtain a
start from a booster battery or the battery
in another vehicle. This type of start can be
dangerous if done improperly. Refer to “Jump Starting” in “In Case Of Emergency”
for further information.
Caution!
To prevent damage to the starter, do not
continuously crank the engine for more than
25 seconds at a time. Wait 60 seconds
before trying again.
Remote Starting System
This system uses the key fob to start the
engine conveniently from outside the
vehicle while still maintaining security.
The system has a range of at least 300
feet (91 meters).
The remote starting system also
activates the climate control (if
equipped), the heated seats (if equipped),
and the heated steering wheel (if
equipped), depending on temperatures
outside and inside of the vehicle.
Note:
Obstructions between the vehicle
and key fob may reduce this range.
How To Use Remote Start
All of the following conditions must be
met before the engine will remote start:
Gear selector in PARK (P).
Doors closed.
Hood closed.
Liftgate closed.
Hazard switch off.
146
STARTING AND OPERATING
Page 149 of 276
.
Battery at an acceptable charge level.
PANIC button not pushed.
System not disabled from previous
remote start event.
Vehicle alarm system indicator
fl")
Brake switch inactive (brake pedal not
pressed).
Battery at an acceptable charge level.
PANIC button not pushed.
System not disabled from previous
remote start event.
Vehicle alarm system indicator
flashing.
Ignition in the OFF mode (if equipped
with keyless ignition system).
Fuel level meets minimum
requirement.
Remote Start Comfort Systems — If
Equipped
When Remote Start is activated, the
heated steering wheel and driver heated
seat features will automatically turn on in
cold weather.
These features will stay on through the
duration of remote start until the ignition
is cycled to the ON/RUN mode.
Remote Start Windshield Wiper De–Icer
Activation — If Equipped
When remote start is active and the
outside ambient temperature is less than
39°F (4°C), the Windshield Wiper De-Icer
will be enabled. Exiting remote start will
resume previous operation, except if the
Windshield Wiper De-Icer is active.
The Windshield Wiper De-Icer timer and
operation will continue.
Cold Weather Operation
To prevent possible engine damage while
starting at low temperatures, this vehicle
will inhibit engine cranking when the
ambient temperature is less than –22° F
(–30° C) and the oil temperature sensor
reading indicates an engine block heater
has not been used. An externally-
powered electric engine block heater is
available as optional equipment or from
your authorized dealer.
The message “plug in engine heater” will
be displayed in the instrument cluster
when the ambient temperature is below
5° F (–15° C) at the time the engine is
shut off as a reminder to avoid possible
crank delays at the next cold start.
Caution!
Use of the recommended oil and adhering to
the prescribed oil change intervals is
important to prevent engine damage and
ensure satisfactory starting in cold
conditions.
Extended Park Starting
If the vehicle has not been started or
driven for at least 90 days, it is advisable
to follow the indications below. To start the engine, proceed as follows:
1. Briefly push the ignition button
2. If the engine does not start, wait five
seconds and let the starter cool down and
then repeat the starting procedure
3. If the engine does not start after eight
attempts, let the starter cool down for at
least 10 seconds, and then repeat the
starting procedure
If the problem persists, contact your
authorized dealer.
Note:
After prolonged vehicle inactivity,
very difficult starting, that can be noticed
through rapid fatigue of the starter,
might also be due to a partially flat
battery. In this case, refer to "Jump
Starting" in "In Case Of Emergency".
If Engine Fails To Start
Starting the Engine with Key Fob
Battery Run Down or Drained
If the ignition does not respond when the
button is pushed, the key fob battery
might be run down or drained. Therefore,
the system does not detect the presence
of the key fob in the vehicle, and will
display a dedicated message.
In this case, follow the instructions
outlined in "Starting With A Discharged
Key Fob Battery" in the "Getting To Know
Your Vehicle" chapter, and start the
engine normally.
147
Page 150 of 276

Warning!
Never pour fuel or other flammable liquid
into the throttle body air inlet opening in an
attempt to start the vehicle. This could
result in flash fire causing serious personal
injury.
Do not attempt to push or tow your
vehicle to get it started. Vehicles equipped
with an automatic transmission cannot be
started this way. Unburned fuel could enter
the catalytic converter and once the engine
has started, ignite and damage the
converter and vehicle.
If the vehicle has a discharged battery,
booster cables may be used to obtain a
start from a booster battery or the battery
in another vehicle. This type of start can be
dangerous if done improperly. Refer to
“Jump Starting” in “In Case Of Emergency”
for further information.
Caution!
To prevent damage to the starter, do not
continuously crank the engine for more than
25 seconds at a time. Wait 60 seconds
before trying again.
After Starting — Warming Up The
Engine
Proceed as follows:
Travel slowly, letting the engine run at
a reduced RPM, without accelerating
suddenly.
It is recommended to wait until the
digital engine coolant temperature
indicator starts to rise for maximum
performance.
Stopping The Engine
To stop the engine, proceed as follows:
1. Park the vehicle in a position that is
not dangerous for oncoming traffic.
2. Engage the PARK (P) mode.
3. With engine idling, push the
START/STOP button on the steering
wheel to STOP the engine.
Note: Do not leave the ignition in ON
mode when the engine is off.
To shut off the engine with vehicle speed
greater than 5 mph (8 km/h), you must
push and hold the ignition or push the
START/STOP button three times
consecutively within a few seconds. The
engine will shut down, and the ignition will
be placed in the ON mode
With the keyless ignition system, it is
possible to go away from the vehicle
taking the key fob with you, without the
engine switching off. The vehicle will inform about the absence of the key on
board, only if the doors are closed.
Stopping the engine (cycling from the ON
to the STOP position) the accessories are
still powered for about three minutes, or
until a door is opened.
When the ignition is in the STOP/OFF
mode, the window switches remain active
for three minutes. Opening a front door
will cancel this function.
After severe driving, idle the engine to
allow the temperature inside the engine
compartment to cool before shutting off
the engine.
Turbocharger Cool Down
It is recommended before switching the
vehicle off, to keep the engine idling for a
few minutes so that the turbocharger can
be suitably lubricated. This procedure is
particularly recommended after severe
driving.
After a full load operation, keep the
engine idling for three to five minutes
before switching it off.
This time allows the lubricating oil and
the engine coolant to eliminate the
excessive heat from combustion
chamber, bearings, inner components and
turbocharger.
148
STARTING AND OPERATING
Page 151 of 276

ENGINE BLOCK HEATER — IF
EQUIPPED
The engine block heater warms the
engine and permits quicker starts in cold
weather.
Connect the cord to a 110-115 Volt AC
electrical outlet with a grounded,
three-wire extension cord.
For ambient temperatures below 0°F
(-18°C), the engine block heater is
recommended. For ambient
temperatures below -20°F (-29°C), the
engine block heater is required.
The engine block heater cord is routed
under the hood, behind to the driver’s
side headlamp. Follow the steps below to
properly use the engine block heater:
1. Locate the engine block heater cord
(access door on the passenger side wiper
cowl).
2. Pull the cord to the front of the
vehicle and plug it into a grounded,
three-wire extension cord.
3. After the vehicle is running, properly
stow away behind access door on the
passenger side wiper cowl.Note:
The engine block heater cord is a
factory installed option. If your vehicle is
not equipped, heater cords are available
from your authorized dealer.
The engine block heater will require
110 Volts AC and 6.5 Amps to activate
the heater element.
The engine block heater must be
plugged in at least 1 hour to have a
warming effect on the engine and at
least 4 hours to have a warming effect
when ambient temperatures are below
-20 F (-29 C)
Warning!
Remember to disconnect the engine block
heater cord before driving. Damage to the
110-115 Volt electrical cord could cause
electrocution.
ELECTRIC PARK BRAKE
The vehicle is equipped with electric park
brake to guarantee better use and
optimal performance compared to a
manually operated park brake.
The electric parking brake features a
switch located on the center console, a
motor with caliper for each rear wheel,
and an electronic control module.
The electric parking brake can be
engaged in two ways:
Manually, by pulling the switch on the
center console.
Automatically, in "Safe Hold" or "Auto
Park Brake" conditions.
0604132227USElectric Park Brake Switch
149
Page 152 of 276

Note:Normally, the electric parking
brake is engaged automatically when the
engine is stopped. This function can be
deactivated/activated on the
Information and Entertainment system
by selecting the following items in
sequence on the main menu: "Settings",
"Driver Assistance" and "Automatic
Parking Brake".
In addition to engaging the electric park
brake, along with steering and positioning
chocks in front of the wheels (when on a
steep slope), you must always place the
vehicle in the PARK (P) mode before
leaving.
Should the vehicle battery be faulty, the
battery must be replaced in order to
unlock the electric park brake.
Engaging The Park Brake Manually
Briefly pull the switch located on the
center console to manually engage the
electric park brake when the vehicle is
stationary.
Noise may be heard from the rear of the
vehicle when engaging the electric
parking brake.
A slight movement of the brake pedal
may be detected when engaging the
electric parking brake with the brake
pedal pressed.
With the electric parking brake engaged,
the BRAKE warning light on the
instrument panel and the switch will
illuminate.
Caution!
With the Electronic Parking Brake failure
warning light on, some functions of the
electric parking brake are deactivated. In
this case the driver is responsible for brake
activation and vehicle parking in complete
safety conditions.
If, under exceptional circumstances, the
use of the brake is required with the
vehicle in motion, keep the switch on the
center console pulled as long as the brake
action is necessary.
The BRAKE warning light may turn on
with the hydraulic system temporarily
unavailable; in this case, braking is
controlled by the motors.
The brake lights will also automatically
turn on in the same way as normal braking
with the use of the brake pedal.
Release the switch on the center console
to stop the braking action with the
vehicle in motion.
If, through this procedure, the vehicle is
braked until a speed below 1.9 mph
(3 km/h) is reached and the switch is kept
pulled, the park brake will definitively
engage.
Note: Driving the vehicle with the
electric parking brake engaged, or using
it several times to slow down the vehicle,
may cause severe damage to the braking
system. Disengaging The Electric Park Brake
Manually
In order to manually release the park
brake, the ignition should be in the ON
mode. Press the brake pedal, and then
push the switch on the center console
briefly.
Noise may be heard from the rear of the
vehicle, and a slight movement of the
brake pedal may be detected during
disengagement.
After disengaging the electric parking
brake, the BRAKE warning light on the
instrument panel and the light on the
switch will turn off.
If the BRAKE warning light on the
instrument panel remains on with the
electric parking brake disengaged, this
indicates a fault: in this case, contact an
authorized dealer.
Warning!
Never leave children alone in a vehicle, or
with access to an unlocked vehicle.
Allowing children to be in a vehicle
unattended is dangerous for a number of
reasons. A child or others could be seriously
or fatally injured. Children should be warned
not to touch the park brake, brake pedal or
the gear selector.
150
STARTING AND OPERATING
 1
1 2
2 3
3 4
4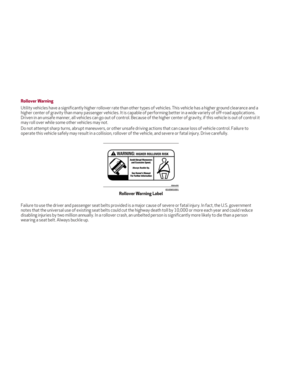 5
5 6
6 7
7 8
8 9
9 10
10 11
11 12
12 13
13 14
14 15
15 16
16 17
17 18
18 19
19 20
20 21
21 22
22 23
23 24
24 25
25 26
26 27
27 28
28 29
29 30
30 31
31 32
32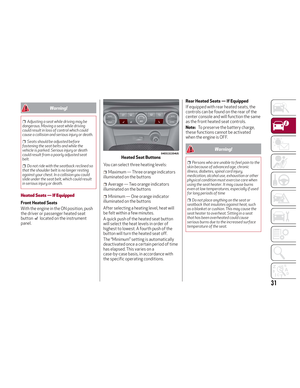 33
33 34
34 35
35 36
36 37
37 38
38 39
39 40
40 41
41 42
42 43
43 44
44 45
45 46
46 47
47 48
48 49
49 50
50 51
51 52
52 53
53 54
54 55
55 56
56 57
57 58
58 59
59 60
60 61
61 62
62 63
63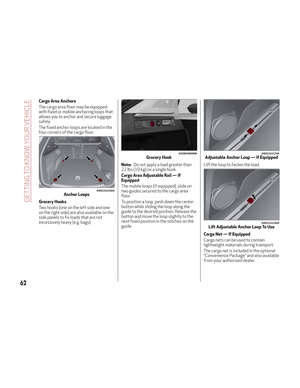 64
64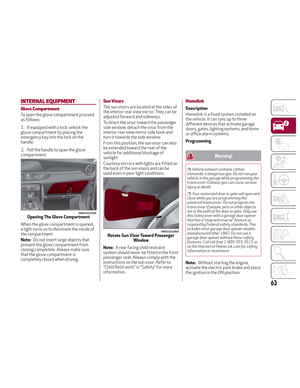 65
65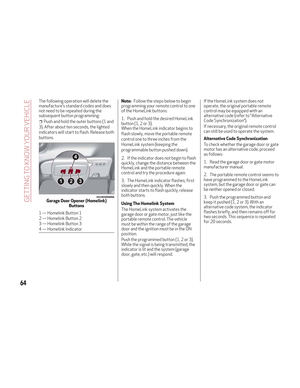 66
66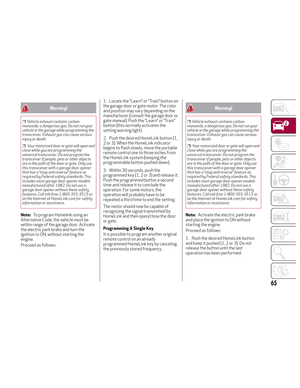 67
67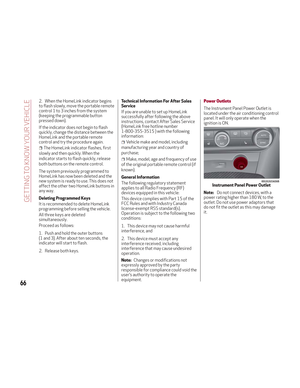 68
68 69
69 70
70 71
71 72
72 73
73 74
74 75
75 76
76 77
77 78
78 79
79 80
80 81
81 82
82 83
83 84
84 85
85 86
86 87
87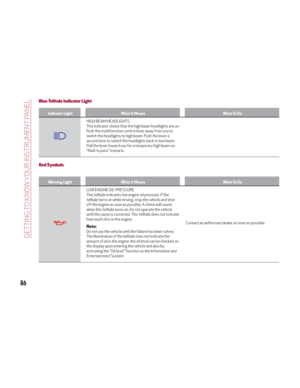 88
88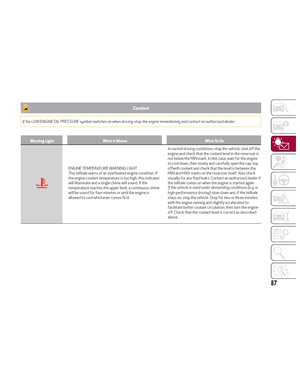 89
89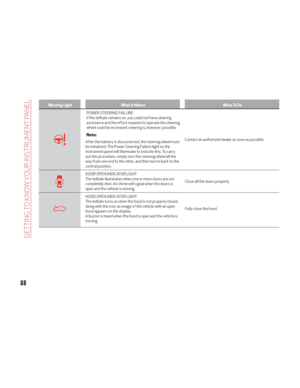 90
90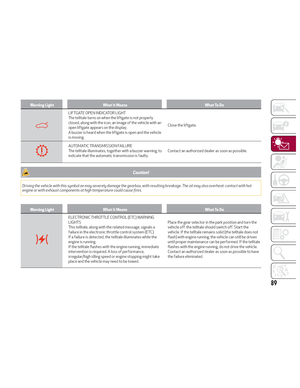 91
91 92
92 93
93 94
94 95
95 96
96 97
97 98
98 99
99 100
100 101
101 102
102 103
103 104
104 105
105 106
106 107
107 108
108 109
109 110
110 111
111 112
112 113
113 114
114 115
115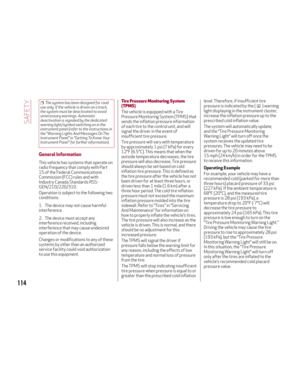 116
116 117
117 118
118 119
119 120
120 121
121 122
122 123
123 124
124 125
125 126
126 127
127 128
128 129
129 130
130 131
131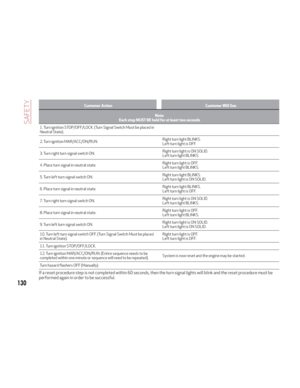 132
132 133
133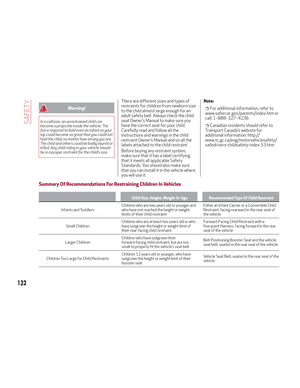 134
134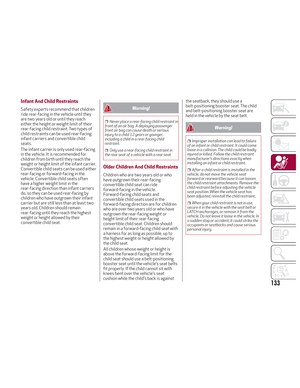 135
135 136
136 137
137 138
138 139
139 140
140 141
141 142
142 143
143 144
144 145
145 146
146 147
147 148
148 149
149 150
150 151
151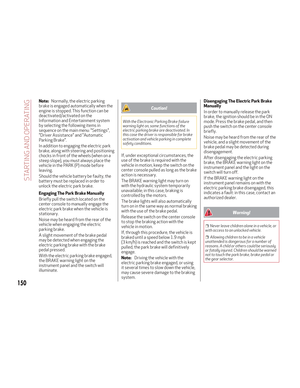 152
152 153
153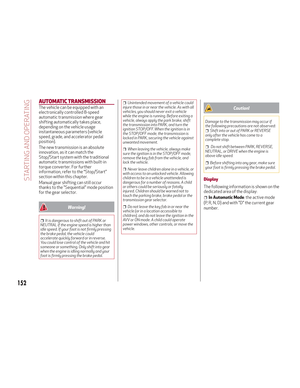 154
154 155
155 156
156 157
157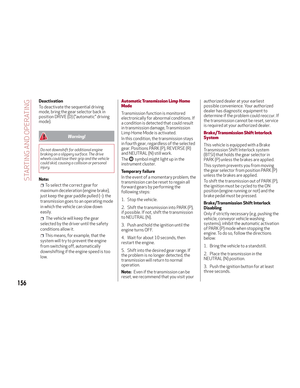 158
158 159
159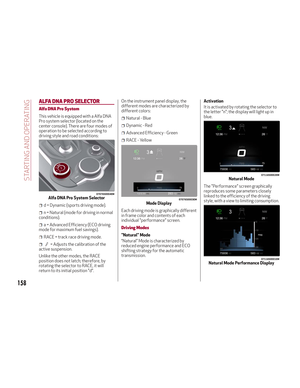 160
160 161
161 162
162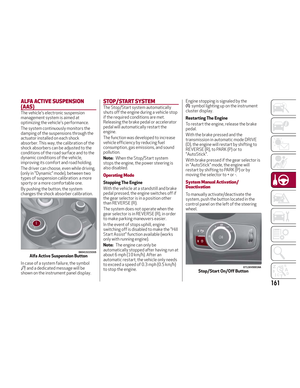 163
163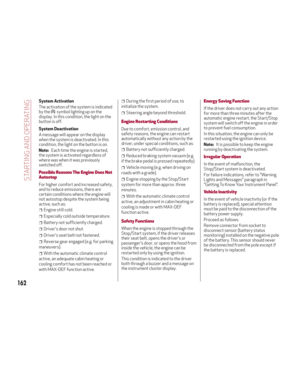 164
164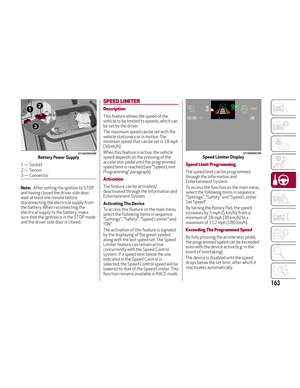 165
165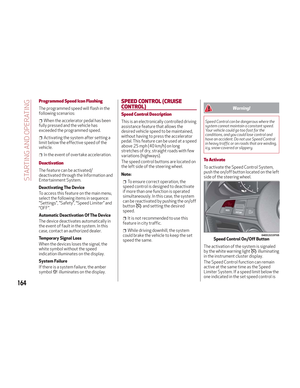 166
166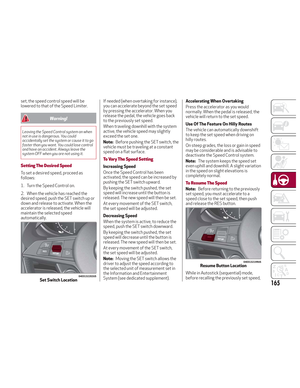 167
167 168
168 169
169 170
170 171
171 172
172 173
173 174
174 175
175 176
176 177
177 178
178 179
179 180
180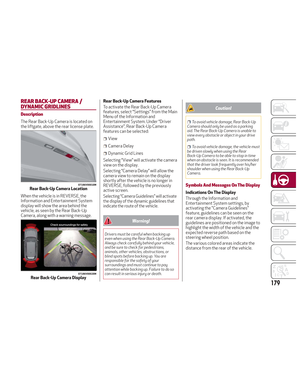 181
181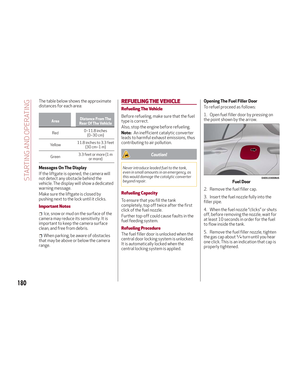 182
182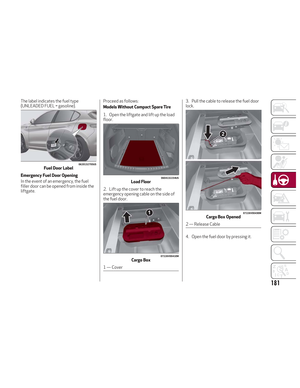 183
183 184
184 185
185 186
186 187
187 188
188 189
189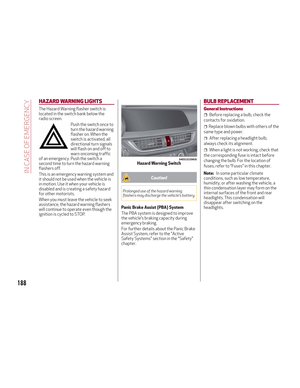 190
190 191
191 192
192 193
193 194
194 195
195 196
196 197
197 198
198 199
199 200
200 201
201 202
202 203
203 204
204 205
205 206
206 207
207 208
208 209
209 210
210 211
211 212
212 213
213 214
214 215
215 216
216 217
217 218
218 219
219 220
220 221
221 222
222 223
223 224
224 225
225 226
226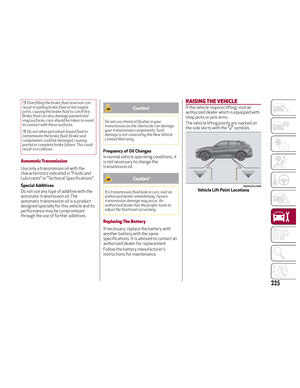 227
227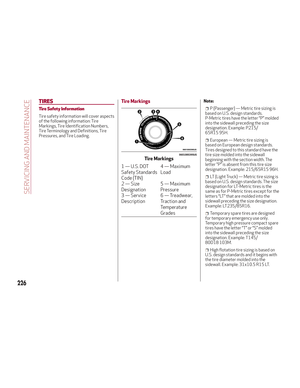 228
228 229
229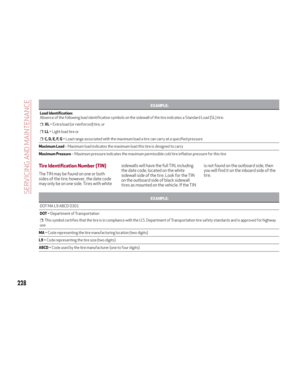 230
230 231
231 232
232 233
233 234
234 235
235 236
236 237
237 238
238 239
239 240
240 241
241 242
242 243
243 244
244 245
245 246
246 247
247 248
248 249
249 250
250 251
251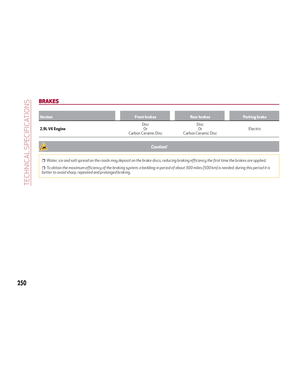 252
252 253
253 254
254 255
255 256
256 257
257 258
258 259
259 260
260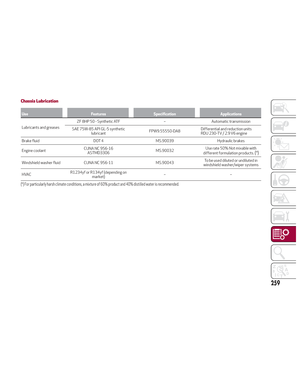 261
261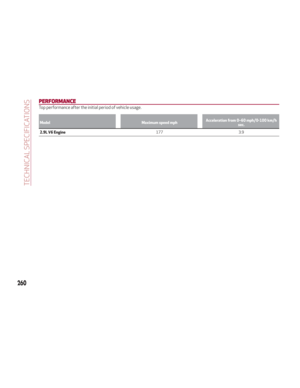 262
262 263
263 264
264 265
265 266
266 267
267 268
268 269
269 270
270 271
271 272
272 273
273 274
274 275
275
