Page 129 of 276

SABICs may help reduce the risk of head
and other injuries to front and rear seat
outboard occupants in certain side
impacts, in addition to the injury
reduction potential provided by the seat
belts and body structure.
The SABIC deploys downward, covering
the side windows. An inflating SABIC
pushes the outside edge of the headliner
out of the way and covers the window.
The SABICs inflate with enough force to
injure occupants if they are not belted
and seated properly, or if items are
positioned in the area where the SABICs
inflate. Children are at an even greater
risk of injury from a deploying air bag.
The SABICs may help reduce the risk of
partial or complete ejection of vehicle
occupants through side windows in
certain side impact events.
Warning!
Do not mount equipment, or stack
luggage or other cargo up high enough to
block the deployment of the SABICs. The
trim covering above the side windows where
the SABIC and its deployment path are
located should remain free from any
obstructions.
In order for the SABICs to work as
intended, do not install any accessory items
in your vehicle which could alter the roof. Do
not add an aftermarket sunroof to your
vehicle. Do not add roof racks that require
permanent attachments (bolts or screws) for installation on the vehicle roof. Do not
drill into the roof of the vehicle for any
reason.
Side Impacts
The Side Air Bags are designed to
activate in certain side impacts. The
Occupant Restraint Controller (ORC)
determines whether the deployment of
the Side Air Bags in a particular impact
event is appropriate, based on the
severity and type of collision. The side
impact sensors aid the ORC in
determining the appropriate response to
impact events. The system is calibrated
to deploy the Side Air Bags on the impact
side of the vehicle during impacts that
require Side Air Bag occupant protection.
In side impacts, the Side Air Bags deploy
independently; a left side impact deploys
the left Side Air Bags only and a
right-side impact deploys the right Side
Air Bags only. Vehicle damage by itself is
not a good indicator of whether or not
Side Air Bags should have deployed.
The Side Air Bags will not deploy in all
side collisions, including some collisions
at certain angles, or some side collisions
that do not impact the area of the
passenger compartment. The Side Air
Bags may deploy during angled or offset
frontal collisions where the front air bags
deploy.
Side Air Bags are a supplement to the
seat belt restraint system. Side Air Bags
deploy in less time than it takes to blink
your eyes.
Warning!
Occupants, including children, who are up
against or very close to Side Air Bags can be
seriously injured or killed. Occupants,
including children, should never lean on or
sleep against the door, side windows, or
area where the side air bags inflate, even if
they are in an infant or child restraint.
Seat belts (and child restraints where
appropriate) are necessary for your
protection in all collisions. They also help
keep you in position, away from an inflating
Side Air Bag. To get the best protection
from the Side Air Bags, occupants must
wear their seat belts properly and sit
upright with their backs against the seats.
Children must be properly restrained in a
child restraint or booster seat that is
appropriate for the size of the child.
Warning!
Side Air Bags need room to inflate. Do not
lean against the door or window. Sit upright
in the center of the seat.
Being too close to the Side Air Bags
during deployment could cause you to be
severely injured or killed.
127
Page 130 of 276

Relying on the Side Air Bags alone could
lead to more severe injuries in a collision.
The Side Air Bags work with your seat belt
to restrain you properly. In some collisions,
Side Air Bags won’t deploy at all. Always
wear your seat belt even though you have
Side Air Bags.
Note: Air bag covers may not be obvious
in the interior trim, but they will open
during air bag deployment.
Rollover Events
Side Air Bags are designed to activate in
certain rollover events. The ORC
determines whether the deployment of
the Side Air Bags in a particular rollover
event is appropriate, based on the
severity and type of collision. Vehicle
damage by itself is not a good indicator
of whether or not Side Air Bags should
have deployed.
The Side Air Bags will not deploy in all
rollover events. The rollover sensing
system determines if a rollover event
may be in progress and whether
deployment is appropriate. In the event
the vehicle experiences a rollover or near
rollover event, and deployment of the
Side Air Bags is appropriate, the rollover
sensing system will also deploy the seat
belt pretensioners on both sides of the
vehicle.
The SABICs may help reduce the risk of
partial or complete ejection of vehicle
occupants through side windows in
certain rollover or side impact events.
Air Bag System Components
Note: The Occupant Restraint Controller
(ORC) monitors the internal circuits and
interconnecting wiring associated with
electrical Air Bag System Components
listed below:
Occupant Restraint Controller (ORC)
Air Bag Warning Light
Steering Wheel and Column
Instrument Panel
Knee Impact Bolsters
Driver and Front Passenger Air Bags
Seat Belt Buckle Switch
Supplemental Side Air Bags
Supplemental Knee Air Bags
Front and Side Impact Sensors
Seat Belt Pretensioners
Seat Track Position Sensors
If A Deployment Occurs
The front air bags are designed to deflate
immediately after deployment.
Note: Front and/or side air bags will not
deploy in all collisions. This does not
mean something is wrong with the air bag
system. If you do have a collision which deploys
the air bags, any or all of the following
may occur:
The air bag material may sometimes
cause abrasions and/or skin reddening to
the occupants as the air bags deploy and
unfold. The abrasions are similar to
friction rope burns or those you might get
sliding along a carpet or gymnasium floor.
They are not caused by contact with
chemicals. They are not permanent and
normally heal quickly. However, if you
haven’t healed significantly within a few
days, or if you have any blistering, see
your doctor immediately.
As the air bags deflate, you may see
some smoke-like particles. The particles
are a normal by-product of the process
that generates the non-toxic gas used for
air bag inflation. These airborne particles
may irritate the skin, eyes, nose, or
throat. If you have skin or eye irritation,
rinse the area with cool water. For nose
or throat irritation, move to fresh air. If
the irritation continues, see your doctor.
If these particles settle on your clothing,
follow the garment manufacturer’s
instructions for cleaning.
Do not drive your vehicle after the air
bags have deployed. If you are involved in
another collision, the air bags will not be
in place to protect you.
128
SAFETY
Page 131 of 276

Warning!
Deployed air bags and seat belt
pretensioners cannot protect you in another
collision. Have the air bags, seat belt
pretensioners, and the seat belt retractor
assemblies replaced by an authorized dealer
immediately. Also, have the Occupant
Restraint Controller System serviced as
well.
Note:
Air bag covers may not be obvious in
the interior trim, but they will open
during air bag deployment.
After any collision, the vehicle should
be taken to an authorized dealer
immediately.
Enhanced Accident Response
System
In the event of an impact, if the
communication network remains intact,
and the power remains intact, depending
on the nature of the event, the ORC will
determine whether to have the Enhanced
Accident Response System perform the
following functions:
Cut off fuel to the engine (If Equipped)
Cut off battery power to the electric
motor (If Equipped)
Flash hazard lights as long as the
battery has power
Turn on the interior lights, which
remain on as long as the battery has
power or for 15 minutes from the
intervention of the Enhanced Accident
Response System.
Unlock the power door locks.
Your vehicle may also be designed to
perform any of these other functions in
response to the Enhanced Accident
Response System:
Turn off the Fuel Filter Heater, Turn off
the HVAC Blower Motor, Close the HVAC
Circulation Door
Cut off battery power to the:
– Engine
– Electric Motor (if equipped)
– Electric power steering
– Brake booster
– Electric park brake
– Automatic transmission gear selector
– Horn
– Front wiper
– Headlamp washer pump
Note: After an accident, remember to
cycle the ignition to the STOP
(OFF/LOCK) position and remove the key from the ignition switch to avoid draining
the battery. Carefully check the vehicle
for fuel leaks in the engine compartment
and on the ground near the engine
compartment and fuel tank before
resetting the system and starting the
engine. If there are no fuel leaks or
damage to the vehicle electrical devices
(e.g. headlights) after an accident, reset
the system by following the procedure
described below.
Enhanced Accident Response
System Reset Procedure
After the event occurs, when the system
is active, a message regarding fuel cutoff
is displayed. Turn the ignition switch from
ignition AVV/START or MAR/ACC/ON/
RUN to ignition STOP/OFF/LOCK.
Carefully check the vehicle for fuel leaks
in the engine compartment and on the
ground near the engine compartment and
fuel tank before resetting the system and
starting the engine.
Depending on the nature of the event the
left and right turn signal lights, located in
the instrument panel, may both be
blinking and will continue to blink. In order
to move your vehicle to the side of the
road, you must follow the system reset
procedure.
129
Page 132 of 276
.
2. Turn ignition MAR/ACC/O")
Customer ActionCustomer Will See
Note:
Each step MUST BE held for at least two seconds
1. Turn ignition STOP/OFF/LOCK. (Turn Signal Switch Must be placed in
Neutral
State).
2. Turn ignition MAR/ACC/ON/RUN. Right turn light BLINKS.
Left turn light is OFF.
3. Turn right turn signal switch ON. Right turn light is ON SOLID.
Left turn light BLINKS.
4. Place turn signal in neutral state. Right turn light is OFF.
Left turn light BLINKS.
5. Turn left turn signal switch ON. Right turn light BLINKS.
Left turn light is ON SOLID.
6. Place turn signal in neutral state. Right turn light BLINKS.
Left turn light is OFF.
7. Turn right turn signal switch ON. Right turn light is ON SOLID.
Left turn light BLINKS.
8. Place turn signal in neutral state. Right turn light is OFF.
Left turn light BLINKS.
9. Turn left turn signal switch ON. Right turn light is ON SOLID.
Left turn light is ON SOLID.
10. Turn left turn signal switch OFF. (Turn Signal Switch Must be placed
in Neutral State). Right turn light is OFF.
Left turn light is OFF.
11. Turn ignition STOP/OFF/LOCK.
12. Turn ignition MAR/ACC/ON/RUN. (Entire sequence needs to be
completed within one minute or sequence will need to be repeated). System is now reset and the engine may be started.
Turn hazard flashers OFF (Manually).
If a reset procedure step is not completed within 60 seconds, then the turn signal lights will blink and the reset procedure must be
performed again in order to be successful.
130
SAFETY
Page 133 of 276

Maintaining Your Air Bag System
Warning!
Modifications to any part of the air bag
system could cause it to fail when you need
it. You could be injured if the air bag system
is not there to protect you. Do not modify
the components or wiring, including adding
any kind of badges or stickers to the
steering wheel hub trim cover or the upper
right side of the instrument panel. Do not
modify the front bumper, vehicle body
structure, or add aftermarket side steps or
running boards.
It is dangerous to try to repair any part of
the air bag system yourself. Be sure to tell
anyone who works on your vehicle that it
has an air bag system.
Do not attempt to modify any part of your
air bag system. The air bag may inflate
accidentally or may not function properly if
modifications are made. Take your vehicle
to an authorized dealer for any air bag
system service. If your seat, including your
trim cover and cushion, needs to be serviced
in any way (including removal or
loosening/tightening of seat attachment
bolts), take the vehicle to your authorized
dealer. Only manufacturer approved seat
accessories may be used. If it is necessary
to modify the air bag system for persons
with disabilities, contact your authorized
dealer.
Event Data Recorder (EDR)
This vehicle is equipped with an event
data recorder (EDR). The main purpose of
an EDR is to record, in certain crash or
near crash-like situations, such as an air
bag deployment or hitting a road
obstacle, data that will assist in
understanding how a vehicle’s systems
performed. The EDR is designed to
record data related to vehicle dynamics
and safety systems for a short period of
time, typically 30 seconds or less. The
EDR in this vehicle is designed to record
such data as:
How various systems in your vehicle
were operating;
Whether or not the driver and
passenger safety belts were
buckled/fastened;
How far (if at all) the driver was
depressing the accelerator and/or brake
pedal; and,
How fast the vehicle was traveling.
These data can help provide a better
understanding of the circumstances in
which crashes and injuries occur.
Note: EDR data are recorded by your
vehicle only if a non-trivial crash situation
occurs; no data are recorded by the EDR
under normal driving conditions and no
personal data (e.g., name, gender, age,
and crash location) are recorded.
However, other parties, such as law
enforcement, could combine the EDR data with the type of personally
identifying data routinely acquired during
a crash investigation.
To read data recorded by an EDR, special
equipment is required, and access to the
vehicle or the EDR is needed. In addition
to the vehicle manufacturer, other
parties, such as law enforcement, that
have the special equipment, can read the
information if they have access to the
vehicle or the EDR.
Child Restraints
Everyone in your vehicle needs to be
buckled up at all times, including babies
and children. Every state in the United
States, and every Canadian province,
requires that small children ride in proper
restraint systems. This is the law, and you
can be prosecuted for ignoring it.
Children 12 years or younger should ride
properly buckled up in a rear seat, if
available. According to crash statistics,
children are safer when properly
restrained in the rear seats rather than in
the front.
131
Page 134 of 276

Warning!
In a collision, an unrestrained child can
become a projectile inside the vehicle. The
force required to hold even an infant on your
lap could become so great that you could not
hold the child, no matter how strong you are.
The child and others could be badly injured or
killed. Any child riding in your vehicle should
be in a proper restraint for the child’s size.
There are different sizes and types of
restraints for children from newborn size
to the child almost large enough for an
adult safety belt. Always check the child
seat Owner’s Manual to make sure you
have the correct seat for your child.
Carefully read and follow all the
instructions and warnings in the child
restraint Owner’s Manual and on all the
labels attached to the child restraint.
Before buying any restraint system,
make sure that it has a label certifying
that it meets all applicable Safety
Standards. You should also make sure
that you can install it in the vehicle where
you will use it.Note:
For additional information, refer to
www.safercar.gov/parents/index.htm or
call: 1–888–327–4236
Canadian residents should refer to
Transport Canada’s website for
additional information: http://
www.tc.gc.ca/eng/motorvehiclesafety/
safedrivers-childsafety-index-53.htm
Summary Of Recommendations For Restraining Children In Vehicles
Child Size, Height, Weight Or Age Recommended Type Of Child Restraint
Infants and Toddlers Children
who are two years old or younger and
who have not reached the height or weight
limits of their child restraint Either an Infant Carrier or a Convertible Child
Restraint, facing rearward in the rear seat of
the vehicle
Small Children Children who are at least two years old or who
have outgrown the height or weight limit of
their rear-facing child restraint Forward-Facing Child Restraint with a
five-point Harness, facing forward in the rear
seat of the vehicle
Larger Children Children who have outgrown their
forward-facing child restraint, but are too
small to properly fit the vehicle’s seat belt Belt Positioning Booster Seat and the vehicle
seat belt, seated in the rear seat of the vehicle
Children Too Large for Child Restraints Children 12 years old or younger, who have
outgrown the height or weight limit of their
booster seat Vehicle Seat Belt, seated in the rear seat of the
vehicle
132
SAFETY
Page 135 of 276

Infant And Child Restraints
Safety experts recommend that children
ride rear-facing in the vehicle until they
are two years old or until they reach
either the height or weight limit of their
rear-facing child restraint. Two types of
child restraints can be used rear-facing:
infant carriers and convertible child
seats.
The infant carrier is only used rear-facing
in the vehicle. It is recommended for
children from birth until they reach the
weight or height limit of the infant carrier.
Convertible child seats can be used either
rear-facing or forward-facing in the
vehicle. Convertible child seats often
have a higher weight limit in the
rear-facing direction than infant carriers
do, so they can be used rear-facing by
children who have outgrown their infant
carrier but are still less than at least two
years old. Children should remain
rear-facing until they reach the highest
weight or height allowed by their
convertible child seat.Warning!
Never place a rear-facing child restraint in
front of an air bag. A deploying passenger
front air bag can cause death or serious
injury to a child 12 years or younger,
including a child in a rear-facing child
restraint.
Only use a rear-facing child restraint in
the rear seat of a vehicle with a rear seat.
Older Children And Child Restraints
Children who are two years old or who
have outgrown their rear-facing
convertible child seat can ride
forward-facing in the vehicle.
Forward-facing child seats and
convertible child seats used in the
forward-facing direction are for children
who are over two years old or who have
outgrown the rear-facing weight or
height limit of their rear-facing
convertible child seat. Children should
remain in a forward-facing child seat with
a harness for as long as possible, up to
the highest weight or height allowed by
the child seat.
All children whose weight or height is
above the forward-facing limit for the
child seat should use a belt-positioning
booster seat until the vehicle’s seat belts
fit properly. If the child cannot sit with
knees bent over the vehicle’s seat
cushion while the child’s back is against the seatback, they should use a
belt-positioning booster seat. The child
and belt-positioning booster seat are
held in the vehicle by the seat belt.
Warning!
Improper installation can lead to failure
of an infant or child restraint. It could come
loose in a collision. The child could be badly
injured or killed. Follow the child restraint
manufacturer’s directions exactly when
installing an infant or child restraint.
After a child restraint is installed in the
vehicle, do not move the vehicle seat
forward or rearward because it can loosen
the child restraint attachments. Remove the
child restraint before adjusting the vehicle
seat position. When the vehicle seat has
been adjusted, reinstall the child restraint.
When your child restraint is not in use,
secure it in the vehicle with the seat belt or
LATCH anchorages, or remove it from the
vehicle. Do not leave it loose in the vehicle. In
a sudden stop or accident, it could strike the
occupants or seatbacks and cause serious
personal injury.
133
Page 136 of 276

Children Too Large For Booster
Seats
Children who are large enough to wear
the shoulder belt comfortably, and whose
legs are long enough to bend over the
front of the seat when their back is
against the seatback, should use the seat
belt in a rear seat. Use this simple 5-step
test to decide whether the child can use
the vehicle’s seat belt alone:
1. Can the child sit all the way back
against the back of the vehicle seat?
2. Do the child’s knees bend comfortably
over the front of the vehicle seat – while
the child is still sitting all the way back?3. Does the shoulder belt cross the
child’s shoulder between their neck and
arm?
4. Is the lap part of the belt as low as
possible, touching the child’s thighs and
not the stomach?
5. Can the child stay seated like this for
the whole trip?
If the answer to any of these questions
was “no,” then the child still needs to use a
booster seat in this vehicle. If the child is
using the lap/shoulder belt, check seat
belt fit periodically and make sure the
seat belt buckle is latched. A child’s
squirming or slouching can move the belt
out of position. If the shoulder belt
contacts the face or neck, move the child
closer to the center of the vehicle, or use
a booster seat to position the seat belt
on the child correctly.
Warning!
Never allow a child to put the shoulder belt
under an arm or behind their back. In a crash,
the shoulder belt will not protect a child
properly, which may result in serious injury or
death. A child must always wear both the lap
and shoulder portions of the seat belt
correctly.
Recommendations For Attaching Child Restraints
Restraint Type
Combined Weight of
the Child + Child Restraint Use Any Attachment Method Shown With An “X” Below
LATCH – Lower Anchors Only Seat Belt Only LATCH – Lower
Anchors + Top
Tether Anchor Seat Belt + Top
Tether Anchor
Rear-Facing Child Restraint Up
to 65 lbs
(29.5 kg) XX
Rear-Facing Child Restraint More than 65 lbs
(29.5 kg) X
Forward-Facing Child Restraint Up to 65 lbs
(29.5 kg) XX
Forward-Facing Child Restraint More than 65 lbs
(29.5 kg) X
134
SAFETY
 1
1 2
2 3
3 4
4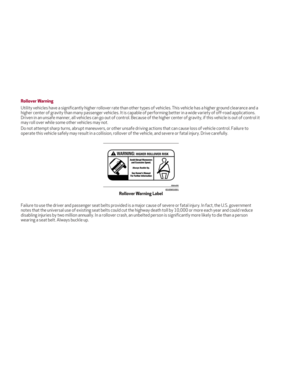 5
5 6
6 7
7 8
8 9
9 10
10 11
11 12
12 13
13 14
14 15
15 16
16 17
17 18
18 19
19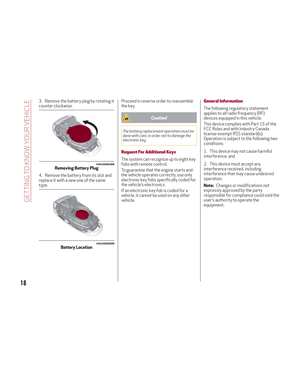 20
20 21
21 22
22 23
23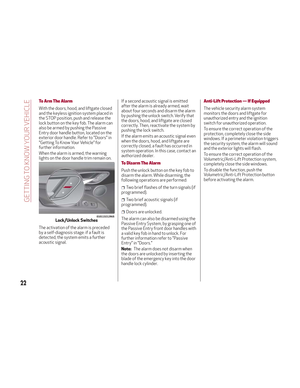 24
24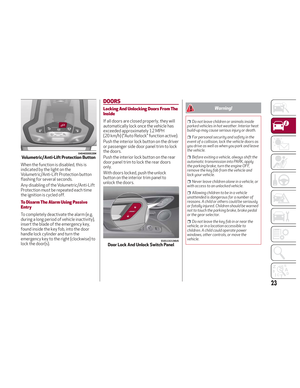 25
25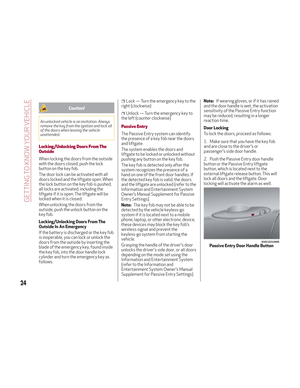 26
26 27
27 28
28 29
29 30
30 31
31 32
32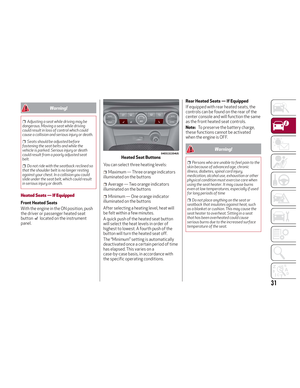 33
33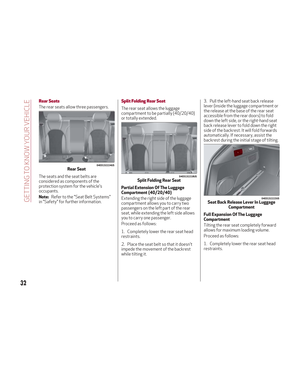 34
34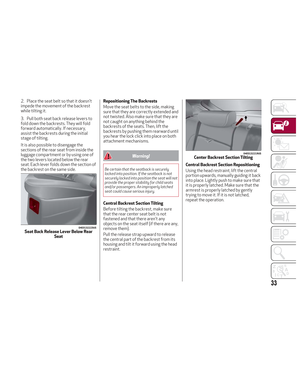 35
35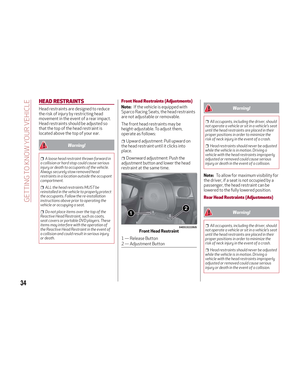 36
36 37
37 38
38 39
39 40
40 41
41 42
42 43
43 44
44 45
45 46
46 47
47 48
48 49
49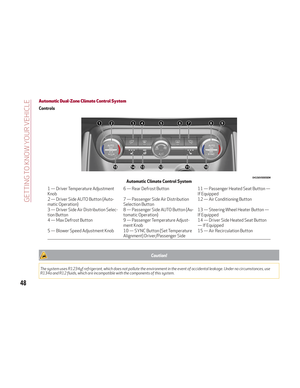 50
50 51
51 52
52 53
53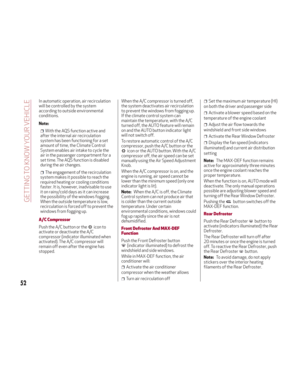 54
54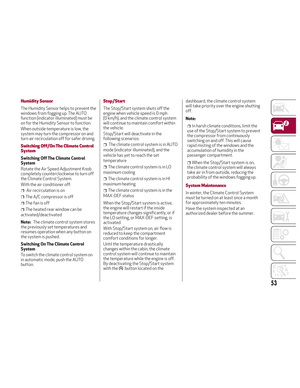 55
55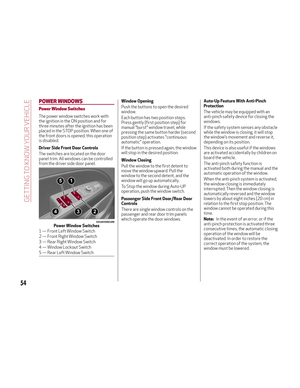 56
56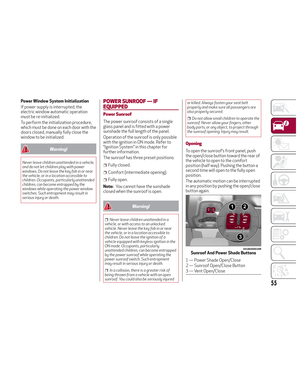 57
57 58
58 59
59 60
60 61
61 62
62 63
63 64
64 65
65 66
66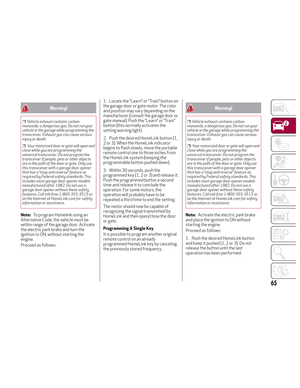 67
67 68
68 69
69 70
70 71
71 72
72 73
73 74
74 75
75 76
76 77
77 78
78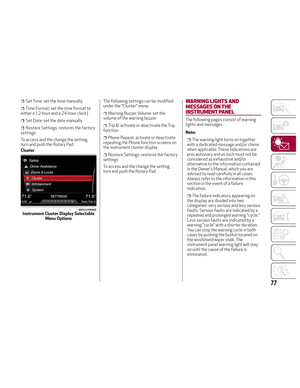 79
79 80
80 81
81 82
82 83
83 84
84 85
85 86
86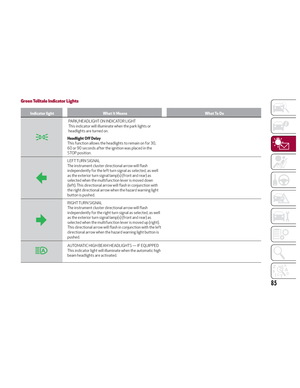 87
87 88
88 89
89 90
90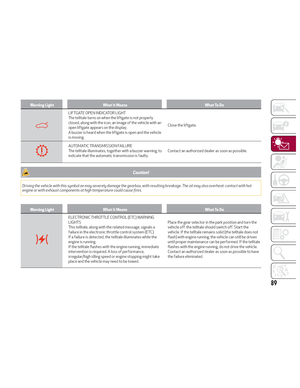 91
91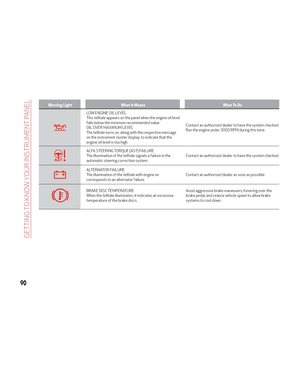 92
92 93
93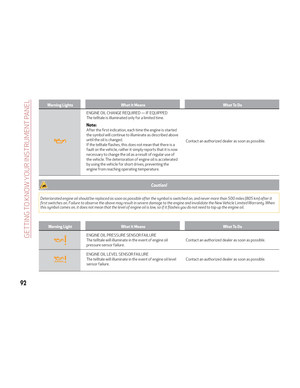 94
94 95
95 96
96 97
97 98
98 99
99 100
100 101
101 102
102 103
103 104
104 105
105 106
106 107
107 108
108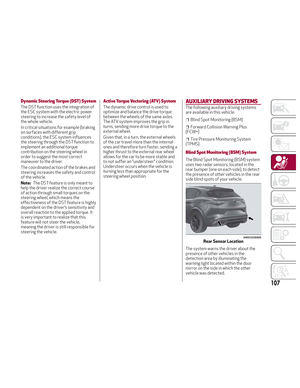 109
109 110
110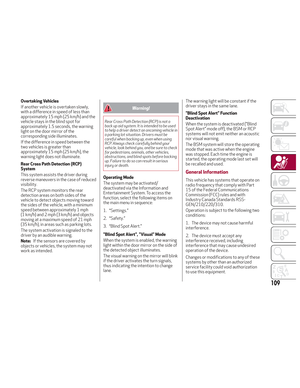 111
111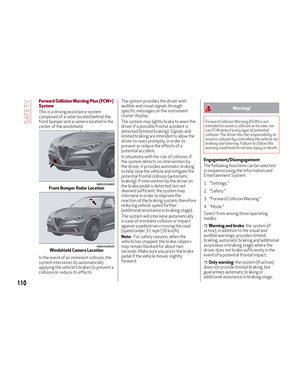 112
112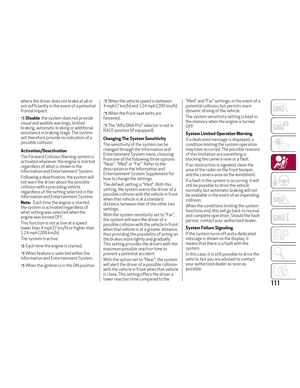 113
113 114
114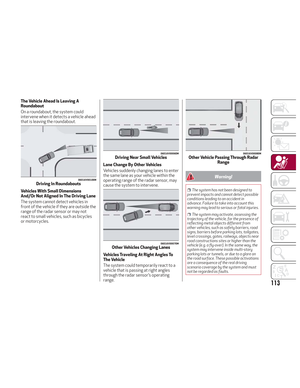 115
115 116
116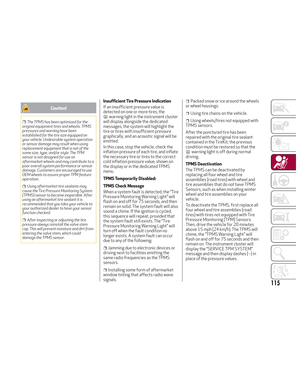 117
117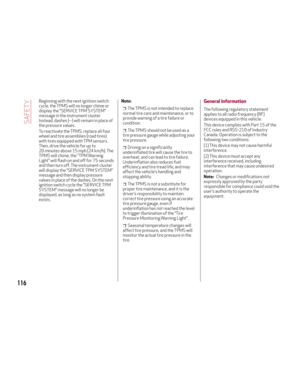 118
118 119
119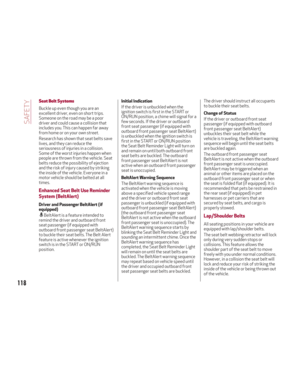 120
120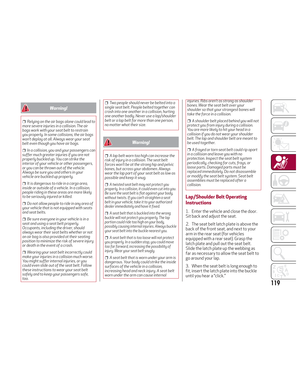 121
121 122
122 123
123 124
124 125
125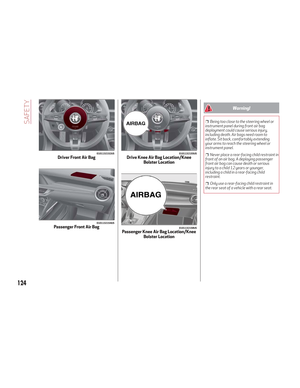 126
126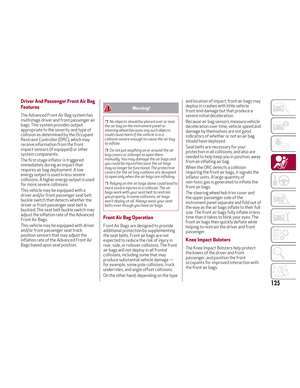 127
127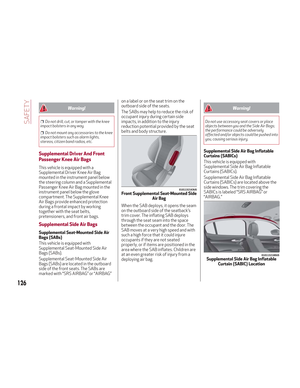 128
128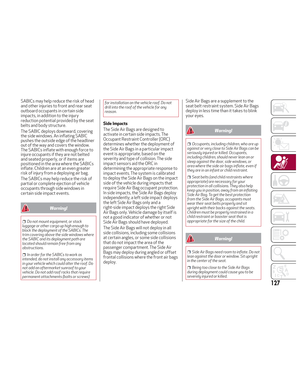 129
129 130
130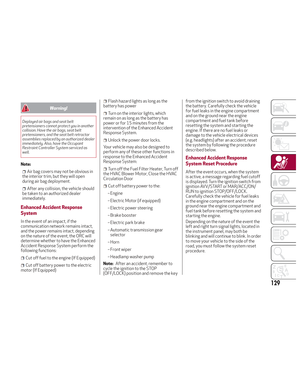 131
131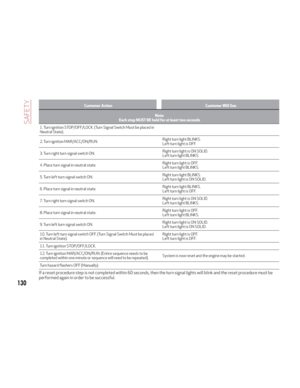 132
132 133
133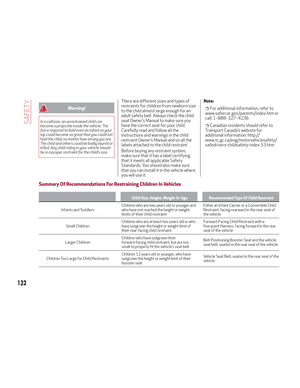 134
134 135
135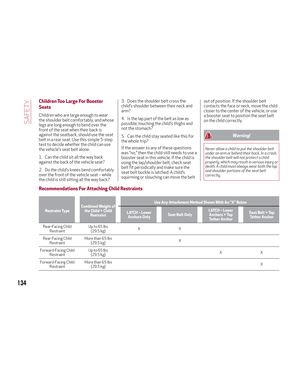 136
136 137
137 138
138 139
139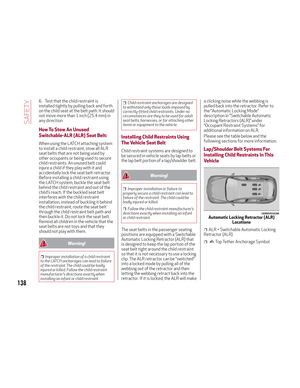 140
140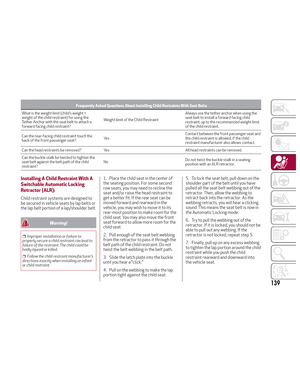 141
141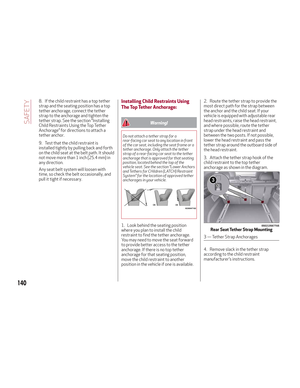 142
142 143
143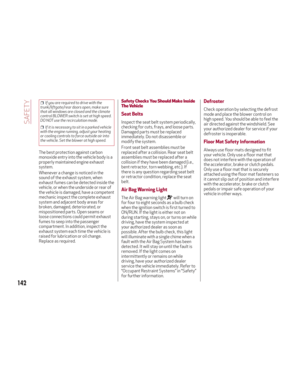 144
144 145
145 146
146 147
147 148
148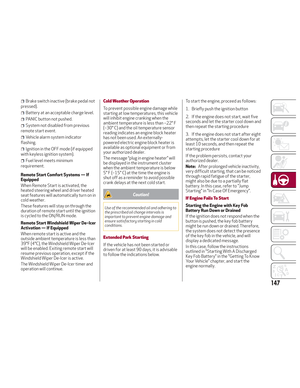 149
149 150
150 151
151 152
152 153
153 154
154 155
155 156
156 157
157 158
158 159
159 160
160 161
161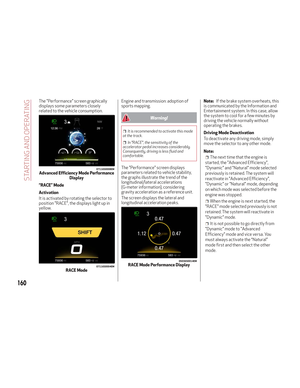 162
162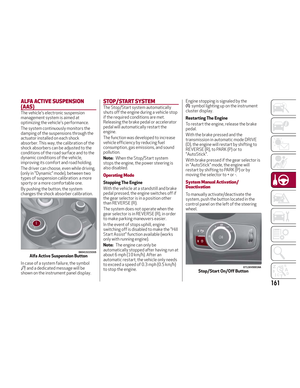 163
163 164
164 165
165 166
166 167
167 168
168 169
169 170
170 171
171 172
172 173
173 174
174 175
175 176
176 177
177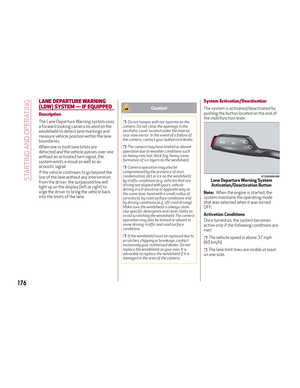 178
178 179
179 180
180 181
181 182
182 183
183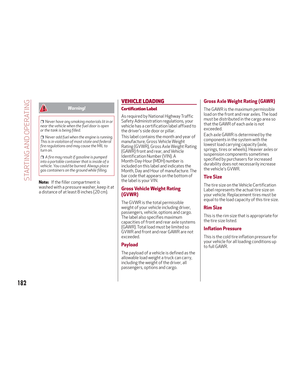 184
184 185
185 186
186 187
187 188
188 189
189 190
190 191
191 192
192 193
193 194
194 195
195 196
196 197
197 198
198 199
199 200
200 201
201 202
202 203
203 204
204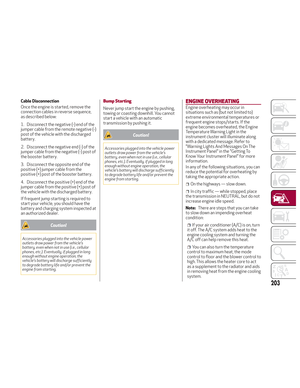 205
205 206
206 207
207 208
208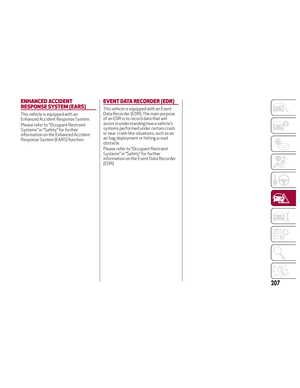 209
209 210
210 211
211 212
212 213
213 214
214 215
215 216
216 217
217 218
218 219
219 220
220 221
221 222
222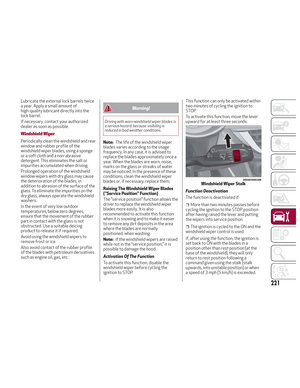 223
223 224
224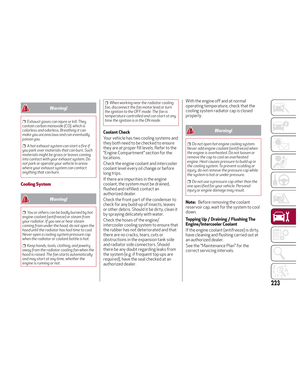 225
225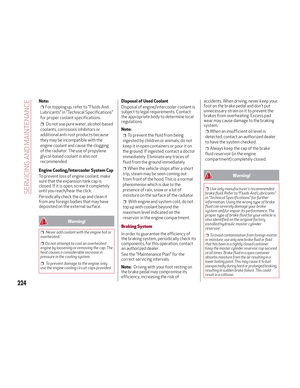 226
226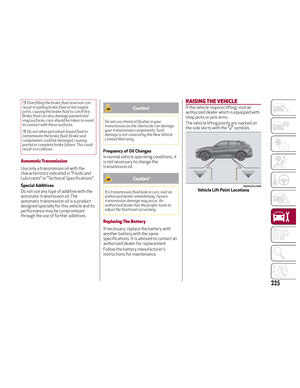 227
227 228
228 229
229 230
230 231
231 232
232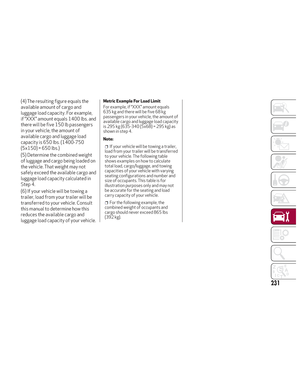 233
233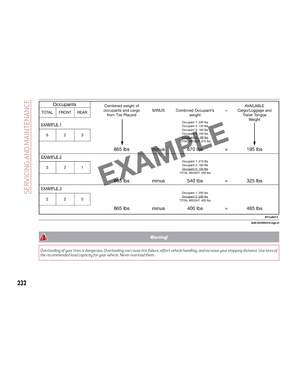 234
234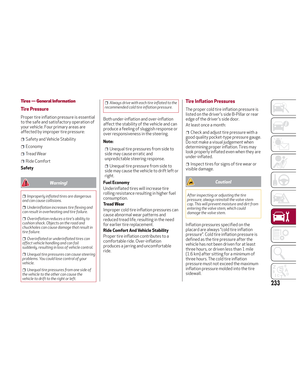 235
235 236
236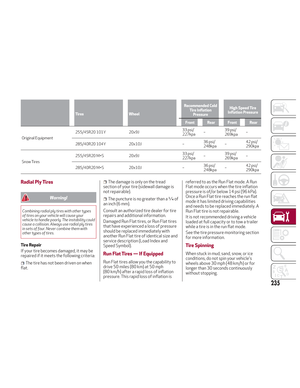 237
237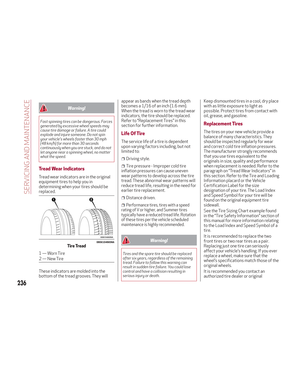 238
238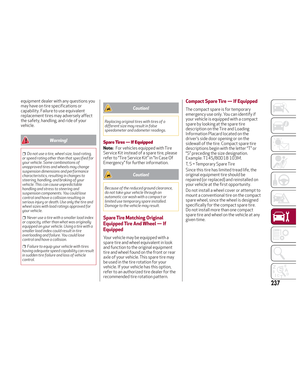 239
239 240
240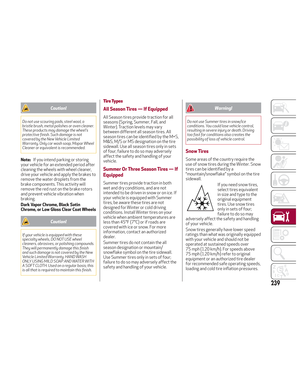 241
241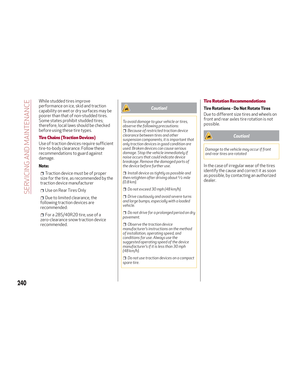 242
242 243
243 244
244 245
245 246
246 247
247 248
248 249
249 250
250 251
251 252
252 253
253 254
254 255
255 256
256 257
257 258
258 259
259 260
260 261
261 262
262 263
263 264
264 265
265 266
266 267
267 268
268 269
269 270
270 271
271 272
272 273
273 274
274 275
275