Page 6 of 276

VEHICLE CHANGES / ALTERATIONS
Accessories Purchased By The Owner
Warning!
Any change or alteration of the vehicle might seriously affect its safety and road handling, thus causing accidents, in which the occupants could
even be fatally injured.
If you decide to install electrical accessories that require a permanent electrical supply (e.g. radio, satellite anti-theft system, etc.) or
accessories that in any case drain the electrical supply after purchasing the vehicle, contact your authorized dealer. Dealer personnel
will check whether the vehicles's electrical system is able to withstand the load required or whether it needs to be integrated with a
more powerful battery.
Note:Use caution when adding additional spoilers, alloy wheel rims, or non-standard wheel hubs: they could reduce the ventilation
of the brakes and affect efficiency under sharp and repeated braking, or on long descents. Make sure that nothing obstructs the
pedal (mats, etc.).
FCA US LLC shall not be liable for damage caused by the installation of accessories either not supplied or recommended by FCA US
LLC and/or not installed in compliance with the provided instructions.
Installing Electrical/Electronic Devices
FCA US LLC authorizes the installation of transceivers provided that installation is carried out at a specialized center, in compliance
with manufacturer's specifications.
Note: Local authorities may not allow the vehicle on the road if devices that modify the features of the vehicle have been installed.
This also may void the warranty in relation to faults caused by the change either directly or indirectly related to it.
FCA US LLC shall not be liable for damage caused by the installation of accessories either not supplied or recommended by FCA US
LLC and/or not installed in compliance with the provided instructions.
Page 13 of 276
GRAPHICAL TABLE OF CONTENTS
FRONT VIEW
0201132312USFront View
1 — Headlights4 — Mirrors
2 — Engine Compartment 5 — Doors
3 — Windshield 6 — Wheels And Tires
11
Page 15 of 276
INSTRUMENT PANEL
0201132314USInstrument Panel
1 — Headlight Switch 3 — Steering Wheel 5 — Windshield WiperStalk7 — Information and
Entertainment System9 — Glove Compartment
2 — Paddle Shifter 4 — Instrument Cluster 6 — Air Vents 8 — Climate Controls 10 — Passenger-Side Air
Bag
13
Page 17 of 276
GETTING TO KNOW YOUR VEHICLE
In this section, you will find important
information to help you become familiar
with the features needed to operate your
vehicle, and how they function.KEYS ....................16
IGNITION SYSTEM............19
ENGINE IMMOBILIZER .........20
SECURITY ALARM SYSTEM — IF
EQUIPPED .................21
DOORS ...................23
SEATS....................28
HEAD RESTRAINTS ...........34
STEERING WHEEL ............36
MIRRORS ..................37
EXTERIOR LIGHTS ............38
INTERIOR LIGHTS ............41
WINDSHIELD WIPERS ..........44
HEADLAMP WASHERS ..........46
CLIMATE CONTROL ...........47
POWERWINDOWS............54
POWER SUNROOF — IF EQUIPPED . .55
HOOD....................57
POWER LIFTGATE ............58
INTERNAL EQUIPMENT .........63
15
Page 22 of 276

Starting With A Discharged Key Fob
Battery
If the key fob battery is discharged,
proceed as follows to start the vehicle:
1. Lift the front armrest.
2. Lay the key fob on the key fob outline
found on the floor of the armrest
compartment while pushing the
START/STOP button to start the ignition.
Steering Wheel Lock — If Equipped
Your vehicle may be equipped with a
passive electronic steering wheel lock.
The steering wheel lock is engaged when
the driver door is opened with the ignition
OFF. The steering wheel lock releases
when the ignition is cycled ON.
General Information
The following regulatory statement
applies to all radio frequency (RF)
devices equipped in this vehicle:
This device complies with Part 15 of the
FCC Rules and with Industry Canada
license-exempt RSS standard(s).
Operation is subject to the following two
conditions:
1. This device may not cause harmful
interference, and
2. This device must accept any
interference received, including
interference that may cause undesired
operation.
Note:Changes or modifications not
expressly approved by the party
responsible for compliance could void the
user’s authority to operate the
equipment.
ENGINE IMMOBILIZER
Engine Immobilizer Operation
The Engine Immobilizer system prevents
unauthorized use of the vehicle by
disabling engine starting.
The system does not need to be enabled
or activated. Operation of the
immobilizer is automatic whether the
vehicle's doors are locked or unlocked.
When the ignition is set to ON, the Engine
Immobilizer system identifies the code
transmitted by the key. If the code is
recognized as valid, the Engine
Immobilizer system enables engine
starting.
When the ignition is brought back to
STOP, the Engine Immobilizer system
deactivates the engine control unit,
disabling engine starting.
For the correct engine starting
procedures, refer to “Starting The
Engine” in “Starting And Operating.”
04026V0002EMKey Fob Placement Location
20
GETTING TO KNOW YOUR VEHICLE
Page 30 of 276

Unlocking The Doors With A Discharged
Battery
Proceed as follows to unlock the doors if
the vehicle battery is discharged.
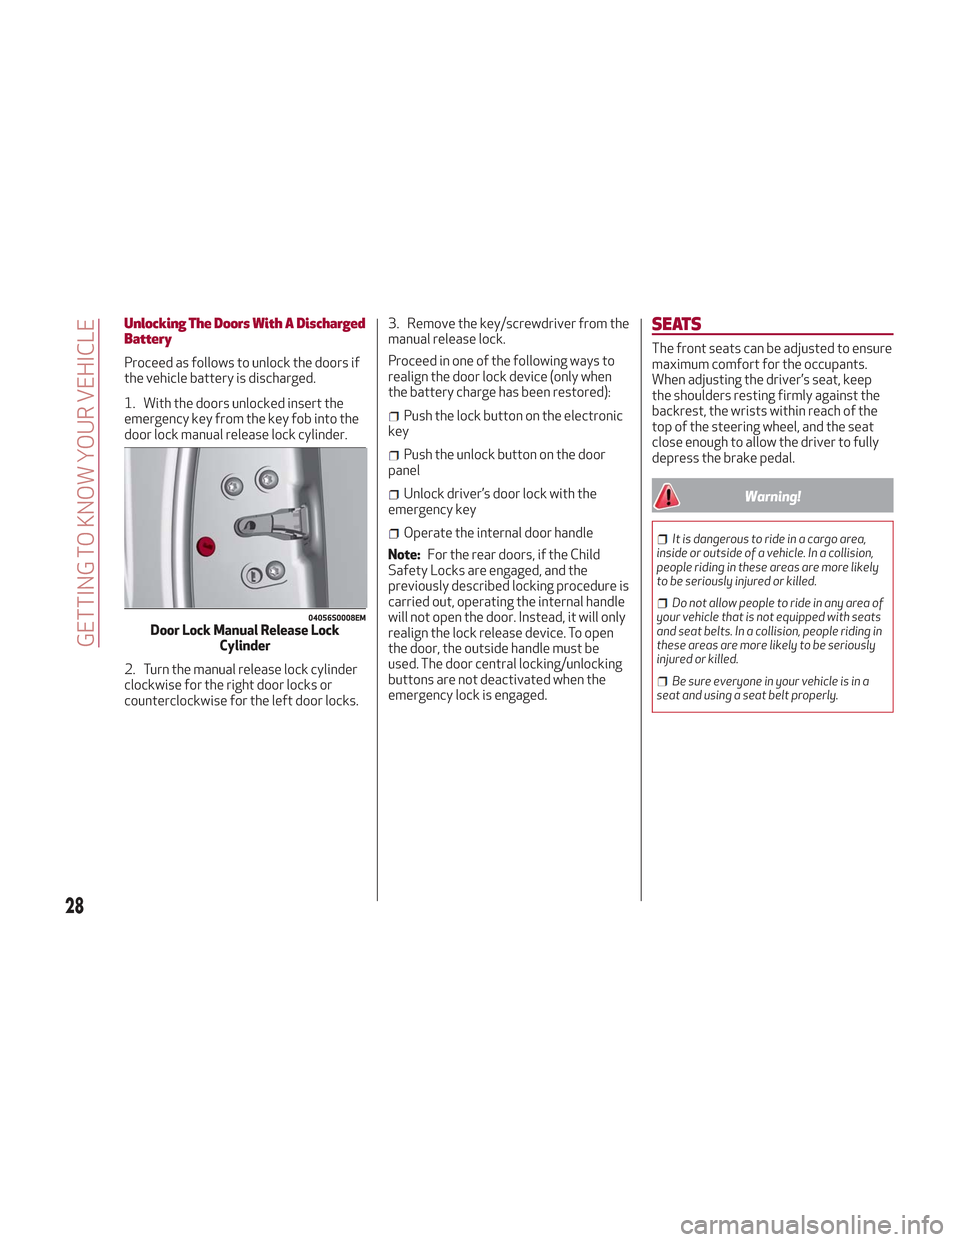
1. With the doors unlocked insert the
emergency key from the key fob into the
door lock manual release lock cylinder.
2. Turn the manual release lock cylinder
clockwise for the right door locks or
counterclockwise for the left door locks.3. Remove the key/screwdriver from the
manual release lock.
Proceed in one of the following ways to
realign the door lock device (only when
the battery charge has been restored):
Push the lock button on the electronic
key
Push the unlock button on the door
panel
Unlock driver’s door lock with the
emergency key
Operate the internal door handle
Note: For the rear doors, if the Child
Safety Locks are engaged, and the
previously described locking procedure is
carried out, operating the internal handle
will not open the door. Instead, it will only
realign the lock release device. To open
the door, the outside handle must be
used. The door central locking/unlocking
buttons are not deactivated when the
emergency lock is engaged.
SEATS
The front seats can be adjusted to ensure
maximum comfort for the occupants.
When adjusting the driver’s seat, keep
the shoulders resting firmly against the
backrest, the wrists within reach of the
top of the steering wheel, and the seat
close enough to allow the driver to fully
depress the brake pedal.
Warning!
It is dangerous to ride in a cargo area,
inside or outside of a vehicle. In a collision,
people riding in these areas are more likely
to be seriously injured or killed.
Do not allow people to ride in any area of
your vehicle that is not equipped with seats
and seat belts. In a collision, people riding in
these areas are more likely to be seriously
injured or killed.
Be sure everyone in your vehicle is in a
seat and using a seat belt properly.
04056S0008EMDoor Lock Manual Release Lock Cylinder
28
GETTING TO KNOW YOUR VEHICLE
Page 38 of 276

STEERING WHEEL
Steering Wheel Adjustments
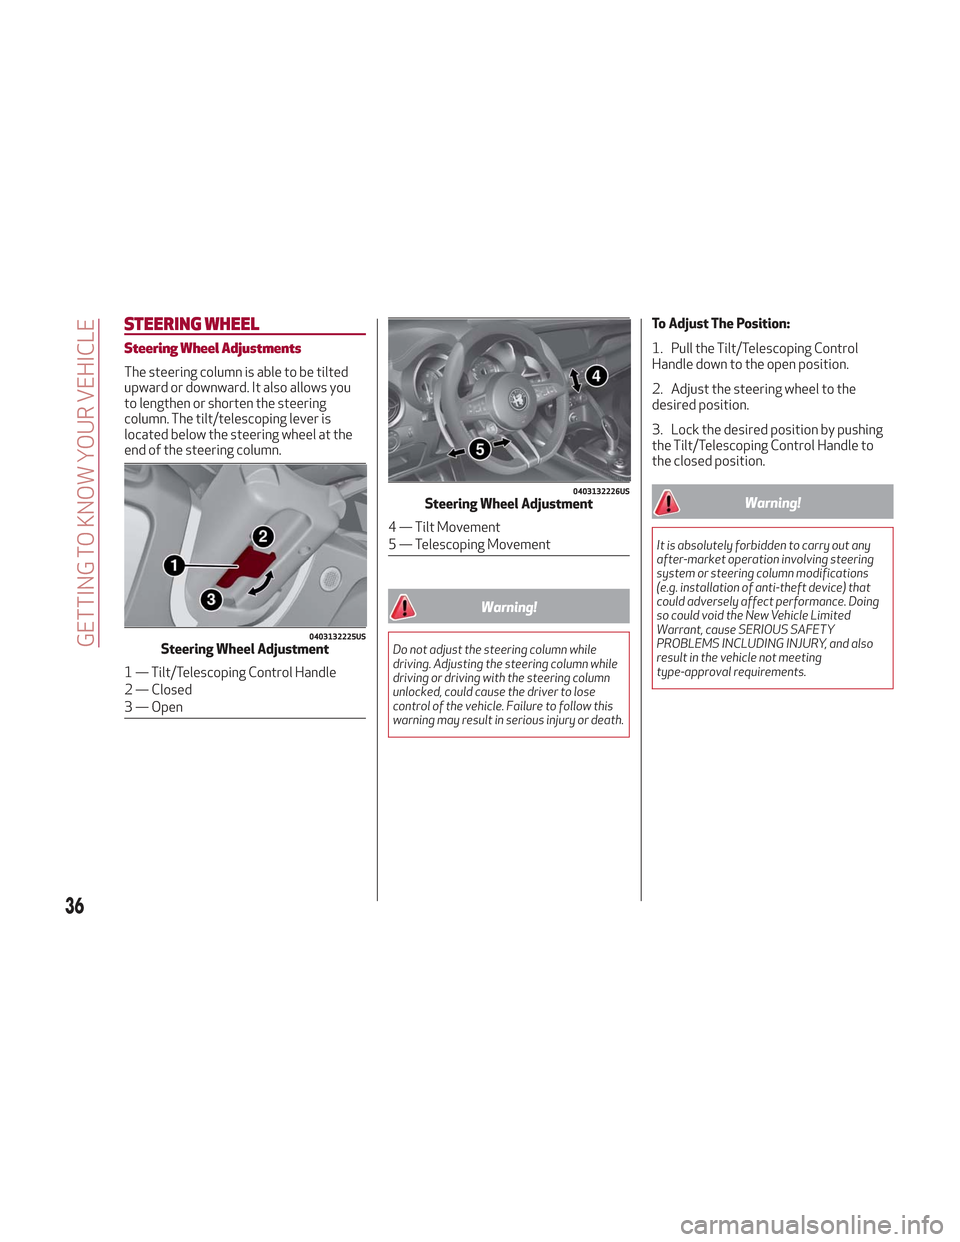
The steering column is able to be tilted
upward or downward. It also allows you
to lengthen or shorten the steering
column. The tilt/telescoping lever is
located below the steering wheel at the
end of the steering column.
Warning!
Do not adjust the steering column while
driving. Adjusting the steering column while
driving or driving with the steering column
unlocked, could cause the driver to lose
control of the vehicle. Failure to follow this
warning may result in serious injury or death.
To Adjust The Position:
1. Pull the Tilt/Telescoping Control
Handle down to the open position.
2. Adjust the steering wheel to the
desired position.
3. Lock the desired position by pushing
the Tilt/Telescoping Control Handle to
the closed position.
Warning!
It is absolutely forbidden to carry out any
after-market operation involving steering
system or steering column modifications
(e.g. installation of anti-theft device) that
could adversely affect performance. Doing
so could void the New Vehicle Limited
Warrant, cause SERIOUS SAFETY
PROBLEMS INCLUDING INJURY, and also
result in the vehicle not meeting
type-approval requirements.
0403132225USSteering Wheel Adjustment
1 — Tilt/Telescoping Control Handle
2 — Closed
3 — Open
0403132226USSteering Wheel Adjustment
4 — Tilt Movement
5 — Telescoping Movement
36
GETTING TO KNOW YOUR VEHICLE
Page 39 of 276

Heated Steering Wheel
With the ignition in the ON position, push
the heated steering wheelbutton on
the instrument panel.
The indicator on the button will illuminate
when this feature is enabled.
Warning!
Persons who are unable to feel pain to the
skin because of advanced age, chronic
illness, diabetes, spinal cord injury,
medication, alcohol use, exhaustion, or other
physical conditions must exercise care when
using the steering wheel heater. It may
cause burns even at low temperatures,
especially if used for long periods.
Do not place anything on the steering
wheel that insulates against heat, such as a
blanket or steering wheel covers of any type
and material. This may cause the steering
wheel heater to overheat.
MIRRORS
Electrochromic Mirror
This mirror automatically adjusts for
headlight glare from vehicles behind you.
The electrochromic mirror has a power
button to activate/deactivate the
automatic dimming/anti-glare function.
When the vehicle is in REVERSE, the
automatic dimming feature is
deactivated.
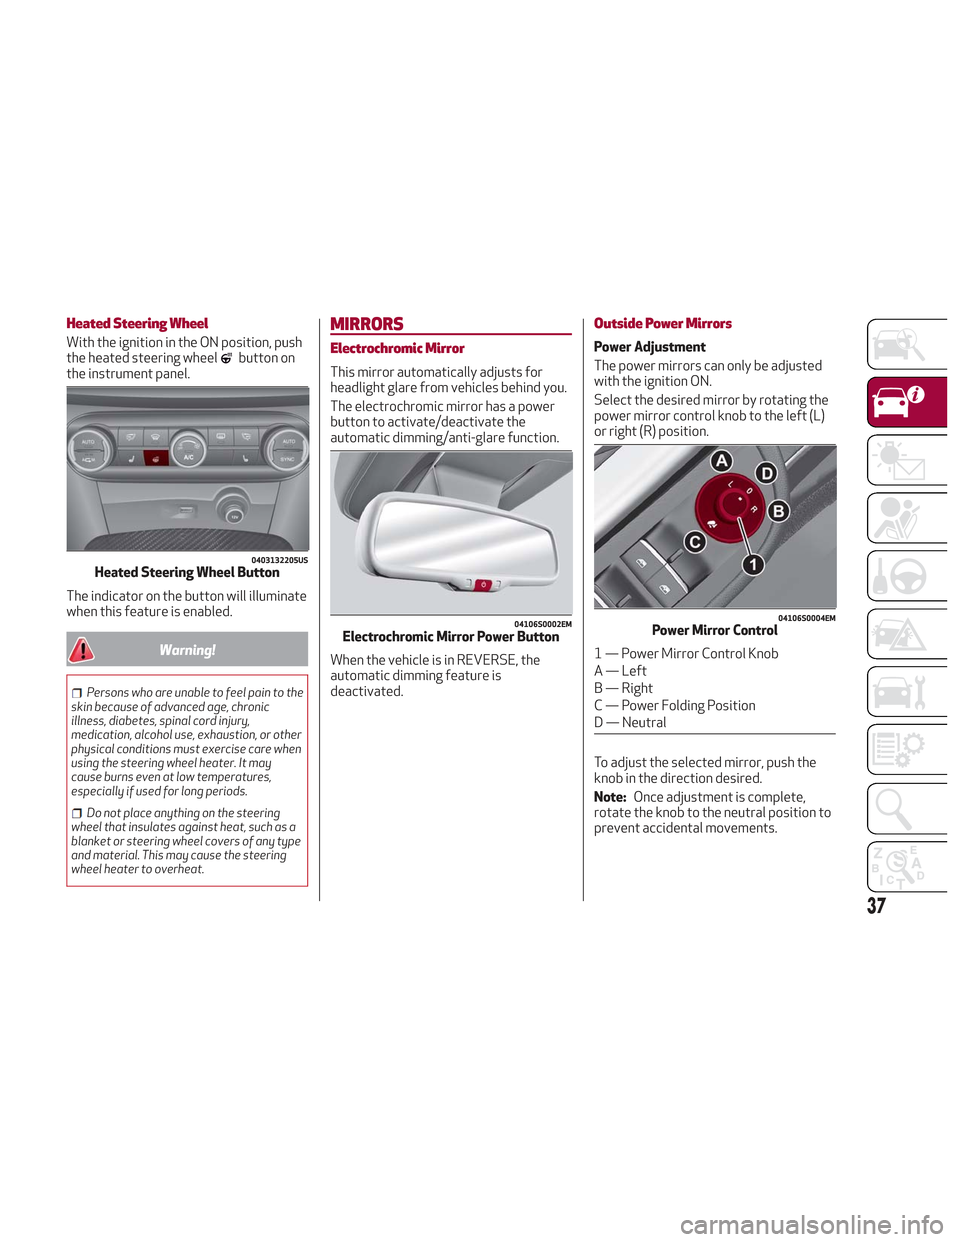
Outside Power Mirrors
Power Adjustment
The power mirrors can only be adjusted
with the ignition ON.
Select the desired mirror by rotating the
power mirror control knob to the left (L)
or right (R) position.
To adjust the selected mirror, push the
knob in the direction desired.
Note: Once adjustment is complete,
rotate the knob to the neutral position to
prevent accidental movements.
0403132205USHeated Steering Wheel Button
04106S0002EMElectrochromic Mirror Power Button
04106S0004EMPower Mirror Control
1 — Power Mirror Control Knob
A — Left
B — Right
C — Power Folding Position
D — Neutral
37