Page 49 of 260

Note:The climate control system stores
the previously set temperatures and
resumes operation when any button on
the system is pushed.
Switching On The Climate Control
System
To switch the climate control system on
in automatic mode, push the AUTO
button.
Stop/Start
The climate control system manages the
Stop/Start system. Stop/Start has the
engine shut off when vehicle speed is
0 mph (0 km/h) to maintain comfort
within the vehicle.
Stop/Start will deactivate in the
following scenarios:
The climate control system is in AUTO
mode (indicator illuminated), and the
vehicle has yet to reach the set
temperature
The climate control system is in LO
maximum cooling
The climate control system is in HI
maximum heating
The climate control system is in the
MAX-DEF status
When the Stop/Start system is active,
the engine will restart if the inside
temperature changes significantly, or if
the LO setting, or MAX-DEF setting, is
activated. With Stop/Start system on, air flow is
reduced to keep the compartment
comfort conditions for longer.
Until the temperature drastically
changes within the cabin, the climate
control system will continue to maintain
the temperature while the engine is off.
By deactivating the Stop/Start system
with the
button located on the
dashboard, the climate control system
will take priority over the engine shutting
off.
Note:
In harsh climate conditions, limit the
use of the Stop/Start system to prevent
the compressor from continuously
switching on and off. This will cause
rapid misting of the windows and the
accumulation of humidity in the
passenger compartment.
When the Stop/Start system is on,
the climate control system will always
take air in from outside, reducing the
probability of the windows fogging up.
System Maintenance
In winter, the Climate Control System
must be turned on at least once a month
for approximately ten minutes.
Have the system inspected at an
authorized dealer before the summer.
POWER WINDOWS
Power Window Switches
The power window switches work with
the ignition in the ON position and for
three minutes after the ignition has been
placed in the STOP position. When one of
the front doors is opened, this operation
is disabled.
Driver Side Front Door Controls
The switches are located on the door
panel trim. All windows can be controlled
from the driver side door panel.
04166S0001EMPower Window Switches
1 — Front Left
Window Switch 4 — Window
Lockout Switch
2 — Front Right
Window Switch 5 — Rear Left
Window Switch
3 — Rear Right
Window Switch
47
Page 50 of 260
 for manual
\"burst\" window travel, while pushing the
same button harder")
Window Opening
Push the buttons to open the desired
window.
Each button has two position steps. Push
gently (first position step) for manual
"burst" window travel, while pushing the
same button harder (second position
step) activates "continuous automatic"
operation.
If the button is pushed again, the window
will stop in the desired position.
Window Closing
Pull the window switch up to move the
window upward. Hold the switch for at
least half of a second and the window will
go up automatically.
To stop the window during Auto-Up
operation, push or pull the window switch
again.
Passenger Side Front Door/Rear Door
Controls
There are single window controls on the
passenger and rear door trim panels
which operate the door windows.
Auto-Up Feature With Anti-Pinch
Protection
The vehicle may be equipped with an
anti-pinch safety device for closing the
windows.
If the safety system senses any obstacle
while the window is closing, it will stop
the window’s movement and reverse it,
depending on its position.This device is also useful if the windows
are activated accidentally by children
inside the vehicle.
The anti-pinch safety function is
activated both during the manual and the
automatic operation of the window.
When the anti-pinch system is activated,
the window closing is immediately
interrupted. Then the window closing is
automatically reversed and the window
lowers by about eight inches (20 cm) in
relation to the first stop position. The
window cannot be operated during this
time.
Note:
In the event of an error, or if the
anti-pinch protection is activated three
consecutive times, the automatic closing
operation of the window will be
deactivated. In order to restore the
correct operation of the system, the
window must be lowered.
Power Window System Initialization
If power supply is interrupted, the
electric window automatic operation
must be reinitialized.
To perform the initialization procedure,
which must be done on each door with the
doors closed, manually fully close the
window to be initialized.HOOD
Opening
To open the hood, proceed as follows:
1. Pull the release lever located on the
driver’s side kick panel.
2. Go to the outside of the vehicle and
position yourself in front of the grille.
3. Lift the hood slightly.
4. Move the under-hood latch from right
to left to release the hood.
04196S0001EMHood Release Lever
48
GETTING TO KNOW YOUR VEHICLE
Page 51 of 260

5. Raise the hood completely. The
operation is assisted by the addition of
two gas props which hold it in the open
position.
Note:
Do not tamper with the props and
assist the hood while lifting it.
Use both hands to lift the hood.
Before lifting, check that the windshield
wiper arms are not raised from the
windshield or in operation, that the
vehicle is stationary and that the electric
park brake is engaged.
Closing
As the hood is extremely light, to close
the hood, lower it to approximately
16 inches (40 cm) from the engine
compartment then apply a slight
pressure downward and drop the hood.
Make sure that the hood is completely
closed and fully latched. If it is not
perfectly closed, do not try to push the
hood down but open it and repeat the
procedure
Note: Always check that the hood is
closed correctly to prevent it from
opening while the vehicle is traveling.
Since the hood is equipped with a double
locking system, one for each side, you
must check that it is closed on both its
side ends.
Warning!
Be sure the hood is fully latched before
driving your vehicle. If the hood is not fully
latched, it could open when the vehicle is in
motion and block your vision. Failure to
follow this warning could result in serious
injury or death.
TRUNK
The trunk unlocking is electrically
operated and is deactivated when the
vehicle is in motion.
Opening
Opening From The Outside
When unlocked, the trunk lid can be
opened from outside the vehicle using
the exterior trunk lid release button
located between the plate lights. Push
the button until you hear a “click.” The
trunk lid can also be opened by quickly
pushing the exterior trunk lid release
button on the key fob twice.
The turn signal indicators will blink and the
interior lights will turn on when the trunk
lid is opened. They turn off automatically
when the trunk lid is closed.
The lights turn off automatically after a
few minutes if the trunk lid is left open.
04196S0002EMRelease Hood Latch To The Left
04056S0005EMExterior Trunk Lid Release Button
49
Page 52 of 260

Opening From The Inside
When unlocked, the trunk lid can be
opened from inside the vehicle using the
interior trunk lid release button, located
under the dashboard near the engine
hood opening lever. Push the trunk lid
release button until you hear a “click.”
Trunk Lid Emergency Opening
A lever can be found in the trunk lid over
the lock to allow opening from the inside.Pull the lever in the direction indicated by
the arrow to open the trunk lid. The lever
can be seen in the dark.
Closing
Grip one of the handles and lower the
trunk lid until it clicks.
Note:
It will not be possible to open the
trunk lid with a key or by pushing the
button in the passenger compartment
when the battery is disconnected. So,
always position the manual trunk lid
opening strap on the trunk lid lock
before disconnecting the battery. Refer
to “Storing The Vehicle” in “Servicing And
Maintenance” for the procedure.
Trunk Initialization
Note: If the battery is disconnected or
the protection fuse blows, the trunk lid
opening/closing mechanism must be
re-initialized as follows:
1. Close all the doors and the trunk lid.
2. Push the lock button on the remote
control.
3. Push the unlock button on the remote
control.
Trunk Specifications
Access To The Tire Service Kit
To access the Tire Service Kit, lift the
carpet in the trunk. For its use, refer to
”Tire Service Kit” in “In Case Of
Emergency” for further information.
04206S0002EMInterior Trunk Lid Release Button
04206S0006EMEmergency Release Button
04206S0003EMTrunk Lid Interior Handles
04206S0004EMCargo Area
50
GETTING TO KNOW YOUR VEHICLE
Page 53 of 260

Rear Cargo Tie–Downs — If Equipped
There are four hooks inside the trunk for
attaching the cargo net or cables which
can safely secure the cargo.
Note:Do not apply a load greater than
22 lbs (10 kg) on a single hook.
Cargo Net — If Equipped
This is useful for correctly arranging the
cargo and/or for transporting light
materials.INTERNAL EQUIPMENT
Glove Compartment
To open the glove compartment proceed
as follows:
1. If equipped with a lock, unlock the
glove compartment by placing the
emergency key in the lock on the handle.
2. Pull handle to open the glove
compartment.
When the glove compartment is opened,
a light turns on to illuminate the inside of
the compartment.
Note: Do not insert large objects that
will prevent the glove compartment from
closing completely. Always make sure
that the glove compartment is
completely closed when driving.
Sun Visors
The sun visors are located at the sides of
the interior rear view mirror. They can be
adjusted forward and toward the side
window.
To direct the visor toward the side
window, detach the visor from the
interior rear view mirror side hook and
turn it towards the side window.
From this position, the sun visor can also
be extended toward to rear of the vehicle
for additional blockage of sunlight.
Courtesy mirrors with lights are fitted on
the back of the sun visors and can be
used even in poor light conditions.
Note: A rear facing child restraint
system should never be fitted in the front
passenger seat. Always comply with the
instructions on the sun visor. Refer to
"Child Restraints" in "Safety" for more
information.
04206S0005EMRear Cargo Tie-Downs
04246S0001EMOpening The Glove Compartment
04246S0002EMRotate Sun Visor Toward Passenger Window
51
Page 54 of 260

Homelink
Description
Homelink is a fixed system installed on
the vehicle. It can sync up to three
different devices that activate garage
doors, gates, lighting systems, and home
or office alarm systems.
Programming
Warning!
Vehicle exhaust contains carbon
monoxide, a dangerous gas. Do not run your
vehicle in the garage while programming the
transceiver. Exhaust gas can cause serious
injury or death.
Your motorized door or gate will open
and close while you are programming the
universal transceiver. Do not program the
transceiver if people, pets or other objects
are in the path of the door or gate. Only use
this transceiver with a garage door opener
that has a “stop and reverse” feature as
required by Federal safety standards. This
includes most garage door opener models
manufactured after 1982. Do not use a
garage door opener without these safety
features. Call toll-free 1-800-355-3515 or,
on the Internet at HomeLink.com for safety
information or assistance.
Note: Without starting the engine,
activate the handbrake and place the
ignition in the ON position. The following operation will delete the
manufacture’s standard codes and does
not need to be repeated during the
subsequent button programming:
Push and hold the outer buttons
(1 and 3). After about ten seconds, the
lighted indicators will start to flash.
Release both buttons.
Note: Follow the steps below to begin
programming your remote control to one
of the HomeLink buttons:
1. Push and hold the desired HomeLink
button (1, 2 or 3). When the HomeLink
indicator begins to flash slowly, move the portable remote control one to three
inches from the HomeLink system
(keeping the programmable button
pushed down).
2. If the indicator does not begin to flash
quickly, change the distance between the
HomeLink and the portable remote
control and try the procedure again.
3. The HomeLink indicator flashes, first
slowly and then quickly. When the
indicator starts to flash quickly, release
both buttons.
Using The Homelink System
The HomeLink system activates the
garage door or gate motor, just like the
portable remote control. The car must be
within the range of the garage door and
the ignition must be in the ON position.
Push the programmed button (1, 2 or 3).
While the signal is being transmitted, the
indicator is lit and the system (garage
door, gate, etc.) will respond.
If the HomeLink system does not
operate, the original portable remote
control may be equipped with an
alternative code (refer to “Alternative
Code Synchronization”).
If necessary, the original remote control
can still be used to operate the system.
04246S0006NAGarage Door Opener (Homelink)
Buttons
1 — Homelink Button 1
2 — Homelink Button 2
3 — Homelink Button 3
4 — Homelink Indicator
52
GETTING TO KNOW YOUR VEHICLE
Page 55 of 260

Alternative Code Synchronization
To check whether the garage door or gate
motor has an alternative code, proceed
as follows:
1. Read the garage door or gate motor
manufacturer manual.
2. The portable remote control seems to
have programmed to the HomeLink
system, but the garage door or gate can
be neither opened or closed.
3. Push the programmed button and
keep it pushed (1, 2 or 3). With an
alternative code system, the indicator
flashes briefly, and then remains off for
two seconds. This sequence is repeated
for 20 seconds.
Warning!
Vehicle exhaust contains carbon
monoxide, a dangerous gas. Do not run your
vehicle in the garage while programming the
transceiver. Exhaust gas can cause serious
injury or death.
Your motorized door or gate will open
and close while you are programming the
universal transceiver. Do not program the
transceiver if people, pets or other objects
are in the path of the door or gate. Only use
this transceiver with a garage door opener
that has a “stop and reverse” feature as
required by Federal safety standards. This
includes most garage door opener models
manufactured after 1982. Do not use a garage door opener without these safety
features. Call toll-free 1-800-355-3515 or,
on the Internet at HomeLink.com for safety
information or assistance.
Note:
To program Homelink using an
Alternative Code, the car must be within
range of the garage door. Activate the
handbrake and turn the ignition to ON,
without starting the engine.
Proceed as follows:
1. Locate the “Learn” or “Train” button on
the garage door or gate motor. The color
and position may vary depending on the
manufacturer (consult the garage door or
gate manual). Push the “Learn” or “Train”
button (this normally activates the
setting warning light).
2. Push the desired HomeLink button
(1, 2 or 3). When the HomeLink indicator
begins to flash slowly, move the portable
remote control one to three inches from
the HomeLink system (keeping the
programmable button pushed down).
3. Within 30 seconds, push the
programmed key (1, 2 or 3) and release it.
Push the programmed button a second
time and release it to conclude the
operation. For some motors, the
operation will probably have to be
repeated a third time to end the setting. The motor should now be capable of
recognizing the signal transmitted by
HomeLink and then open/close the door
or gate.
Programming A Single Key
It is possible to program another
original remote control on an already
programmed HomeLink key by canceling
the previously stored frequency.
Warning!
Vehicle exhaust contains carbon
monoxide, a dangerous gas. Do not run your
vehicle in the garage while programming the
transceiver. Exhaust gas can cause serious
injury or death.
Your motorized door or gate will open and
close while you are programming the
universal transceiver. Do not program the
transceiver if people, pets or other objects
are in the path of the door or gate. Only use
this transceiver with a garage door opener
that has a “stop and reverse” feature as
required by Federal safety standards. This
includes most garage door opener models
manufactured after 1982. Do not use a
garage door opener without these safety
features. Call toll-free 1-800-355-3515 or,
on the Internet at HomeLink.com for safety
information or assistance.
Note: Activate the handbrake and place
the ignition to ON without starting the
engine.
53
Page 56 of 260
. Do not
release the button until the last
operation has been performed.
2. When the HomeLink indicator begins
to")
Proceed as follows:
1. Push the desired HomeLink button
and keep it pushed (1, 2 or 3). Do not
release the button until the last
operation has been performed.
2. When the HomeLink indicator begins
to flash slowly, move the portable remote
control 1 to 3 inches from the system
(keeping the programmable button
pressed down).
If the indicator does not begin to flash
quickly, change the distance between the
HomeLink and the portable remote
control and try the procedure again.
The HomeLink indicator flashes, first
slowly and then quickly. When the
indicator starts to flash quickly, release
both buttons on the remote control.
The system previously programmed to
HomeLink has now been deleted and the
new system is ready to use. This does not
affect the other two HomeLink buttons in
any way.
Deleting Programmed Keys
It is recommended to delete HomeLink
programming before selling the car.
All three keys are deleted simultaneously.
Proceed as follows:
1. Push and hold the outer buttons
(1 and 3). After about ten seconds, the
indicator will start to flash.
2. Release both keys. Technical Information For After Sales
Service
If you are unable to set up HomeLink
successfully after following the above
instructions, contact After Sales Service
(HomeLink free hotline number
1-800-355-3515 ) with the following
information:
Vehicle make and model, including
manufacturing year and country of
purchase;
Make, model, age and frequency of use
of the original portable remote control
(if known).
General Information
The following regulatory statement
applies to all Radio Frequency (RF)
devices equipped in this vehicle:
This device complies with Part 15 of the
FCC Rules and with Industry Canada
license-exempt RSS standard(s).
Operation is subject to the following two
conditions:
1. This device may not cause harmful
interference, and
2. This device must accept any
interference received, including
interference that may cause undesired
operation.
Note:
Changes or modifications not
expressly approved by the party
responsible for compliance could void the
user’s authority to operate the equipment.
Center Console
The center console storage compartment
is located between the front seats.
To access the center console storage, lift
the upper part of the center console as
shown below.
Warning!
Do not operate this vehicle with a console
compartment lid in the open position.
Driving with the console compartment lid
open may result in injury in a collision.
04246S0004EMCenter Console
54
GETTING TO KNOW YOUR VEHICLE
 1
1 2
2 3
3 4
4 5
5 6
6 7
7 8
8 9
9 10
10 11
11 12
12 13
13 14
14 15
15 16
16 17
17 18
18 19
19 20
20 21
21 22
22 23
23 24
24 25
25 26
26 27
27 28
28 29
29 30
30 31
31 32
32 33
33 34
34 35
35 36
36 37
37 38
38 39
39 40
40 41
41 42
42 43
43 44
44 45
45 46
46 47
47 48
48 49
49 50
50 51
51 52
52 53
53 54
54 55
55 56
56 57
57 58
58 59
59 60
60 61
61 62
62 63
63 64
64 65
65 66
66 67
67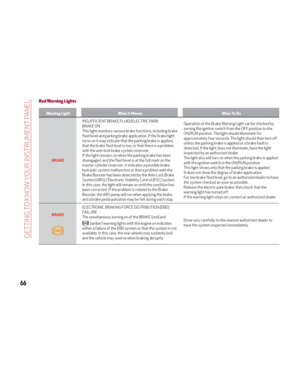 68
68 69
69 70
70 71
71 72
72 73
73 74
74 75
75 76
76 77
77 78
78 79
79 80
80 81
81 82
82 83
83 84
84 85
85 86
86 87
87 88
88 89
89 90
90 91
91 92
92 93
93 94
94 95
95 96
96 97
97 98
98 99
99 100
100 101
101 102
102 103
103 104
104 105
105 106
106 107
107 108
108 109
109 110
110 111
111 112
112 113
113 114
114 115
115 116
116 117
117 118
118 119
119 120
120 121
121 122
122 123
123 124
124 125
125 126
126 127
127 128
128 129
129 130
130 131
131 132
132 133
133 134
134 135
135 136
136 137
137 138
138 139
139 140
140 141
141 142
142 143
143 144
144 145
145 146
146 147
147 148
148 149
149 150
150 151
151 152
152 153
153 154
154 155
155 156
156 157
157 158
158 159
159 160
160 161
161 162
162 163
163 164
164 165
165 166
166 167
167 168
168 169
169 170
170 171
171 172
172 173
173 174
174 175
175 176
176 177
177 178
178 179
179 180
180 181
181 182
182 183
183 184
184 185
185 186
186 187
187 188
188 189
189 190
190 191
191 192
192 193
193 194
194 195
195 196
196 197
197 198
198 199
199 200
200 201
201 202
202 203
203 204
204 205
205 206
206 207
207 208
208 209
209 210
210 211
211 212
212 213
213 214
214 215
215 216
216 217
217 218
218 219
219 220
220 221
221 222
222 223
223 224
224 225
225 226
226 227
227 228
228 229
229 230
230 231
231 232
232 233
233 234
234 235
235 236
236 237
237 238
238 239
239 240
240 241
241 242
242 243
243 244
244 245
245 246
246 247
247 248
248 249
249 250
250 251
251 252
252 253
253 254
254 255
255 256
256 257
257 258
258 259
259