Page 17 of 114

Special features
3-3
3
Settin
g the traction control system
To turn TCS off
Stop the vehicle and: ’ü¼ push up on the TCS switch for two
seconds to turn the traction con-
trol system off.
’ü¼ push down on the TCS switch to
turn the traction control system
back on.
TIP
Turn the traction control system off to
help free the rear wheel if it is stuck in
mud or sand, etc.
To change TCS settings
Stop the vehicle or close the throttle
and:
’ü¼ push up on the TCS switch to de-
crease traction control
(6ŌåÆ 5ŌåÆ 4ŌåÆ 3ŌåÆ 2ŌåÆ 1).
’ü¼ push down on the TCS switch to
increase traction control
(1ŌåÆ 2ŌåÆ 3ŌåÆ 4ŌåÆ 5ŌåÆ 6).
TIP
TCS settings can also be changed
when moving in straight line if the throt-
tle grip is held in a fixed position for two
seconds while in 4th, 5th, or 6th gear.
WARNING
EWA18940
Take extra precaution when chan g-
in g mo des while ri din g.
Resettin g the traction control sys-
tem
The traction control system will auto-
matically disable when: ’ü¼ the front wheel or rear wheel
comes off the ground while riding.
’ü¼ excessive rear wheel spin is de-
tected while riding.
’ü¼ either wheel is rotated with the key
turned to ŌĆ£ONŌĆØ (such as when per-
forming maintenance).
If the traction control system is dis-
abled, both the ŌĆ£ ŌĆØ indicator light and
the ŌĆ£ ŌĆØ warning light will come on.
Should this occur, try resetting the sys-
tem as follows. 1. Stop the vehicle and turn the key to ŌĆ£OFFŌĆØ.
2. Wait a few seconds and then turn the key back to ŌĆ£ONŌĆØ.
3. The ŌĆ£ ŌĆØ indicator light should turn off and the system be en-
abled.
TIP
If the ŌĆ£ ŌĆØ indicator light remains on af-
ter resetting, the vehicle may still be
ridden; however, have a Yamaha deal-
er check the vehicle as soon as possi-
ble.
4. Have a Yamaha dealer check thevehicle and turn off the ŌĆ£ ŌĆØ
warning light.
1. Traction control system switch ŌĆ£TCSŌĆØ
1
UBN6E0E0.book Page 3 Wednesday, January 25, 2017 1:28 PM
Page 18 of 114
Special features
3-4
3
EAU79480
Quick shift system
The quick shift system (QS) allows for
full-throttle, clutch lever-less, electron-
ically-assisted upshifts. When the shift
switch detects motion in the shift pedal
(page 4-17), engine power and drive
torque are momentarily adjusted to al-
low the upshift to occur.
TIP
’ü¼The quick shift system operates
when traveling at least 20 km/h (12
mi/h) with an engine speed of
2000 r/min or higher, and only
when accelerating.
’ü¼ It does not operate when the
clutch lever is pulled.
UBN6E0E0.book Page 4 Wednesday, January 25, 2017 1:28 PM
Page 19 of 114

Instrument and control functions
4-1
4
EAU10978
Immo bilizer system
This vehicle is equipped with an immo-
bilizer system to help prevent theft by
re-registering codes in the standard
keys. This system consists of the fol-
lowing:
’ü¼ a code re-registering key (with a
red bow)
’ü¼ two standard keys (with a black
bow) that can be re-registered
with new codes
’ü¼ a transponder (which is installed in
the code re-registering key)
’ü¼ an immobilizer unit
’ü¼ an ECU
’ü¼ an immobilizer system indicator
light (See page 4-7.)
The key with the red bow is used to
register codes in each standard key.
Since re-registering is a difficult pro-
cess, take the vehicle along with all
three keys to a Yamaha dealer to have
them re-registered. Do not use the key
with the red bow for driving. It should
only be used for re-registering the
standard keys. Always use a standard
key for driving.
NOTICE
ECA11822
’ü¼ DO NOT LOSE THE CODE RE-
REGISTERING KEY! CONTACT
YOUR DEALER IMMEDIATELY
IF IT IS LOST! If the co de re-reg -
isterin g key is lost, reg istering
new co des in the stan dar d keys
is impossi ble. The stan dar d
keys can still be used to start
the vehicle, however if co de re-
re gisterin g is require d (i.e., if a
new stan dar d key is ma de or all
keys are lost) the entire immob i-
lizer system must be replaced .
Therefore, it is hi ghly recom-
mend ed to use either stan dar d
key an d keep the co de re-re gis-
tering key in a safe place.
’ü¼ Do not su bmerse any key in wa-
ter.
’ü¼ Do not expose any key to exces-
sively hig h temperatures.
’ü¼ Do not place any key close to
ma gnets (this includ es, but not
limite d to, pro ducts such as
speakers, etc.).
’ü¼ Do n
ot place items that transmit
electrical si gnals close to any
key.
’ü¼ Do not place heavy items on any
key.
’ü¼ Do not g rind any key or alter its
shape.
’ü¼ Do not d isassemble the plastic
part of any key.
’ü¼ Do not put two keys of any im-
mo bilizer system on the same
key rin g.
1. Code re-registering key (red bow)
2. Standard keys (black bow)
UBN6E0E0.book Page 1 Wednesday, January 25, 2017 1:28 PM
Page 20 of 114

Instrument and control functions
4-2
4 ’ü¼
Keep the stan dar d keys as well
as keys of other immo bilizer
systems away from this vehi-
cleŌĆÖs cod e re-registering key.
’ü¼ Keep other immo bilizer system
keys away from the main switch
as they may cause si gnal inter-
ference.
EAU10474
Main switch/steerin g lock
The main switch/steering lock controls
the ignition and lighting systems, and is
used to lock the steering. The various
positions are described below.
TIP
Be sure to use the standard key (black
bow) for regular use of the vehicle. To
minimize the risk of losing the code re-
registering key (red bow), keep it in a
safe place and only use it for code re-
registering.
EAU58321ON
All electrical circuits are supplied with
power, and the engine can be started.
The key cannot be removed.
TIP
The headlight comes on automatically
when the engine is started. The head-
light will stay on until the key is turned
to ŌĆ£OFFŌĆØ, even if the engine stalls.
EAU10662OFF
All electrical systems are off. The key
can be removed.
ON
OFF
LOCK
P
UBN6E0E0.book Page 2 Wednesday, January 25, 2017 1:28 PM
Page 21 of 114

Instrument and control functions
4-3
4
WARNING
EWA10062
Never turn the key to ŌĆ£OFFŌĆØ or
ŌĆ£LOCKŌĆØ while the vehicle is movin g.
Otherwise the electrical systems will
b e switche d off, which may result in
loss of control or an acci dent.
EAU1068BLOCK
The steering is locked and all electrical
systems are off. The key can be re-
moved.
To lock the steering
1. Turn the handlebars all the way to
the left.
2. With the key in the ŌĆ£OFFŌĆØ position, push the key in and turn it to
ŌĆ£LOCKŌĆØ.
3. Remove the key.
TIP
If the steering will not lock, try turning
the handlebars back to the right slight-
ly.
To unlock the steering
From the ŌĆ£LOCKŌĆØ position, push the
key in and turn it to ŌĆ£OFFŌĆØ.
EAU59680 (Parkin g)
The hazard lights and turn signal lights
can be turned on, but all other electri-
cal systems are off. The key can be re-
moved.
The steering must be locked before the
key can be turned to ŌĆ£ ŌĆØ.
NOTICE
ECA20760
Usin g the hazar d or turn si gnal li ghts
for an exten ded len gth of time may
cause the battery to d ischarge.
1. Push.
2. Turn.
12
1. Push.
2. Turn.
12
UBN6E0E0.book Page 3 Wednesday, January 25, 2017 1:28 PM
Page 22 of 114

Instrument and control functions
4-4
4
EAU66054
Han dle bar switches
Left
Ri ght
EAU79740Pass switch ŌĆ£ ŌĆØ
Press this switch to flash the headlight
and to mark the start of each lap when
using the lap timer.
TIP
When the dimmer switch is set
to ŌĆ£ ŌĆØ, the passing switch has no ef-
fect.
EAU79871Dimmer switch ŌĆ£ / ŌĆØ
Set this switch to ŌĆ£ ŌĆØ for the high
beam and to ŌĆ£ ŌĆØ for the low beam.
TIP
When the switch is set to low beam,
only the left headlight comes on.
EAU66040Turn si gnal switch ŌĆ£ / ŌĆØ
To signal a right-hand turn, push this
switch to ŌĆ£ ŌĆØ. To signal a left-hand
turn, push this switch to ŌĆ£ ŌĆØ. When
released, the switch returns to the cen-
ter position. To cancel the turn signal
lights, push the switch in after it has re-
turned to the center position.
EAU66030Horn switch ŌĆ£ ŌĆØ
Press this switch to sound the horn.
EAU73961Traction control system switch
ŌĆ£TCSŌĆØ
See page 3-2 for an explanation of the
traction control system.
EAU66060Stop/Run/Start switch ŌĆ£ / / ŌĆØ
To crank the engine with the starter,
set this switch to ŌĆ£ ŌĆØ, and then push
the switch down towards ŌĆ£ ŌĆØ. See
page 6-2 for starting instructions prior
to starting the engine.
Set this switch to ŌĆ£ ŌĆØ to stop the en-
gine in case of an emergency, such as
when the vehicle overturns or when the
throttle cable is stuck.
1. Dimmer switch ŌĆ£ / ŌĆØ
2. Pass switch ŌĆ£ ŌĆØ
3. Traction control system switch ŌĆ£TCSŌĆØ
4. Turn signal switch ŌĆ£ / ŌĆØ
5. Horn switch ŌĆ£ ŌĆØ
1. Stop/Run/Start switch ŌĆ£ / / ŌĆØ
2. Drive mode switch ŌĆ£MODEŌĆØ
3. Hazard switch ŌĆ£ ŌĆØ
54
231
2
3
1
UBN6E0E0.book Page 4 Wednesday, January 25, 2017 1:28 PM
Page 23 of 114

Instrument and control functions
4-5
4
EAU66010Hazar d switch ŌĆ£ ŌĆØ
With the key in the ŌĆ£ONŌĆØ or ŌĆ£ ŌĆØ posi-
tion, use this switch to turn on the haz-
ard lights (simultaneous flashing of all
turn signal lights).
The hazard lights are used in case of an
emergency or to warn other drivers
when your vehicle is stopped where it
might be a traffic hazard.
NOTICE
ECA10062
Do not use the hazar d lig hts for an
exten ded len gth of time with the en-
g ine not runnin g, otherwise the bat-
tery may dischar ge.
EAU73931Drive mo de switch ŌĆ£MODEŌĆØ
See page 3-1 for an explanation of the
drive mode.
EAU4939C
In dicator li ghts an d warnin g
lig hts
EAU11022Turn si gnal in dicator li ght ŌĆ£ ŌĆØ
This indicator light flashes when a turn
signal light is flashing.
EAU11061Neutral in dicator li ght ŌĆ£ ŌĆØ
This indicator light comes on when the
transmission is in the neutral position.
EAU11081Hi gh beam in dicator li ght ŌĆ£ ŌĆØ
This indicator light comes on when the
high beam of the headlight is switched
on.
EAU11257Oil level warnin g lig ht ŌĆ£ ŌĆØ
This warning light comes on if the en-
gine oil level is low.
1. Shift light
2. Engine trouble warning light ŌĆ£ ŌĆØ
3. Oil level warning light ŌĆ£ ŌĆØ
4. Coolant temperature warning light ŌĆ£ ŌĆØ
5. Traction control system indicator light ŌĆ£ ŌĆØ
6. Turn signal indicator light ŌĆ£ ŌĆØ
7. High beam indicator light ŌĆ£ ŌĆØ
8. Neutral indicator light ŌĆ£ ŌĆØ
9. Fuel level warning light ŌĆ£ ŌĆØ
10.ABS warning light ŌĆ£ ŌĆØ
11.Immobilizer system indicator light
2345
109876
11
1
ABS
UBN6E0E0.book Page 5 Wednesday, January 25, 2017 1:28 PM
Page 24 of 114
.
If the warning light remains on after
confirmi")
Instrument and control functions
4-6
4 When the vehicle is turned on, the light
will perform a circuit check (come on
for a few seconds and then go off).
If the warning light remains on after
confirming that the oil level is correct
(page 7-13), have a Yamaha dealer
check the vehicle.
TIP
’ü¼
Even if the oil level is sufficient, the
warning light may flicker when rid-
ing up or downhill, or during sud-
den acceleration or deceleration,
but this is not a malfunction.
’ü¼ If a malfunction is detected, the oil
level warning light will flash re-
peatedly. Have a Yamaha dealer
check the vehicle.
EAU11369Fuel level warnin g lig ht ŌĆ£ ŌĆØ
This warning light comes on when you
are low on fuel. When the fuel level
drops below approximately 3.4 L (0.90
US gal, 0.75 Imp.gal), the light will
come on to remind you to refuel as
soon as possible.
When the vehicle is turned on, the light
will perform a circuit check (come on
for a few seconds and then go off).
If the warning light does not come on
during the circuit check, or if the warn-
ing light remains on after refueling,
have a Yamaha dealer check the vehi-
cle.
TIP
If a malfunction is detected, the fuel
level warning light will flash repeatedly.
Have a Yamaha dealer check the vehi-
cle.
EAU72930Coolant temperature warnin g
li g ht ŌĆ£ ŌĆØ
This warning light comes on if the en-
gine overheats. If this occurs, reduce
the load on the engine immediately. If
message ŌĆ£HIŌĆØ flashes in the coolant
temperature display, stop the vehicle,
then stop the engine and let the engine
cool.
The electrical circuit of the warning
light can be checked by turning the key
to ŌĆ£ONŌĆØ. The warning light should
come on for a few seconds, and then
go off.
If the warning light does not come on
initially when the key is turned to ŌĆ£ONŌĆØ,
or if the warning light remains on, have
a Yamaha dealer check the electrical
circuit.
NOTICE
ECA10022
Do not continue to operate the en-
g ine if it is overheatin g.
TIP
’ü¼ For radiator-fan-equipped vehi-
cles, the radiator fan(s) automati-
cally switch on or off according to
the coolant temperature in the ra-
diator.
’ü¼ If the engine overheats, see page
7-42 for further instructions.
EAU73171Engine trou ble warnin g lig ht ŌĆ£ ŌĆØ
This warning light comes on if a prob-
lem is detected in the engine or other
vehicle control system. If this occurs,
have a Yamaha dealer check the on-
board diagnostic system.
UBN6E0E0.book Page 6 Wednesday, January 25, 2017 1:28 PM
 1
1 2
2 3
3 4
4 5
5 6
6 7
7 8
8 9
9 10
10 11
11 12
12 13
13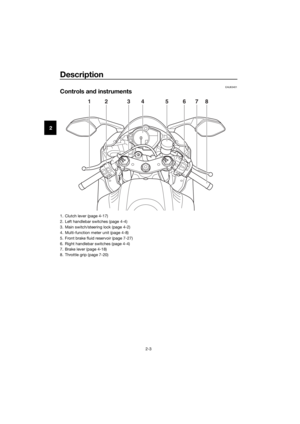 14
14 15
15 16
16 17
17 18
18 19
19 20
20 21
21 22
22 23
23 24
24 25
25 26
26 27
27 28
28 29
29 30
30 31
31 32
32 33
33 34
34 35
35 36
36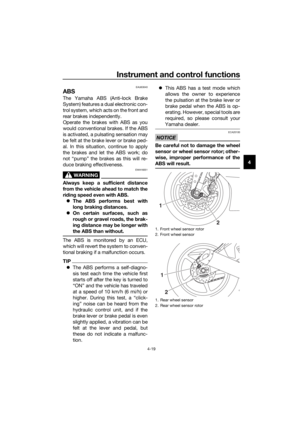 37
37 38
38 39
39 40
40 41
41 42
42 43
43 44
44 45
45 46
46 47
47 48
48 49
49 50
50 51
51 52
52 53
53 54
54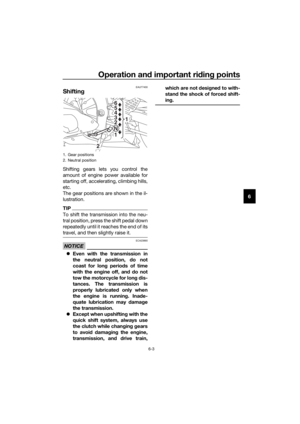 55
55 56
56 57
57 58
58 59
59 60
60 61
61 62
62 63
63 64
64 65
65 66
66 67
67 68
68 69
69 70
70 71
71 72
72 73
73 74
74 75
75 76
76 77
77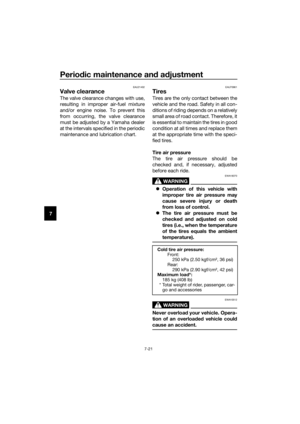 78
78 79
79 80
80 81
81 82
82 83
83 84
84 85
85 86
86 87
87 88
88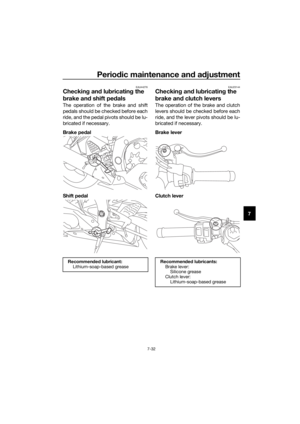 89
89 90
90 91
91 92
92 93
93 94
94 95
95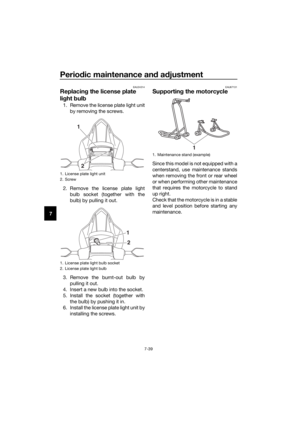 96
96 97
97 98
98 99
99 100
100 101
101 102
102 103
103 104
104 105
105 106
106 107
107 108
108 109
109 110
110 111
111 112
112 113
113 allows for
full-throttle, clutch lever-less, electron-
ically-assisted upshifts. When the shift
switch detects motion in")