Page 25 of 120

Instrument and control functions
3-11
3
TIP
If a problem is detected in the fuel me-
ter circuit, all display segments of the
fuel meter will start flashing. If this oc-
curs, have a Yamaha dealer check the
vehicle.
Eco in dicator
This indicator comes on when the vehi-
cle is being operated in an environ-
mentally friendly, fuel-efficient manner.
The indicator goes off when the vehicle
is stopped.
TIP
Consider the following tips to reduce
fuel consumption: Avoid high engine speeds during
acceleration.
Travel at a constant speed.
Select the transmission gear that
is appropriate for the vehicle
speed.
Transmission gear in dicator
This indicator shows the current trans-
mission gear and neutral position as
follows: 1–N–2–3–4–5–6. When the
clutch lever is pulled or the vehicle is
stopped, “—” will be displayed.
Drive mo de in dicator
This indicator shows the current drive
mode: Touring mode “T” or sports
mode “S”. For more information on the
modes and on how to select them, see
pages 3-20 and 3-21.
1. Eco indicator “ECO”
1
1. Neutral indicator light “ ”
2. Transmission gear indicator
1. Drive mode indicator
GEAR
N
25A.TEMP ˚C
LoC.TEMP˚C
0:00TIME TRIP
12
1
UBP8E0E0.book Page 11 Thursday, December 8, 2016 7:25 PM
Page 26 of 120

Instrument and control functions
3-12
3 Traction control system in
dicator
This indicator shows the current trac-
tion control mode: “1”, “2” or “OFF”.
For more information on the traction
control system, see page 3-25.
Information display
There are 3 information display pages.
Push the select switch rotate between
them.
You can select and arrange which
items will be shown on each informa-
tion display page. (See page 3-17.) The
following items are available: odometer
tripmeters
fuel reserve tripmeter
estimated traveling range
elapsed time
air intake temperature
coolant temperature
average fuel consumption
instantaneous fuel consumption
Odometer:
The odometer shows the total distance
traveled by the vehicle.
Tripmeters:
“TRIP-1” and “TRIP-2” show the dis-
tance traveled since they last reset.
TIP
The odometer will lock at 999999.
The tripmeters will reset and con-
tinue counting after 9999.9 is
reached.
The fuel reserve tripmeter shows the
distance traveled on the fuel reserve.
When approximately 3.9 L (1.03 US
gal, 0.86 Imp.gal) of fuel remains in the
fuel tank, the last segment of the fuel
meter starts flashing. In addition, the
information display will automatically
1. Traction control system indicator
1. Information display
2. Display–1
3. Display–2
4. Display–3
1
GEARN
5.0TRIP-1 km
7.0TRIP-2km
km
20ODO
GEARN
11RANGEkm
12.3FUEL AVG km/L
km/L
12.3CRNT FUEL
GEARN
25A.TEMP ˚C
LoC.TEMP ˚C
0:06TIME TRIP
3
421
20
ODOkm
5.0
TRIP-1km
7.0
TRIP-2km
UBP8E0E0.book Page 12 Thursday, December 8, 2016 7:25 PM
Page 27 of 120

Instrument and control functions
3-13
3
change to the fuel reserve tripmeter
“TRIP-F” and start counting the dis-
tance traveled from that point.
In this case, push the select switch to
rotate among the information display
pages in the following order;
TRIP-F
→ Display–1 → Display–2 →
Display–3 → TRIP-F
To reset a tripmeter, push the “RESET”
button briefly so that the tripmeter
flashes, and then push and hold the
“RESET” button for 2 seconds.
TIP
The fuel reserve tripmeter can be reset
manually, or after refueling and travel-
ing 5 km (3 mi), it will reset automatical-
ly and disappear from the display.
Estimated traveling range:
This shows the approximate distance
that can be traveled with the remaining
fuel under current riding conditions. Elapsed time:
This timer shows the elapsed time
since the key was turned to “ON”. The
maximum time that can be shown is
99:59.
This timer automatically resets when
the key is turned to “OFF”.
TIP
There are also “TIME–2” and “TIME–3”
timer functions, but they cannot be set
to the information display pages. See
“Setting mode” on page 3-15 for more
information.
Air intake temperature:
This shows the temperature of the air
drawn into the air filter case. The dis-
play range is –9 °C to 93 °C in 1 °C in-
crements.
TIP
The displayed temperature may
vary from the actual ambient tem-
perature.
The temperature reading may be
affected by engine heat when rid-
ing slowly (under 20 km/h [12
mi/h]) or when stopped at traffic
signals, etc.
GEAR
4
3.4
TRIP-F km
11
RANGEkm
0:06
TIME TRIP
25
A.TEMP ˚C
UBP8E0E0.book Page 13 Thursday, December 8, 2016 7:25 PM
Page 28 of 120

Instrument and control functions
3-14
3 Coolant temperature:
This shows the temperature of the
coolant. The coolant temperature will
vary with changes in the ambient tem-
perature and engine load.
If the message “Hi” flashes, stop the
vehicle, then stop the engine and let
the engine cool. (See page 6-41.)
TIP
The information display pages cannot
be rotated when the engine overheat
message “Hi” is flashing.
NOTICE
ECA10022
Do not continue to operate the en-
g
ine if it is overheatin g.
Average fuel consumption:
This function calculates the average
fuel consumption since it was last re-
set. The average fuel consumption can
be displayed as “km/L”, “L/100km” or
“MPG”.
“km/L” shows the number of kilo-
meters traveled on one liter of fuel.
“L/100km” shows how many liters
of fuel is needed to travel 100 km.
“MPG” shows the number of miles
traveled per Imp.gallon of fuel.
TIP
See “Selecting the units” on page 3-16
to change the kilometer-based fuel
consumption units or to switch to
miles.
To reset the average fuel consumption,
push the “RESET” button briefly so
that the average fuel consumption dis-
play flashes, and then push and hold
the “RESET” button for 2 seconds.
TIP
After resetting the average fuel con-
sumption, “_ _._” will be shown until
the vehicle has traveled 1 km (0.6 mi).
NOTICE
ECA15474
If there is a malfunction, “– –.–” will
be continuously displaye d. Have a
Yamaha dealer check the vehicle.
Instantaneous fuel consumption:
This function calculates the instanta-
neous fuel consumption under current
riding conditions. The instantaneous
fuel consumption can be displayed as
“km/L”, “L/100km” or “MPG”.
“km/L” shows the number of kilo-
meters traveled on one liter of fuel.
“L/100km” shows how many liters
of fuel is needed to travel 100 km.
Lo
C.TEMP ˚C
GEAR
4
Hi
C.TEMP˚C
12.3
FUEL AVG km/L
12.3
CRNT FUEL km/L
UBP8E0E0.book Page 14 Thursday, December 8, 2016 7:25 PM
Page 29 of 120

Instrument and control functions
3-15
3
“MPG” shows the number of miles
traveled per Imp.gallon of fuel.
TIP
See “Selecting the units” on page
3-16 to change the kilometer-
based fuel consumption units or
to switch to miles.
When traveling under 10 km/h (6
mi/h), “_ _._” will be displayed.
NOTICE
ECA15474
If there is a malfunction, “– –.–” will
be continuously displaye d. Have a
Yamaha dealer check the vehicle.
Settin g mo de
The setting mode allows you to set, se-
lect, or reset the items shown in the in-
formation display and its pages.
TIP
The transmission must be in neu-
tral and the vehicle must be
stopped to change settings in this
mode.
Shifting the transmission into gear
and starting off, or turning the key
to “OFF”, saves all setting chang-
es made and exits the setting mo-
de.
Push and hold the menu switch
“MENU” for 2 seconds to enter the set-
ting mode. To exit the setting mode
and return to the normal display, push
and hold the menu switch “MENU”
again for 2 seconds.
Resetting the maintenance intervals
1. Use the select switch to highlight
“Maintenance”.
1. Setting mode display
MENUMaintenanceTime TripUnitDisplayBrightnessClockAll Reset
1
Display Description
Check and reset the “OIL”
oil change interval (dis-
tance traveled since last
oil change), and the
“FREE-1” and “FREE-2”
maintenance intervals.
Check and reset the
“TIME–2” and “TIME–3”
timers. These timers show
the total elapsed time that
the key has been in the
“ON” position. When the
key is turned to “OFF”,
these timers stop counting
but are not reset. The
maximum time that can be
shown is 99:59.
When the time trips ex-
ceed 99:59, they will reset
and continue counting.
Switch the multi-function
meter distance units be-
tween kilometers and
miles. When kilometers are
selected, the fuel con-
sumption units can be
switched between
“L/100km” and “km/L”.
Arrange the items shown
in the 3 information display
pages.
Adjust the brightness of
the multi-function meter
unit.
Set the clock. The clock
displays time in 12-hour
format.
Reset all items, except the
odometer and the clock.
Maintenance
Time Trip
Unit
Display
Brightness
Clock
All Reset
UBP8E0E0.book Page 15 Thursday, December 8, 2016 7:25 PM
Page 30 of 120

Instrument and control functions
3-16
3
2. Push the menu switch “MENU”,
and then push the “RESET” but-
ton to select the item to reset.
3. While the selected item is flashing, push and hold the “RESET” but-
ton for 2 seconds.
4. Push the menu switch “MENU” to return to the setting mode main
screen.
Checking and resetting “TIME–2” and
“TIME–3”
1. Use the select switch to highlight “Time Trip”. 2. Push the menu switch “MENU” to
display “TIME–2” and “TIME–3”.
To reset a time trip, push the “RE-
SET” button to select the item to
reset.
3. While the selected item is flashing, push and hold the “RESET” but-
ton for 2 seconds.
4. Push the menu switch “MENU” to return to the setting mode main
screen.
Selecting the units
1. Use the select switch to highlight “Unit”.
MENU
Maintenance
Time Trip
Unit
Display
Brightness
Clock
All Reset
20
OIL km
10
FREE-1km
10
FREE-2km
Maintenance
MENU
Maintenance
Time Trip
Unit
Display
Brightness
Clock
All Reset
TIME-20:07
TIME-30:07
Time Trip
UBP8E0E0.book Page 16 Thursday, December 8, 2016 7:25 PM
Page 31 of 120

Instrument and control functions
3-17
3
2. Push the menu switch “MENU”.
The unit setting display will be
shown and “km or mile” will flash
in the display.
3. Push the menu switch “MENU”. “km” or “mile” will flash in the dis-
play.
4. Use the select switch to select “km” or “mile”, and then push the
menu switch “MENU”.
TIP
When “km” is selected, “L/100km” or
“km/L” can be set as the fuel con-
sumption units. To set the fuel con-
sumption units, proceed as follows. If
“mile” was selected, skip steps 5 and
6.
5. Use the select switch to select“km/L or L/100km”.
6. Push the menu switch “MENU”, use the select switch to select
“L/100km” or “km/L”, and then
push the menu switch “MENU”
again.
7. Use the select switch to highlight “ ”, and then push the
menu switch “MENU” to return to
the setting mode menu.
Selecting the information display page
items
1. Use the select switch to highlight “Display”.
MENU
Maintenance
Time Trip
Unit
Display
Brightness
Clock
All Reset
Unit
km or mile
km
km/L or L/100km
km/L
Unit
km or mile
km
km/L or L/100km
km/L
Unit
km or mile
km
km/L or L/100km
km/L
MENU
Maintenance
Time Trip
Unit
Display
Brightness
Clock
All Reset
UBP8E0E0.book Page 17 Thursday, December 8, 2016 7:25 PM
Page 32 of 120

Instrument and control functions
3-18
3 2. Push the menu switch “MENU”,
use the select switch to highlight
the page you want to adjust, and
then push the menu switch
“MENU” again.
3. Use the select switch to highlight the item you want to change, and
then push the menu switch
“MENU”.
4. Use the select switch to select the item that you want to appear, and
then push the menu switch
“MENU” to confirm the selection. 5. Repeat the previous step to make
other item changes, or if you are
finished adjusting the information
display page items, use the select
switch to highlight “ ”, and then
push the menu switch “MENU” to
exit.
6. Use the select switch to highlight “ ”, and then push the
menu switch “MENU” to return to
the setting mode main screen.
Adjusting the multi-function meter unit
brightness
1. Use the select switch to highlight “Brightness”.
2. Push the menu switch “MENU”.
3. Use the select switch to select the desired brightness level, and then
push the menu switch “MENU” to
return to the setting mode main
screen.
Display
Display-1
Display-2
Display-3
Display-1
1-1
A.TEMP
1-2
C.TEMP
1-3
TIME TRIP
Display-1
1-1
ODO
1-2
C.TEMP
1-3
TIME TRIP
Display-1
1-1
ODO
1-2
C.TEMP
1-3
TIME TRIP
MENU
Maintenance
Time Trip
Unit
Display
Brightness
Clock
All Reset
UBP8E0E0.book Page 18 Thursday, December 8, 2016 7:25 PM
 1
1 2
2 3
3 4
4 5
5 6
6 7
7 8
8 9
9 10
10 11
11 12
12 13
13 14
14 15
15 16
16 17
17 18
18 19
19 20
20 21
21 22
22 23
23 24
24 25
25 26
26 27
27 28
28 29
29 30
30 31
31 32
32 33
33 34
34 35
35 36
36 37
37 38
38 39
39 40
40 41
41 42
42 43
43 44
44 45
45 46
46 47
47 48
48 49
49 50
50 51
51 52
52 53
53 54
54 55
55 56
56 57
57 58
58 59
59 60
60 61
61 62
62 63
63 64
64 65
65 66
66 67
67 68
68 69
69 70
70 71
71 72
72 73
73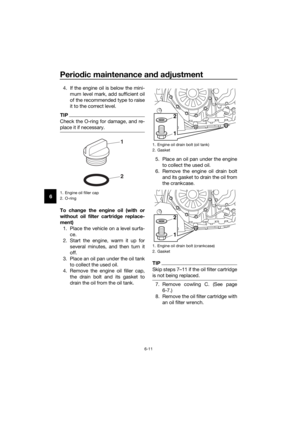 74
74 75
75 76
76 77
77 78
78 79
79 80
80 81
81 82
82 83
83 84
84 85
85 86
86 87
87 88
88 89
89 90
90 91
91 92
92 93
93 94
94 95
95 96
96 97
97 98
98 99
99 100
100 101
101 102
102 103
103 104
104 105
105 106
106 107
107 108
108 109
109 110
110 111
111 112
112 113
113 114
114 115
115 116
116 117
117 118
118 119
119