Page 73 of 120

Periodic maintenance an d a djustment
6-10
6
EAU79401
Canister
This model is equipped with a canister
to prevent the discharging of fuel vapor
into the atmosphere. Before operating
this vehicle, make sure to check the
following:
Check each hose connection.
Check each hose and canister for
cracks or damage. Replace if
damaged.
Make sure that the canister
breather hose is not blocked, and
if necessary, clean it.
Make sure that the canister
breather hose is positioned out-
side of the cowling.
EAU58602
Engine oil an d oil filter car-
tri dge
The engine oil level should be checked
before each ride. In addition, the oil
must be changed and the oil filter car-
tridge replaced at the intervals speci-
fied in the periodic maintenance and
lubrication chart.
To check the en gine oil level
1. Place the vehicle on a level surfa- ce and hold it in an upright posi-
tion. A slight tilt to the side can
result in a false reading.
2. Start the engine and warm it up for ten minutes until the engine oil has
reached a normal temperature of
60 °C (140 °F), and then turn the
engine off.
3. Wait a few minutes until the oil set- tles, and then check the oil level
through the engine oil level check
window located at the bottom-
right side of the crankcase.
TIP
The engine oil should be between the
minimum and maximum level marks.
1. Canister
2. Canister breather hose
2
1
1. Engine oil level check window
2. Maximum level mark
3. Minimum level mark
4. Engine oil filler cap
4
2
3
1
UBP8E0E0.book Page 10 Thursday, December 8, 2016 7:25 PM
Page 74 of 120

Periodic maintenance an d a djustment
6-11
6 4. If the engine oil is below the mini-
mum level mark, add sufficient oil
of the recommended type to raise
it to the correct level.
TIP
Check the O-ring for damage, and re-
place it if necessary.
To chan ge the en gine oil (with or
without oil filter cartri dge replace-
ment) 1. Place the vehicle on a level surfa- ce.
2. Start the engine, warm it up for several minutes, and then turn it
off.
3. Place an oil pan under the oil tank to collect the used oil.
4. Remove the engine oil filler cap, the drain bolt and its gasket to
drain the oil from the oil tank. 5. Place an oil pan under the engine
to collect the used oil.
6. Remove the engine oil drain bolt and its gasket to drain the oil from
the crankcase.
TIP
Skip steps 7–11 if the oil filter cartridge
is not being replaced.
7. Remove cowling C. (See page6-7.)
8. Remove the oil filter cartridge with an oil filter wrench.
1. Engine oil filler cap
2. O-ring
2
11. Engine oil drain bolt (oil tank)
2. Gasket
1. Engine oil drain bolt (crankcase)
2. Gasket
1
2
1
2
UBP8E0E0.book Page 11 Thursday, December 8, 2016 7:25 PM
Page 75 of 120

Periodic maintenance an d a djustment
6-12
6
TIP
An oil filter wrench is available at a
Yamaha dealer.
9. Apply a thin coat of clean engine oil to the O-ring of the new oil filter
cartridge.
TIP
Make sure that the O-ring is properly
seated.
10. Install the new oil filter cartridge with an oil filter wrench, and then
tighten it to the specified torque
with a torque wrench. 11. Install the cowling.
12. Install the engine oil drain bolts
and their new gasket, and then
tighten the bolts to the specified
torques.
13. Refill with the specified amount of the recommended engine oil.
TIP
Be sure to wipe off spilled oil on any
parts after the engine and exhaust sys-
tem have cooled down.
1. Oil filter cartridge
2. Oil filter wrench
1. O-ring
2
1
1. Torque wrench
Tightenin g torque:
Oil filter cartridge: 17 N·m (1.7 kgf·m, 12 lb·ft)
Ti ghtenin g torques:
Engine oil drain bolt (crankcase):
20 N·m (2.0 kgf·m, 14 lb·ft)
Engine oil drain bolt (oil tank): 20 N·m (2.0 kgf·m, 14 lb·ft)
Recommen ded en gine oil:
See page 8-1.
Oil quantity: Oil change: 3.10 L (3.28 US qt, 2.73 Imp.qt)
With oil filter removal: 3.40 L (3.59 US qt, 2.99 Imp.qt)
1
UBP8E0E0.book Page 12 Thursday, December 8, 2016 7:25 PM
Page 76 of 120
, do not
mix any chemical additives. Do
not")
Periodic maintenance an d a djustment
6-13
6
NOTICE
ECA11621
In or der to prevent clutch slip-
pa ge (since the en gine oil also
lu bricates the clutch), do not
mix any chemical additives. Do
not use oils with a diesel speci-
fication of “CD” or oils of a hi gh-
er quality than specifie d. In
a ddition, do not use oils la bele d
“ENERGY CONSERVING II” or
hi gher.
Make sure that no forei gn mate-
rial enters the crankcase.
14. Check the O-ring for damage, and replace it if necessary.
15. Install and tighten the engine oil filler cap.
16. Start the engine, and then let it idle for several minutes while checking
it for oil leakage. If oil is leaking,
immediately turn the engine off
and check for the cause.
TIP
After the engine is started, the engine
oil level warning light should go off if
the oil level is sufficient.
NOTICE
ECA10402
If the oil level warnin g li ght flickers
or remains on even if the oil level is
correct, imme diately turn the en gine
off an d have a Yamaha dealer check
the vehicle.
17. Turn the engine off, wait a few mi- nutes until the oil settles, and then
check the oil level and correct it if
necessary.
1. Engine oil filler cap
2. O-ring
2
1
UBP8E0E0.book Page 13 Thursday, December 8, 2016 7:25 PM
Page 77 of 120

Periodic maintenance an d a djustment
6-14
6
EAU20028
Final gear oil
The final gear case must be checked
for oil leakage before each ride. If any
leakage is found, have a Yamaha deal-
er check and repair the vehicle. In ad-
dition, the final gear oil level must be
checked and the oil changed as fol-
lows at the intervals specified in the
periodic maintenance and lubrication
chart.
WARNING
EWA10371
Make sure that no forei gn mate-
rial enters the final gear case.
Make sure that no oil gets on
the tire or wheel.
To check the final g ear oil level
1. Place the vehicle on a level surfa- ce and hold it in an upright posi-
tion.
TIP
Make sure that the vehicle is posi-
tioned straight up when checking the
oil level. A slight tilt to the side can re-
sult in a false reading.
2. Remove the final gear oil filler boltand its gasket, and then check the
oil level in the final gear case.
TIP
The oil level should be at the brim of
the filler hole.
3. If the oil is below the brim of thefiller hole, add sufficient oil of the
recommended type to raise it to
the correct level.
4. Check the gasket for damage, and replace it if necessary.
5. Install the final gear oil filler bolt and its gasket, and then tighten
the bolt to the specified torque.
To chan ge the final g ear oil
1. Place an oil pan under the final gear case to collect the used oil.
2. Remove the final gear oil filler bolt, the final gear oil drain bolt and
their gasket to drain the oil from
the final gear case.
1. Final gear oil filler bolt
2. Gasket
3. Correct oil level
Tightenin g torque:
Final gear oil filler bolt:
23 N·m (2.3 kgf·m, 17 lb·ft)
12
3
UBP8E0E0.book Page 14 Thursday, December 8, 2016 7:25 PM
Page 78 of 120
Periodic maintenance an d a djustment
6-15
6 3. Install the final gear oil drain bolt
and its new gasket, and then tight-
en the bolt to the specified torque.
4. Refill with the recommended final gear oil to the brim of the filler
hole.
5. Check the oil filler bolt gasket for damage, and replace it if neces-
sary.
6. Install the oil filler bolt and its gas- ket, and then tighten the bolt to
the specified torque. 7. Check the final gear case for oil
leakage. If oil is leaking, check for
the cause.
1. Final gear oil filler bolt
2. Final gear oil drain bolt
3. Gasket
Tightenin g torque:
Final gear oil drain bolt:
23 N·m (2.3 kgf·m, 17 lb·ft)
Recommen ded final gear oil:
Yamaha genuine shaft drive gear oil
SAE 80W-90 API GL-5 or SAE 80
API GL-4 Hypoid gear oil
Oil quantity: 0.20 L (0.21 US qt, 0.18 Imp.qt)
Ti ghtenin g torque:
Final gear oil filler bolt: 23 N·m (2.3 kgf·m, 17 lb·ft)
23
1
UBP8E0E0.book Page 15 Thursday, December 8, 2016 7:25 PM
Page 79 of 120

Periodic maintenance an d a djustment
6-16
6
EAU20071
Coolant
The coolant level should be checked
before each ride. In addition, the cool-
ant must be changed at the intervals
specified in the periodic maintenance
and lubrication chart.
EAU20095To check the coolant level
1. Place the vehicle on a level surfa- ce and hold it in an upright posi-
tion.
TIP
The coolant level must be
checked on a cold engine since
the level varies with engine tem-
perature.
Make sure that the vehicle is posi-
tioned straight up when checking
the coolant level. A slight tilt to the
side can result in a false reading.
2. Check the coolant level in the
coolant reservoir.
TIP
The coolant should be between the mi-
nimum and maximum level marks.
3. If the coolant is at or below the mi-nimum level mark, remove the res-
ervoir cap. WARNING! Remove
only the coolant reservoir cap.
Never attempt to remove the ra-
d iator cap when the en gine is
hot.
[EWA15162]
4. Add coolant to the maximum level mark, and then install the reservoir
cap. NOTICE: If coolant is not
availab le, use distille d water or
soft tap water instead . Do not
use har d water or salt water
since it is harmful to the en gine.
If water has been used instead
of coolant, replace it with cool-
ant as soon as possi ble, other-
wise the coolin g system will not
b e protecte d a gainst frost an d
corrosion. If water has been
a dd ed to the coolant, have a
Yamaha dealer check the anti-
freeze content of the coolant as
soon as possi ble, otherwise the
effectiveness of the coolant will
b e red uced.
[ECA10473]
1. Coolant reservoir
2. Maximum level mark
3. Minimum level mark
2
13
1. Coolant reservoir cap
Coolant reservoir capacity (up to
the maximum level mark):
0.26 L (0.27 US qt, 0.23 Imp.qt)
1
UBP8E0E0.book Page 16 Thursday, December 8, 2016 7:25 PM
Page 80 of 120
Periodic maintenance an d a djustment
6-17
6
EAU33032Chan gin g the coolant
The coolant must be changed at the in-
tervals specified in the periodic mainte-
nance and lubrication chart. Have a
Yamaha dealer change the coolant.
WARNING! Never attempt to remove the ra diator cap when the en gine is
hot.
[EWA10382] EAU36765
Air filter element
The air filter element must be replaced
at the intervals specified in the periodic
maintenance and lubrication chart.
Have a Yamaha dealer replace the air
filter element.
UBP8E0E0.book Page 17 Thursday, December 8, 2016 7:25 PM
 1
1 2
2 3
3 4
4 5
5 6
6 7
7 8
8 9
9 10
10 11
11 12
12 13
13 14
14 15
15 16
16 17
17 18
18 19
19 20
20 21
21 22
22 23
23 24
24 25
25 26
26 27
27 28
28 29
29 30
30 31
31 32
32 33
33 34
34 35
35 36
36 37
37 38
38 39
39 40
40 41
41 42
42 43
43 44
44 45
45 46
46 47
47 48
48 49
49 50
50 51
51 52
52 53
53 54
54 55
55 56
56 57
57 58
58 59
59 60
60 61
61 62
62 63
63 64
64 65
65 66
66 67
67 68
68 69
69 70
70 71
71 72
72 73
73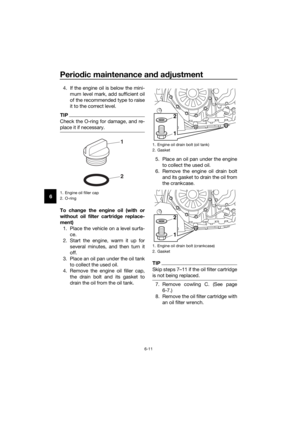 74
74 75
75 76
76 77
77 78
78 79
79 80
80 81
81 82
82 83
83 84
84 85
85 86
86 87
87 88
88 89
89 90
90 91
91 92
92 93
93 94
94 95
95 96
96 97
97 98
98 99
99 100
100 101
101 102
102 103
103 104
104 105
105 106
106 107
107 108
108 109
109 110
110 111
111 112
112 113
113 114
114 115
115 116
116 117
117 118
118 119
119
