Page 113 of 184
 in inflation pressure. Check yourtire pressures frequently and adjust them to theproper pressure, which can b")
PRACTICAL INFORMATION
}}
111
temperature drop causes a corresponding drop of 1 psi (7 kPa) in inflation pressure. Check yourtire pressures frequently and adjust them to theproper pressure, which can be found on the vehi-cle's tire information placard or certification label. If checking tire pressure when the tire is hot, never "bleed" or reduce air pressure. The tiresare hot from driving and it is normal for pressuresto increase above recommended cold pressures.A hot tire at or below recommended cold inflationpressure could be significantly under-inflated.
Recommended inflation pressures
Tire inflation placard
A tire inflation pressure placard is located on the driver's side B-pillar (the structural member at theside of the vehicle, at the rear of the driver's dooropening). This placard indicates the designation
of the factory-mounted tires on your vehicle, aswell as load limits and inflation pressure.
NOTE
•
The placard shown indicates inflation pressure for the tires installed on thevehicle at the factory only.
• A certain amount of air seepage from thetires occurs naturally and tire pressurefluctuates with seasonal changes in tem-perature. Always check tire pressure reg-ularly.
•Use a tire gauge to check the tire inflation pressure, including the spare 6
, at least once
a month and before long trips. You are strongly urged to buy a reliable tire pressuregauge, as automatic service station gaugesmay be inaccurate.
• Use the recommended cold inflation pres-sure for optimum tire performance and wear.
• Under-inflation or over-inflation may causeuneven treadwear patterns.
Checking tire pressure1. Remove the cap from the valve on one tire,
then firmly press the tire gauge onto thevalve. 2. Add air to reach the recommended air pres-
sure.
3. Replace the valve cap.
CAUTION
• After inflating the tires, always reinstall the valve cap to help avoid damage to thevalve from dirt, gravel, etc.
• Use plastic valve caps only. Metal capscould corrode and become difficult toremove.
4. Visually inspect the tires to make sure there
are no nails or other objects embedded that could puncture the tire and cause an air leak.
5. Check the sidewalls to make sure there are no gouges, cuts, bulges or other irregulari-ties.
6. Repeat this procedure for each tire, including the spare.
6Not available in all models.
Page 114 of 184

PRACTICAL INFORMATION
* Option/accessory.
112
NOTE
• If you overfill the tire, release air by push- ing on the metal stem in the center of thevalve. Then recheck the pressure withyour tire gauge.
• Some spare tires require higher inflationpressure than the other tires. Consult thetire inflation pressure table or the inflationpressure placard.
Changing tires
When changing wheels to another dimension, always follow Volvo's instructions.
When changing to tires of another
dimension
If you mount tires with a dimension other thanthe factory-installed tires, contact an authorizedVolvo retailer to update the vehicle's software.This may also be necessary when changing fromsummer to winter tires, or vice versa.
Related information
• Snow tires and chains (p. 110)
• Spare tire (p. 113)
• Installing a wheel (p. 117)
• Removing a wheel (p. 115)
Tools
Tools for e.g., changing wheels, etc., are located under the cargo compartment floor.
Generic illustration - the appearance and location of the foam block may vary from model to model
The foam block under the cargo compartment floor contains the towing eyelet, the tool for removing plastic wheel bolt covers, the jack * and
the lug wrench *. There is also a storage space for
the tool used to remove locking wheel bolts.
Related information
• Jack (p. 113)
• Changing tires (p. 112)
Page 115 of 184

PRACTICAL INFORMATION
}}
* Option/accessory.113
Jack
The jack is used to raise the vehicle, for example when mounting winter wheels, etc.
WARNING
• The jack must correctly engage the jack attachment.
• Be sure the jack is on a firm, level, non-slippery surface.
• Never allow any part of your body to beextended under a vehicle supported by ajack.
• Use the jack intended for the vehiclewhen changing a tire. For any other job,use stands to support the vehicle.
• Apply the parking brake and put the gear selector in the Park (
P) position.
• Block the wheels standing on the ground, use rigid wooden blocks or large stones.
• The jack should be kept well-greased andclean, and should not be damaged.
• No objects should be placed between thebase of jack and the ground, or betweenthe jack and the attachment bar on thevehicle.
CAUTION
•
When not in use, the jack
* should be kept
in its storage compartment under the cargo compartment floor.
• The jack provided with your vehicle isintended to be used only in temporary sit-uations such as changing wheels in theevent of a flat tire. Only the jack thatcame with your particular model shouldbe used to lift the vehicle. If the vehicleneeds to be lifted more frequently or for aprolonged period, using a garage jack orhoist is recommended. Always follow thisdevice
Page 116 of 184

||
PRACTICAL INFORMATION
114
WARNING
Current legislation prohibits the use of the "Temporary Spare" tire other than as a tem-porary replacement for a punctured tire. Itmust be replaced as soon as possible by astandard tire. Road holding and handling maybe affected with the "Temporary Spare" inuse. Do not exceed 50 mph (80 km/h).
CAUTION
The vehicle must not be driven with wheels of different dimensions or with a spare tire otherthan the one that came with the vehicle. Theuse of different size wheels can seriouslydamage your car's transmission.
CAUTION
The vehicle must never be driven with more than one temporary spare wheel.
The spare tire is located under the floor of the cargo compartment. A retaining bolt holds thespare tire and foam block containing tools inplace.
Accessing the spare tire
1. Lift the rear edge of the cargo compartmentfloor.
2. Unscrew the retaining bolt.
3. Lift out the foam block holding the tools.
4. Lift out the spare tire.
Stowing a flat tire1. Take out the package containing a wheel bag from the foam block and put the wheel in the bag.
2. Return the tools to the foam block and put the foam block bag in the vehicle.
3. 4.
Related information
• Changing tires (p. 112)
• Removing a wheel (p. 115)
• Wheel bolts (p. 115)
• Checking tire inflation pressure (p. 110)
Page 117 of 184
. Over-tightening could damagethe t")
PRACTICAL INFORMATION
}}
* Option/accessory.115
Wheel bolts
The wheel bolts hold the wheel in place.
CAUTION
Wheel bolts should be tightened to 103 ft. lbs. (140 Nm). Over-tightening could damagethe threads.
Only use wheels/rims that have been tested and approved by Volvo and are included in Volvo'sproduct range. Use a torque wrench to check that the wheel bolts are tightened correctly. Never lubricate the wheel bolts' threads.
Locking wheel bolts *A tool for removing locking wheel bolts can be found in the foam block under the cargo com-partment floor.
Related information
•Changing tires (p. 112)
• Installing a wheel (p. 117)
Removing a wheel
Wheel changes should always be carried out correctly.
1. Turn on the hazard warning flashers if the wheel change has to be done near passing traffic.
2. Apply the parking brake and put the gear selector in P.
CAUTION
Models with suspension and level con- trol *:
Turn this function off before raising the vehi- cle. To do so, go to
SettingsVehicleDeactivate Suspension & Leveling Controlin the center display's Top view.
WARNING
• The jack must correctly engage the jack attachment.
• Be sure the jack is on a firm, level, non-slippery surface.
• Never allow any part of your body to beextended under a vehicle supported by ajack.
• Use the jack intended for the vehicle whenchanging a tire. For any other job, usestands to support the vehicle.
• Apply the parking brake and put the gear selector in the Park (
P) position.
• Block the wheels standing on the ground, use rigid wooden blocks or large stones.
• The jack should be kept well-greased andclean, and should not be damaged.
• No objects should be placed between thebase of jack and the ground, or betweenthe jack and the attachment bar on thevehicle.
Page 118 of 184
||
PRACTICAL INFORMATION
* Option/accessory.
116
NOTE
The jack provided with your vehicle is intended to be used only in temporary situa-tions such as changing wheels in the event ofa flat tire. Only the jack that came with yourparticular model should be used to lift thevehicle. If the vehicle needs to be lifted morefrequently or for a prolonged period, using agarage jack or hoist is recommended. Alwaysfollow this device
Page 119 of 184

PRACTICAL INFORMATION
}}
117
Installing a wheel
It is important to install wheels properly.
1. Clean the contact surfaces on the wheel and hub.
2. Lift the wheel and place it on the hub.
3. Install the wheel bolts and tighten hand-tight. Using the lug wrench, tighten crosswise until all bolts are snug.
4. Lower the vehicle to the ground and alter- nately tighten the bolts crosswise to103 ft. lbs. (140 Nm).
5. Press the plastic covers onto the wheel bolts.
CAUTION
• After inflating the tires, always reinstall the valve cap to help avoid damage to thevalve from dirt, gravel, etc.
• Use plastic valve caps only. Metal capscould corrode and become difficult toremove.
Related information
•Wheel bolts (p. 115)
• Jack (p. 113)
Tire Pressure Monitoring System (TPMS) TPMS provides a warning if inflation pressure in one or more tires is too low. It also uses a sym-bol (called a telltale) that will flash for60 seconds and then glow steadily if there is asystem malfunction.
TPMS uses the rotational speed of the tires in combination with signal analysis of the ABS sen-sor signals to determine if they are properly infla-ted. When a tire is under-inflated, its diameter(and consequently also its rotational speed)changes. By comparing the individual tires witheach other it is possible to determine if one ormore tires are under inflated. If inflation pressureis too low, an indicator symbol will illuminate inthe instrument panel and a text message will bedisplayed.
Symbol
Explanation
The symbol illuminates to indicate low tire inflation pressure. If a malfunction occurs in the sys- tem, the tire pressure warning sym-bol will flash for approximately1 minute and then remain illumi-nated.
Each tire, including the spare (if provided), should be checked monthly when cold and inflated to
Page 120 of 184

||
PRACTICAL INFORMATION
118the inflation pressure recommended by the vehi- cle manufacturer on the vehicle placard or tireinflation pressure label. (If your vehicle has tiresof a different size than the size indicated on thevehicle placard or tire inflation pressure label, youshould determine the proper tire inflation pres-sure for those tires.) As an added safety feature, your vehicle has been equipped with a tire pressure monitoringsystem (TPMS) that illuminates a low tire pres-sure telltale when one or more of your tires issignificantly under-inflated. Accordingly, when thelow tire pressure telltale illuminates, you shouldstop and check your tires as soon as possible,and inflate them to the proper pressure. Driving on a significantly under-inflated tire cau- ses the tire to overheat and can lead to tire fail-ure. Under-inflation also reduces fuel efficiencyand tire tread life, and may affect the vehicle'shandling and stopping ability. Please note thatthe TPMS is not a substitute for proper tire main-tenance, and it is the driver's responsibility tomaintain correct tire pressure, even if under-infla-tion has not reached the level to trigger illumina-tion of the TPMS low tire pressure telltale. Your vehicle has also been equipped with a TPMS malfunction indicator to indicate when thesystem is not operating properly. The TPMS mal-function indicator is combined with the low tirepressure telltale.
When the system detects a malfunction, the tell-tale will flash for approximately one minute andthen remain continuously illuminated. Thissequence will continue upon subsequent vehiclestart-ups as long as the malfunction exists. Whenthe malfunction indicator is illuminated, the sys-tem may not be able to detect or signal low tirepressure as intended. TPMS malfunctions may occur for a variety of reasons, including the installation of replacementor alternate tires or wheels on the vehicle thatprevent the TPMS from functioning properly.Always check the TPMS malfunction telltale afterreplacing one or more tires or wheels on yourvehicle to ensure that the replacement or alter-nate tires and wheels allow the TPMS to con-tinue to function properly.
Messages in the instrument panel
When the TPMS symbol illuminates, the following text messages may also be displayed:
•
Tire pressure low
•Tire pressure system Temporarily
unavailable
•Tire pressure system Service required
If TPMS cannot determine which tire(s) have low inflation pressure:
• All four tires will be shown as affected in thecenter display After changing wheels, always calibrate the sys-tem to avoid false warnings. TPMS does not replace the need for regular tire inspection and maintenance.
NOTE
If you change to tires with a different dimen- sion than the factory-installed ones, theTPMS system must be calibrated for thesetires. TPMS cannot be turned off.
WARNING
Incorrect inflation pressure could lead to tire failure, resulting in a loss of control of thevehicle.
Related information
•
Checking tire inflation pressure (p. 119)
• Reinflating tires equipped with the Tire Pressure Monitoring System (TPMS)(p. 120)
 1
1 2
2 3
3 4
4 5
5 6
6 7
7 8
8 9
9 10
10 11
11 12
12 13
13 14
14 15
15 16
16 17
17 18
18 19
19 20
20 21
21 22
22 23
23 24
24 25
25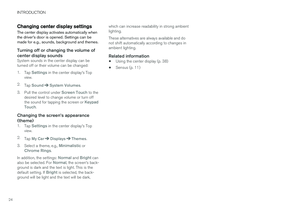 26
26 27
27 28
28 29
29 30
30 31
31 32
32 33
33 34
34 35
35 36
36 37
37 38
38 39
39 40
40 41
41 42
42 43
43 44
44 45
45 46
46 47
47 48
48 49
49 50
50 51
51 52
52 53
53 54
54 55
55 56
56 57
57 58
58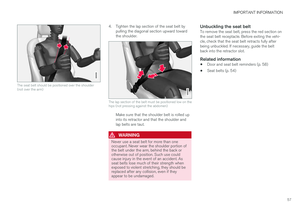 59
59 60
60 61
61 62
62 63
63 64
64 65
65 66
66 67
67 68
68 69
69 70
70 71
71 72
72 73
73 74
74 75
75 76
76 77
77 78
78 79
79 80
80 81
81 82
82 83
83 84
84 85
85 86
86 87
87 88
88 89
89 90
90 91
91 92
92 93
93 94
94 95
95 96
96 97
97 98
98 99
99 100
100 101
101 102
102 103
103 104
104 105
105 106
106 107
107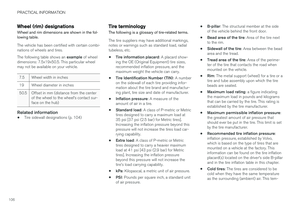 108
108 109
109 110
110 111
111 112
112 113
113 114
114 115
115 116
116 117
117 118
118 119
119 120
120 121
121 122
122 123
123 124
124 125
125 126
126 127
127 128
128 129
129 130
130 131
131 132
132 133
133 134
134 135
135 136
136 137
137 138
138 139
139 140
140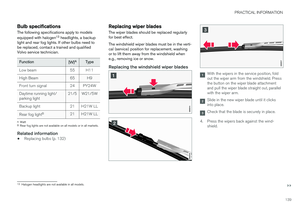 141
141 142
142 143
143 144
144 145
145 146
146 147
147 148
148 149
149 150
150 151
151 152
152 153
153 154
154 155
155 156
156 157
157 158
158 159
159 160
160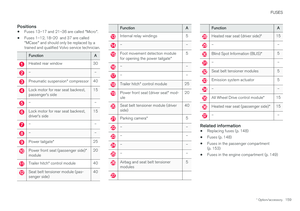 161
161 162
162 163
163 164
164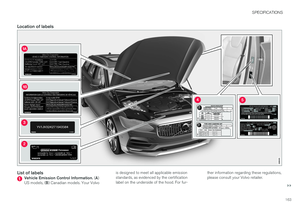 165
165 166
166 167
167 168
168 169
169 170
170 171
171 172
172 173
173 174
174 175
175 176
176 177
177 178
178 179
179 180
180 181
181 182
182 183
183