Page 97 of 184
PRACTICAL INFORMATION
}}
95
WARNING
•Objects in the cargo compartment should always be securely anchored.
• All of the net's attachment points must besecurely in place when the net is used.
• A damaged net must never be used.
Attaching
Rear mounting
Rear mounting
1. Fold down the rear seat backrests to make
mounting the net easier.
2. Guide the ends of the net's cassette over the load anchoring eyelets in the recesses in the side panels. Press the cassette's ends intoplace on each side. Check that the cassetteis securely in place. 3. Pull up the net using its strap.
4. Insert one of the net's upper attachments
into one of the rear ceiling brackets and press it as far forward into the bracket aspossible.
5. Press the other attachment into the rear ceil- ing bracket on the opposite side and press itas far forward into the bracket as possible.
Front mounting
Front mounting
1. Fold down the rear seat backrests.
2. Align the cassette
Page 98 of 184

||
PRACTICAL INFORMATION
* Option/accessory.
96 2.
If the net is mounted in the rear position: Press the buttons on the respective sides of the cassette to release the ends from theload anchors. Lift out the net. If the net is mounted in the front position: Slide the cassette off of the mounting brack- ets and lift it out.
Related information
•
Cargo compartment cover
* (p. 98)
• Load anchoring eyelets (p. 97)
• Steel cargo grid
* (p. 96)
• Loading (p. 92)
Steel cargo grid
*
Your vehicle can be equipped with a steel grid that helps prevent objects in the cargo compart-ment from moving forward into the passengerarea.
The steel grid is made up of the grid itself and two separate mounting brackets.
WARNING
• No one should ever be allowed to remain in the cargo compartment when the vehi-cle is moving.
• The steel grid may only be used in therear position described in this article. Theceiling attachment points above the front seats are
not intended to anchor the
steel grid.
• After being mounted, be sure that the steel grid is securely anchored in place.
MountingBefore installing the steel grid, the existing plas-tic ceiling mounting consoles must be replacedby steel ones. This should preferably be done bya trained and qualified Volvo service technician.
1. Fold down the rear seat backrests.
Page 99 of 184

PRACTICAL INFORMATION
}}
* Option/accessory.97
2. Be sure that the steel grid is turned in the
right direction and that the handles are in the installation position pointing up. Lift the gridinto the vehicle through one of the reardoors. This is easier to if two people can holdthe grid in the correct position.
3. Place the grid's attachment points in theceiling mounting consoles and fold up the grid toward the roof liner without moving thehandle.
4. Pull the handles outward to leave the instal-lation position and turn the handles a quarter turn rearward to lock the steel grid in place.The handles should point rearward whenthey are in the locked position.
> Check that the grid is securely in placeand fold it down toward the rear seat backrests.
RemovingPerform the steps above in reverse order.
Related information
• Cargo net (p. 94)
• Cargo compartment cover
* (p. 98)
• Load anchoring eyelets (p. 97)
• Loading (p. 92)
Load anchoring eyelets
The eyelets in the cargo compartment can be folded out to secure objects with straps, a net,etc.
Load anchoring eyelets
WARNING
• Cover sharp edges on long loads to help prevent injury to occupants. Secure theload to help prevent shifting during sud-den stops.
• Always secure large and heavy objectswith a seat belt or cargo retaining straps.
• Always secure the load to help prevent itfrom moving in the event of sudden stops.
• Switch off the engine, apply the parking brake and put the gear selector in
P
when loading and unloading the vehicle.
Page 100 of 184

||
PRACTICAL INFORMATION
* Option/accessory.
98
Related information
• Loading (p. 92)
• Grocery bag holder (p. 94)
Cargo compartment cover
*
The cover can be used to conceal objects in the cargo compartment.
Installing the cover
With the cover retracted, press the end piece on one side of the cargo area cover into theretaining bracket in the side panel of thecargo area.
Do the same on the opposite side.
Press both sides of the cover, one at a time, until they click into place.
> The red mark will no longer be visible. Check that both ends of the cover are securely locked in place.
4. Fold out the cover's front flap to eliminate a gap between the cover and the rear seat backrest.
If the cargo net * is used at the same time as the
cargo compartment cover, the net has to be putin place first.
Using the coverThe cover can be used in two positions: fullyopen to completely cover the cargo compartmentor partially retracted to make it easier to reachfarther into the cargo compartment.
Page 101 of 184

PRACTICAL INFORMATION
}}
* Option/accessory.99
Fully open
1. Grasp the handle and pull out the cover
above the side panels in the cargo compart- ment as far as possible.
2. With the cover completely open, press the attaching pins on the rear corners of thecover into the grooves in the side panels andrelease the cover slightly while pressing thehandle lightly downward to hook the pins intothe grooves.
> The cover will remain in the fully openposition.
Partially retracted (loading) position
From the fully open position:
–Move the handle to release the attaching pins from the hooks.
> The cover will open until it reaches the partially retracted position.
In vehicles equipped with the automatic cargo compartment cover *, if the cover is fully open, it
will move automatically to the partially retracted position whenever the tailgate is opened and willreturn to the fully open position when the tailgateis closed. To fully open the cover from the partially open position:
1. Grasp the handle and pull the cover out to the fully open position.
2. Release the handle so that the pins engage in the hooks.
> The cover will remain in the fully openposition. In models equipped with the electrically operated cargo compartment cover
*, the cover will retract
from the fully open position to the loading posi- tion each time the tailgate is opened and returnto the fully open position when the tailgate isclosed. If the cover is obstructed while moving, itis designed to return to the loading position auto-matically.
CAUTION
• Avoid placing any objects on the cover when it is open.
• The electrically operated cover may notbe able to move automatically at low pas-senger compartment temperatures.
• If there are large objects in the cargocompartment, put the electrically oper-ated cover in the fully retracted positionso that it does not come into contact withthe object(s) while moving.
WARNING
Keep fingers, hands, etc. clear of the electri- cally operated cargo area cover while it ismoving.
Page 102 of 184

||
PRACTICAL INFORMATION
100
Retracting the cover
From the fully open position:
–Lift the cover's handle and pull it rearward slightly to release the attaching pins fromtheir grooves. Allow the cover to retract.
From the partially retracted position:
–Grasp the handle and lift it slightly to release the attaching pins from their grooves. Pullthe cover to the fully open position.
> Allow the cover to retract completely.
Removing the cover1. With the cover retracted, press the button on one of the cover's ends and lift out that end.
2. Carefully lift the cover up/out. > The other end will release automatically.Lift the cover out of the cargo compart- ment.
Automatically arming/disarming the alarm
Automatically arming the alarm helps prevent inadvertently leaving the vehicle without alarmprotection.
In certain markets, the alarm will be re-armed automatically after a slight delay after the driver'sdoor has been opened and closed without beinglocked.
Octane rating Volvo requires premium fuel (91 octane or above) for best performance.
Minimum octane
Sample fuel pump octane label
TOP TIER Detergent GasolineVolvo endorses the use of “TOP TIER Detergent Gasoline” where available to help maintain engineperformance and reliability. TOP TIER DetergentGasoline meets a new standard jointly estab-lished by leading automotive manufactures tomeet the needs of today
Page 103 of 184

PRACTICAL INFORMATION
}}
101
NOTE
Information about TOP TIER Detergent Gaso- line is available at www.toptiergas.com.
NOTE
When switching to higher octane fuel or changing gasoline brands, it may be neces-sary to fill the tank more than once before adifference in engine operation is noticeable.
Fuel FormulationsDo not use gasoline that contains lead as a knock inhibitor, and do not use lead additives.Besides damaging the exhaust emission controlsystems on your vehicle, lead has been stronglylinked to certain forms of cancer. Many fuels contain benzene as a solvent. Unburned benzene has been strongly linked tocertain forms of cancer. If you live in an areawhere you must fill your own gas tank, take pre-cautions. These may include: •standing upwind away from the filler nozzle while refueling
• refueling only at gas stations with vaporrecovery systems that fully seal the mouth ofthe filler neck during refueling
• wearing neoprene gloves while handling afuel filler nozzle.
Use of AdditivesWith the exception of gas line antifreeze duringwinter months, do not add solvents, thickeners, orother store-bought additives to your vehicle'sfuel, cooling, or lubricating systems. Overuse maydamage your engine, and some of these additivescontain organically volatile chemicals. Do notneedlessly expose yourself to these chemicals.
WARNING
Never carry a cell phone that is
switched on
while refueling your vehicle. If the phone rings, this may cause a spark that could ignite gaso-line fumes, resulting in fire and injury.
WARNING
Carbon monoxide is a poisonous, colorless, and odorless gas. It is present in all exhaustgases. If you ever smell exhaust fumes insidethe vehicle, make sure the passenger com-partment is ventilated, and immediately returnthe vehicle to a trained and qualified Volvoservice technician for correction.
Opening/closing the fuel filler door The fuel tank has a filling system that does not have a cover.
Opening/closing the fuel filler doorThe vehicle must be unlocked before the fuel filler door can be opened.
An arrow next to the fuel pumpsymbol in the instrument panelindicates the side of the vehiclewhere the fuel filler door islocated.
1. Open the fuel filler door by pressing lightlyon its rear edge.
2. After refueling, close the fuel filler door by pressing lightly.
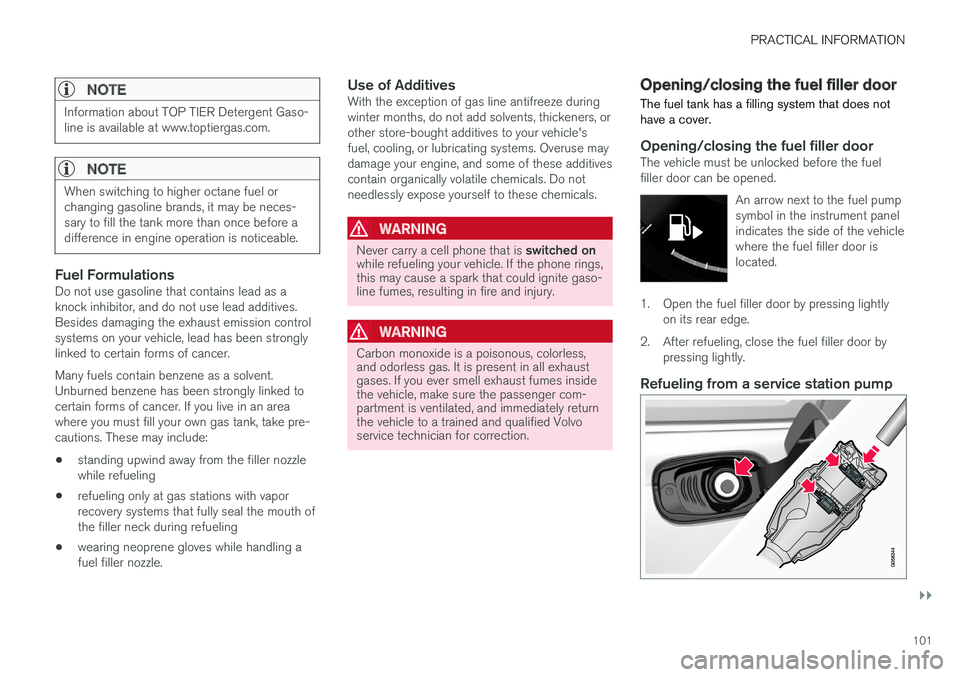
Refueling from a service station pump
Page 104 of 184

||
PRACTICAL INFORMATION
102To refuel:
1. Open the fuel filler door. Do not refuel with
the engine running 2
2. Insert the pump's nozzle into the fuel filler pipe's opening as far as possible (see the
illustration).
3. Avoid overfilling the fuel tank. Do not press the handle on the filler nozzle after it has stopped pumping. Too much fuel in the tankin hot weather conditions can cause the fuelto overflow. Overfilling could also cause dam-age to the emission control systems.
CAUTION
Avoid spilling gasoline during refueling. In addition to causing damage to the environ-ment, gasolines containing alcohol can causedamage to painted surfaces, which may notbe covered under the New Vehicle LimitedWarranty.
Related information
• Octane rating (p. 100)
Tires
Your vehicle is equipped with tires according to the vehicle's tire information placard on the B-pillar (the structural member at the side of thevehicle, at the rear of the driver's door opening).
CAUTION
Some Volvo models are equipped with an Ultra High Performance tire and wheel com-bination designed to provide maximum drypavement performance with consideration forhydroplaning resistance. They may be moresusceptible to road hazard damage and,depending on driving conditions, may achievea tread life of less than 20,000 miles (30,000km). Even if this vehicle is equipped with Vol-vo