Page 381 of 640
3816-1. Using the air conditioning system
6
Interior features
■Fan speed setting
To adjust the fan speed, turn
the fan speed control dial clock-
wise (increase) or counterclock-
wise (decrease).
Press to turn the fan off.
■
Change the airflow mode
To change the airflow, press .
The air outlets used are
switched each time the button is
pressed.
Air flows to the upper body
Air flows to the upper body
and feet
Air flows to the feet
Air flows to the feet and
the windshield defogger
operates
■Other functions
●Switching between outside ai r and recirculated air modes
( → P. 383)
● Defogging the windshield ( →P. 383)
● Defogging the outside rear view mirrors ( →P. 383)
1
2
3
4
Page 397 of 640
3976-3. Using the storage features
6
Interior features
Rear (Access Cab models [vehicles without rear seats])
Turn the knob counterclockwise
and open the lid.
Under the rear seats (Access Cab models [vehicles with rear
seats])
Pull up the lever and raise the
bottom cushion up.
WARNING
■Items unsuitable for the bottle holders
Do not place anything other than a bottle in the bottle holders.
Other items may be thrown out of the holders in the event of an accident or
sudden braking and cause injury.
NOTICE
■Items that should not be st owed in the bottle holders
Put the cap on before stowing a bottle. Do not place open bottles in the bot-
tle holders, or glasses and paper cups containing liquid. The contents may
spill and glasses may break.
Storage boxes
1
Page 398 of 640
3986-3. Using the storage features
Turn the knob counterclock-
wise.
Open the lid.
Press the lid against the bottom of
the lower cushion until it is sup-
ported by the hook-and-loop fas-
tener.
Make sure that the lid is supported
to prevent it from closing unexpect-
edly.
Under the rear seats (Double Cab models)
Swing the bottom cushion up by
pulling the lock release strap.
Turn the knob counterclockwise
and open the lid.
2
3
1
2
Page 402 of 640
4026-3. Using the storage features
●Installing the tie-down cleat
Loosen the thumb wheel in a
counterclockwise motion,
and depress the wheel so
that the locking plate main-
tains 0.5 in. (12.7 mm) gap.Deck rail
Detent
Locking plate
Insert the locking plate into
the deck rail, rotate the tie-
down cleat 90°, and release
the thumb wheel.
Slide the cleat to the closest
detent in the rail system. You
will feel that the locking plate
snaps into a detent.
When using a tonneau cover,
confirm the cleat position will not
interfere with its proper closing
and latching.
Tighten the thumb wheel in a
clockwise motion until the
clutch mechanism ratchets.
0.5 in.
(12.7 mm)
1
1
2
3
2
3
4
Page 411 of 640
4116-4. Other interior features
6
Interior features
The clock is displayed on the
screen.
■Setting the clock
Vehicles with Entune Audio (Audio system types: →P. 284)
→ P. 2 9 4
Vehicles with Entune Audio Plus or Entune Premium Audio
(Audio system types: →P. 284)
Refer to the “NAVIGATION AND MULTIMEDIA SYSTEM
OWNER’S MANUAL”.
■ The clock is displayed when
Vehicles without a smart key system
The engine switch is in the “ACC” or “ON” position.
Vehicles with a smart key system
The engine switch is in ACCESSORY or IGNITION ON mode.
■ When disconnecting and reco nnecting battery terminals
The clock data will be reset.
Clock
Page 457 of 640

4577-3. Do-it-yourself maintenance
7
Maintenance and care
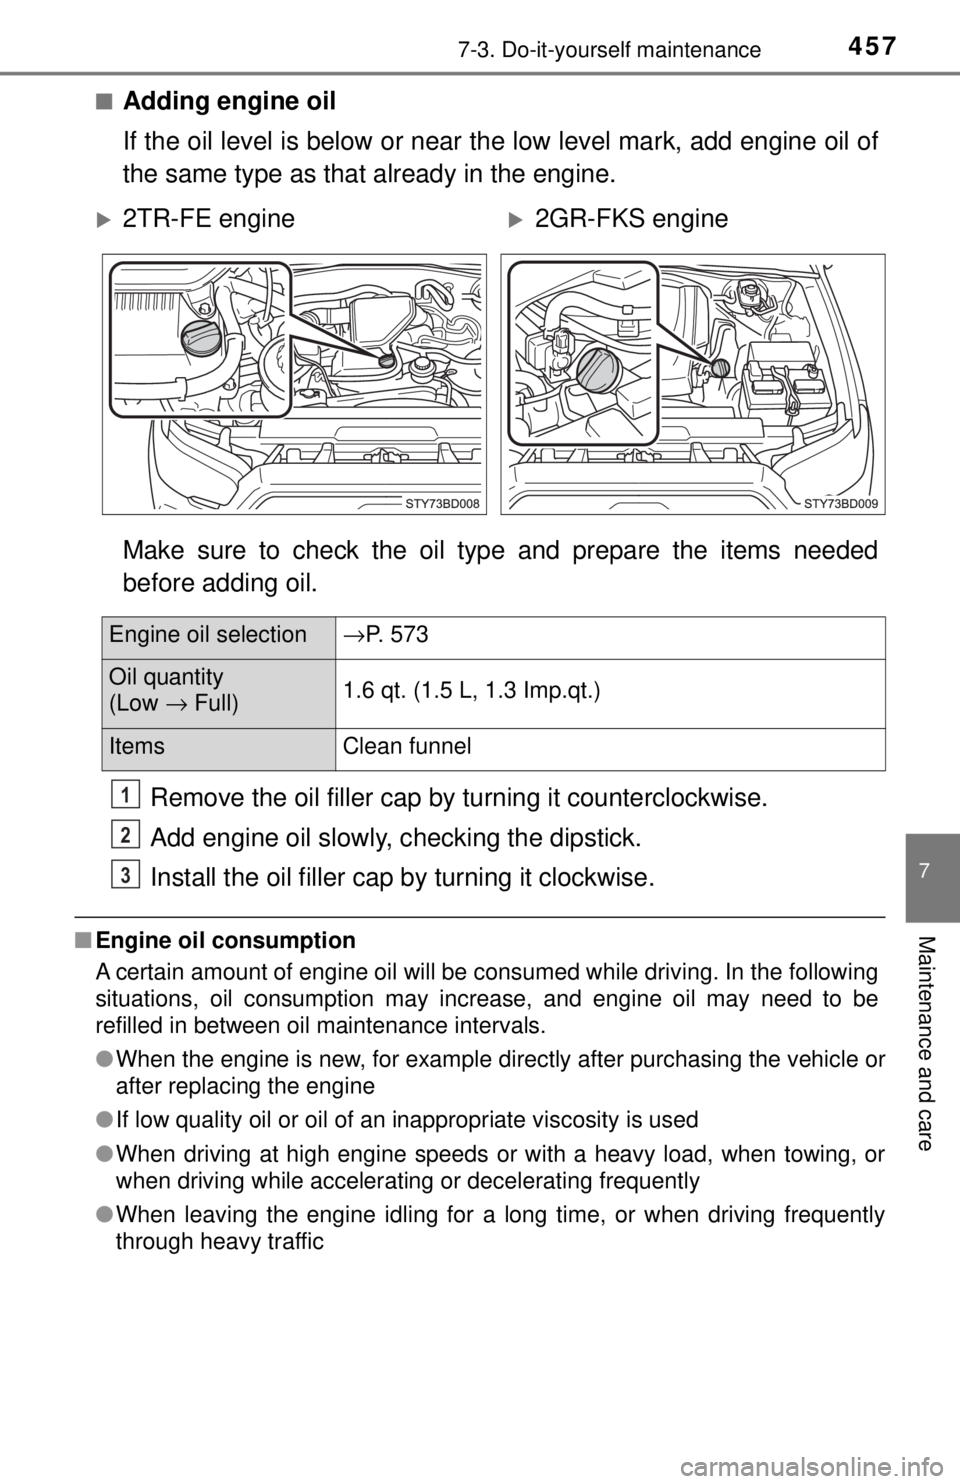
■Adding engine oil
If the oil level is below or near the low level mark, add engine oil of
the same type as that already in the engine.
Make sure to check the oil type and prepare the items needed
before adding oil. Remove the oil filler cap by turning it counterclockwise.
Add engine oil slowly, c hecking the dipstick.
Install the oil filler cap by turning it clockwise.
■Engine oil consumption
A certain amount of engine oil will be consumed while driving. In the following
situations, oil consumption may increase, and engine oil may need to be
refilled in between oil maintenance intervals.
●When the engine is new, for example directly after purchasing the vehicle or
after replacing the engine
● If low quality oil or oil of an inappropriate viscosity is used
● When driving at high engine speeds or with a heavy load, when towing, or
when driving while accelerating or decelerating frequently
● When leaving the engine idling for a long time, or when driving frequently
through heavy traffic
2TR-FE engine2GR-FKS engine
Engine oil selection →P. 573
Oil quantity
(Low → Full) 1.6 qt. (1.5 L, 1.3 Imp.qt.)
Items
Clean funnel
1
2
3
Page 462 of 640

4627-3. Do-it-yourself maintenance
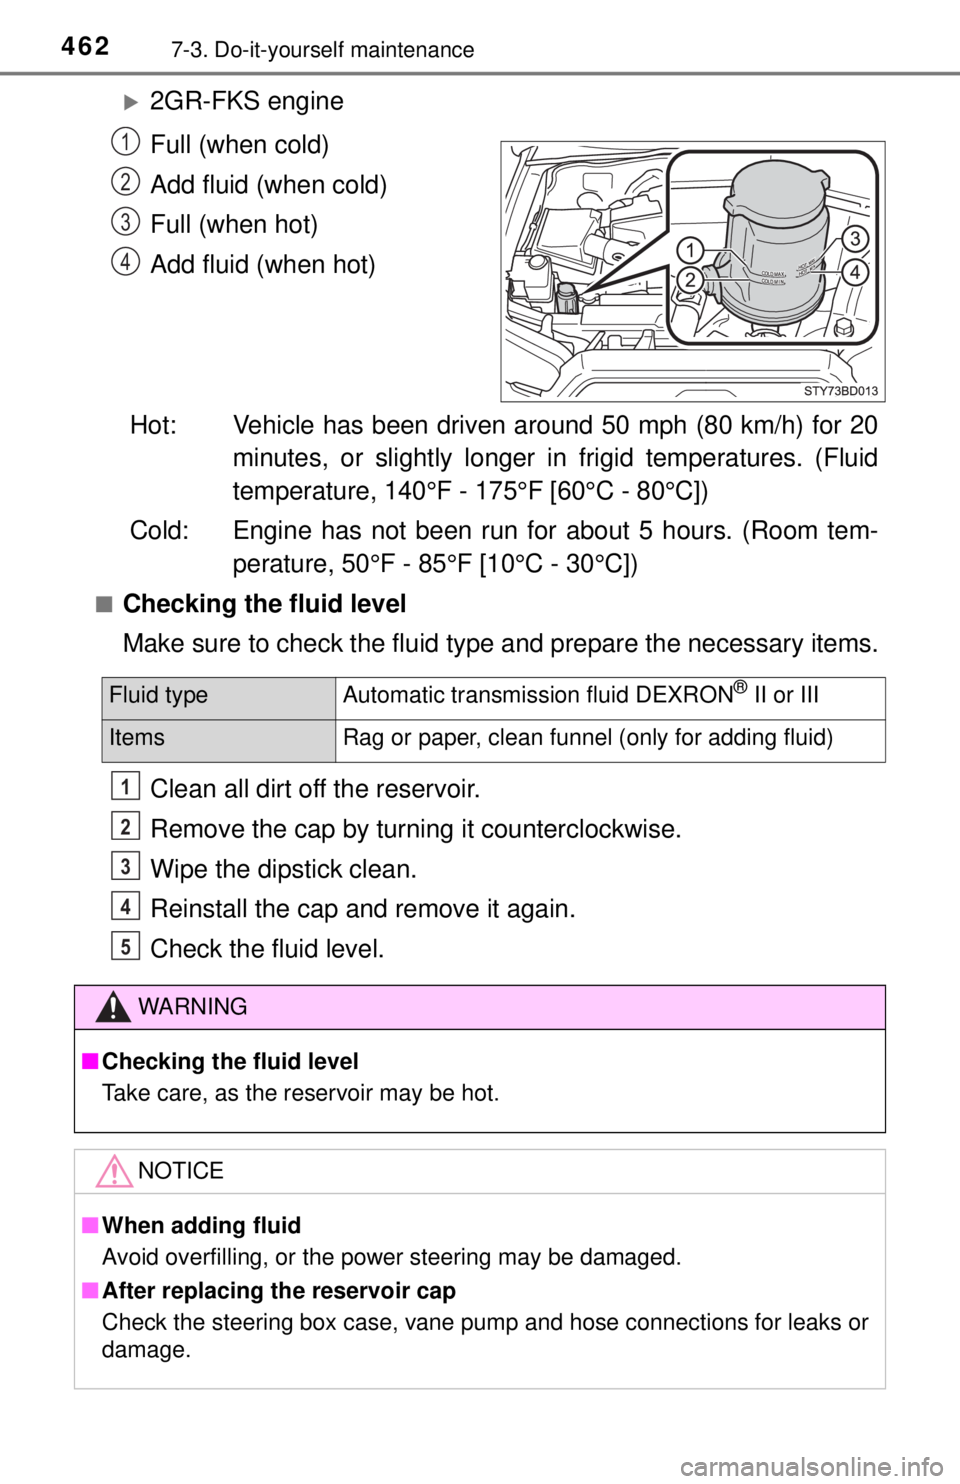
2GR-FKS engine
Full (when cold)
Add fluid (when cold)
Full (when hot)
Add fluid (when hot)
Hot: Vehicle has been driven around 50 mph (80 km/h) for 20 minutes, or slightly longer in frigid temperatures. (Fluid
temperature, 140°F - 175°F [60°C - 80°C])
Cold: Engine has not been run for about 5 hours. (Room tem- perature, 50°F - 85°F [10°C - 30°C])
■Checking the fluid level
Make sure to check the fluid type and prepare the necessary items.
Clean all dirt off the reservoir.
Remove the cap by turn ing it counterclockwise.
Wipe the dipstick clean.
Reinstall the cap and remove it again.
Check the fluid level.
1
2
3
4
Fluid type Automatic transmission fluid DEXRON® II or III
Items Rag or paper, clean funnel (only for adding fluid)
WARNING
■Checking the fluid level
Take care, as the reservoir may be hot.
NOTICE
■When adding fluid
Avoid overfilling, or the power steering may be damaged.
■ After replacing the reservoir cap
Check the steering box case, vane pump and hose connections for leaks or
damage.
1
2
3
4
5
Page 493 of 640
4937-3. Do-it-yourself maintenance
7
Maintenance and care
■Headlight low beamUnplug the connector while
pressing the lock release.
Turn the bulb base counter-
clockwise.
Set the new light bulb.
Align the 3 tabs on the light bulb
with the mounting and insert.
Turn it clockwise to set.
Install the connector.
After installing the connector,
shake the bulb base gently to
check that it is not loose, turn
the headlight low beams on
once and visually confirm that
no light is leaking through the
mounting.
Replacing light bulbs
1
2
3
4