Page 293 of 464
2936-4. Other interior features
6
Interior features
MIRAI_OM_USA_OM62023U■
Programming HomeLink
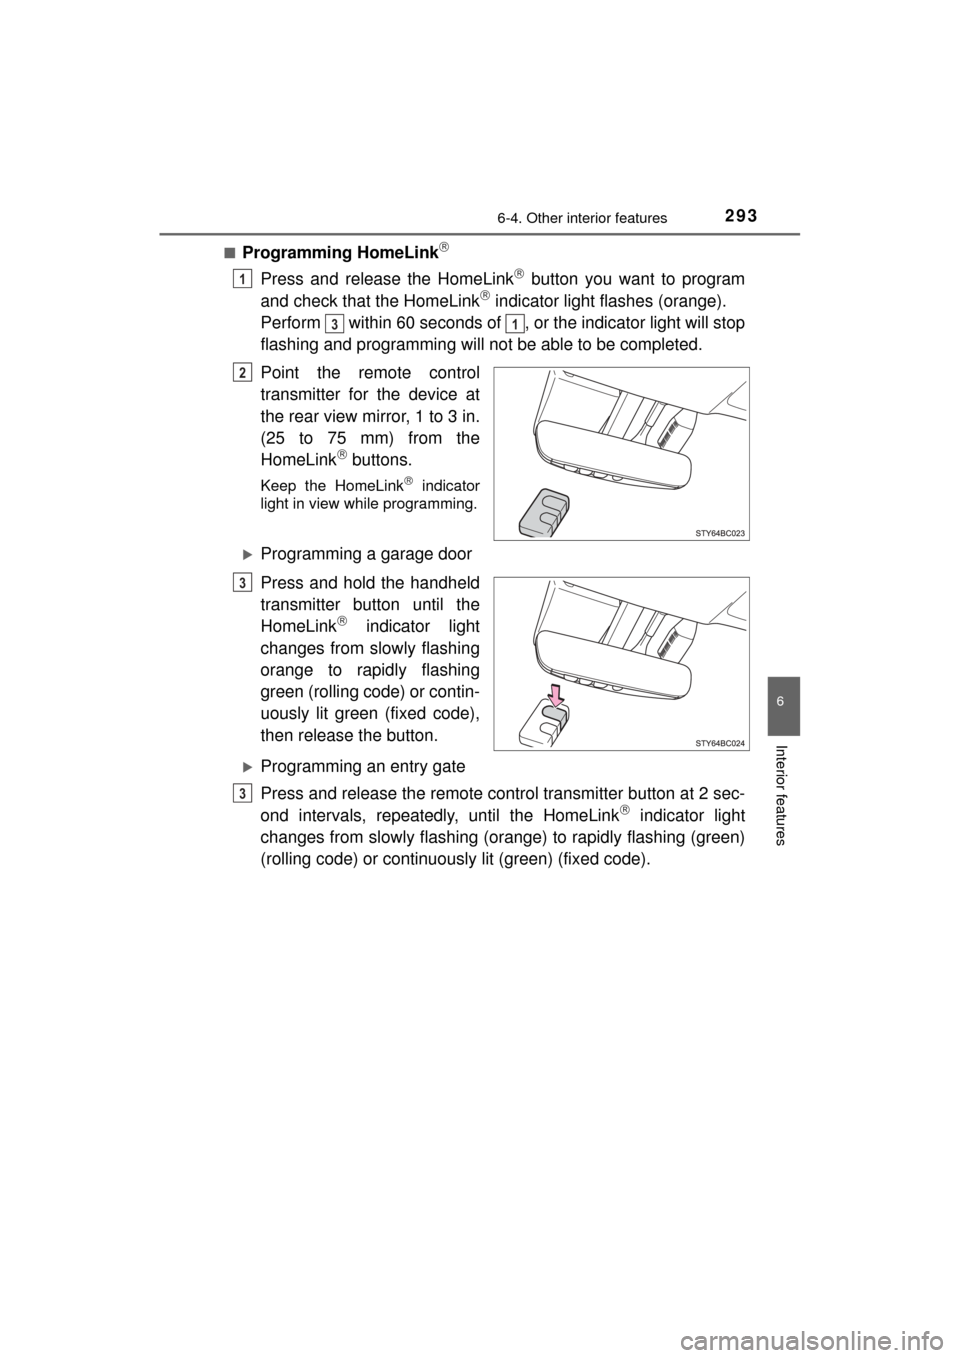
Press and release the HomeLink button you want to program
and check that the HomeLink indicator light flashes (orange).
Perform within 60 seconds of , or the indicator light will stop
flashing and programming will not be able to be completed.
Point the remote control
transmitter for the device at
the rear view mirror, 1 to 3 in.
(25 to 75 mm) from the
HomeLink
buttons.
Keep the HomeLink indicator
light in view while programming.
Programming a garage door
Press and hold the handheld
transmitter button until the
HomeLink
indicator light
changes from slowly flashing
orange to rapidly flashing
green (rolling code) or contin-
uously lit green (fixed code),
then release the button.
Programming an entry gate
Press and release the remote control transmitter button at 2 sec-
ond intervals, repeatedly, until the HomeLink
indicator light
changes from slowly flashing (or ange) to rapidly flashing (green)
(rolling code) or continuously lit (green) (fixed code).
1
31
2
3
3
Page 294 of 464
2946-4. Other interior features
MIRAI_OM_USA_OM62023U
Test the HomeLink operation by pressing the newly pro-
grammed button and observing the indicator light:
● Device with fixed code: If the in dicator light is solid/continuous,
programming has been completed and your garage door or
other device should operate when the HomeLink
button is
pressed and released.
● Device with rolling code: If the indicator light flashes rapidly,
your garage door opener motor (or other device) is equipped
with a rolling code. Complete the programming process by
firmly pressing and holding the programmed HomeLink
but-
ton for 2 seconds and then release the button.
● If the garage door or other device does not operate, proceed
to “Programming a rolling code system”.
Repeat the steps above to program another device for any of the
remaining HomeLink
buttons.
■Programming a rolling code system
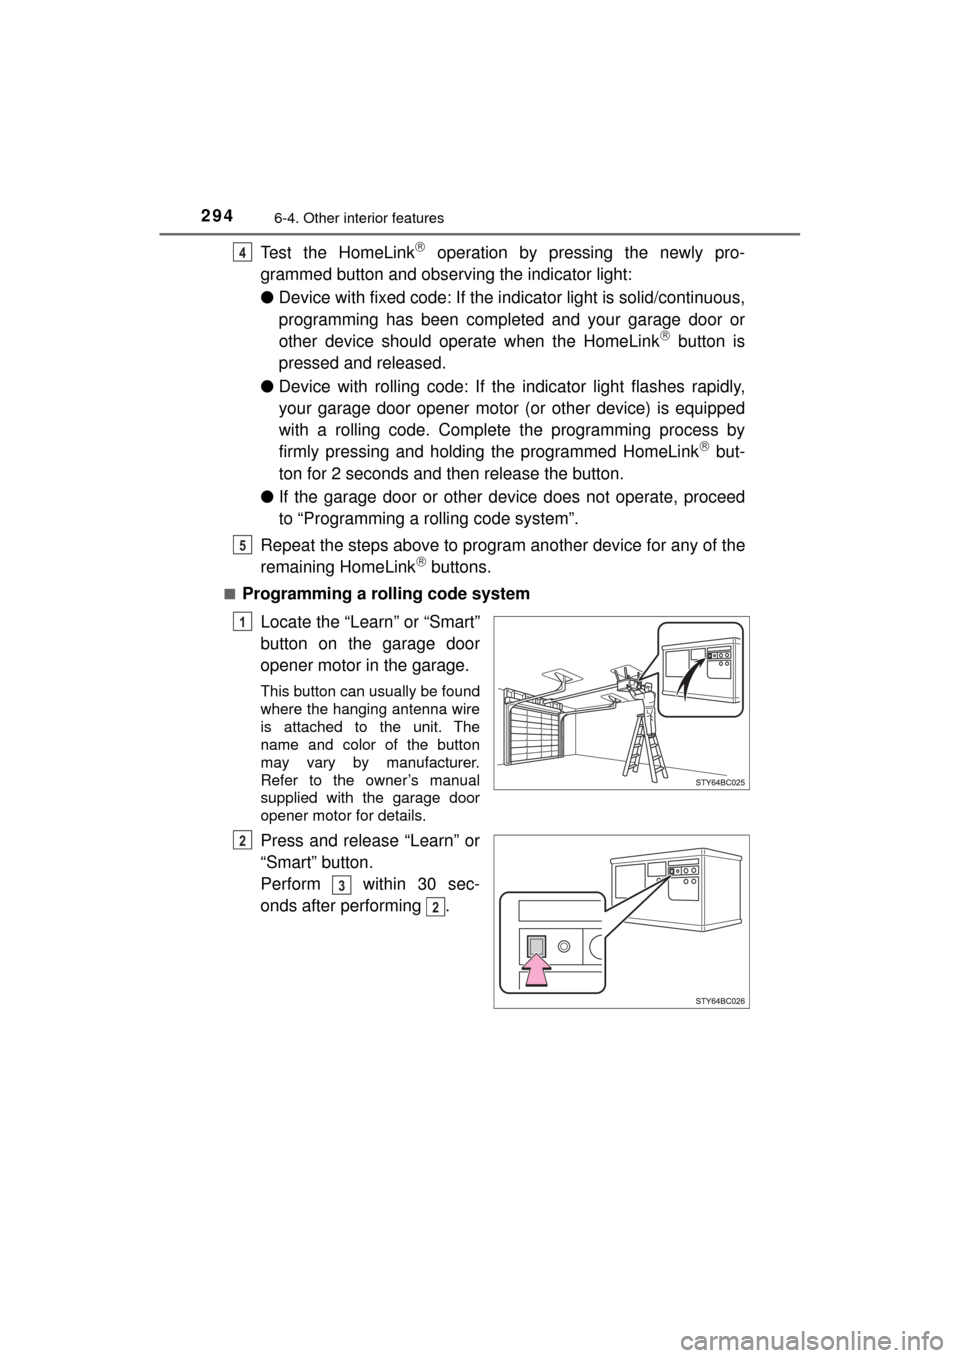
Locate the “Learn” or “Smart”
button on the garage door
opener motor in the garage.
This button can usually be found
where the hanging antenna wire
is attached to the unit. The
name and color of the button
may vary by manufacturer.
Refer to the owner’s manual
supplied with the garage door
opener motor for details.
Press and release “Learn” or
“Smart” button.
Perform within 30 sec-
onds after performing .
4
5
1
2
3
2
Page 295 of 464
2956-4. Other interior features
6
Interior features
MIRAI_OM_USA_OM62023U
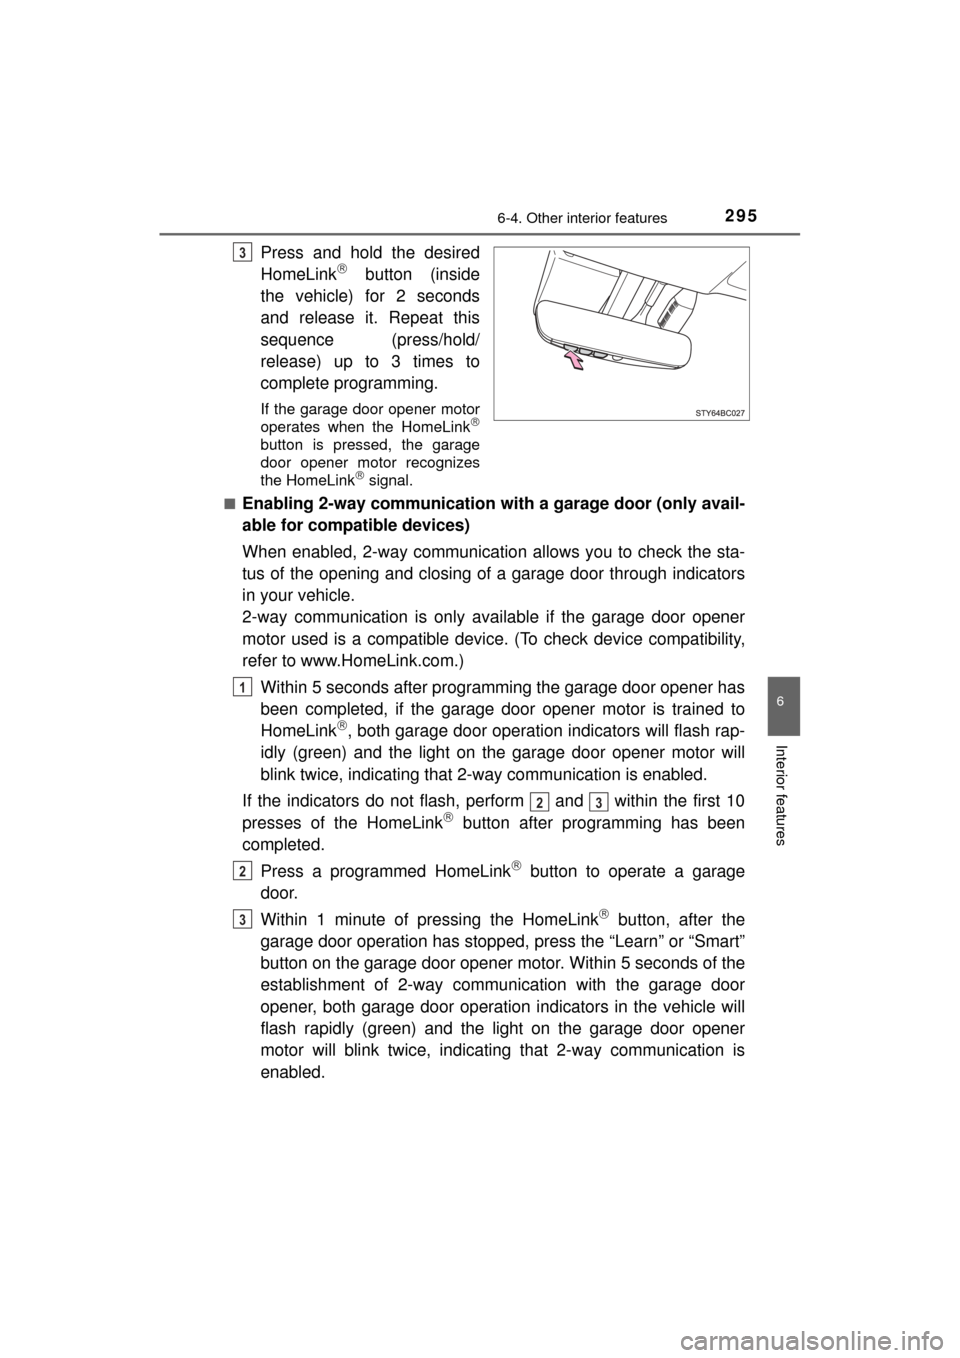
Press and hold the desired
HomeLink button (inside
the vehicle) for 2 seconds
and release it. Repeat this
sequence (press/hold/
release) up to 3 times to
complete programming.
If the garage door opener motor
operates when the HomeLink
button is pressed, the garage
door opener motor recognizes
the HomeLink
signal.
■
Enabling 2-way communication with a garage door (only avail-
able for compatible devices)
When enabled, 2-way communication allows you to check the sta-
tus of the opening and closing of a garage door through indicators
in your vehicle.
2-way communication is only available if the garage door opener
motor used is a compatible device. (To check device compatibility,
refer to www.HomeLink.com.)
Within 5 seconds after programming the garage door opener has
been completed, if the garage door opener motor is trained to
HomeLink
, both garage door operation indicators will flash rap-
idly (green) and the light on the garage door opener motor will
blink twice, indicating that 2-way communication is enabled.
If the indicators do not flash, perform and within the first 10
presses of the HomeLink
button after programming has been
completed.
Press a programmed HomeLink
button to operate a garage
door.
Within 1 minute of pressing the HomeLink
button, after the
garage door operation has stopped, press the “Learn” or “Smart”
button on the garage door opener motor. Within 5 seconds of the
establishment of 2-way communication with the garage door
opener, both garage door operati on indicators in the vehicle will
flash rapidly (green) and the light on the garage door opener
motor will blink twice, indicating that 2-way communication is
enabled.
3
1
23
2
3
Page 296 of 464
2966-4. Other interior features
MIRAI_OM_USA_OM62023U■
Reprogramming a single HomeLink button
When the following procedure is pe rformed, buttons which already
have devices registered to them can be overwritten:
With one hand, press and hold the desired HomeLink
button.
When the HomeLink
indicator starts flashing (orange), continue
to hold the HomeLink button and perform “Programming Home-
Link” (it takes 20 seconds for the HomeLink indicator to
start flashing).
Press the appropriate HomeLink
button. The HomeLink indicator
light should turn on.
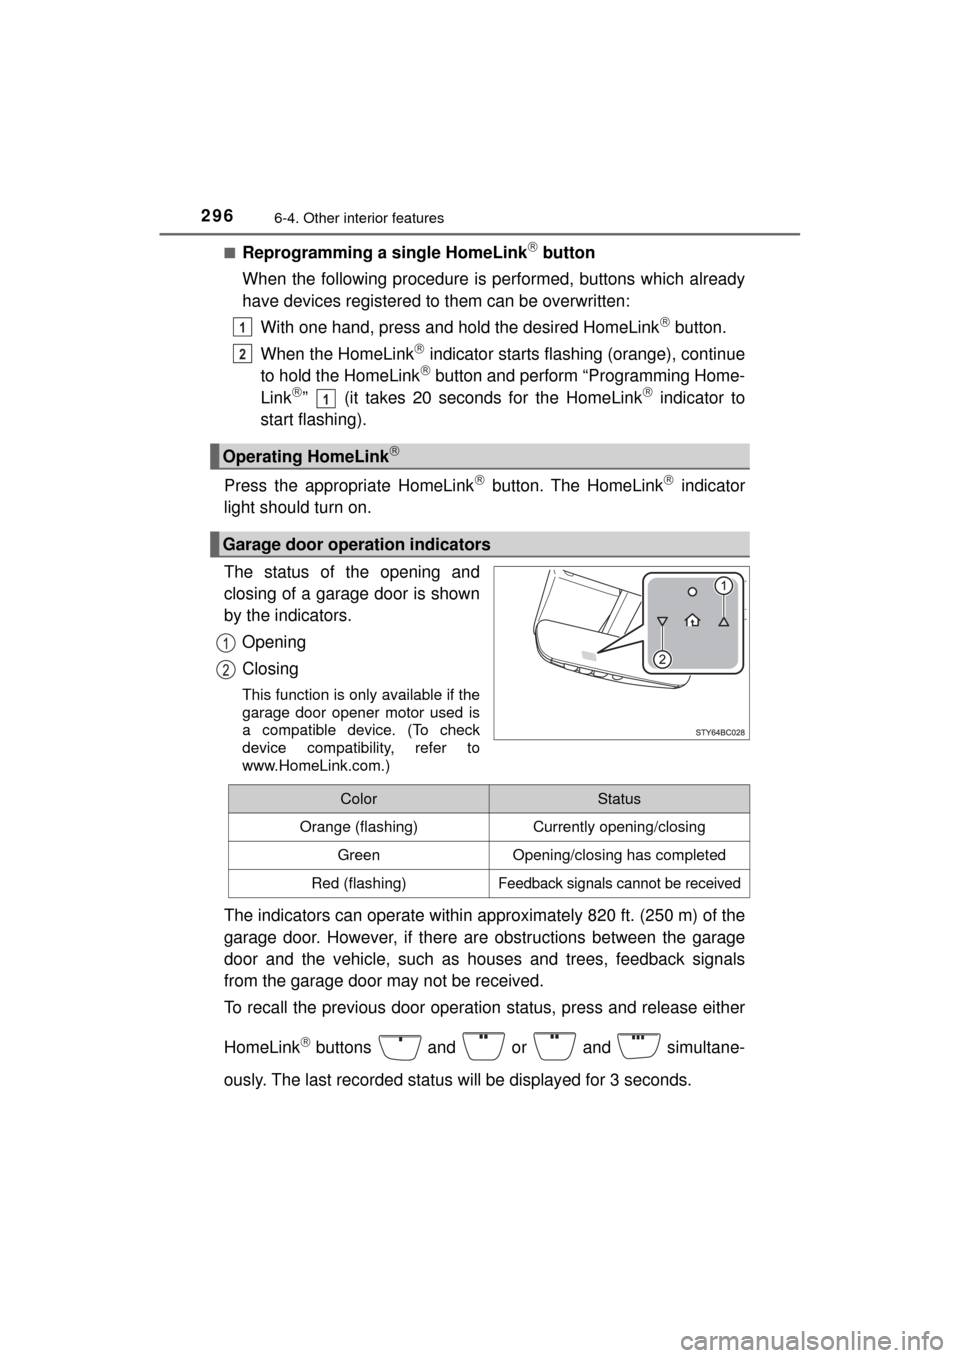
The status of the opening and
closing of a garage door is shown
by the indicators.
Opening
Closing
This function is only available if the
garage door opener motor used is
a compatible device. (To check
device compatibility, refer to
www.HomeLink.com.)
The indicators can operate within appro ximately 820 ft. (250 m) of the
garage door. However, if there are obstructions between the garage
door and the vehicle, such as houses and trees, feedback signals
from the garage door may not be received.
To recall the previous door operation status, press and release either
HomeLink
buttons and or and simultane-
ously. The last recorded status will be displayed for 3 seconds.
Operating HomeLink
Garage door operation indicators
1
2
1
ColorStatus
Orange (flashing)Currently opening/closing
GreenOpening/closing has completed
Red (flashing)Feedback signals cannot be received
Page 297 of 464
2976-4. Other interior features
6
Interior features
MIRAI_OM_USA_OM62023U
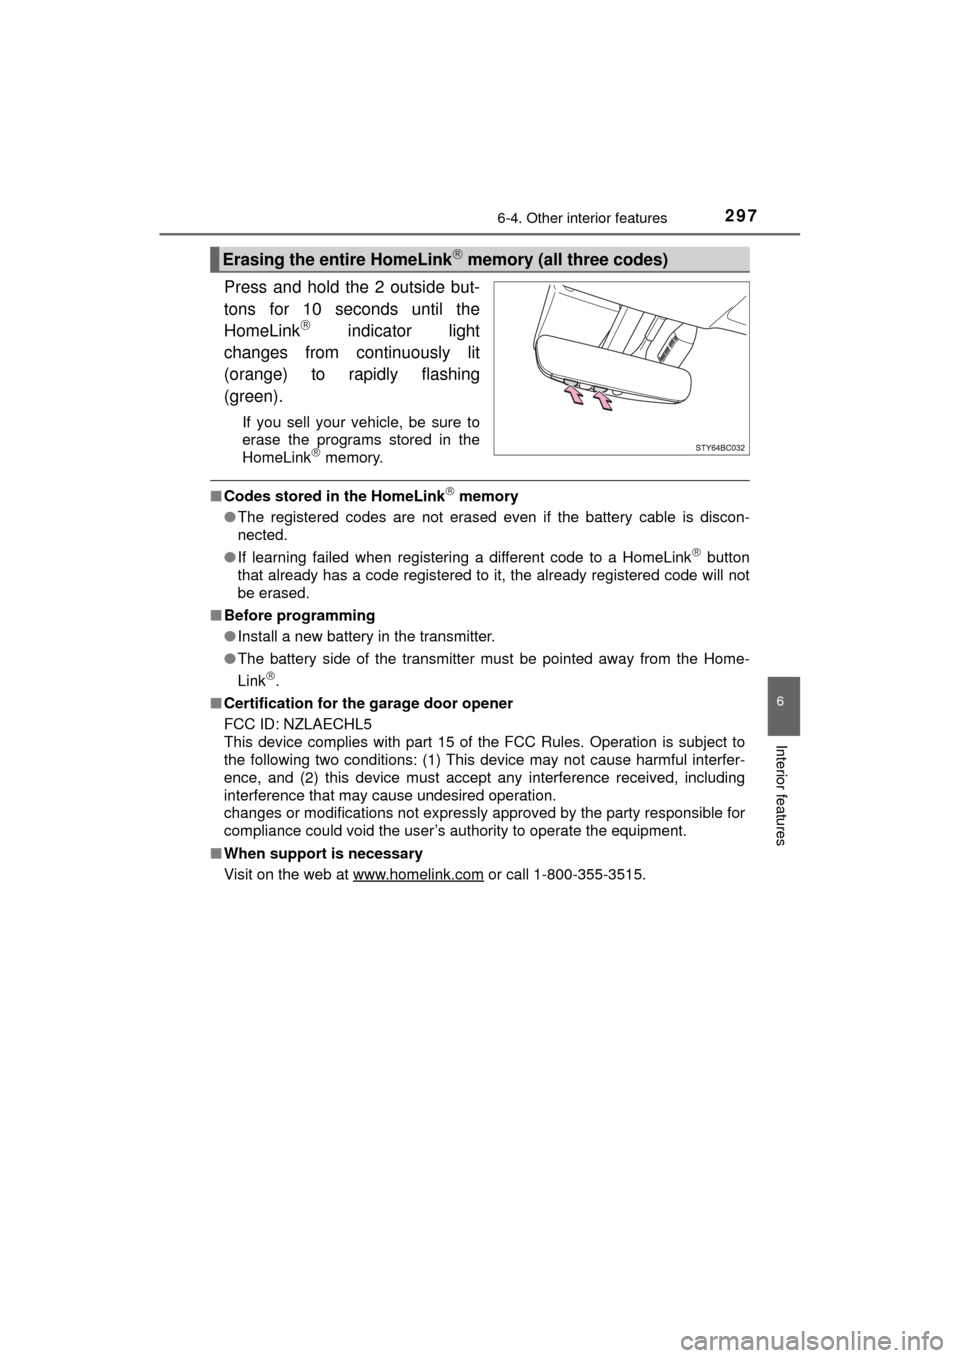
Press and hold the 2 outside but-
tons for 10 seconds until the
HomeLink
indicator light
changes from continuously lit
(orange) to rapidly flashing
(green).
If you sell your vehicle, be sure to
erase the programs stored in the
HomeLink
memory.
■ Codes stored in the HomeLink memory
● The registered codes are not erased even if the battery cable is discon-
nected.
● If learning failed when registering a different code to a HomeLink
button
that already has a code registered to it, the already registered code will not
be erased.
■ Before programming
●Install a new battery in the transmitter.
● The battery side of the transmitter must be pointed away from the Home-
Link
.
■ Certification for the garage door opener
FCC ID: NZLAECHL5
This device complies with part 15 of the FCC Rules. Operation is subject to
the following two conditions: (1) This device may not cause harmful interfer-
ence, and (2) this device must accept any interference received, including
interference that may cause undesired operation.
changes or modifications not expressly approved by the party responsible for
compliance could void the user’s authority to operate the equipment.
■ When support is necessary
Visit on the web at www.homelink.com
or call 1-800-355-3515.
Erasing the entire HomeLink memory (all three codes)
Page 299 of 464
2996-4. Other interior features
6
Interior features
MIRAI_OM_USA_OM62023U
Safety Connect
■System components“SOS” button
LED light indicators
Microphone
Safety Connect is a subscription-based telematics service that
uses Global Positioning System (GPS) data and embedded cel-
lular technology to provide safety and security features to sub-
scribers. Safety Connect is s upported by Toyota’s designated
response center, which operates 24 hours per day, 7 days per
week.
Safety Connect service is avai lable by subscription on select,
telematics hardware-equipped vehicles.
By using the Safety Connect service, you are agreeing to be
bound by the Telematics Subscription Service Agreement and
its Terms and Conditions, as in ef fect and amended from time to
time, a current copy of which is available at Toyota.com. All use
of the Safety Connect service is subject to such then-applicable
Terms and Conditions.
Page 301 of 464
3016-4. Other interior features
6
Interior features
MIRAI_OM_USA_OM62023U■
Languages
The Safety Connect response center will offer support in multiple languages.
The Safety Connect system will offer voice prompts in English and Spanish.
Please indicate your language of choice when enrolling.
■ When contacting th e response center
You may be unable to contact the response center if the network is busy.
When the power switch is turned to ON mode, the red indicator light
comes on for 2 seconds then turns off. Afterward, the green indicator
light comes on, indicating t hat the service is active.
The following indicator light pattern s indicate specific system usage
conditions:
● Green indicator light on = Active service
● Green indicator light flashing = Sa fety Connect call in process
● Red indicator light (except at vehicle start-up) = System malfunction
(contact your Toyota dealer)
● No indicator light (off) = Safety Connect service not active
■Automatic Collision Notification
In case of either airbag deployment or severe rear-end collision, the
system is designed to automatically call the response center. The
responding agent receives the ve hicle’s location and attempts to
speak with the vehicle occupants to assess the level of emergency.
If the occupants are unable to communicate, the agent automati-
cally treats the call as an emergency, contacts the nearest emer-
gency services provider to descri be the situation, and requests that
assistance be sent to the location.
Safety Connect LE D light Indicators
Safety Connect services
Page 305 of 464
305
7Maintenance and care
MIRAI_OM_USA_OM62023U7-1. Maintenance and care
Cleaning and protecting the vehicle exterior .......... 306
Cleaning and protecting the vehicle interior ........... 310
7-2. Maintenance Maintenance requirements ................... 313
General maintenance........ 315
7-3. Do-it-yourself maintenance
Do-it-yourself service precautions ..................... 318
Hood ................................. 320
Positioning a floor jack ...... 321
Motor compartment ........... 323
12-volt battery ................... 328
Tires .................................. 332
Replacing the tire .............. 339
Tire inflation pressure ....... 346
Wheels .............................. 349
Air conditioning filter.......... 351
Electronic key battery........ 353
Checking and replacing fuses ............................... 355
Light bulbs......................... 358