2017 TOYOTA MIRAI light
[x] Cancel search: lightPage 376 of 464
3768-2. Steps to take in an emergency
MIRAI_OM_USA_OM62023U
If a warning message is displayed
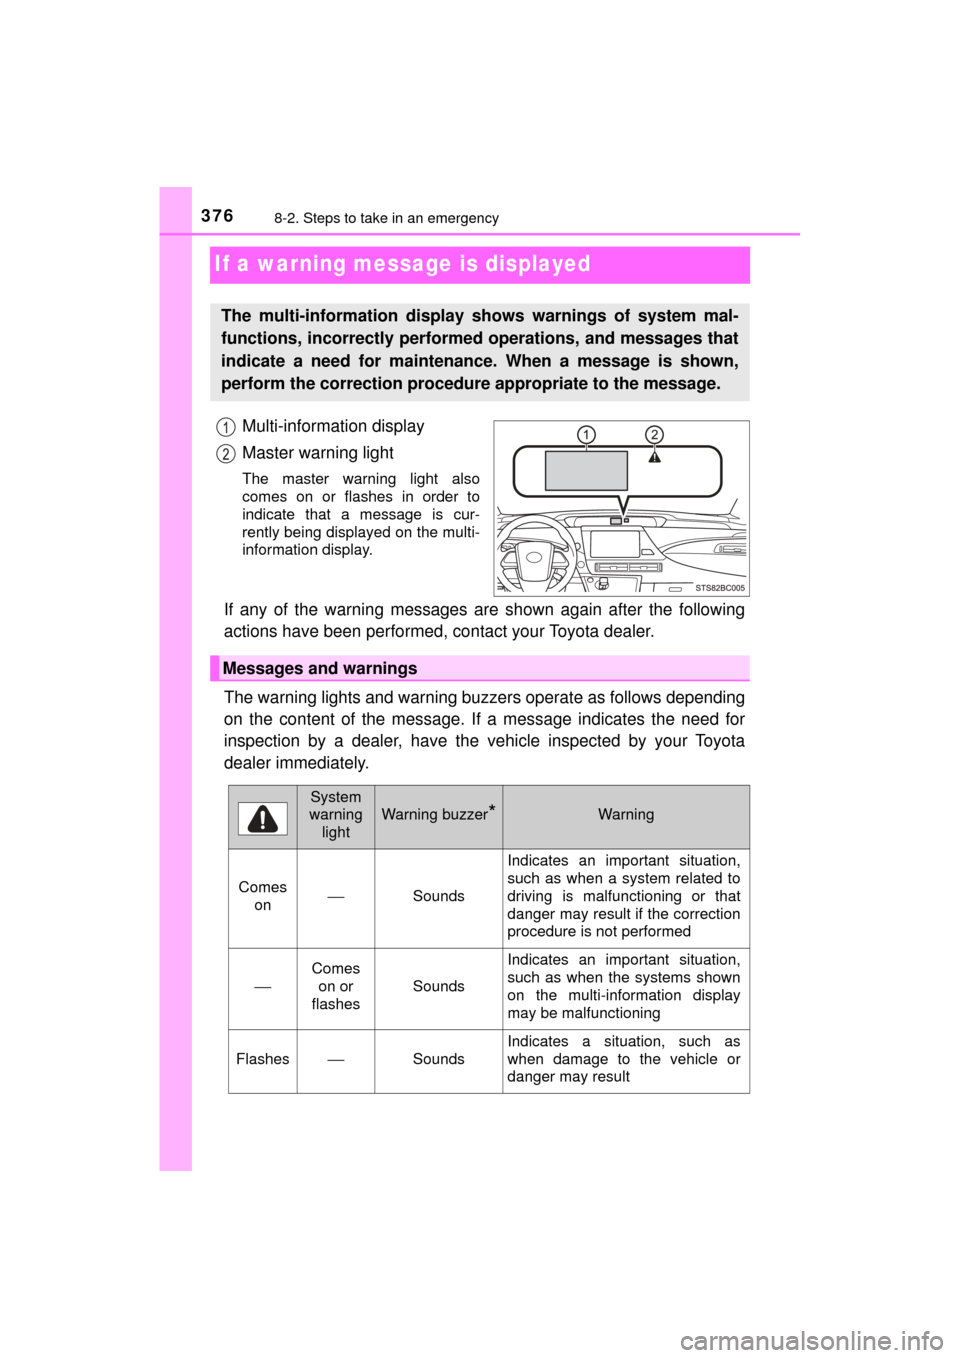
Multi-information display
Master warning light
The master warning light also
comes on or flashes in order to
indicate that a message is cur-
rently being displayed on the multi-
information display.
If any of the warning messages are shown again after the following
actions have been performed, contact your Toyota dealer.
The warning lights and warning buzzers operate as follows depending
on the content of the message. If a message indicates the need for
inspection by a dealer, have the vehicle inspected by your Toyota
dealer immediately.
The multi-information display shows warnings of system mal-
functions, incorrectly performe d operations, and messages that
indicate a need for maintenance. When a message is shown,
perform the correction procedur e appropriate to the message.
Messages and warnings
System
warning light
Warning buzzer*Warning
Comes on ⎯
Sounds Indicates an important situation,
such as when a system related to
driving is malfunctioning or that
danger may result if the correction
procedure is not performed
⎯
Comes
on or
flashes
Sounds
Indicates an important situation,
such as when the systems shown
on the multi-information display
may be malfunctioning
Flashes⎯Sounds
Indicates a situation, such as
when damage to the vehicle or
danger may result
Page 377 of 464
3778-2. Steps to take in an emergency
MIRAI_OM_USA_OM62023U
8
When trouble arises
*: A buzzer sounds the first time a message is shown on the multi-informa-tion display.
■ System warning lights
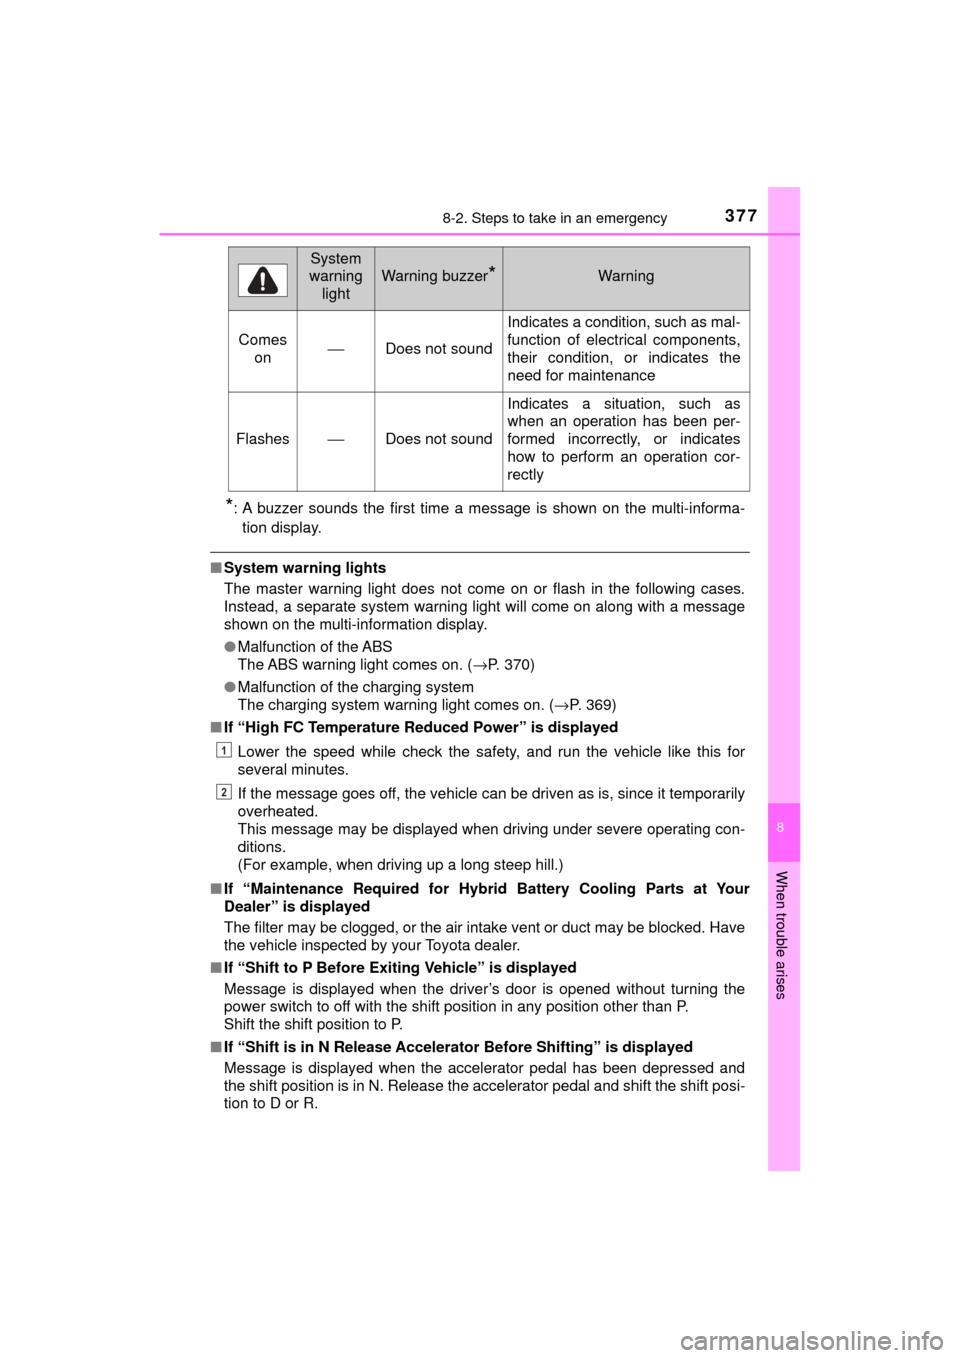
The master warning light does not come on or flash in the following cases.
Instead, a separate system warning light will come on along with a message
shown on the multi-information display.
●Malfunction of the ABS
The ABS warning light comes on. ( →P. 370)
● Malfunction of the charging system
The charging system warning light comes on. ( →P. 369)
■ If “High FC Temperature Re duced Power” is displayed
Lower the speed while check the safety, and run the vehicle like this for
several minutes.
If the message goes off, the vehicle can be driven as is, since it temporarily
overheated.
This message may be displayed when driving under severe operating con-
ditions.
(For example, when driving up a long steep hill.)
■ If “Maintenance Required for Hybr id Battery Cooling Parts at Your
Dealer” is displayed
The filter may be clogged, or the air intake vent or duct may be blocked. Have
the vehicle inspected by your Toyota dealer.
■ If “Shift to P Before Exiting Vehicle” is displayed
Message is displayed when the driver’s door is opened without turning the
power switch to off with the shift position in any position other than P.
Shift the shift position to P.
■ If “Shift is in N Release Accelerat or Before Shifting” is displayed
Message is displayed when the accelerator pedal has been depressed and
the shift position is in N. Release the accelerator pedal and shift the shift posi-
tion to D or R.
Comes on⎯Does not sound
Indicates a condition, such as mal-
function of electrical components,
their condition, or indicates the
need for maintenance
Flashes⎯Does not sound
Indicates a situation, such as
when an operation has been per-
formed incorrectly, or indicates
how to perform an operation cor-
rectly
System
warning
light
Warning buzzer*Warning
1
2
Page 392 of 464
3928-2. Steps to take in an emergency
MIRAI_OM_USA_OM62023U■
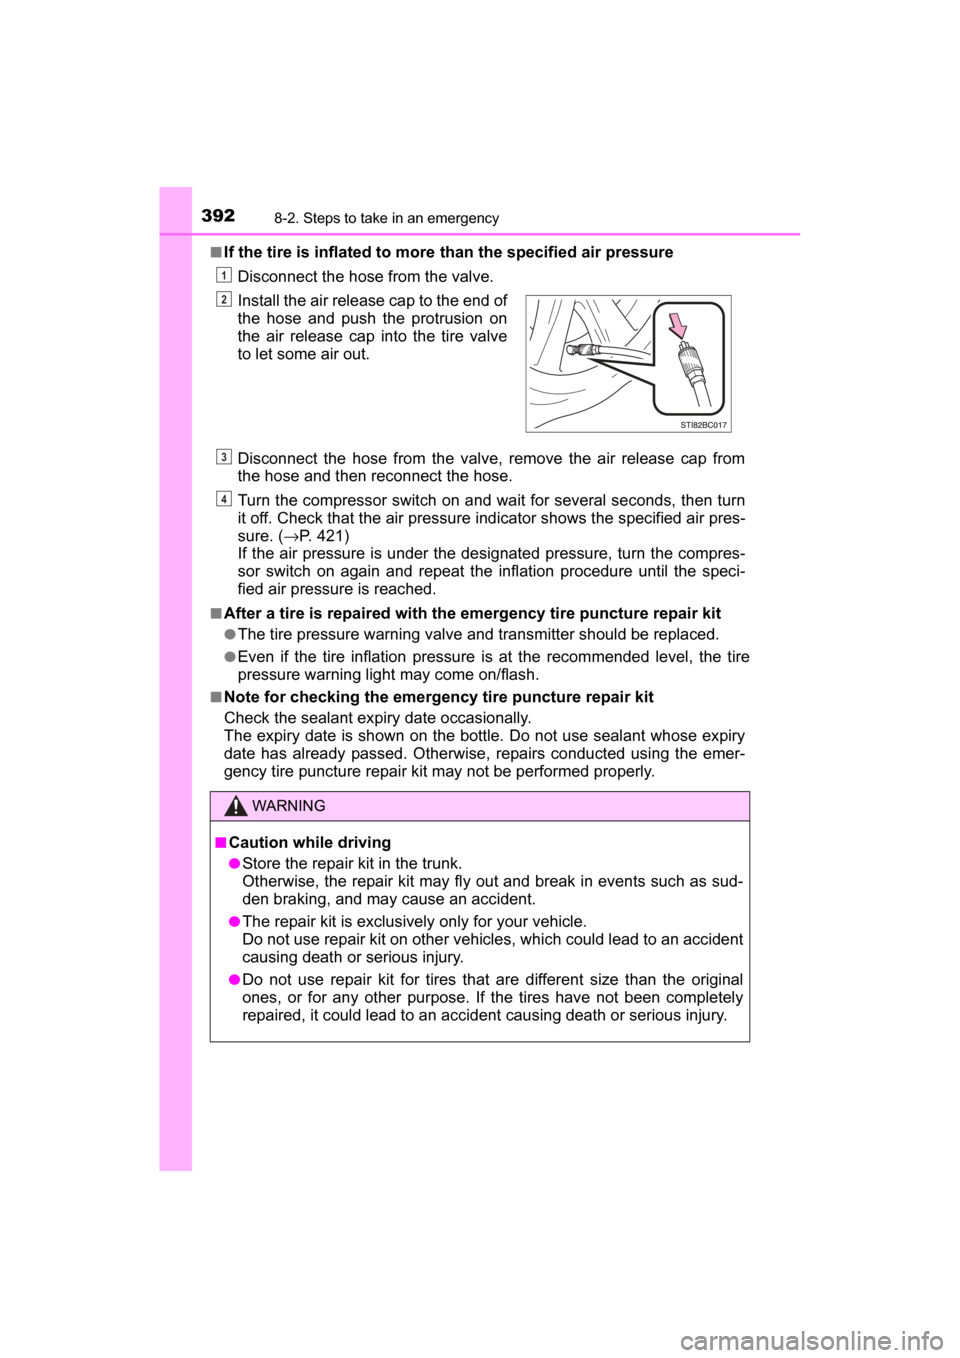
If the tire is inflated to more
than the specified air pressure
Disconnect the hose from the valve.
Disconnect the hose from the valve, remove the air release cap from
the hose and then reconnect the hose.
Turn the compressor switch on and wait for several se conds, then turn
it off. Check that the air pressure indicator shows the specified air pres-
sure. ( →P. 421)
If the air pressure is under the designated pressure, turn the compres-
sor switch on again and repeat the inflation procedure until the speci-
fied air pressure is reached.
■After a tire is repaired with the emergency tire puncture repair kit
●The tire pressure warning valve and transmitter should be replaced.
●Even if the tire inflation pressure is at the recommended level, the tire
pressure warning light may come on/flash.
■Note for checking the emergency tire puncture repair kit
Check the sealant expiry date occasionally.
The expiry date is shown on the bottle. Do not use sealant whose expiry
date has already passed. Otherwise, repairs conducted using the emer-
gency tire puncture repair kit may not be performed properly.Install the air release cap to the end of
the hose and push the protrusion on
the air release cap into the tire valve
to let some air out.
WARNING
■
Caution while driving
●Store the repair kit in the trunk.
Otherwise, the repair kit may fly out and break in events such as sud-
den braking, and may cause an accident.
●The repair kit is exclusively only for your vehicle.
Do not use repair kit on other vehicles, which could lead to an accident
causing death or serious injury.
●Do not use repair kit for tires that are different size than the original
ones, or for any other purpose. If the tires have not been completely
repaired, it could lead to an accide nt causing death or serious injury.
1
2
3
4
Page 396 of 464
3968-2. Steps to take in an emergency
MIRAI_OM_USA_OM62023U
If the fuel cell system will not start
One of the following may be the cause of the problem:
●The electronic key may not be functioning properly. ( →P. 398)
● There may not be sufficient fuel in the vehicle’s tank.
Refuel the vehicle.
● The fuel door may be open. ( →P. 201)
● There may be a malfunction in the immobilizer system.
( → P. 72)
● There may be a malfunction in the shift control system.
* (→ P. 378)
● The fuel cell system may be malf unctioning due to an electrical
problem such as electronic key ba ttery depletion or a blown fuse.
However, depending on the type of malfunction, an interim mea-
sure is available to start the fuel cell system. ( →P. 177, 397)
● The electronic key may be in battery-saving mode. ( →P. 133)
*: It may not be possible to shift the shift position from P to another position.
One of the following may be the cause of the problem:
● The 12-volt battery may be discharged. ( →P. 401)
● The 12-volt battery terminal connections may be loose or corroded.
(→ P. 328)
Reasons for the fuel cell system not starting vary depending on
the situation. Check the follo wing and perform the appropriate
procedure:
The fuel cell system will not start even though the correct start-
ing procedure is being followed. ( →P. 172)
The interior lights and headlights are dim, or the horn does not
sound or sounds at a low volume.
Page 397 of 464
3978-2. Steps to take in an emergency
MIRAI_OM_USA_OM62023U
8
When trouble arises
One of the following may be the cause of the problem:
●The 12-volt battery may be discharged. ( →P. 401)
● One or both of the 12-volt batter y terminals may be disconnected.
Contact your Toyota dealer if the problem cannot be repaired, or if repair
procedures are unknown.
When the fuel cell system does not start, the following steps can be
used as an interim measure to star t the fuel cell system if the power
switch is functioning normally.
Do not use this starting procedure except in case of emergency.
Set the parking brake.
Turn the power switch to ACCESSORY mode.
Press and hold the power switch for about 15 seconds while
depressing the brake pedal firmly.
Even if the fuel cell system can be started using the above steps, the
system may be malfunctioning. Have the vehicle inspected by your
Toyota dealer.
The interior lights and headlight s do not turn on, or the horn
does not sound.
Emergency start function
1
2
3
Page 402 of 464
4028-2. Steps to take in an emergency
MIRAI_OM_USA_OM62023U
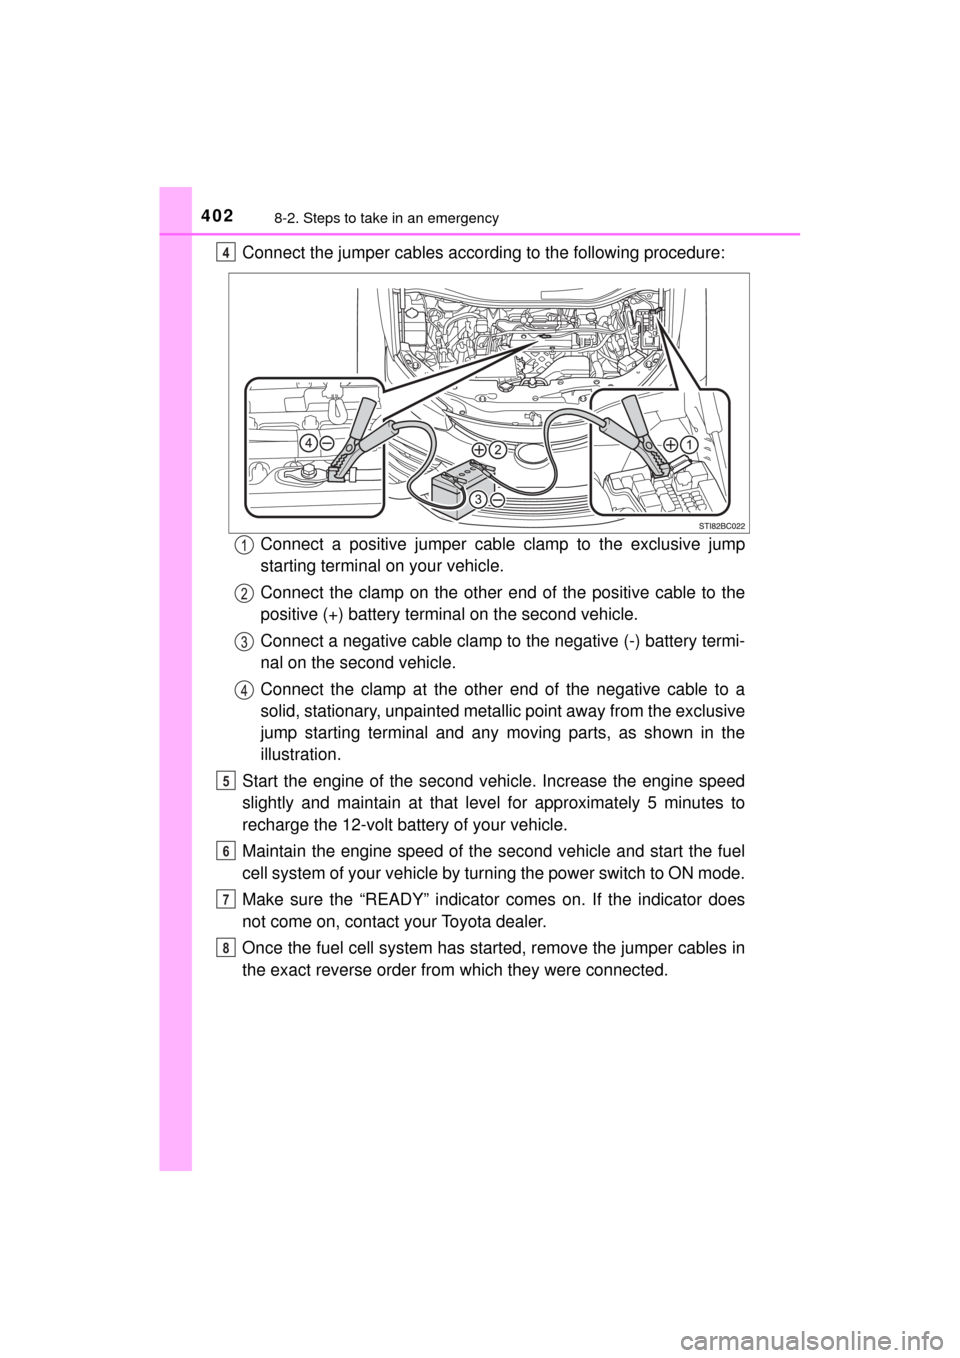
Connect the jumper cables according to the following procedure:Connect a positive jumper cabl e clamp to the exclusive jump
starting terminal on your vehicle.
Connect the clamp on the other e nd of the positive cable to the
positive (+) battery terminal on the second vehicle.
Connect a negative cable clamp to the negative (-) battery termi-
nal on the second vehicle.
Connect the clamp at the other end of the negative cable to a
solid, stationary, unpainted metallic point away from the exclusive
jump starting terminal and any moving parts, as shown in the
illustration.
Start the engine of the second v ehicle. Increase the engine speed
slightly and maintain at that level for approximately 5 minutes to
recharge the 12-volt battery of your vehicle.
Maintain the engine speed of the second vehicle and start the fuel
cell system of your vehicle by turn ing the power switch to ON mode.
Make sure the “READY” indicato r comes on. If the indicator does
not come on, contact your Toyota dealer.
Once the fuel cell system has started, remove the jumper cables in
the exact reverse order from which they were connected.4
5
6
7
8
Page 403 of 464

4038-2. Steps to take in an emergency
MIRAI_OM_USA_OM62023U
8
When trouble arises
Close the exclusive jump starting terminal cover, reinstall the motor
cover and the fuse box cover to its original position.
Once the fuel cell system starts, have the vehicle inspected at your
Toyota dealer as soon as possible.
■ Starting the fuel cell system when the 12-volt battery is discharged
The fuel cell system cannot be started by push-starting.
■ To prevent 12-volt battery discharge
●Turn off the headlights and the audio system while the fuel cell system is off.
● Turn off any unnecessary electrical components when the vehicle is running
at a low speed for an extended period, such as in heavy traffic.
■ Charging the 12-volt battery
The electricity stored in the 12-volt battery will discharge gradually even when
the vehicle is not in use, due to natural discharge and the draining effects of
certain electrical appliances. If the vehicle is left for a long time, the 12-volt
battery may discharge, and the fuel cell system may be unable to start. \
(The
12-volt battery recharges automatically while the fuel cell system is operat-
ing.)
■ When the 12-volt battery is removed or discharged
●In some cases, it may not be possible to unlock the doors using the smart
key system when the 12-volt battery is discharged. Use the wireless remote
control or the mechanical key to lock or unlock the doors.
● The fuel cell system may not start on the first attempt after the 12-volt bat-
tery has recharged but will start normally after the second attempt. This is
not a malfunction.
● The power switch mode is memorized by the vehicle. When the 12-volt bat-
tery is reconnected, the system will return to the mode it was in before the
12-volt battery was discharged. Before disconnecting the 12-volt battery,
turn the power switch off.
If you are unsure what mode the power switch was in before the 12-volt bat-
tery discharged, be especially careful when reconnecting the 12-volt battery.
● If the 12-volt battery is depleted with the shift position in P, it will not be pos-
sible to shift the shift position other than P. In this case, the vehicle cannot
be towed without lifting both front wheels because the front wheels are
locked by the parking lock. ( →P. 363)
● When the 12-volt battery is reconnected, start the fuel cell system, depress
the brake pedal, and confirm that it is possible to shift into each shift posi-
tion.
● Make sure that the key is not inside the vehicle when recharging or replac-
ing the 12-volt battery. The key may be locked in the vehicle if the alarm is
activated. ( →P. 75)
9
Page 404 of 464
4048-2. Steps to take in an emergency
MIRAI_OM_USA_OM62023U■
When exchanging the 12-volt battery
Use a Central Degassing type 12-volt battery (Japanese Industrial Stan-
dards). Also, use 12-volt batteries with case sizes similar to one prior the
exchange and an equivalent 20 hour rate capacity (20HR) or greater.
• If the sizes differ, the 12-volt battery cannot be properly secured.
• If the 20 hour rate capacity is low, even if the time period where the vehicle
is not used is a short time, the 12-volt battery may discharge and fuel cell
system may not be able to start.
For details, consult your Toyota dealer.
WARNING
■ Avoiding 12-volt battery fires or explosions
Observe the following precautions to prevent accidentally igniting the flam-
mable gas that may be emitted from the 12-volt battery:
● Make sure each jumper cable is connected to the correct terminal and that
it is not unintentionally in contact with any other than the intended terminal.
● Do not allow the other end of the jumper cable connected to the “+” termi-
nal to come into contact with any other parts or metal surfaces in the area,
such as brackets or unpainted metal.
● Do not allow the + and - clamps of the jumper cables to come into contact
with each other.
● Do not smoke, use matches, cigarette lighters or allow open flame near
the 12-volt battery.
■ 12-volt battery precautions
The 12-volt battery contains poisonous and corrosive acidic electrolyte,
while related parts contain lead and lead compounds. Observe the following
precautions when handling the 12-volt battery:
● When working with the 12-volt battery, always wear safety glasses and
take care not to allow any 12-volt battery fluids (acid) to come into contact
with skin, clothing or the vehicle body.
● Do not lean over the 12-volt battery.
● In the event that 12-volt battery fluid comes into contact with the skin or
eyes, immediately wash the affected area with water and seek medical
attention.
Place a wet sponge or cloth over the affected area until medical attention
can be received.
● Always wash your hands after handling the 12-volt battery support, termi-
nals, and other battery-related parts.
● Do not allow children near the 12-volt battery.