Page 196 of 634

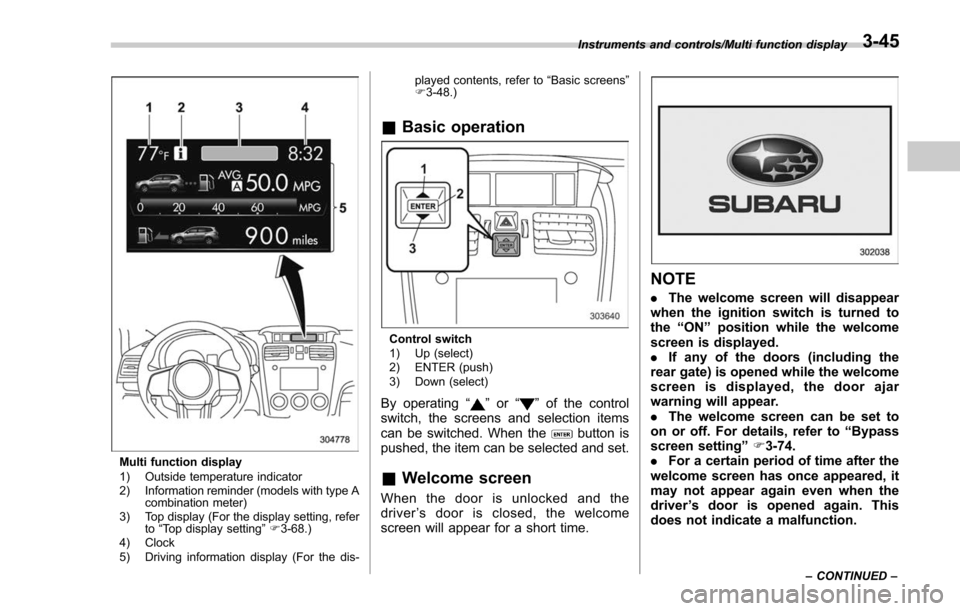
Multi function display
1) Outside temperature indicator
2) Information reminder (models with type Acombination meter)
3) Top display (For the display setting, refer to“Top display setting ”F 3-68.)
4) Clock
5) Driving information display (For the dis- played contents, refer to
“Basic screens ”
F 3-48.)
& Basic operation
Control switch
1) Up (select)
2) ENTER (push)
3) Down (select)
By operating “”or “”of the control
switch, the screens and selection items
can be switched. When the
button is
pushed, the item can be selected and set.
& Welcome screen
When the door is unlocked and the
driver ’s door is closed, the welcome
screen will appear for a short time.
NOTE
. The welcome screen will disappear
when the ignition switch is turned to
the “ON ”position while the welcome
screen is displayed.
. If any of the doors (including the
rear gate) is opened while the welcome
screen is displayed, the door ajar
warning will appear.
. The welcome screen can be set to
on or off. For details, refer to “Bypass
screen setting ”F 3-74.
. For a certain period of time after the
welcome screen has once appeared, it
may not appear again even when the
driver ’s door is opened again. This
does not indicate a malfunction.
Instruments and controls/Multi function display
–CONTINUED –3-45
Page 197 of 634

Instruments and controls/Multi function display
&Ending screen
If the ignition switch is turned to the
“LOCK”/ “OFF ”position, one of the follow-
ing screens will be displayed as the
ending screen before the screen turns off.
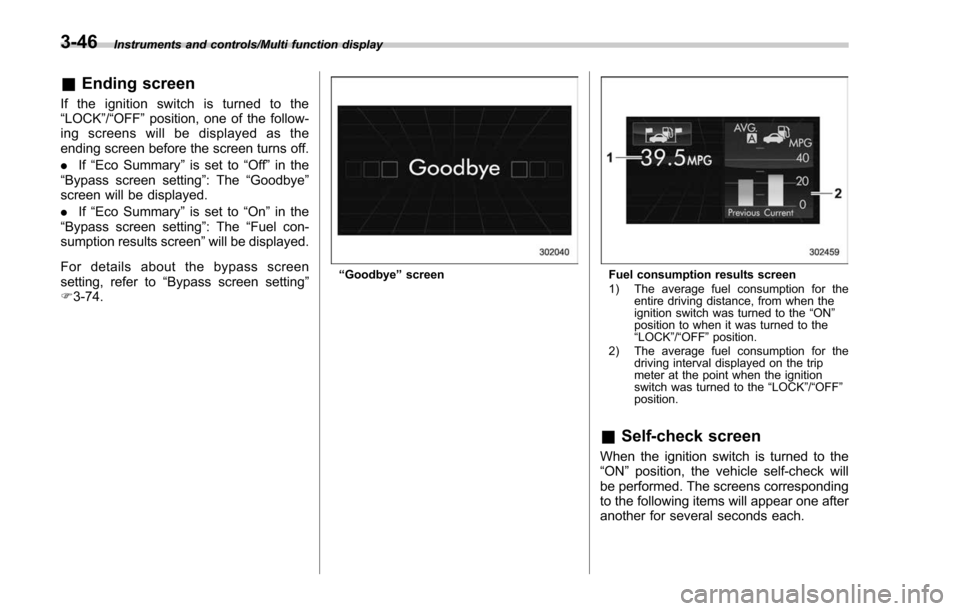
. If“Eco Summary ”is set to “Off ”in the
“Bypass screen setting ”: The“Goodbye ”
screen will be displayed.
. If“Eco Summary ”is set to “On”in the
“ Bypass screen setting ”: The “Fuel con-
sumption results screen” will be displayed.
For details about the bypass screen
setting, refer to “Bypass screen setting ”
F 3-74.
“Goodbye ”screenFuel consumption results screen
1) The average fuel consumption for the
entire driving distance, from when the
ignition switch was turned to the “ON ”
position to when it was turned to the
“ LOCK ”/“ OFF ”position.
2) The average fuel consumption for the driving interval displayed on the trip
meter at the point when the ignition
switch was turned to the “LOCK ”/“ OFF ”
position.
& Self-check screen
When the ignition switch is turned to the
“ON ”position, the vehicle self-check will
be performed. The screens corresponding
to the following items will appear one after
another for several seconds each.
3-46
Page 207 of 634

Instruments and controls/Multi function display
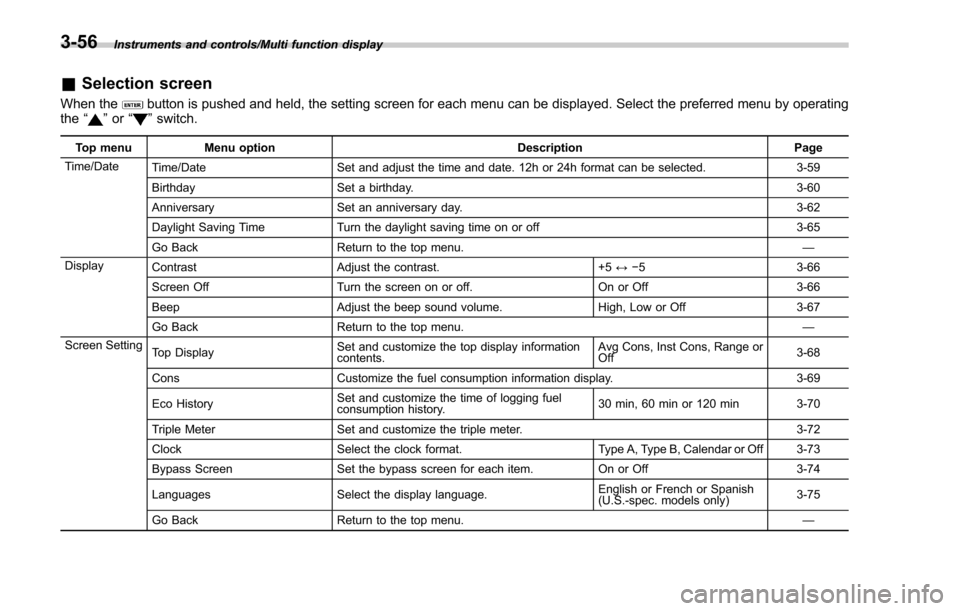
&Selection screen
When thebutton is pushed and held, the setting screen for each menu can be displayed. Select the preferred menu by operating
the “”or “”switch.
Top menu Menu option DescriptionPage
Time/Date Time/Date Set and adjust the time and date. 12h or 24h format can be selected. 3-59
Birthday Set a birthday. 3-60
Anniversary Set an anniversary day. 3-62
Daylight Saving Time Turn the daylight saving time on or off 3-65
Go Back Return to the top menu. —
Display Contrast Adjust the contrast. +5↔−53 -6 6
Screen Off Turn the screen on or off. On or Off3-66
Beep Adjust the beep sound volume. High, Low or Off3-67
Go Back Return to the top menu. —
Screen Setting Top Display Set and customize the top display information
contents. Avg Cons, Inst Cons, Range or
Off
3-68
Cons Customize the fuel consumption information display. 3-69
Eco History Set and customize the time of logging fuel
consumption history. 30 min, 60 min or 120 min 3-70
Triple Meter Set and customize the triple meter. 3-72
Clock Select the clock format. Type A, Type B, Calendar or Off 3-73
Bypass Screen Set the bypass screen for each item. On or Off3-74
Languages Select the display language. English or French or Spanish
(U.S.-spec. models only)
3-75
Go Back Return to the top menu. —
3-56
Page 213 of 634
Instruments and controls/Multi function display
9. The system will notify you that the
setting is complete.
If a birthday is approaching, the following
screen will be displayed accompanied by
a beep when the ignition switch has been
turned to the“ON”position. This function
can be set to on or off. For details, refer to
“Bypass screen setting ”F 3-74.From 1 to 7 days prior to the birthday
On a birthday (displayed in red)
NOTE
If “__ ”is selected for either the
“ Month ”or “Day ”item instead of
numbers, the birthday notification will be deactivated.
!
Anniversary setting
1. Perform the preparation steps accord-
ing to “Preparation for date setting ”F 3-
59.
2. Operate the “”or “”switch to
select the “Anniversary ”item. Then push
the
button.
3-62
Page 215 of 634

Instruments and controls/Multi function display
8. After entering the name by repeating
step 7, select“Set”by operating the “”
switch and confirm the setting by pushing
the
button.
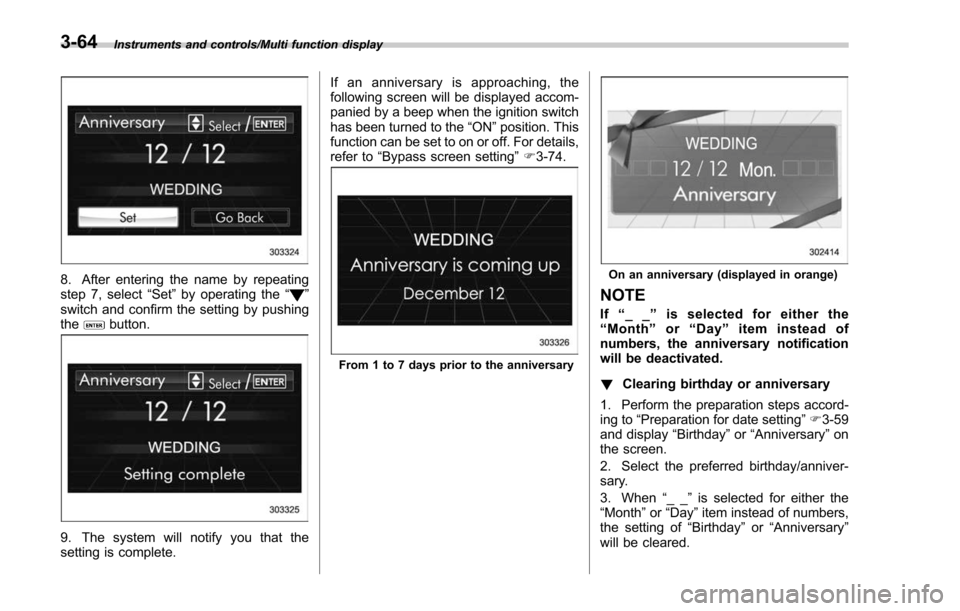
9. The system will notify you that the
setting is complete. If an anniversary is approaching, the
following screen will be displayed accom-
panied by a beep when the ignition switch
has been turned to the
“ON ”position. This
function can be set to on or off. For details,
refer to “Bypass screen setting ”F 3-74.
From 1 to 7 days prior to the anniversary
On an anniversary (displayed in orange)
NOTE
If “__ ”is selected for either the
“ Month ”or “Day ”item instead of
numbers, the anniversary notification
will be deactivated.
! Clearing birthday or anniversary
1. Perform the preparation steps accord-
ing to “Preparation for date setting ”F 3-59
and display “Birthday ”or “Anniversary ”on
the screen.
2. Select the preferred birthday/anniver-
sary.
3. When “__ ”is selected for either the
“Month ”or “Day” item instead of numbers,
the setting of “Birthday ”or “Anniversary ”
will be cleared.
3-64
Page 225 of 634
Instruments and controls/Multi function display
6. The system will notify you that the
setting is complete.
!Bypass screen setting
1. Perform the preparation steps accord-
ing to “Preparation for screen settings ”
F 3-68.2. Operate the “”or “”switch to
select the “Bypass Screen ”item. Then
push the
button.
3. Select the item to set by operating the
“” or “”switches. Then push thebutton.
4. Select “On”or“Off ”by operating the
“” or “”switch. Then push thebutton.
If you want to change setting for another
item, repeat steps 3 and 4.
5. Select “Set”by operating the “”or
3-74