Page 539 of 634
Maintenance and service/Engine compartment overview
Engine compartment overview
&Non-turbo models
1) Brake fluid reservoir/Clutch fluid reservoir
(MT) (page 11-18)
2) Fuse box (page 11-37)
3) Battery (page 11-36)
4) Windshield washer tank (page 11-30)
5) Engine oil filler cap (page 11-10)
6) Engine coolant reservoir (page 11-13)
7) Radiator cap (page 11-13)
8) Engine oil filter (page 11-11)
9) Engine oil level gauge (page 11-10)
10) Air cleaner case (page 11-14)
11-8
Page 540 of 634
&Turbo models1) Brake fluid reservoir (page 11-18)
2) Fuse box (page 11-37)
3) Battery (page 11-36)
4) Windshield washer tank (page 11-30)
5) Engine oil filler cap (page 11-10)
6) Engine coolant reservoir (page 11-13)
7) Radiator cap (page 11-13)
8) Engine oil filter (page 11-11)
9) Engine oil level gauge (page 11-10)
10) Air cleaner case (page 11-14)
Maintenance and service/Engine compartment overview
11-9
Page 567 of 634

Maintenance and service/Battery
ends. If the rubber is not retained properly,
the wiper may scratch the rear window
glass.
5. Install the wiper blade assembly to the
wiper arm. Make sure that it locks in place.
6. Hold the wiper arm by hand and slowly
lower it in position.Battery
WARNING
.Before beginning work on or near
any battery, be sure to extinguish
all cigarettes, matches, and light-
ers. Never expose a battery to an
open flame or electric sparks.
Batteries give off a gas which is
highly flammable and explosive.
. For safety, in case an explosion
does occur, wear eye protection
or shield your eyes when work-
ing near any battery. Never lean
over a battery.
. Do not let battery fluid contact
eyes, skin, fabrics, or paint be-
cause battery fluid is a corrosive
acid. If battery fluid gets on your
skin or in your eyes, immediately
flush the area with water thor-
oughly. Seek medical help imme-
diately if acid has entered the
eyes.
If battery fluid is accidentally
swallowed, immediately drink a
large amount of milk or water,
and seek medical attention im-
mediately.
. To lessen the risk of sparks, remove rings, metal watchbands,
and other metal jewelry. Never
allow metal tools to contact the
positive battery terminal and any-
thing connected to it WHILE you
are at the same time in contact
with any other metallic portion of
the vehicle because a short cir-
cuit will result.
. Keep everyone including children
away from the battery.
. Charge the battery in a well-
ventilated area.
. Battery posts, terminals and re-
lated accessories contain lead
and lead compounds, chemicals
known to the State of California
to cause cancer and reproductive
harm. Batteries also contain
other chemicals known to the
State of California to cause can-
cer.
Wash hands after handling.
11-36
Page 568 of 634

1) Cap
2) Upper level
3) Lower level
It is unnecessary to periodically check the
battery fluid level or periodically refill with
distilled water.
However, if the battery fluid level is below
the lower level, remove the cap. Fill to the
upper level with distilled water.
CAUTION
Never use more than 10 amperes
when charging the battery because
it will shorten battery life.
Fuses
CAUTION
Never replace a fuse with one hav-
ing a higher rating or with material
other than a fuse because serious
damage or a fire could result.
The fuses are designed to melt during an
overload to prevent damage to the wiring
harness and electrical equipment. The
fuses are located in two fuse boxes.
One is located under the instrument panel
behind the fuse box cover on the driver ’s
seat side. To remove the cover, pull it out.
1) Spare fuses
The other one (main fuse box) is housed
in the engine compartment. Also, the
spare fuses are stored in the fuse box
cover.
The fuse puller is stored in the main fuse
Maintenance and service/Fuses
–CONTINUED –11-37
Page 575 of 634

Maintenance and service/Replacing key battery
7. Tighten the upper and lower screws.
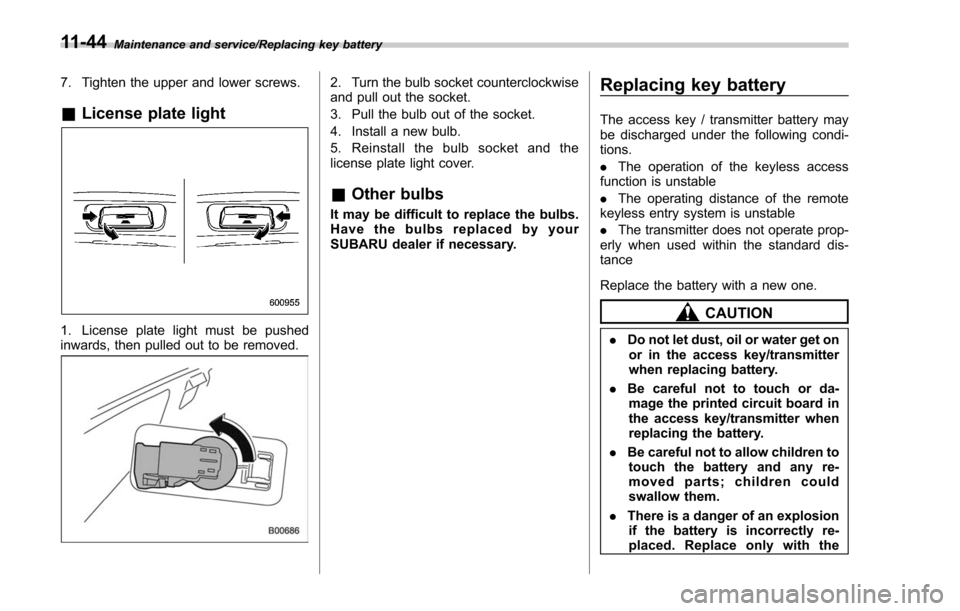
&License plate light
1. License plate light must be pushed
inwards, then pulled out to be removed.
2. Turn the bulb socket counterclockwise
and pull out the socket.
3. Pull the bulb out of the socket.
4. Install a new bulb.
5. Reinstall the bulb socket and the
license plate light cover.
&Other bulbs
It may be difficult to replace the bulbs.
Have the bulbs replaced by your
SUBARU dealer if necessary.
Replacing key battery
The access key / transmitter battery may
be discharged under the following condi-
tions.
. The operation of the keyless access
function is unstable
. The operating distance of the remote
keyless entry system is unstable
. The transmitter does not operate prop-
erly when used within the standard dis-
tance
Replace the battery with a new one.
CAUTION
. Do not let dust, oil or water get on
or in the access key/transmitter
when replacing battery.
. Be careful not to touch or da-
mage the printed circuit board in
the access key/transmitter when
replacing the battery.
. Be careful not to allow children to
touch the battery and any re-
moved parts; children could
swallow them.
. There is a danger of an explosion
if the battery is incorrectly re-
placed. Replace only with the
11-44
Page 576 of 634

same or equivalent type of the
battery.
. Batteries should not be exposed
to excessive heat such as bright
sunlight, fire or the like.
NOTE
. Replace only with the same or
equivalent type of battery recom-
mended by the manufacturer.
. Dispose of used batteries according
to local laws.
. Mount the battery in the correct
orientation to prevent fluid leakage.
Be careful not to bend the terminals. It
may result in a malfunction.
. It is recommended that the battery
be replaced by a SUBARU dealer.
. Use a new battery.
. After replacing the battery, confirm
that the access key/transmitter func-
tions properly.
& Replacing battery of access
key
CAUTION
When removing or reinstalling the
access key cover, make sure that
the plastic part does not come off or
become misaligned.
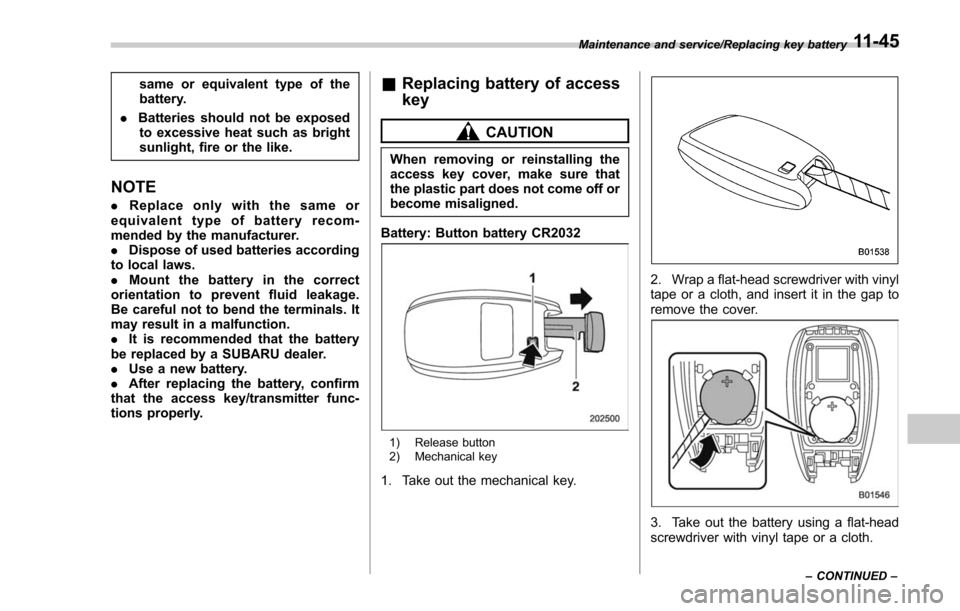
Battery: Button battery CR2032
1) Release button
2) Mechanical key
1. Take out the mechanical key.
2. Wrap a flat-head screwdriver with vinyl
tape or a cloth, and insert it in the gap to
remove the cover.
3. Take out the battery using a flat-head
screwdriver with vinyl tape or a cloth.
Maintenance and service/Replacing key battery
–CONTINUED –11-45
Page 577 of 634
Maintenance and service/Replacing key battery
4. Insert a new battery with its positive (+)
side facing upward as shown in the figure.
5. Attach the cover to the access key by
fitting the projections and recesses to-
gether.
&Replacing transmitter battery
1. Open the key head using a flat-head
screwdriver.
2. Remove the transmitter case from the
key head.
3. Open the transmitter case by releasing
the hooks.
1) Negative ( −) side facing up
4. Replace the old battery with a new
battery (typeCR1620or equivalent) mak-
ing sure to install the new battery with the
11-46
Page 578 of 634
negative (−) side facing up.
5. Put together the transmitter case by
fitting the hooks on the case.
6. Reinstall the transmitter case in the
key head.
7. Refit the removed half of the key head.
After the battery is replaced, the trans-
mitter must be synchronized with the
remote keyless entry system ’s control
unit. Press either the “
”or “”button
six times to synchronize the unit.
Maintenance and service/Replacing key battery11-47