2017 SUBARU FORESTER Battery
[x] Cancel search: BatteryPage 485 of 634
Driving tips/Winter driving
need to be washed thoroughly.
.Frequent driving of an AWD model
under hard-driving conditions such as
rough roads or off roads will necessitate
more frequent replacement of the follow-
ing items than that specified in the
maintenance schedule described in the
“Warranty and Maintenance Booklet ”.
– Engine oil
– Brake fluid
– Rear differential gear oil
– Manual transmission oil (MT mod-
els)
– Continuously variable transmission
fluid (CVT models)
– Front differential gear oil (CVT
models)
Remember that damage done to your
SUBARU while operating it off-road and
not using common sense precautions
such as those listed above is not eligible
for warranty coverage.Winter driving
& Operation during cold
weather
Carry some emergency equipment, such
as a window scraper, a bag of sand,
flares, a small shovel and jumper cables.
Check the battery and cables. Cold
temperatures reduce battery capacity.
The battery must be in good condition to
provide enough power for cold winter
starts.
It normally takes longer to start the engine
in very cold weather conditions. Use an
engine oil of a proper grade and viscosity
for cold weather. Using heavy summer oil
will make it harder to start the engine.
Keep the door locks from freezing by
squirting them with deicer or glycerin.
Forcing a frozen door open may damage
or separate the rubber weather strips
around the door. If the door is frozen,
use hot water to melt the ice, and after-
wards thoroughly wipe the water away.
Use a windshield washer fluid that con-
tains an antifreeze solution. Do not use
engine antifreeze or other substitutes
because they may damage the paint of
the vehicle. SUBARU Windshield Washer Fluid con-
tains 58.5% methyl alcohol and 41.5%
surfactant, by volume. Its freezing tem-
perature varies according to how much it
is diluted, as indicated in the following
table.
Washer Fluid Con-
centration Freezing Temperature
30% 10.4 8F( −12 8C)
50% −48F( −20 8C)
100% −
49 8F( −45 8C)
In order to prevent freezing of washer
fluid, check the freezing temperatures in
the table above when adjusting the fluid
concentration to the outside temperature.
If you fill the reservoir tank with a fluid with
a different concentration from the one
used previously, purge the old fluid from
the piping between the reservoir tank and
washer nozzles by operating the washer
for a certain period of time. Otherwise, if
the concentration of the fluid remaining in
the piping is too low for the outside
temperature, it may freeze and block the
nozzles.
CAUTION
. Adjust the washer fluid concen-
tration appropriately for the out-
8-8
Page 512 of 634

significant damage and a fast leak
that causes the tire to lose air
rapidly. If you have a flat tire, replace
it with a spare tire as soon as
possible.
When a spare tire is mounted or a
wheel rim is replaced without the
original pressure sensor/transmitter
being transferred, the low tire pres-
sure warning light will illuminate
steadily after blinking for approxi-
mately one minute. This indicates
the TPMS is unable to monitor all
four road wheels. Contact your
SUBARU dealer as soon as possible
for tire and sensor replacement and/
or system resetting.
When a tire is repaired with liquid
sealant, the tire pressure warning
valve and transmitter may not oper-
ate properly. If a liquid sealant is
used, contact your nearest SUBARU
dealer or other qualified service
shop as soon as possible. Make
sure to replace the tire pressure
warning valve and transmitter when
replacing the tire. You may reuse the
wheel if there is no damage to it and
if the sealant residue is properly
cleaned off.
If the light illuminates steadily after
blinking for approximately one min-ute, promptly contact a SUBARU
dealer to have the system inspected.Jump starting
WARNING
.
Battery fluid is SULFURIC ACID.
Do not let it come in contact with
the eyes, skin, clothing or the
vehicle.
If battery fluid gets on you,
thoroughly flush the exposed
area with water immediately. Get
medical help if the fluid has
entered your eyes.
If battery fluid is accidentally
swallowed, immediately drink a
large amount of milk or water,
and obtain immediate medical
help.
Keep everyone including chil-
dren away from the battery.
. The gas generated by a battery
explodes if a flame or spark is
brought near it. Do not smoke or
light a match while jump starting.
. Never attempt jump starting if the
discharged battery is frozen. It
could cause the battery to burst
or explode.
. Whenever working on or around
a battery, always wear suitable
In case of emergency/Jump starting
–CONTINUED –9-9
Page 513 of 634
In case of emergency/Jump starting
eye protectors, and remove metal
objects such as rings, bands or
other metal jewelry.
. Be sure the jumper cables and
clamps on them do not have
loose or missing insulation.
Do not jump start unless cables
in suitable condition are avail-
able.
. A running engine can be danger-
ous. Keep your fingers, hands,
clothing, hair and tools away
from the cooling fan, belts and
any other moving engine parts.
Removing rings, watches and
ties is advisable.
. Jump starting is dangerous if it
done incorrectly. If you are un-
sure about the proper procedure
for jump starting, consult a com-
petent mechanic.
When your vehicle does not start due to a
run down (discharged) battery, the vehicle
may be jump started by connecting your
battery to another battery (called the
booster battery) with jumper cables.& How to jump start
1. Make sure the booster battery is 12
volts and the negative terminal is
grounded.
2. If the booster battery is in another
vehicle, do not let the two vehicles touch.
3. Turn off all unnecessary lights and
accessories.
4. Connect the jumper cables exactly in
the sequence illustrated.
9-10
Page 514 of 634
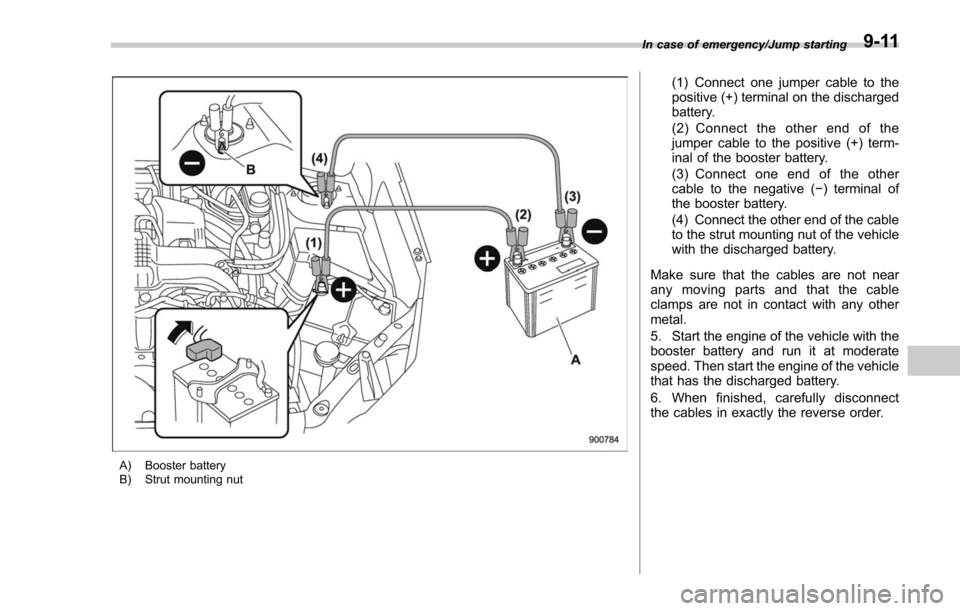
A) Booster battery
B) Strut mounting nut
(1) Connect one jumper cable to the
positive (+) terminal on the discharged
battery.
(2) Connect the other end of the
jumper cable to the positive (+) term-
inal of the booster battery.
(3) Connect one end of the other
cable to the negative (−) terminal of
the booster battery.
(4) Connect the other end of the cable
to the strut mounting nut of the vehicle
with the discharged battery.
Make sure that the cables are not near
any moving parts and that the cable
clamps are not in contact with any other
metal.
5. Start the engine of the vehicle with the
booster battery and run it at moderate
speed. Then start the engine of the vehicle
that has the discharged battery.
6. When finished, carefully disconnect
the cables in exactly the reverse order.
In case of emergency/Jump starting9-11
Page 520 of 634
Access key–if access key
does not operate properly
CAUTION
Keep metallic objects, magnetic
sources and signal transmitters
away from the area between the
access key and the push-button
ignition switch. They may interfere
with the communication between
the access key and the push-button
ignition switch.
The following functions may be inoperable
because of strong radio signals in the
surrounding area or the access key
battery being low.
. Locking/unlocking doors including the
rear gate
. Switching power status
. Starting the engine
In such cases, perform the following
procedure. When the battery of the access
key is discharged, replace it with a new
one. Refer to “Replacing battery of access
key ”F 11-45.
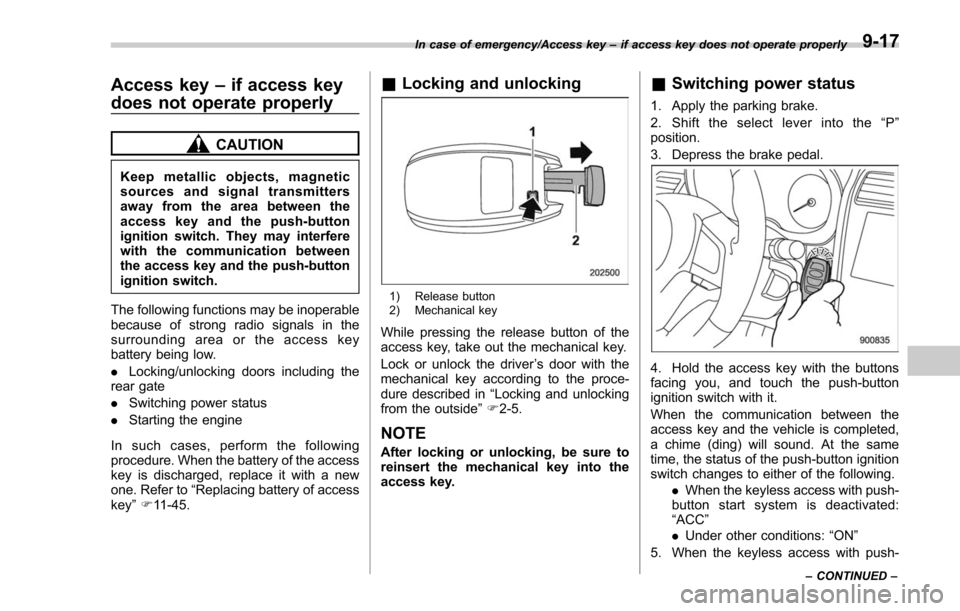
& Locking and unlocking
1) Release button
2) Mechanical key
While pressing the release button of the
access key, take out the mechanical key.
Lock or unlock the driver ’s door with the
mechanical key according to the proce-
dure described in “Locking and unlocking
from the outside ”F 2-5.
NOTE
After locking or unlocking, be sure to
reinsert the mechanical key into the
access key.
& Switching power status
1. Apply the parking brake.
2. Shift the select lever into the “P ”
position.
3. Depress the brake pedal.
4. Hold the access key with the buttons
facing you, and touch the push-button
ignition switch with it.
When the communication between the
access key and the vehicle is completed,
a chime (ding) will sound. At the same
time, the status of the push-button ignition
switch changes to either of the following.
.When the keyless access with push-
button start system is deactivated:
“ACC ”
. Under other conditions: “ON ”
5. When the keyless access with push-
In case of emergency/Access key –if access key does not operate properly
–CONTINUED –9-17
Page 523 of 634
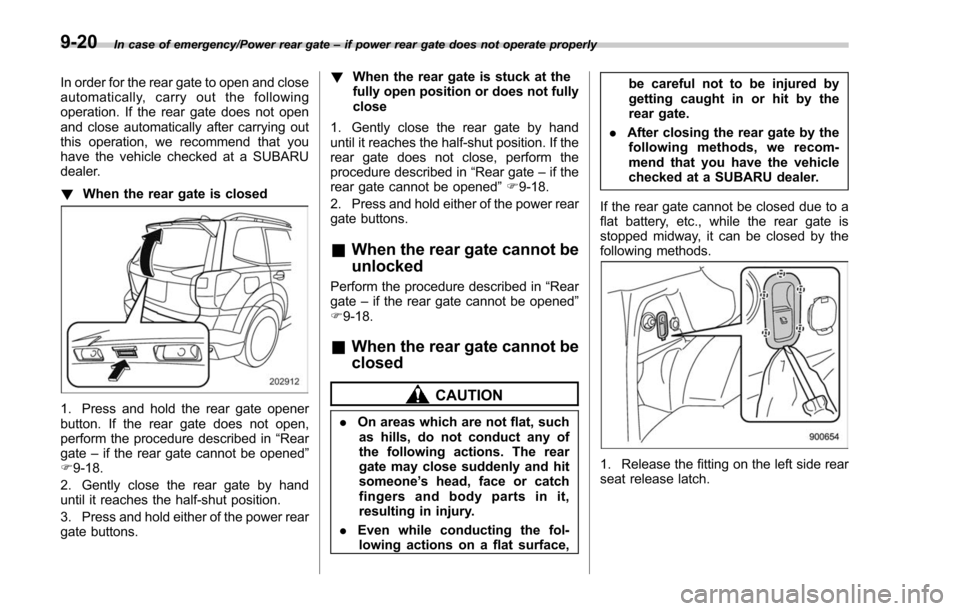
In case of emergency/Power rear gate–if power rear gate does not operate properly
In order for the rear gate to open and close
automatically, carry out the following
operation. If the rear gate does not open
and close automatically after carrying out
this operation, we recommend that you
have the vehicle checked at a SUBARU
dealer.
! When the rear gate is closed
1. Press and hold the rear gate opener
button. If the rear gate does not open,
perform the procedure described in “Rear
gate –if the rear gate cannot be opened ”
F 9-18.
2. Gently close the rear gate by hand
until it reaches the half-shut position.
3. Press and hold either of the power rear
gate buttons. !
When the rear gate is stuck at the
fully open position or does not fully
close
1. Gently close the rear gate by hand
until it reaches the half-shut position. If the
rear gate does not close, perform the
procedure described in “Rear gate–if the
rear gate cannot be opened ”F 9-18.
2. Press and hold either of the power rear
gate buttons.
& When the rear gate cannot be
unlocked
Perform the procedure described in “Rear
gate –if the rear gate cannot be opened ”
F 9-18.
& When the rear gate cannot be
closed
CAUTION
. On areas which are not flat, such
as hills, do not conduct any of
the following actions. The rear
gate may close suddenly and hit
someone ’s head, face or catch
fingers and body parts in it,
resulting in injury.
. Even while conducting the fol-
lowing actions on a flat surface, be careful not to be injured by
getting caught in or hit by the
rear gate.
. After closing the rear gate by the
following methods, we recom-
mend that you have the vehicle
checked at a SUBARU dealer.
If the rear gate cannot be closed due to a
flat battery, etc., while the rear gate is
stopped midway, it can be closed by the
following methods.
1. Release the fitting on the left side rear
seat release latch.
9-20
Page 533 of 634

Maintenance and service
Tire replacement.............................................. 11-29
Wheel replacement ........................................... 11-30
Aluminum wheels............................................. 11-30
Windshield washer fluid .................................. 11-30
Replacement of wiper blades .......................... 11-32
Windshield wiper blade assembly ..................... 11-33
Windshield wiper blade rubber ......................... 11-33
Rear window wiper blade assembly .................. 11-34
Rear window wiper blade rubber ....................... 11-35
Battery............................................................... 11-36
Fuses ................................................................ 11-37
Installation of accessories ............................... 11-38 Replacing bulbs
............................................... 11-39
Headlights (models with LED headlights) .......... 11-39
Headlights (models with halogen headlights) .................................................... 11-39
Front turn signal light, front side marker light and parking light ........................................... 11-41
Front fog light (if equipped) .............................. 11-42
Rear combination lights ................................... 11-42
License plate light ........................................... 11-44
Other bulbs ..................................................... 11-44
Replacing key battery ...................................... 11-44Replacing battery of access key ....................... 11-45
Replacing transmitter battery ........................... 11-46
Page 534 of 634

Maintenance schedule
U.S. models
The scheduled maintenance items re-
quired to be serviced at regular intervals
are shown in the“Warranty and Main-
tenance Booklet ”. For details, read the
separate “Warranty and Maintenance
Booklet ”.
Canada models
The scheduled maintenance items re-
quired to be serviced at regular intervals
are shown in the “Warranty and Service
Booklet ”. For details, read the separate
“Warranty and Service Booklet ”.
Except for U.S. and Canada models
Some items of your vehicle are required to
be serviced at scheduled intervals. For
details about your maintenance schedule,
read the separate “Warranty and Main-
tenance Booklet ”.
NOTE
For models with a multi function dis-
play, you can set a reminder to be
displayed when a scheduled mainte-
nance item is almost due. For details,
refer to“Maintenance settings ”F 3-76.
Maintenance precautions
When maintenance and service are re-
quired, it is recommended that all work be
done by an authorized SUBARU dealer.
If you perform maintenance and service
by yourself, you should familiarize yourself
with the information provided in this
section on general maintenance and
service for your SUBARU.
Incorrect or incomplete service could
cause improper or unsafe vehicle opera-
tion. Any problems caused by improper
maintenance and service performed by
you are not eligible for warranty coverage.
WARNING
. Always select a safe area when
performing maintenance on your
vehicle.
. Always be very careful to avoid
injury when working on the vehi-
cle. Remember that some of the
materials in the vehicle may be
hazardous if improperly used or
handled, for example, battery
acid.
. Your vehicle should only be ser-
viced by persons fully competent
to do so. Serious personal injury may result to persons not experi-
enced in servicing vehicles.
. Always use the proper tools and
make certain that they are well
maintained.
. Never get under the vehicle sup-
ported only by a jack. Always use
safety stands to support the
vehicle.
. Never keep the engine running in
a poorly ventilated area, such as
a garage or other closed areas.
. Do not smoke or allow open
flames around the fuel or battery.
This will cause a fire.
. Because the fuel system is under
pressure, replacement of the fuel
filter should be performed only
by your SUBARU dealer.
. Wear adequate eye protection to
guard against getting oil or fluids
in your eyes. If something does
get in your eyes, thoroughly
wash them out with clean water.
. Do not tamper with the wiring of
the SRS airbag system or seat-
belt pretensioner system, or at-
tempt to take its connectors
apart, as that may activate the
system or it can render it inop-
Maintenance and service/Maintenance schedule
–CONTINUED –11-3