2017 SUBARU FORESTER back light
[x] Cancel search: back lightPage 399 of 634

Interior equipment/Rear view camera
of the image on the monitor is
limited, you should always check
the rear view and the surround-
ing area with your eyes and
mirrors, and move backward at
a slow speed. Moving backward
only by checking the rear view
image from the camera could
cause an accident.
. Do not disassemble or modify the
camera, switch or wiring. If
smoke comes out or you smell
a strange odor, stop using the
rear view camera immediately.
Contact your SUBARU dealer
for an inspection. Continued use
may result in accident, fire or
electric shock.
CAUTION
. If your vehicle is washed with a
high-pressure washer, do not
allow water to contact the camera
directly. Entry of water into the
camera lens may result in con-
densation, malfunction, fire or
electric shock.
. Since the camera is a precision
device, do not subject it to strong
impacts. Otherwise, malfunction, fire or electric shock may occur.
. If mud or snow sticks to or is
frozen on the camera, you must
be very careful when removing it.
Otherwise, damage to the camera
may cause a fire or electric
shock. Pour water or lukewarm
water over the camera to remove
mud and ice, and wipe it with a
soft, dry cloth.
. Do not put a flame close to the
camera or wiring. Otherwise, da-
mage or fire may occur.
. When replacing the fuse, be sure
to use a fuse with the specified
rating. Use of a fuse with a
different rating may result in a
malfunction.
. If the rear view camera is used for
a long time while the engine is
not operated, the battery may
become completely discharged.
NOTE
. Do not wipe the camera with alcohol,
benzine or paint thinner. Otherwise,
discoloration may occur. To remove
contamination, wipe the camera with a
cloth moistened with a diluted neutral
detergent and then wipe it with a soft, dry cloth.
.
When waxing the vehicle, be careful
not to apply the wax to the camera. If it
comes in contact with the camera,
moisten a clean cloth with a diluted
neutral detergent to remove the wax.
. The camera lens has a hard coating
to help prevent scratches. However,
when washing the vehicle or cleaning
the camera lens, be careful not to
scratch the camera lens. Do not use a
washing brush directly on the camera
lens. The image quality of the rear view
camera may deteriorate.
. Strong light shined on the camera
lens may develop vertical lines around
the light source. This is not a malfunc-
tion.
. Under fluorescent light, the display
may flicker. However, this is not a
malfunction.
. The image of the rear view camera
may be slightly different from the
actual color of the objects.& How to use the rear view
camera
When the shift lever/select lever is set to
“R”, the rear view camera automatically
displays the rear view image from the
vehicle. When the lever is set to other
positions, the image before setting to “R”
6-18
Page 400 of 634

is displayed.
1. Set the ignition switch to“ON”.
2. Set the shift lever/select lever to “R”.
NOTE
. For models with the genuine
SUBARU navigation or audio system,
while the navigation system is acti-
vated, the image of the rear view
camera will not be displayed. However,
the image of the rear view camera has
priority over other screen displays.
. The image of the rear view camera
has priority over other screen displays.
. The image of the rear view camera is
horizontally reversed as is the case
with the vehicle rearview mirror or the
side view mirror.
. It may be difficult to see the image of
the rear view camera in the following
cases. This is not a malfunction of the
camera.
–The vehicle is used for towing or
a trailer hitch is installed.
– The vehicle is in a dark place (at
night, in a tunnel, etc.).
– The vehicle is in an extremely hot
or cold place.
– An object (such as raindrops,
snow, dirt, etc.) that disturbs the
view of the rear view camera sticks to the lens of the camera.
–
Strong light shined directly on
the camera lens (occasionally, there
are vertical lines on the screen).& Viewing range on the screen
CAUTION
The range that can be viewed with
the rear view camera is limited.
Always be sure to check with your
eyes when moving backward and
proceed slowly.
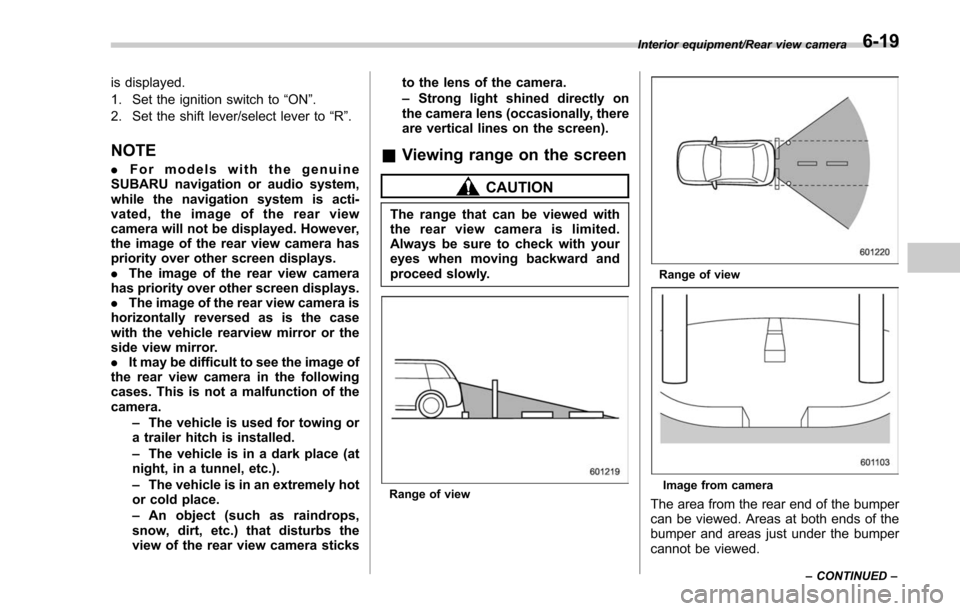
Range of view
Range of view
Image from camera
The area from the rear end of the bumper
can be viewed. Areas at both ends of the
bumper and areas just under the bumper
cannot be viewed.
Interior equipment/Rear view camera
–CONTINUED –6-19
Page 408 of 634

&Fuel filler lid and cap
! Refueling
Only one person should be involved in
refueling. Do not allow others to approach
the area of the vehicle near the fuel filler
pipe while refueling is in progress.
Be sure to observe any other precautions
that are posted at the service station.
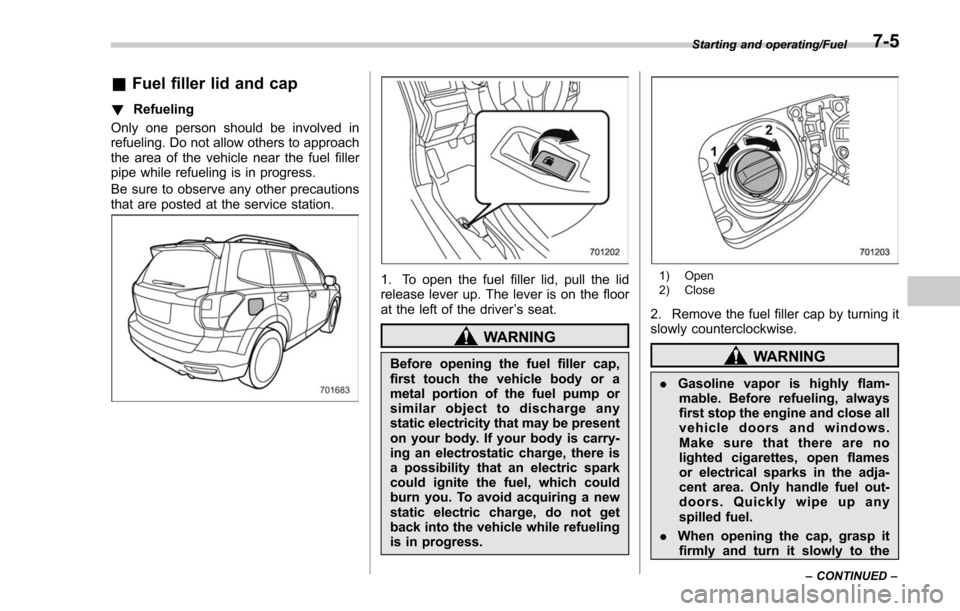
1. To open the fuel filler lid, pull the lid
release lever up. The lever is on the floor
at the left of the driver ’s seat.
WARNING
Before opening the fuel filler cap,
first touch the vehicle body or a
metal portion of the fuel pump or
similar object to discharge any
static electricity that may be present
on your body. If your body is carry-
ing an electrostatic charge, there is
a possibility that an electric spark
could ignite the fuel, which could
burn you. To avoid acquiring a new
static electric charge, do not get
back into the vehicle while refueling
is in progress.
1) Open
2) Close
2. Remove the fuel filler cap by turning it
slowly counterclockwise.
WARNING
. Gasoline vapor is highly flam-
mable. Before refueling, always
first stop the engine and close all
vehicle doors and windows.
Make sure that there are no
lighted cigarettes, open flames
or electrical sparks in the adja-
cent area. Only handle fuel out-
doors. Quickly wipe up any
spilled fuel.
. When opening the cap, grasp it
firmly and turn it slowly to the
Starting and operating/Fuel
–CONTINUED –7-5
Page 409 of 634

Starting and operating/Fuel
left. Do not remove the cap
quickly. Fuel may be under pres-
sure and spray out of the fuel
filler neck, especially in hot
weather. If you hear a hissing
sound while you are removing
the cap, wait for the sound to
stop and then slowly open the
cap to prevent fuel from spraying
out and creating a fire hazard.
3. Set the fuel filler cap on the cap holder
inside the fuel filler lid.
WARNING
.When refueling, insert the fuel
nozzle securely into the fuel filler
pipe. If the nozzle is lifted or not
fully inserted, its automatic stop- ping mechanism may not func-
tion, causing fuel to overflow the
tank and creating a fire hazard.
. Stop refueling when the auto-
matic stop mechanism on the
fuel nozzle activates. If you con-
tinue to add fuel, temperature
changes or other conditions
may cause fuel to overflow from
the tank and create a fire hazard.
4. Stop filling the tank after the fuel filler
pump automatically stops. Do not add any
more fuel.
5. Put the cap back on, turn it clockwise
until you hear a clicking noise. Be certain
not to catch the tether under the cap while
tightening.
6. Close the fuel filler lid completely.
If you spill any fuel on the painted surface,
rinse it off immediately. Otherwise, the
painted surface could be damaged.
NOTE
. You will see the “”sign in the fuel
gauge. This indicates that the fuel filler
door (lid) is located on the right side of
the vehicle.
. If the fuel filler cap is not tightened
until it clicks or if the tether is caught
under the cap, the CHECK ENGINE warning light/malfunction indicator
light may illuminate. Refer to
“CHECK
ENGINE warning light/Malfunction in-
dicator light ”F 3-16.
CAUTION
. Never add any cleaning agents to
the fuel tank. The addition of a
cleaning agent may cause da-
mage to the fuel system.
. After refueling, turn the cap to the
right until it clicks to ensure that
it is fully tightened. If the cap is
not securely tightened, fuel may
leak out while the vehicle is being
driven or fuel spillage could
occur in the event of an accident,
creating a fire hazard.
. Do not let fuel spill on the exterior
surfaces of the vehicle. Because
fuel may damage the paint, be
sure to wipe off any spilled fuel
quickly. Paint damage caused by
spilled fuel is not covered under
the SUBARU Limited Warranty.
. Always use a genuine SUBARU
fuel filler cap. If you use the
wrong cap, it may not fit or have
proper venting and your fuel tank
and emission control system
may be damaged. It could also
7-6
Page 413 of 634

Starting and operating/Starting and stopping the engine (models without push–button start system)
. When starting the engine, be sure
to sit in the driver ’s seat (except
when using the remote engine
start system).
NOTE
. Avoid rapid racing and rapid accel-
eration immediately after the engine
has started.
. For a short time after the engine has
started, the engine speed is kept high.
When the warm-up is completed, the
engine speed lowers automatically.
. On rare occasions, it may be difficult
to start the engine depending on the
fuel and the usage condition (repeated
driving of a distance in which the
engine has not warmed up sufficiently).
In such a case, it is recommended that
you change to a different brand of fuel.
. On rare occasions, transient knock-
ing may be heard from the engine when
the accelerator is operated rapidly
such as a rapid start-up and a rapid
acceleration. This is not a malfunction.
. The engine starts more easily when
the headlights, air conditioner and rear
window defogger are turned off.
. After the engine starts, the engine
speed will be kept high until the engine
has warmed up sufficiently. !
MT models
1. Apply the parking brake.
2. Turn off unnecessary lights and ac-
cessories.
3. Depress the clutch pedal to the floor
and shift the shift lever into neutral. Hold
the clutch pedal to the floor while starting
the engine.
The starter motor will only operate when
the clutch pedal is depressed fully to the
floor.
4. Turn the ignition switch to the “ON”
position and check the operation of the
warning and indicator lights. Refer to
“Warning and indicator lights ”F 3-13.
5. Turn the ignition switch to the “START”
position without depressing the accelera-
tor pedal. Release the key immediately
after the engine has started.
If the engine does not start, try the
following procedure.
(1) Turn the ignition switch to the
“OFF ”position and wait for at least
10 seconds. After checking that the
parking brake is firmly set, turn the
ignition switch to the “START”position
while depressing the accelerator pedal
slightly (approximately a quarter of the
full stroke). Release the accelerator
pedal as soon as the engine starts.
(2) If this fails to start the engine, turn the ignition switch back to the
“OFF”
position and wait for at least 10
seconds. Then fully depress the accel-
erator pedal and turn the ignition
switch to the “START”position. If the
engine starts, quickly release the
accelerator pedal.
(3) If this fails to start the engine, turn
the ignition switch again to the “OFF”
position. After waiting for 10 seconds
or longer, turn the ignition switch to the
“START ”position without depressing
the accelerator pedal.
(4) If the engine still does not start,
contact your nearest SUBARU dealer
for assistance.
6. Confirm that all warning and indicator
lights have turned off after the engine has
started. The fuel injection system auto-
matically lowers the idle speed as the
engine warms up.
! CVT models
1. Apply the parking brake.
2. Turn off unnecessary lights and ac-
cessories.
3. Shift the select lever to the “P”or “N
”
position (preferably the “P”position).
The
starter motor will only operate when
the select lever is at the “P”or “N”position.
4. Turn the ignition switch to the “ON”
7-10
Page 414 of 634

position and check the operation of the
warning and indicator lights. Refer to
“Warning and indicator lights”F 3-13.
5. Turn the ignition switch to the “START”
position without depressing the accelera-
tor pedal. Release the key immediately
after the engine has started.
If the engine does not start, try the
following procedure.
(1) Turn the ignition switch to the
“OFF ”position and wait for at least
10 seconds. After checking that the
parking brake is firmly set, turn the
ignition switch to the “START”position
while depressing the accelerator pedal
slightly (approximately a quarter of the
full stroke). Release the accelerator
pedal as soon as the engine starts.
(2) If this fails to start the engine, turn
the ignition switch back to the “OFF”
position and wait for at least 10
seconds. Then fully depress the accel-
erator pedal and turn the ignition
switch to the “START ”position. If the
engine starts, quickly release the
accelerator pedal.
(3) If this fails to start the engine, turn
the ignition switch again to the “OFF”
position. After waiting for 10 seconds
or longer, turn the ignition switch to the
“START ”position without depressing
the accelerator pedal. (4) If the engine still does not start,
contact your nearest SUBARU dealer
for assistance.
6. Confirm that all warning and indicator
lights have turned off after the engine has
started. The fuel injection system auto-
matically lowers the idle speed as the
engine warms up.
While the engine is warming up, make
sure that the select lever is at the “P ” or
“N ”position and that the parking brake is
applied.
CAUTION
If you restart the engine while the
vehicle is moving, shift the select
lever into the “N ” position. Do not
attempt to place the select lever of a
moving vehicle into the “P ” posi-
tion.
& Stopping the engine
The ignition switch should be turned off
only when the vehicle is stopped and the
engine is idling.
WARNING
Do not stop the engine when the
vehicle is moving. This will cause
loss of power to the power steering and the brake booster, making steer-
ing and braking more difficult. It
could also result in accidental acti-
vation of the
“LOCK ”position on the
ignition switch, causing the steering
wheel to lock.
Starting and operating/Starting and stopping the engine (models without push –button start system)7-11
Page 423 of 634

Starting and operating/Remote engine start system (dealer option)
&Remote transmitter program
(models without “keyless ac-
cess with push-button start
system ”)
New transmitters can be programmed to
the remote engine start system in the
event that a transmitter is lost, stolen,
damaged or additional transmitters are
desired (the system will accept up to eight
transmitters). New remote engine start
transmitters can be programmed accord-
ing to the following procedure.
1. Open the driver ’s door (the driver ’s
door must remain opened throughout the
entire process).
2. Depress and hold the brake pedal.
3. Turn the ignition switch to “ON”then
“LOCK” , back to “ON”then “LOCK ”, back
to “ON ”then “LOCK”, then back to “ON”
again and leave the ignition “ON”through-
out the programming process.
4. The system will flash the side marker
lights, tail lights and parking lights and
honk the horn three times, indicating that
the system has entered the transmitter
learn mode.
5. Press and release the “
”button on
the transmitter that you want to program.
6. The system will flash the side marker
lights, tail lights and parking lights and honk the horn one time, indicating that the
system has learned the transmitter. Upon
successful programming, the remote start
confirmation transmitter button will flash
one time.
7. Repeat step 5 for any additional
transmitters (the system will accept up to
eight transmitters).
8. The system will exit the transmitter
learn mode if the key is turned to the
“LOCK”
position, the door is closed or
after 2 minutes.
& System maintenance
NOTE
For models without “keyless access
with push-button start system ”:
In the event that the vehicle ’s battery is
replaced, discharged or disconnected,
it will be necessary to start the vehicle
a minimum of one time using the key
prior to activating the remote engine
start system. This is required to allow
the vehicle electronic systems to re-
synchronize. !
Changing the battery
CAUTION
.Do not let dust, oil or water get on
or in the remote engine start
transmitter when replacing the
battery.
. Be careful not to damage the
printed circuit board in the re-
mote engine start transmitter
when replacing the battery.
. Be careful not to allow children to
touch the battery and any re-
moved parts; children could
swallow them.
. There is a danger of explosion if
an incorrect replacement battery
is used. Replace only with the
same or equivalent type of bat-
tery.
. Batteries should not be exposed
to excessive heat such as sun-
shine, fire or the like.
For models with “keyless access with
push-button start system ”:
Perform the procedure described in “Re-
placing battery of access key ”F 11-45.
7-20
Page 429 of 634

Starting and operating/Continuously variable transmission
Type B
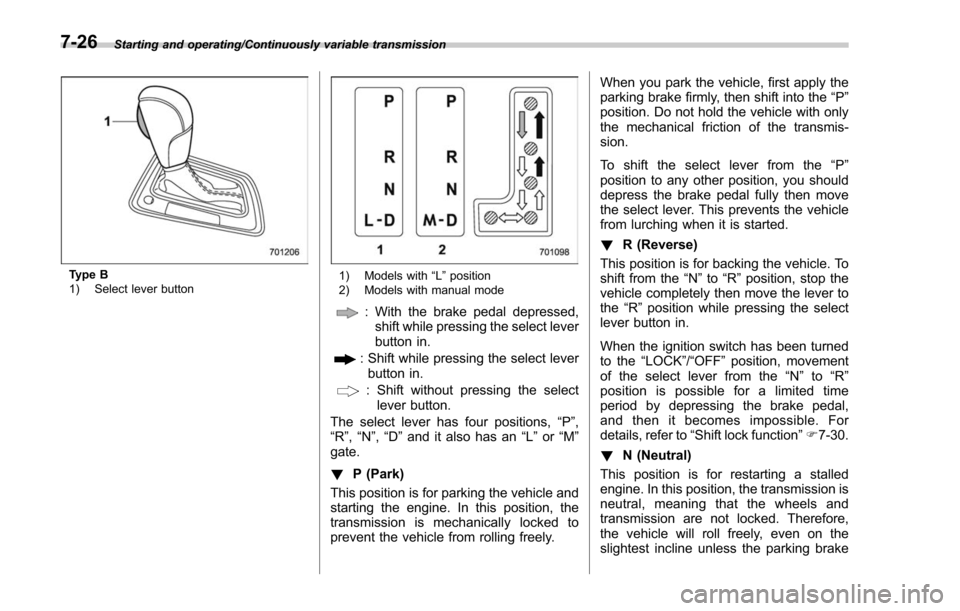
1) Select lever button1) Models with“L ” position
2) Models with manual mode
: With the brake pedal depressed, shift while pressing the select lever
button in.
: Shift while pressing the select leverbutton in.
: Shift without pressing the select lever button.
The select lever has four positions, “P”,
“R ”,“N ”,“D ”and it also has an “L”or “M”
gate.
! P (Park)
This position is for parking the vehicle and
starting the engine. In this position, the
transmission is mechanically locked to
prevent the vehicle from rolling freely. When you park the vehicle, first apply the
parking brake firmly, then shift into the
“P ”
position. Do not hold the vehicle with only
the mechanical friction of the transmis-
sion.
To shift the select lever from the “P ”
position to any other position, you should
depress the brake pedal fully then move
the select lever. This prevents the vehicle
from lurching when it is started.
! R (Reverse)
This position is for backing the vehicle. To
shift from the “N ”to “R”position, stop the
vehicle completely then move the lever to
the “R”position while pressing the select
lever button in.
When the ignition switch has been turned
to the “LOCK”/ “OFF”position, movement
of the select lever from the “N”to “R”
position is possible for a limited time
period by depressing the brake pedal,
and then it becomes impossible. For
details, refer to “Shift lock function ”F 7-30.
! N (Neutral)
This position is for restarting a stalled
engine. In this position, the transmission is
neutral, meaning that the wheels and
transmission are not locked. Therefore,
the vehicle will roll freely, even on the
slightest incline unless the parking brake
7-26