2017 SUBARU FORESTER back light
[x] Cancel search: back lightPage 49 of 634

Seat, seatbelt and SRS airbags/Seatbelts
the ELR mode, refer to“Installing child
restraint systems with ALR/ELR seatbelt ”
F 1-32.
&Seatbelt warning light
and chime
Refer to “Seatbelt warning light and
chime ”F 3-14.
& Fastening the seatbelt
WARNING
. Never use a belt that is twisted or
reversed. In an accident, this can
increase the risk or severity of
injury.
. Keep the lap belt as low as
possible on your hips. In a colli-
sion, this spreads the force of the
lap belt over stronger hip bones
instead of across the weaker
abdomen.
. Seatbelts provide maximum re-
straint when the occupant sits
well back and upright in the seat.
To reduce the risk of sliding
under the seatbelt in a collision,
the front seatbacks should be
always used in the upright posi-
tion while the vehicle is running. If the front seatbacks are not
used in the upright position in a
collision, the risk of sliding under
the lap belt and of the lap belt
sliding up over the abdomen will
increase, and both can result in
serious internal injury or death.
. Do not put cushions or any other
materials between occupants
and seatbacks or seat cushions.
If you do so, the risk of sliding
under the lap belt and of the lap
belt sliding up over the abdomen
will increase, and both can result
in serious internal injury or
death.
WARNING
Never place the shoulder belt under
the arm or behind the back. If an
accident occurs, this can increase
the risk or severity of injury.
CAUTION
Metallic parts of the seatbelt can
become very hot in a vehicle that
has been closed up in sunny weath-
er; they could burn an occupant. Do
not touch such hot parts until they
cool.
! Front seatbelts
1. Adjust the seat position according to
the following procedure.
Driver ’s seat: Adjust the seatback to the
upright position. Move the seat as far from
the steering wheel as practical while still
maintaining full vehicle control.
Front passenger ’s seat: Adjust the seat-
back to the upright position. Move the seat
as far back as possible.
2. Sit well back in the seat.
3. Pick up the tongue plate and pull the
belt out slowly. Do not let it get twisted.
.If the belt stops before reaching the
1-18
Page 51 of 634

Seat, seatbelt and SRS airbags/Seatbelts
WARNING
When wearing the seatbelts, make
sure the shoulder portion of the
webbing does not pass over your
neck. If it does, adjust the seatbelt
anchor to a lower position. Placing
the shoulder belt over the neck may
result in neck injury during sudden
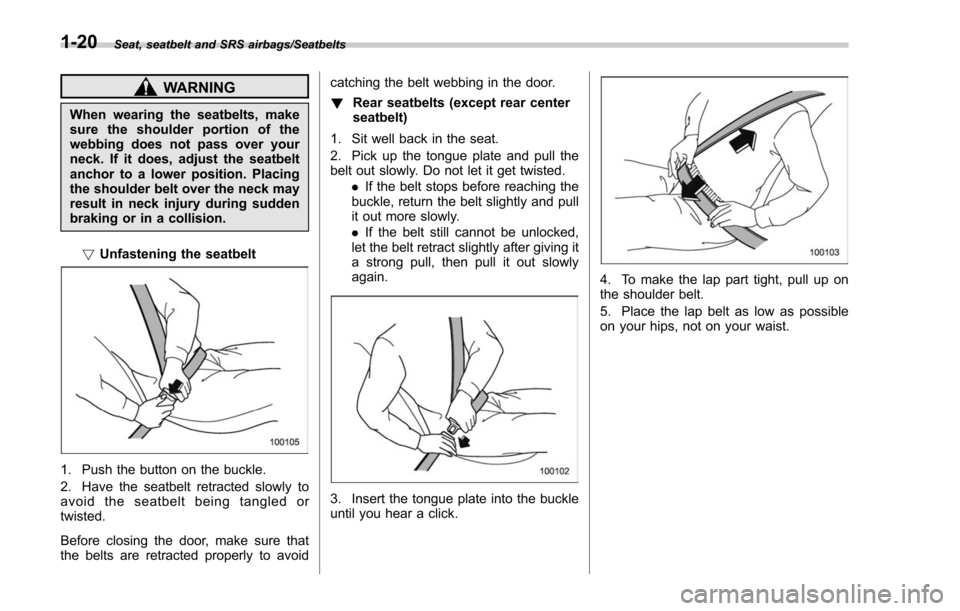
braking or in a collision.! Unfastening the seatbelt
1. Push the button on the buckle.
2. Have the seatbelt retracted slowly to
avoid the seatbelt being tangled or
twisted.
Before closing the door, make sure that
the belts are retracted properly to avoid catching the belt webbing in the door.
!
Rear seatbelts (except rear center
seatbelt)
1. Sit well back in the seat.
2. Pick up the tongue plate and pull the
belt out slowly. Do not let it get twisted. .If the belt stops before reaching the
buckle, return the belt slightly and pull
it out more slowly.
. If the belt still cannot be unlocked,
let the belt retract slightly after giving it
a strong pull, then pull it out slowly
again.
3. Insert the tongue plate into the buckle
until you hear a click.
4. To make the lap part tight, pull up on
the shoulder belt.
5. Place the lap belt as low as possible
on your hips, not on your waist.
1-20
Page 65 of 634

Seat, seatbelt and SRS airbags/Child restraint systems
8. To remove the child restraint system,
press the release button on the seatbelt
buckle and allow the belt to retract
completely. The belt will return to the
ELR mode.
WARNING
NEVER INSTALL A FORWARD OR
REARWARD FACING CHILD SEAT
IN THE FRONT PASSENGER’S
SEAT. DOING SO RISKS SERIOUS
INJURY OR DEATH TO THE CHILD
BY PLACING THE CHILD ’S HEAD
TOO CLOSE TO THE SRS AIRBAG.
NOTE
When the child restraint system is no
longer in use, remove it and restore the
ELR function of the retractor. That
function is restored by allowing the
seatbelt to retract fully.
! Installing forward facing child re-
straint
WARNING
Before installing a child restraint
system, be sure to confirm that the
seatback is securely locked into
place. Otherwise, in an accident,
serious injury or death could result.
1. Shake the seatback slightly to confirm
that it is securely locked into place. –It is possible to check whether the
seatback is locked visually. If the
seatback is locked into place, the red
colored unlocking marker which is
attached to the bottom of the lock
release knob is invisible. For details,
refer to “Folding down the rear seat-
back ”F 1-13.
2. Remove the head restraint of the rear
seating position where the child restraint
system is to be installed. For details, refer
to “Head restraint adjustment ”F 1-12.
CAUTION
Store the head restraint that has
been removed in the cargo area.
Avoid placing the head restraint in
the passenger compartment to pre-
vent it from being thrown around in
the passenger compartment in a
sudden stop or a sharp turn.
3. For models with rear seat reclining
mechanism, adjust the seatback to the
upright position.
4. Place the child restraint system in the
rear seating position.
WARNING
When you intend to install a child
restraint system on the rear center
seating position, if the child restraint
system does not fit snugly against
the contours of the rear center seat
cushion, install the child restraint
system on the window-side seating
position to be safe. For details, refer
to “Where to place a child restraint
system ”F 1-30.
1-34
Page 70 of 634

seatback is securely locked into
place. Otherwise, in an accident,
serious injury or death could result.
1. Shake the seatback slightly to confirm
that it is securely locked into place. –It is possible to check whether the
seatback is locked visually. If the
seatback is locked into place, the red
colored unlocking marker which is
attached to the bottom of the lock
release knob is invisible. For details,
refer to “Folding down the rear seat-
back ”F 1-13.
2. You will find marks “”at the bottom of
the rear seat seatbacks. These marks
indicate the positions of the lower an-
chorages (bars).
Remove the covers and locate the lower
anchorages (bars).
3. Remove the rear seat head restraint.
For details, refer to “Head restraint adjust-
ment ”F 1-12.
CAUTION
Store the head restraint that has
been removed in the cargo area.
Avoid placing the head restraint in
the passenger compartment to pre-
vent it from being thrown around in
the passenger compartment in a
sudden stop or a sharp turn.
4. For models with rear seat reclining
mechanism, adjust the seatback to the
upright position.
5. While following the instructions sup-
plied by the child restraint system manu-
facturer, connect the lower hooks onto the
lower anchorages located at “
”marks on
the bottom of the rear seatback. When the
hooks are connected, make sure the
adjacent seatbelts are not caught.
Seat, seatbelt and SRS airbags/Child restraint systems
–CONTINUED –1-39
Page 76 of 634

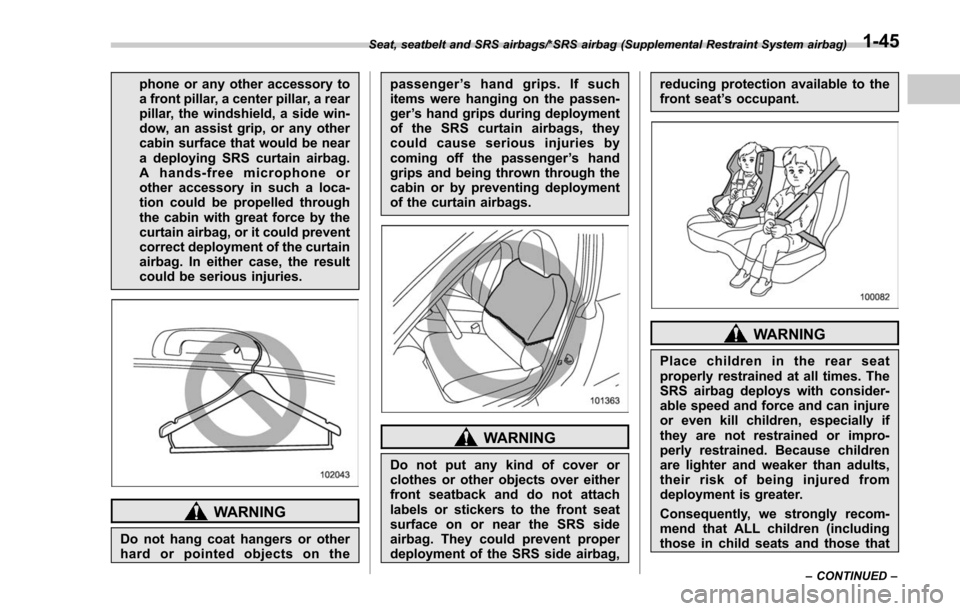
phone or any other accessory to
a front pillar, a center pillar, a rear
pillar, the windshield, a side win-
dow, an assist grip, or any other
cabin surface that would be near
a deploying SRS curtain airbag.
A hands-free microphone or
other accessory in such a loca-
tion could be propelled through
the cabin with great force by the
curtain airbag, or it could prevent
correct deployment of the curtain
airbag. In either case, the result
could be serious injuries.
WARNING
Do not hang coat hangers or other
hard or pointed objects on thepassenger
’s hand grips. If such
items were hanging on the passen-
ger ’s hand grips during deployment
of the SRS curtain airbags, they
could cause serious injuries by
coming off the passenger ’s hand
grips and being thrown through the
cabin or by preventing deployment
of the curtain airbags.
WARNING
Do not put any kind of cover or
clothes or other objects over either
front seatback and do not attach
labels or stickers to the front seat
surface on or near the SRS side
airbag. They could prevent proper
deployment of the SRS side airbag, reducing protection available to the
front seat
’s occupant.
WARNING
Place children in the rear seat
properly restrained at all times. The
SRS airbag deploys with consider-
able speed and force and can injure
or even kill children, especially if
they are not restrained or impro-
perly restrained. Because children
are lighter and weaker than adults,
their risk of being injured from
deployment is greater.
Consequently, we strongly recom-
mend that ALL children (including
those in child seats and those that
Seat, seatbelt and SRS airbags/*SRS airbag (Supplemental Restraint System airbag)
–CONTINUED –1-45
Page 83 of 634

Seat, seatbelt and SRS airbags/*SRS airbag (Supplemental Restraint System airbag)
back and seat cushion.
. Do not spill liquid on the front
passenger ’s seat. If liquid is
spilled, wipe it off immediately.
. Do not remove or disassemble
the front passenger ’s seat.
. Do not install any accessory
(such as an audio amplifier) other
than a genuine SUBARU acces-
sory under the front passenger ’s
seat.
. Do not place anything (shoes,
umbrella, etc.) under the front
passenger ’s seat.
. Do not use the front passenger ’s
seat with the head restraint re-
moved.
. Do not leave any articles on the
front passenger ’s seat or the
seatbelt tongue and buckle en-
gaged when you leave your ve-
hicle.
. Do not put sharp object(s) on the
seat or pierce the seat uphols-
tery.
. Do not place a magnet near the
seatbelt buckle and the seatbelt
retractor.
. Do not use front seats with their
backward-forward position and seatback not being locked into
place securely. If any of them are
not locked securely, adjust them
again. For adjusting procedure,
refer to
“Manual seat ”F1-4
(models equipped with manual
seats only).
If the seatbelt buckle switch and/or front
passenger ’s occupant detection system
have failed, the SRS airbag system
warning light will illuminate. Have the
system inspected by your SUBARU deal-
er immediately if the SRS airbag system
warning light illuminates.
If your vehicle has sustained impact, this
may affect the proper function of the
SUBARU advanced frontal airbag system.
Have your vehicle inspected at your
SUBARU dealer. Do not use the front
passenger ’s seat while driving the vehicle
to your SUBARU dealer.
! Passenger ’s frontal airbag ON and
OFF indicators
Refer to “Front passenger ’s frontal airbag
ON and OFF indicators ”F 3-16.
! Occupant detection system
The occupant detection system sensor is
installed under the seat upholstery and
monitors the physique and posture of the
front passenger. Using this information, the occupant detection system determines
whether the front passenger
’s SRS frontal
airbag should be deployed or not.
If the front passenger ’s seat cushion is
wet, this may adversely affect the ability of
the system to determine deployment. If
the seat cushion is wet, the front passen-
ger should stop sitting on the front
passenger ’s seat. Wipe off liquid from
the seat immediately, let the seat dry
naturally and then check that the front
passenger ’s frontal airbag ON and OFF
indicators
work properly.
ON /: Front passenger ’s frontal airbag ON
indicator
/: Front passenger ’s frontal airbag OFF
indicator
If the front passenger ’s frontal airbag ON
1-52
Page 166 of 634

operation that follows the 6-second
warning after turning ON the ignition
switch. When the ignition switch is
turned ON next time, however, the
complete sequence of the warning
operation resumes. For further details
about canceling the warning operation,
please contact your SUBARU dealer.
If there is no passenger on the front
passenger’s seat, the seatbelt warning
device for the front passenger ’s seat will
be deactivated. The front passenger ’s
occupant detection system monitors
whether or not there is a passenger on
the front passenger ’s seat.
Observe the following precautions. Failure
to do so may prevent the device from
functioning correctly or cause the device
to fail.
. Do not install any accessory such as a
table or TV onto the seatback.
. Do not store a heavy load in the
seatback pocket.
. Do not allow the rear seat occupant to
place his/her hands or legs on the front
passenger ’s seatback, or allow him/her to
pull the seatback.
. Do not use front seats with their back-
ward-forward position and seatback not
being locked into place securely. If any of
them are not locked securely, adjust them again. For adjusting procedure, refer to
“Front seats
”F 1-2.
If the seatbelt warning device for the front
passenger ’s seat does not function cor-
rectly (e.g., it is activated even when the
front passenger ’s seat is empty or it is
deactivated even when the front passen-
ger has not fastened his/her seatbelt),
take the following actions.
. Ensure that no article is placed on the
seat other than a child restraint system
and its child occupant, although we
strongly recommend that all children sit
in the rear seat properly restrained.
. Ensure that there is no article left in the
seatback pocket.
. Ensure that the backward-forward po-
sition and seatback of front passenger ’s
seat are locked into place securely by
moving the seat back and forth.
If still the seatbelt warning device for front
passenger ’s seat does not function cor-
rectly after taking relevant corrective ac-
tions described above, immediately con-
tact your SUBARU dealer for an inspec-
tion.&SRS airbag system
warning light
WARNING
If the warning light exhibits any of
the following conditions, there may
be a malfunction in the seatbelt
pretensioners and/or SRS airbag
system. Immediately take your vehi-
cle to your nearest SUBARU dealer
to have the system checked. Unless
checked and properly repaired, the
seatbelt pretensioners and/or SRS
airbag will not operate properly in
the event of a collision, which may
increase the risk of injury.
. Flashing or flickering of the warn-
ing light
. No illumination of the warning
light when the ignition switch is
first turned to the “ON ”position
. Continuous illumination of the
warning light
. Illumination of the warning light
while driving
For more details about the SRS airbag
system warning light, refer to “SRS airbag
system monitors ”F 1-69.
Instruments and controls/Warning and indicator lights
–CONTINUED –3-15
Page 207 of 634

Instruments and controls/Multi function display
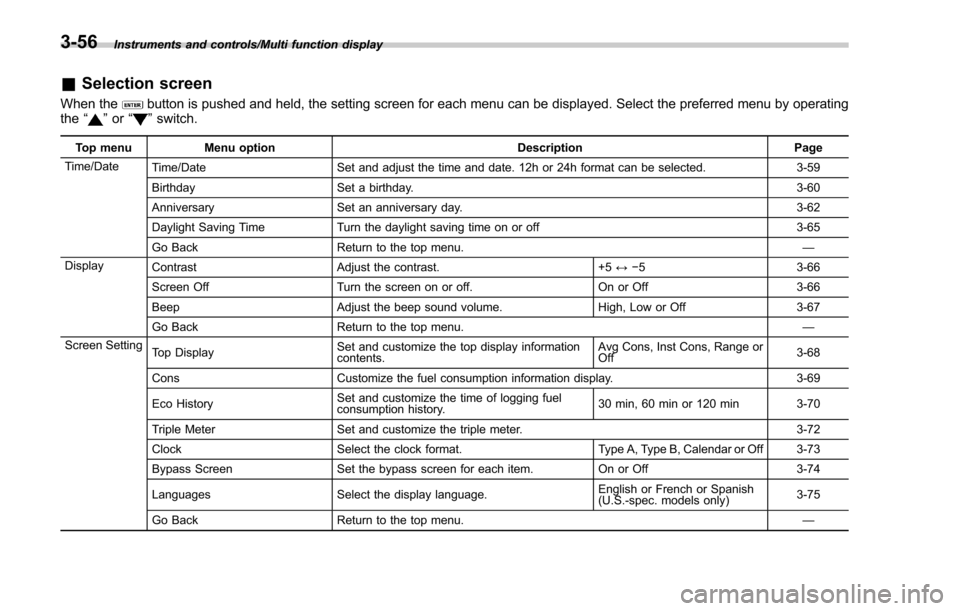
&Selection screen
When thebutton is pushed and held, the setting screen for each menu can be displayed. Select the preferred menu by operating
the “”or “”switch.
Top menu Menu option DescriptionPage
Time/Date Time/Date Set and adjust the time and date. 12h or 24h format can be selected. 3-59
Birthday Set a birthday. 3-60
Anniversary Set an anniversary day. 3-62
Daylight Saving Time Turn the daylight saving time on or off 3-65
Go Back Return to the top menu. —
Display Contrast Adjust the contrast. +5↔−53 -6 6
Screen Off Turn the screen on or off. On or Off3-66
Beep Adjust the beep sound volume. High, Low or Off3-67
Go Back Return to the top menu. —
Screen Setting Top Display Set and customize the top display information
contents. Avg Cons, Inst Cons, Range or
Off
3-68
Cons Customize the fuel consumption information display. 3-69
Eco History Set and customize the time of logging fuel
consumption history. 30 min, 60 min or 120 min 3-70
Triple Meter Set and customize the triple meter. 3-72
Clock Select the clock format. Type A, Type B, Calendar or Off 3-73
Bypass Screen Set the bypass screen for each item. On or Off3-74
Languages Select the display language. English or French or Spanish
(U.S.-spec. models only)
3-75
Go Back Return to the top menu. —
3-56