2017 SUBARU FORESTER back light
[x] Cancel search: back lightPage 208 of 634
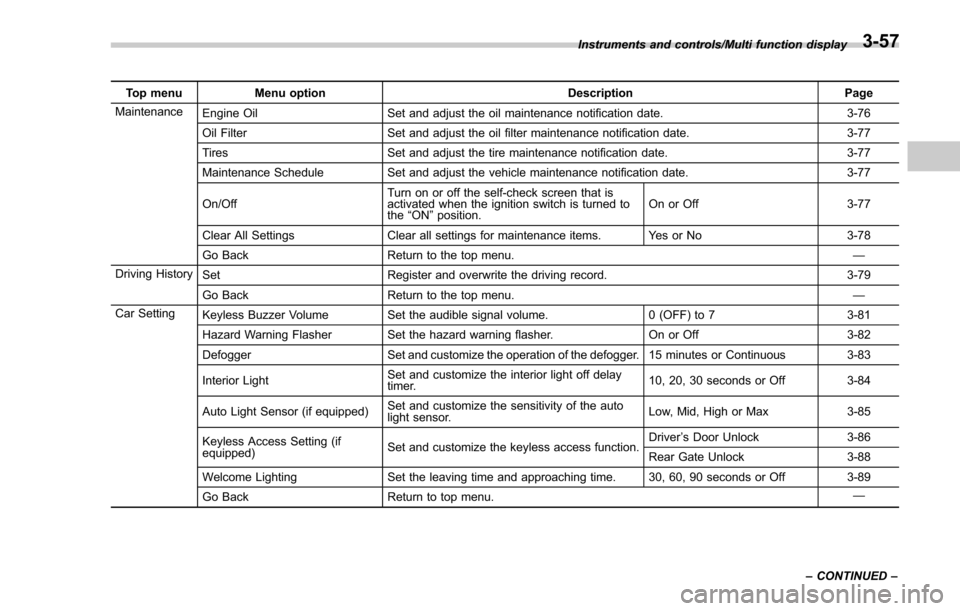
Top menuMenu option DescriptionPage
Maintenance Engine Oil Set and adjust the oil maintenance notification date. 3-76
Oil Filter Set and adjust the oil filter maintenance notification date. 3-77
Tires Set and adjust the tire maintenance notification date. 3-77
Maintenance Schedule Set and adjust the vehicle maintenance notification date. 3-77
On/Off Turn on or off the self-check screen that is
activated when the ignition switch is turned to
the
“ON ”position. On or Off
3-77
Clear All Settings Clear all settings for maintenance items. Yes or No 3-78
Go Back Return to the top menu. —
Driving History Set Register and overwrite the driving record. 3-79
Go Back Return to the top menu. —
Car Setting Keyless Buzzer Volume Set the audible signal volume. 0 (OFF) to 73-81
Hazard Warning Flasher Set the hazard warning flasher. On or Off3-82
Defogger Set and customize the operation of the defogger. 15 minutes or Continuous 3-83
Interior Light Set and customize the interior light off delay
timer. 10, 20, 30 seconds or Off
3-84
Auto Light Sensor (if equipped) Set and customize the sensitivity of the auto
light sensor. Low, Mid, High or Max
3-85
Keyless Access Setting (if
equipped) Set and customize the keyless access function. Driver
’s Door Unlock 3-86
Rear Gate Unlock 3-88
Welcome Lighting Set the leaving time and approaching time. 30, 60, 90 seconds or Off 3-89
Go Back Return to top menu. —
Instruments and controls/Multi function display
–CONTINUED –
3-57
Page 246 of 634

!Sensor for the auto on/off head-
lights (if equipped)
The sensor is on the instrument panel as
shown in the illustration.
CAUTION
If any object is placed on or near the
sensor, the sensor may not detect
the level of the ambient light cor-
rectly and the auto on/off headlights
may not operate properly.
&High/low beam change
(dimmer)
To change from low beam to high beam,
push the turn signal lever forward. When
the headlights are on high beam, the high
beam indicator light “
”on the combina-
tion meter is also on.
To switch back to low beam, pull the lever
back to the center position.
! High beam assist function (if
equipped)
NOTE
.The high beam assist function uti-
lizes the stereo camera installed at the
position of the front map lights.
. For details on how to handle the
stereo camera, refer to the Owner ’s
Manual supplement for the EyeSight system.
The high beam assist function automati-
cally changes the headlight from high
beam to low beam (or vice versa).
When all of the following conditions are
met, the headlight will change to high
beam.
.
When the vehicle speed increases to
or above 20 mph (32 km/h).
. There is no preceding or oncoming
vehicle.
. The forward area of the vehicle is dark.
. The road does not have a sharp curve.
When any of the following conditions is
met, the headlight will change to low
beam.
. When the vehicle speed decreases to
or below 10 mph (16 km/h).
. When the forward area of the vehicle is
bright.
. When there is a preceding or oncoming
vehicle.
. When the EyeSight system is malfunc-
tioning or is temporarily stopped.NOTE
The factory setting (default setting) for
this function is set as “operational ”.
This setting can be changed to OFF
(non-operation) at SUBARU dealers.
Instruments and controls/Light control switch
–CONTINUED –3-95
Page 253 of 634

Instruments and controls/Headlight beam leveler
Headlight beam leveler (if
equipped)
&Automatic headlight beam
leveler (models with LED
headlights)
The LED headlights generate more light
than conventional halogen headlights.
Therefore a driver of an oncoming vehicle
may experience too much glare if your
headlight beam height adjustment is high
when the vehicle is carrying a heavy load.
The automatic headlight beam leveler
adjusts the headlight beam height auto-
matically and optimally according to the
load being carried by the vehicle.
Fog light switch (if equipped)
1) Headlight switch
2) Fog light switch
The front fog lights will turn on when the
fog light switch is placed in the “”
position while the headlights are in the
following condition.
. while the headlight switch is in the “
”
position
. for models with the auto on/off head-
lights, while the headlight switch is in the
“AUTO ”position and the headlights turn
on automatically
To turn off the front fog lights, turn the
switch back down to the “
”position.
Front fog light indicator (type A)
Front fog light indicator (type B)
The indicator light on the combination
meter will illuminate when the front fog
lights are illuminated.
3-102
Page 278 of 634
Automatic climate control
operation (type B, C and D)
When this mode is selected, the fan
speed, airflow distribution, air-inlet control,
and air conditioner compressor operation
are automatically controlled. To activate
this mode, perform the following.
NOTE
.Operate the automatic climate con-
trol system when the engine is running.
. Even when cooling is not necessary,
setting the temperature much lower
than the current outlet air temperature
turns on the air conditioner compres-
sor automatically and the “A/C ”indi-
cator light on the control panel illumi-
nates.
& Type B
1. Turn the airflow mode selection dial
and fan speed control dial to the “AUTO”
position.
2. Set the preferred temperature using
the temperature control dial.
NOTE
. Each function can be individually
set to the AUTO mode independently of
the other functions. Any function set to the AUTO mode is controlled automa-
tically. Any function not set to the
AUTO mode can be manually adjusted
as desired.
.
The controllable temperature range
may vary depending on the regional
specifications of the vehicle.
3. To turn off the climate control system,
turn the fan speed control dial to the “OFF”
position. Then the air inlet selection will be
set as follows.
. when the AUTO mode is selected: OFF
(outside air)
. when the AUTO mode is not selected:
the mode that was selected when turning
off the climate system will be selected.
& Type C and D
1. Depress the “AUTO ”button. The
indicator light “FULL AUTO ”on the display
illuminates.
2. Set the preferred temperature using
the temperature control dial.
NOTE
. The controllable temperature range
may vary depending on the regional
specifications of the vehicle.
. During FULL AUTO mode operation,
a small amount of air may flow from the
foot outlets when ventilation mode is displayed.
.
If you operate any of the buttons on
the control panel other than the “OFF ”
button, rear window defogger button
and temperature control dial(s) during
FULL AUTO mode operation, the
“ FULL ”indicator light on the control
panel will turn off and the “AUTO ”
indicator light will remain illuminated.
You can then manually control the
system as desired using the button
you operated. To change the system
back to the FULL AUTO mode, press
the “AUTO ”button.
3. To turn off the climate control system,
press the “OFF ”button. Then the air inlet
selection will be set to OFF (outside air).
Climate control/Automatic climate control operation (type B, C and D)
–CONTINUED –4-7
Page 296 of 634

To clean a disc: Wipe it with a soft, lint-
free cloth that has been dampened with
water. Wipe in a straight line from the
center to the edge of the disc (not in
circles). Dry it with another soft, lint-free
cloth. Do not use a conventional record
cleaner or anti-static device.
!CD-R/RW discs
. CD-R/CD-RW discs that have not been
subject to the “finalizing process ”(a
process that allows discs to be played
on a conventional CD player) cannot be
played.
. It may not be possible to play CD-R/
CD-RW discs recorded on a music CD
recorder or a personal computer because
of disc characteristics, scratches or dirt on
the disc, or dirt, condensation, etc. on the lens of the unit.
.
It may not be possible to play discs
recorded on a personal computer depend-
ing on the application settings and the
environment. Record with the correct
format. (For details, contact the appropri-
ate application manufacturers of the ap-
plications.)
. CD-R/CD-RW discs may be damaged
by direct exposure to sunlight, high tem-
peratures or other storage conditions. The
unit may be unable to play some damaged
discs.
. If you insert a CD-RW disc into the
player, playback will begin more slowly
than with a conventional CD or CD-R disc.
. Recordings on CD-R/CD-RW cannot
be played using the DDCD (Double
Density CD) system.
! USB memory device
. USB communication formats: USB
1.1/2.0 HS (480 Mbps) and FS (12 Mbps)
. File formats: FAT 16/32
. Correspondence class: Mass storage
class
! iPod
The following iPod, iPod nano, iPod
classic, iPod touch and iPhone devices
can be used with this system. Made for
.
iPod touch (5th generation)*
. iPod touch (4th generation)
. iPod touch (3rd generation)
. iPod touch (2nd generation)
. iPod touch (1st generation)
. iPod classic
. iPod nano (7th generation)*
. iPod nano (6th generation)*
. iPod nano (5th generation)
. iPod nano (4th generation)
. iPod nano (3rd generation)
. iPod nano (2nd generation)*
. iPod nano (1st generation)*
. iPhone 5s*
. iPhone 5c*
. iPhone 5*
. iPhone 4s
. iPhone 4
. iPhone 3GS
. iPhone 3G
. iPhone
*: iPod video not supported
Depending on differences between mod-
els or software versions etc., some mod-
els might be incompatible with this sys-
tem.
Audio/Audio set
–CONTINUED –5-9
Page 302 of 634
!Touch screen operation
This system is operated mainly by the
keys on the screen.
When a screen key is touched, a beep
sounds. You can set the beep sound.
Refer to “Unit settings” F5-18.
NOTE
. If the system does not respond to
touching a screen key, move your
finger away from the screen and touch
it again.
. Grayed-out screen keys cannot be
operated.
. The displayed image may become
darker and moving images may be
slightly distorted when the screen is
cold.
. In extremely cold conditions, the
screen may not be displayed correctly.
Also, the screen keys may be less
responsive than usual when pressed.
. When you look at the screen
through polarized material such as
polarized sunglasses, the screen may
be dark and difficult to see. If so, look at
the screen from different angles, adjust
the screen settings or take off your
sunglasses. Refer to “Unit settings ”
F 5-18. !
Entering letters and numbers/list
screen operation
! Entering letters and numbers
When entering the Bluetooth device name
or PIN-code, or the phone number, letters
and numbers can be entered via the
screen.
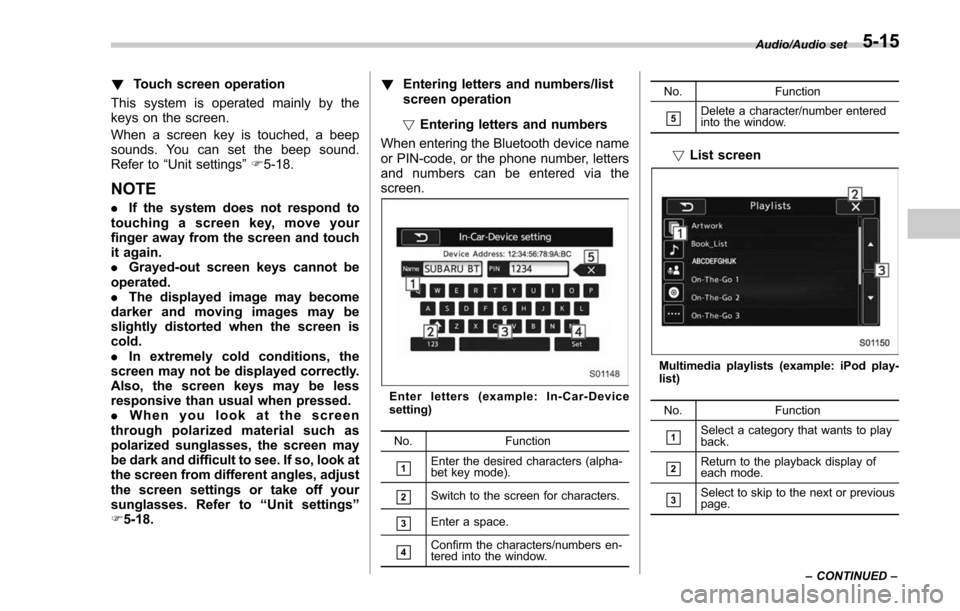
Enter letters (example: In-Car-Device
setting)
No. Function
&1Enter the desired characters (alpha-
bet key mode).
&2Switch to the screen for characters.
&3Enter a space.
&4Confirm the characters/numbers en-
tered into the window. No. Function
&5Delete a character/number entered
into the window.
!
List screen
Multimedia playlists (example: iPod play-
list)
No. Function
&1Select a category that wants to play
back.
&2Return to the playback display of
each mode.
&3Select to skip to the next or previous
page. Audio/Audio set
–CONTINUED –
5-15
Page 389 of 634
Interior equipment/Cup holders
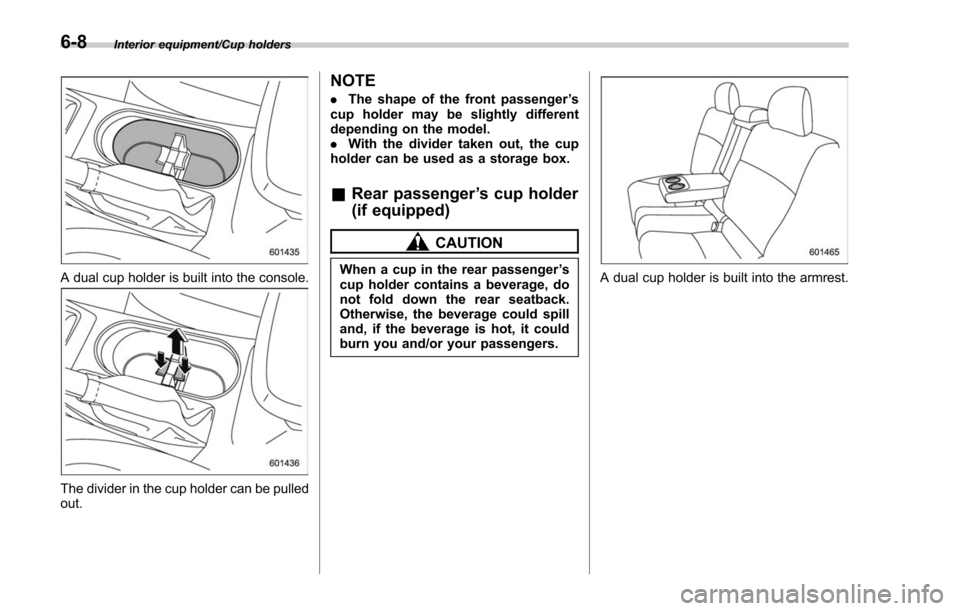
A dual cup holder is built into the console.
The divider in the cup holder can be pulled
out.
NOTE
.The shape of the front passenger ’s
cup holder may be slightly different
depending on the model.
. With the divider taken out, the cup
holder can be used as a storage box.
& Rear passenger ’s cup holder
(if equipped)
CAUTION
When a cup in the rear passenger ’s
cup holder contains a beverage, do
not fold down the rear seatback.
Otherwise, the beverage could spill
and, if the beverage is hot, it could
burn you and/or your passengers.A dual cup holder is built into the armrest.
6-8
Page 395 of 634
Interior equipment/Cargo area cover
Cargo area cover (if
equipped)
The cargo area cover is provided for
covering the cargo area and to protect its
contents from direct sunlight. This cover is
detachable to make room for additional
cargo.
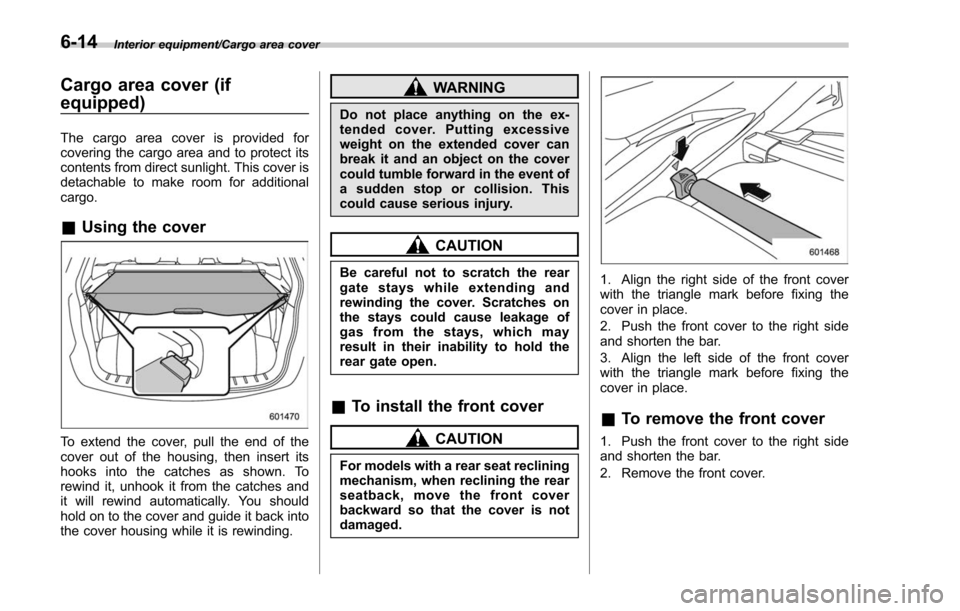
&Using the cover
To extend the cover, pull the end of the
cover out of the housing, then insert its
hooks into the catches as shown. To
rewind it, unhook it from the catches and
it will rewind automatically. You should
hold on to the cover and guide it back into
the cover housing while it is rewinding.
WARNING
Do not place anything on the ex-
tended cover. Putting excessive
weight on the extended cover can
break it and an object on the cover
could tumble forward in the event of
a sudden stop or collision. This
could cause serious injury.
CAUTION
Be careful not to scratch the rear
gate stays while extending and
rewinding the cover. Scratches on
the stays could cause leakage of
gas from the stays, which may
result in their inability to hold the
rear gate open.
&To install the front cover
CAUTION
For models with a rear seat reclining
mechanism, when reclining the rear
seatback, move the front cover
backward so that the cover is not
damaged.
1. Align the right side of the front cover
with the triangle mark before fixing the
cover in place.
2. Push the front cover to the right side
and shorten the bar.
3. Align the left side of the front cover
with the triangle mark before fixing the
cover in place.
&To remove the front cover
1. Push the front cover to the right side
and shorten the bar.
2. Remove the front cover.
6-14