2017 SUBARU FORESTER control
[x] Cancel search: controlPage 456 of 634

Cruise control (if equipped)
NOTE
For models with the EyeSight system:
Refer to the Owner’s Manual supple-
ment for the EyeSight system.
Cruise control enables you to maintain a
constant vehicle speed without holding
your foot on the accelerator pedal and it is
operative when the vehicle speed is 25
mph (40 km/h) or more.
WARNING
Do not use the cruise control under
any of the following conditions.
These may cause loss of vehicle
control.
. driving up or down a steep grade
. driving on slippery or winding
roads
. driving in heavy traffic
. towing a trailer
NOTE
.On uphill and downhill slopes, de-
pending on the degree of the slope and
the load of the vehicle, there may be
cases when a constant speed cannot
be guaranteed.
. If the cruise control indicator light
does not illuminate even after pressing
the cruise control main button, it is
possible that there is a malfunction in
the system. We recommend that you
contact your SUBARU dealer for an
inspection.
. Make sure the cruise control system
is turned off when the cruise control is
not in use to avoid unintentionally
setting the cruise control.& To set cruise control
Cruise control main button
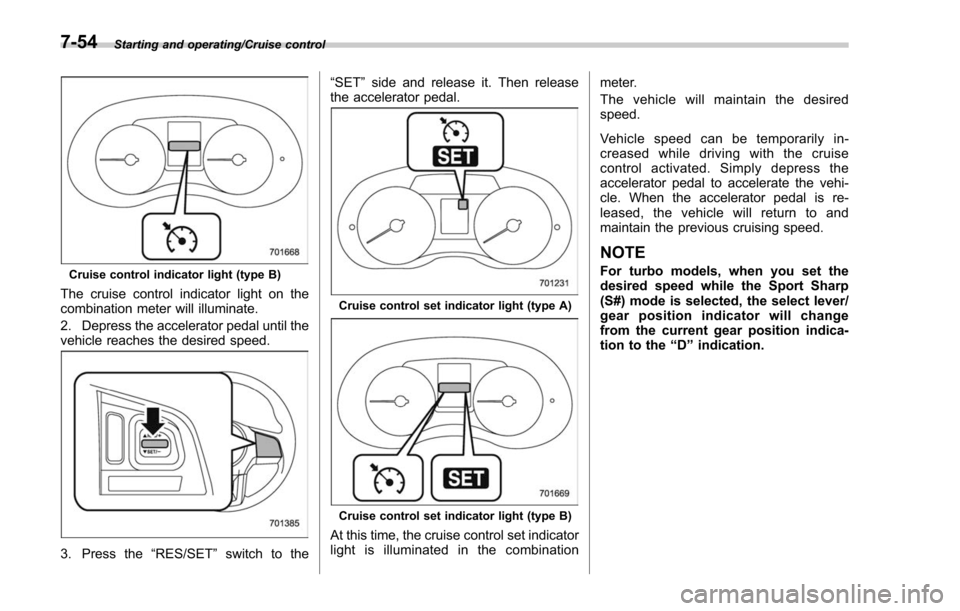
1. Press the cruise control main button.
Cruise control indicator light (type A)
Starting and operating/Cruise control
–CONTINUED –
7-53
Page 457 of 634
Starting and operating/Cruise control
Cruise control indicator light (type B)
The cruise control indicator light on the
combination meter will illuminate.
2. Depress the accelerator pedal until the
vehicle reaches the desired speed.
3. Press the“RES/SET”switch to the “SET
”side and release it. Then release
the accelerator pedal.
Cruise control set indicator light (type A)
Cruise control set indicator light (type B)
At this time, the cruise control set indicator
light is illuminated in the combination meter.
The vehicle will maintain the desired
speed.
Vehicle speed can be temporarily in-
creased while driving with the cruise
control activated. Simp
ly depress the
accelerator pedal to accelerate the vehi-
cle. When the accelerator pedal is re-
leased, the vehicle will return to and
maintain the previous cruising speed.
NOTE
For turbo models, when you set the
desired speed while the Sport Sharp
(S#) mode is selected, the select lever/
gear position indicator will change
from the current gear position indica-
tion to the “D”indication.
7-54
Page 458 of 634
&To temporarily cancel the
cruise control
The cruise control can be temporarily
canceled in the following ways.
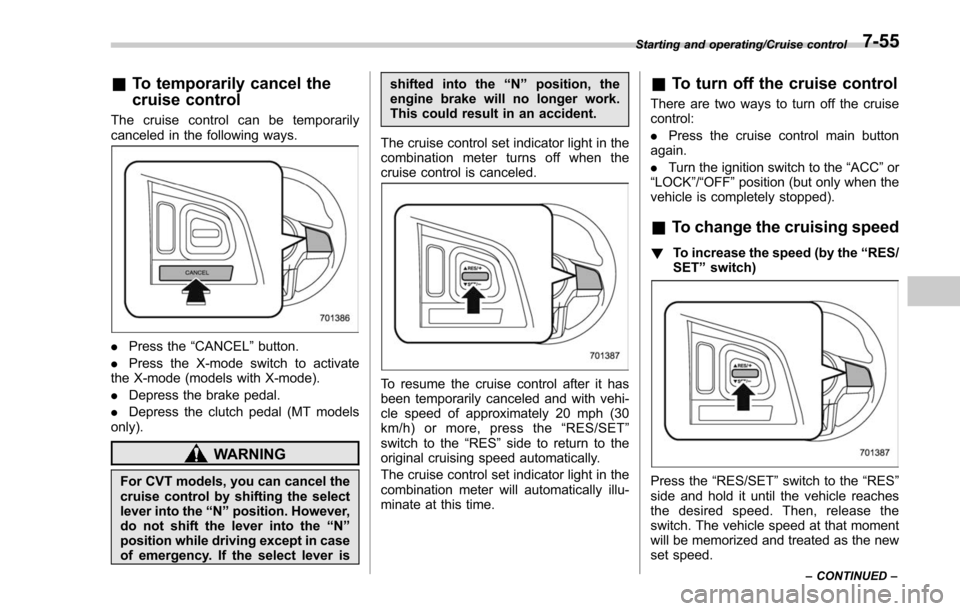
. Press the “CANCEL”button.
. Press the X-mode switch to activate
the X-mode (models with X-mode).
. Depress the brake pedal.
. Depress the clutch pedal (MT models
only).
WARNING
For CVT models, you can cancel the
cruise control by shifting the select
lever into the “N ” position. However,
do not shift the lever into the “N ”
position while driving except in case
of emergency. If the select lever is shifted into the
“N ” position, the
engine brake will no longer work.
This could result in an accident.
The cruise control set indicator light in the
combination meter turns off when the
cruise control is canceled.
To resume the cruise control after it has
been temporarily canceled and with vehi-
cle speed of approximately 20 mph (30
km/h) or more, press the “RES/SET ”
switch to the “RES ”side to return to the
original cruising speed automatically.
The cruise control set indicator light in the
combination meter will automatically illu-
minate at this time.
& To turn off the cruise control
There are two ways to turn off the cruise
control:
. Press the cruise control main button
again.
. Turn the ignition switch to the “ACC”or
“ LOCK ”/“OFF ”position (but only when the
vehicle is completely stopped).
& To change the cruising speed
! To increase the speed (by the “RES/
SET ”switch)
Press the “RES/SET ”switch to the “RES”
side and hold it until the vehicle reaches
the desired speed. Then, release the
switch. The vehicle speed at that moment
will be memorized and treated as the new
set speed.
Starting and operating/Cruise control
–CONTINUED –7-55
Page 459 of 634
Starting and operating/Cruise control
U.S.-spec. models
When the difference between the actual
vehicle speed and the set speed is small,
the set speed can be increased 1 mph
(1.6 km/h) each time by pressing the
“RES/SET ”switch to the “RES ”side
quickly.
Except U.S.-spec. models
When the difference between the actual
vehicle speed and the set speed is small,
the set speed can be increased 1 km/h
each time by pressing the “RES/SET”
switch to the “RES”side quickly. !
To increase the speed (by accel-
erator pedal)
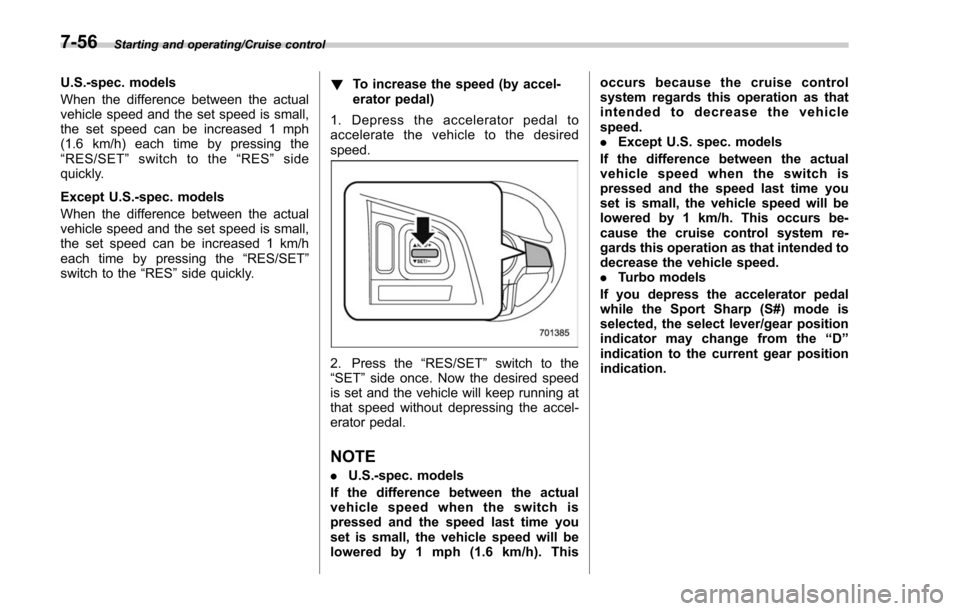
1. Depress the accelerator pedal to
accelerate the vehicle to the desired
speed.
2. Press the “RES/SET”switch to the
“SET ”side once. Now the desired speed
is set and the vehicle will keep running at
that speed without depressing the accel-
erator pedal.
NOTE
. U.S.-spec. models
If the difference between the actual
vehicle speed when the switch is
pressed and the speed last time you
set is small, the vehicle speed will be
lowered by 1 mph (1.6 km/h). This occurs because the cruise control
system regards this operation as that
intended to decrease the vehicle
speed.
.
Except U.S. spec. models
If the difference between the actual
vehicle speed when the switch is
pressed and the speed last time you
set is small, the vehicle speed will be
lowered by 1 km/h. This occurs be-
cause the cruise control system re-
gards this operation as that intended to
decrease the vehicle speed.
. Turbo models
If you depress the accelerator pedal
while the Sport Sharp (S#) mode is
selected, the select lever/gear position
indicator may change from the “D ”
indication to the current gear position
indication.
7-56
Page 460 of 634
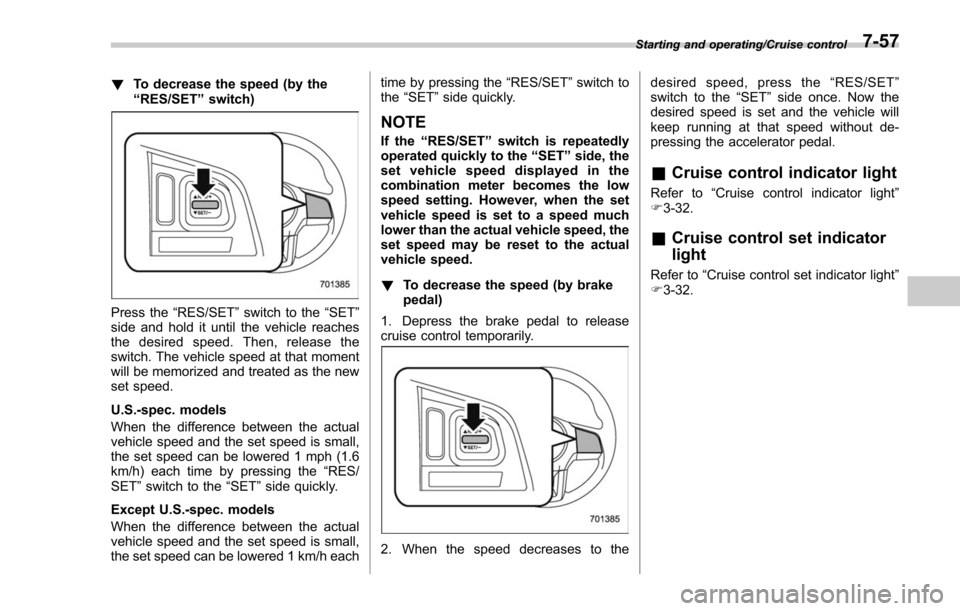
!To decrease the speed (by the
“RES/SET ”switch)
Press the “RES/SET”switch to the “SET”
side and hold it until the vehicle reaches
the desired speed. Then, release the
switch. The vehicle speed at that moment
will be memorized and treated as the new
set speed.
U.S.-spec. models
When the difference between the actual
vehicle speed and the set speed is small,
the set speed can be lowered 1 mph (1.6
km/h) each time by pressing the “RES/
SET ”switch to the “SET”side quickly.
Except U.S.-spec. models
When the difference between the actual
vehicle speed and the set speed is small,
the set speed can be lowered 1 km/h each time by pressing the
“RES/SET”switch to
the “SET ”side quickly.
NOTE
If the “RES/SET ”switch is repeatedly
operated quickly to the “SET ”side, the
set vehicle speed displayed in the
combination meter becomes the low
speed setting. However, when the set
vehicle speed is set to a speed much
lower than the actual vehicle speed, the
set speed may be reset to the actual
vehicle speed.
! To decrease the speed (by brake
pedal)
1. Depress the brake pedal to release
cruise control temporarily.
2. When the speed decreases to the desired speed, press the
“RES/SET ”
switch to the “SET”side once. Now the
desired speed is set and the vehicle will
keep running at that speed without de-
pressing the accelerator pedal.
& Cruise control indicator light
Refer to “Cruise control indicator light ”
F 3-32.
& Cruise control set indicator
light
Refer to “Cruise control set indicator light ”
F 3-32.
Starting and operating/Cruise control7-57
Page 465 of 634

Starting and operating/BSD/RCTA
signal lever is operated toward the side in
which this light turned on, the indicator
light flashes to warn the driver of dangers.
When reversing the vehicle, the indicator
light flashes when the system detects a
vehicle approaching from either side.! BSD/RCTA approach indicator
light dimming function
When the headlights are turned on, the
brightness of the BSD/RCTA approach
indicator light will be reduced.
NOTE
. When affected by direct sunlight,
you may have difficulty recognizing
the BSD/RCTA approach indicator light.
. When affected by the headlight
beams from the vehicles behind, you
may have difficulty recognizing the
BSD/RCTA approach indicator light.
. While the illumination brightness
control dial is in the fully upward
position, even if the headlights are
turned on, the brightness of the BSD/
RCTA approach indicator light will not
be reduced. For details about the
illumination brightness control dial,
refer to “Illumination brightness con-
trol” F3-101. !
BSD/RCTA approach warning buz-
zer (only when reversing)
A warning buzzer sounds along with
flashing of the BSD/RCTA approach in-
dicator light to warn the driver of dangers.
The setting of the warning buzzer volume
can be changed by operating the multi
information display of the combination
meter. For details, refer to “BSD/RCTA”
F 3-43.
! Safety tips regarding the BSD/RCTA
approach indicator light/warning
buzzer
. In the following cases, operation of the
BSD/RCTA approach indicator light and
the warning buzzer may be delayed or the
system may fail to issue these warnings.
–Whenavehiclemovestothe
neighboring lane from a lane next to
the neighboring lane
– When driving on a steep incline or
on repeated sharp uphill and downhill
grades
– When going beyond a pass
– When both your vehicle and a
vehicle driving on a neighboring lane
are driving on the far side of each lane.
– When several narrowly-spaced ve-
hicles are approaching in a row
– In low radius bends (tight bends or when making turns at an intersection)
–
When there is a difference in height
between your lane and the neighbor-
ing lane
– Immediately after the BSD/RCTA is
activated by pressing the BSD/RCTA
OFF switch
– Immediately after the shift lever/
select lever is shifted to the “R ”
position
– When extremely heavy cargo is
loaded in the trunk or cargo area
. During reversing, operation of the BSD/
RCTA approach indicator light and the
warning buzzer may be delayed or the
system may fail to issue these warnings
under the following conditions.
–When backing out of an angled
parking space
– When a large-sized vehicle is
parked next to your vehicle (That
vehicle prevents the propagation of
radar waves.)
– When reversing on sloped roads
– When reversing at a high speed
7-62
Page 482 of 634

Driving tips for AWD models
WARNING
.Always maintain a safe driving
speed according to the road and
weather conditions in order to
avoid having an accident on a
sharp turn, during sudden brak-
ing or under other similar condi-
tions.
. Always use the utmost care in
driving –overconfidence be-
cause you are driving an All-
Wheel Drive vehicle could easily
lead to a serious accident.
. When replacing or installing tire
(s), all four tires must be the
same for the following items.
(a) Size
(b) Circumference
(c) Speed symbol
(d) Load index
(e) Construction
(f) Manufacturer
(g) Brand (tread pattern)
(h) Degrees of wear
For the items (a) to (d), you must
obey the specification that is printed on the tire placard. The
tire placard is located on the
bottom of driver
’s door pillar.
If all of four tires are not the same
in items (a) to (h), it may lead to
serious mechanical damage to
the drive train of your car and
affect the following factors.
— Ride
— Handling
— Braking
— Speedometer/Odometer
calibration
— Clearance between the body
and tires
It also may be dangerous and
lead to loss of vehicle control,
and it can lead to an accident.
CAUTION
If you use a temporary spare tire to
replace a flat tire, be sure to use the
original temporary spare tire stored
in the vehicle. Using other sizes may
result in severe mechanical damage
to the drive train of your vehicle.
All-Wheel Drive distributes the engine
power to all four wheels. AWD models
provide better traction when driving on
slippery, wet or snow-covered roads and
when moving out of mud, dirt and sand.
By shifting power between the front and
rear wheels, SUBARU AWD can also
provide added traction during acceleration
and added engine braking force during
deceleration.
Therefore, your SUBARU AWD vehicle
may handle differently than an ordinary
two wheel drive vehicle and it contains
some features unique to AWD. For safety
purposes as well as to avoid damaging
the AWD system, you should keep the
following tips in mind.
. An AWD model is better able to climb
steeper roads under snowy or slippery
Driving tips/Driving tips for AWD models
–CONTINUED –8-5
Page 483 of 634
Driving tips/On–road and off –road driving
conditions than a two wheel drive vehicle.
There is little difference in handling,
however, during extremely sharp turns or
sudden braking. Therefore, when driving
down a slope or turning corners, be sure
to reduce your speed and maintain an
ample distance from other vehicles.
. Always check the cold tire pressure
before starting to drive. The recom-
mended tire pressure is provided on the
tire placard, which is located under the
door latch on the driver ’s side.
. Frequent driving of an AWD vehicle
under hard-driving conditions such as
steep hills or dusty roads will necessitate
more frequent replacement of the follow-
ing items than that specified in the
“Warranty and Maintenance Booklet ”.
– Engine oil
– Brake fluid
– Rear differential gear oil
– Manual transmission oil (MT mod-
els)
– Continuously variable transmission
fluid (CVT models)
– Front differential gear oil (CVT
models)
. There are some precautions that you
must observe when towing your vehicle.
For detailed information, refer to “Towing ”
F 9-13.On-road and off-road driving
WARNING
. In a rollover crash, an unbelted
person is significantly more
likely to die than a person wear-
ing a seat belt. You the driver and
all your passengers should fas-
ten the seatbelts before starting
to drive in order to minimize the
chance of serious injury or death.
. Do not make sharp turns and
quick maneuvers unless abso-
lutely unavoidable. Such actions
are dangerous as you may lose
control, possibly resulting in a
rollover which could cause death
or serious injury.
. Always maintain a safe driving
speed according to the road and
weather conditions in order to
avoid having an accident on a
sharp turn, during sudden brak-
ing or under other similar condi-
tions.
. Whenever strong crosswinds are
present, slow down sufficiently
to maintain control of your vehi-
cle. Remember that your vehicle,
with its higher profile and center of gravity, is more likely to be
affected by crosswinds than or-
dinary passenger cars.
. Always use the utmost care in
driving –overconfidence be-
cause you are driving an All-
Wheel Drive model could easily
lead to a serious accident.
Your vehicle is classified as a utility
vehicle. Utility vehicles feature a higher
ground clearance which enables them to
be used for wide applications including off-
road driving. But please keep in mind that
your vehicle is neither a conventional off-
road vehicle nor an all-terrain vehicle. A
higher center of gravity in relation to the
tread width as compared with ordinary
passenger cars makes vehicles of this
type more likely to roll over. In reality, utility
vehicles have a significantly higher roll-
over rate than other types of vehicles. The
high ground clearance of this vehicle is a
real advantage, giving you a better view of
the road and allowing you to anticipate
problems earlier. However, remember that
your utility vehicle is not designed for high-
speed cornering comparable to ordinary
passenger cars and that your vehicle
could roll over if you make a sharp turn
at high speed.
If you take your SUBARU off-road, certain
8-6