2017 SUBARU FORESTER AUX
[x] Cancel search: AUXPage 108 of 634
–Canada-spec. models
NOTE
This device complies with Industry
Canada licence-exempt RSS standard
(s). Operation is subject to the follow-
ing two conditions: (1) this device may
not cause interference, and (2) this
device must accept any interference,
including interference that may cause
undesired operation of the device.
NOTE
Le présent appareil est conforme aux
CNR d’ Industrie Canada applicables
aux appareils radio exempts de licence.
L ’exploitation est autorisée aux deux
conditions suivantes: (1) l ’appareil ne
doit pas produire de brouillage, et (2)
l ’utilisateur de l ’appareil doit accepter
tout brouillage radioélectrique subi,
même si le brouillage est susceptible
d ’en compromettre le fonctionnement. –
Mexico-spec. models
Door locks
& Locking and unlocking from
the outside
NOTE
If you unlock the driver ’s door with a
key (including a mechanical key) and
open the door while the alarm system
is armed, the alarm system is triggered
and the vehicle ’s horn sounds. In this
case, perform any of the following
operations:
Models with “keyless access with
push-button start system ”:
. Press any button on the access key
(except when the access key battery is
discharged).
. Turn the push-button ignition switch
to the “ACC ”position.
. Carry the access key and perform
either of the following procedures.
–Grip the front door handle
– Press the rear gate opener button
Models without “keyless access with
push-button start system ”:
. Press any button on the remote
transmitter (except when the transmit-
ter battery is discharged).
. Insert the key into the ignition
switch and turn the ignition switch to
Keys and doors/Door locks
–CONTINUED –2-5
Page 122 of 634
&Certification for keyless ac-
cess with push-button start
system
! U.S.-spec. models
FCC ID: HYQ14AHC
FCC ID: HYQ13CZZ
FCC ID: Y8PSSPIMB02
FCC ID: Y8PSSPLF02
CAUTION
FCC WARNING
Changes or modifications not ex-
pressly approved by the party re-
sponsible for compliance could void
the user ’s authority to operate the
equipment.
NOTE
This device complies with Part 15 of
the FCC Rules. Operation is subject to
the following two conditions: (1) This
device may not cause harmful inter-
ference, and (2) this device must
accept any interference received, in-
cluding interference that may cause
undesired operation. !
Canada-spec. models
NOTE
This device complies with Industry
Canada licence-exempt RSS standard
(s). Operation is subject to the follow-
ing two conditions: (1) this device may
not cause interference, and (2) this
device must accept any interference,
including interference that may cause
undesired operation of the device.
NOTE
Le présent appareil est conforme aux
CNR d’ Industrie Canada applicables
aux appareils radio exempts de licence.
L ’exploitation est autorisée aux deux
conditions suivantes: (1) l ’appareil ne
doit pas produire de brouillage, et (2)
l ’ utilisateur de l ’appareil doit accepter
tout brouillage radioélectrique subi,
même si le brouillage est susceptible
d ’en compromettre le fonctionnement.
PIN Code Access (models
with “keyless access with
push-button start system ”)
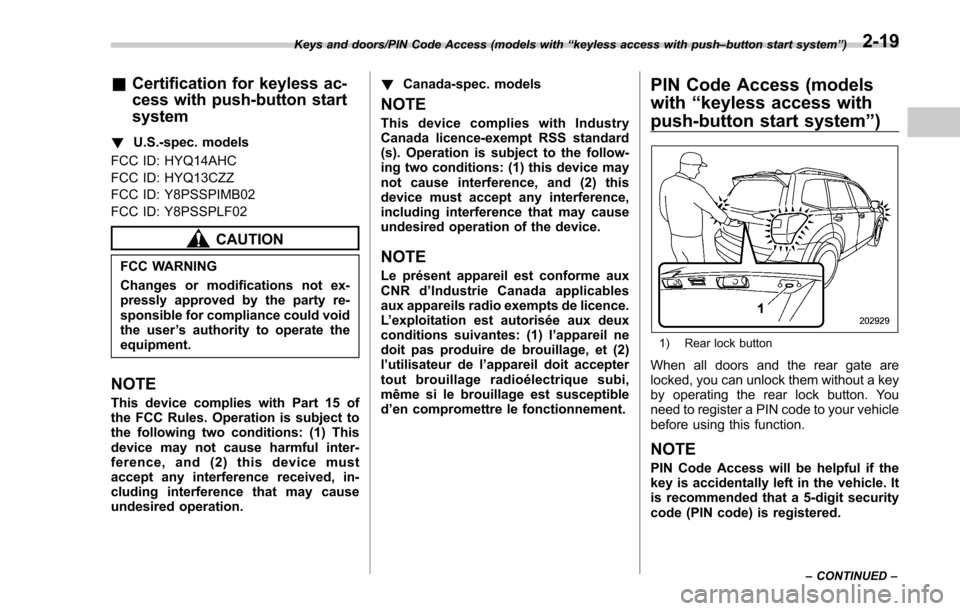
1) Rear lock button
When all doors and the rear gate are
locked, you can unlock them without a key
by operating the rear lock button. You
need to register a PIN code to your vehicle
before using this function.
NOTE
PIN Code Access will be helpful if the
key is accidentally left in the vehicle. It
is recommended that a 5-digit security
code (PIN code) is registered.
Keys and doors/PIN Code Access (models with “keyless access with push –button start system ”)
– CONTINUED –2-19
Page 124 of 634
&Unlocking
Perform steps 1 to 5 described in “Regis-
tration ”.
NOTE
. You cannot unlock by PIN Code
Access in the following cases.
–when the access key is within the
operating ranges
– when the ignition switch is in the
“ ACC ”or “ON ”position
. If you make an operation error
during the unlocking procedure, start
over with the unlocking procedure after
waiting for 5 seconds or longer.
. To protect your vehicle from theft, a
buzzer will sound if incorrect PIN codes
are entered five times continuously. If
this occurs, you cannot unlock the
doors by PIN Code Access for 5
minutes.
Remote keyless entry system
CAUTION
. Do not expose the remote trans-
mitter to severe shocks, such as
those experienced as a result of
dropping or throwing.
. Do not take the remote transmit-
ter apart except when replacing
the battery.
. Do not get the remote transmitter
wet. If it gets wet, wipe it dry with
a cloth immediately.
. When you carry the remote trans-
mitteronanairplane,donot
press the button of the remote
transmitter while in the airplane.
When any button of the remote
transmitter is pressed, radio
waves are sent and may affect
the operation of the airplane.
When you carry the remote trans-
mitter in a bag on an airplane,
take measures to prevent the
buttons of the remote transmitter
from being pressed.
. FCC WARNING
Changes or modifications not
expressly approved by the party responsible for compliance
could void the user
’s authority
to operate the equipment.
FCC ID: CWTWB1U811
FCC ID: CWTWD1U781
This device complies with Part 15 of
the FCC Rules. Operation is subject to
the following two conditions: (1) This
device may not cause harmful inter-
ference, and (2) this device must
accept any interference received, in-
cluding interference that may cause
undesired operation.
NOTE
This device complies with Industry
Canada licence-exempt RSS standard
(s). Operation is subject to the follow-
ing two conditions: (1) this device may
not cause interference, and (2) this
device must accept any interference,
including interference that may cause
undesired operation of the device.
NOTE
Le présent appareil est conforme aux
CNR d’ Industrie Canada applicables
aux appareils radio exempts de licence.
L ’exploitation est autorisée aux deux
conditions suivantes: (1) l ’appareil ne
doit pas produire de brouillage, et (2)
Keys and doors/Remote keyless entry system
–CONTINUED –2-21
Page 288 of 634

Antenna................................................................ 5-2Roof antenna ...................................................... 5-2
Audio set............................................................. 5-2Base display audio set (if equipped) .................... 5-3
STARLINKTM7.0 Multimedia Plus audio set
(U.S. spec. models only, if equipped) ................. 5-5
Tips for operating the audio/visual system ........... 5-6
Basic information before use .............................. 5-14
Basic operation .................................................. 5-17
Unit settings ...................................................... 5-18
SUBARU STARLINK (if equipped) ....................... 5-25
AM/FM radio ....................................................... 5-27
SiriusXM Satellite Radio (if equipped) ................. 5-36
aha
TMby HARMAN ............................................. 5-43
Pandora®(if equipped) ....................................... 5-49
CD ..................................................................... 5-52
USB memory ...................................................... 5-54
iPod ................................................................... 5-55
Bluetooth audio .................................................. 5-57
AUX ................................................................... 5-60
Steering switches for audio .............................. 5-62
Bluetooth®settings ............................................ 5-65Regulatory information ....................................... 5-65 Registering/connecting Bluetooth
®device
.......... 5-65
Setting Bluetooth details .................................... 5-68
Hands-free phone system ................................. 5-70Control screen................................................... 5-71
Registering/connecting a Bluetooth phone ......... 5-72
Using the phone switch/microphone ................... 5-72
How to change the hands-free phone system ..... 5-72
Making a call ..................................................... 5-73
Receiving a call ................................................. 5-76
Talking on the phone ......................................... 5-77
Phone settings .................................................. 5-78
Voice command system .................................... 5-80Using the voice command system ...................... 5-81
Voice command system operation ...................... 5-82
Command list .................................................... 5-84
What to do if.... ................................................... 5-88Troubleshooting ................................................. 5-88
Appendix............................................................ 5-92Certification ....................................................... 5-92
Certification for the Hands-free system ............... 5-92
Certification for Mexico models .......................... 5-93
Audio
5
Page 290 of 634
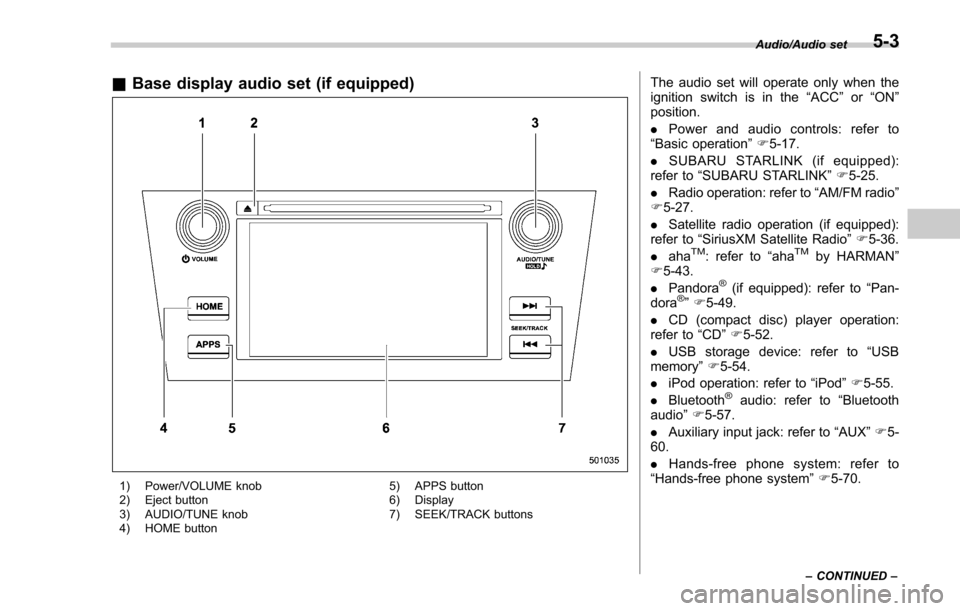
&Base display audio set (if equipped)
1) Power/VOLUME knob
2) Eject button
3) AUDIO/TUNE knob
4) HOME button 5) APPS button
6) Display
7) SEEK/TRACK buttons
The audio set will operate only when the
ignition switch is in the
“ACC”or “ON ”
position.
. Power and audio controls: refer to
“Basic operation ”F 5-17.
. SUBARU STARLINK (if equipped):
refer to “SUBARU STARLINK ”F 5-25.
. Radio operation: refer to “AM/FM radio ”
F 5-27.
. Satellite radio operation (if equipped):
refer to “SiriusXM Satellite Radio” F5-36.
. aha
TM: refer to “ahaTMby HARMAN ”
F 5-43.
. Pandora
®(if equipped): refer to “Pan-
dora®” F 5-49.
. CD (compact disc) player operation:
refer to “CD”F 5-52.
. USB storage device: refer to “USB
memory ”F 5-54.
. iPod operation: refer to “iPod”F 5-55.
. Bluetooth
®audio: refer to “Bluetooth
audio ”F 5-57.
. Auxiliary input jack: refer to “AUX”F 5-
60.
. Hands-free phone system: refer to
“Hands-free phone system ”F 5-70.
Audio/Audio set
–CONTINUED –5-3
Page 303 of 634

Audio/Audio set
!Initial screen
When the ignition switch is in the “ACC”or
“ON ”position, the initial screen will be
displayed and the system will begin
operating.
. When using the SUBARU STARLINK
function (if equipped), the display screen
may be different from the screen above.
. After a few seconds, the caution screen
will be displayed.
. After about 5 seconds, the caution
screen automatically switches to the next
screen.
! Connecting and disconnecting a
USB memory/portable device
The USB port and the AUX jack are
located as shown in the following illustra-
tion.
NOTE
. This unit does not support commer-
cially available USB hubs.
. Turn on the power of the device
when it is not turned on.
. This device has a USB port for USB
memory/portable device.
. For compatible USB memory de-
vices, refer to “USB memory device ”
F 5-9.
. For compatible iPod models, refer to
“ iPod ”F 5-9.
. Even if a USB hub is used to
connect more than two USB devices,
5-16
Page 347 of 634
Audio/Audio set
IconFunction
Return to the control screen.
NOTE
If the connected device does not sup-
port the group repeat mode, the group
functions are not available.
&AUX
WARNING
Do not operate the player ’s controls
or connect the portable audio device
while driving. Doing so may result in
loss of control of your vehicle and
cause an accident or serious injury.
CAUTION
. Do not leave portable audio de-
vice in the vehicle. The tempera-
ture inside the vehicle may be-
come high, resulting in damage
to the player.
. Do not push down on or apply
unnecessary pressure to the por-
table audio device while it is
connected as this may damage
the portable audio device or its terminal.
. Do not insert foreign objects into
the port as this may damage the
portable audio device or its term-
inal.
5-60
Page 348 of 634
!Control screen and audio panel
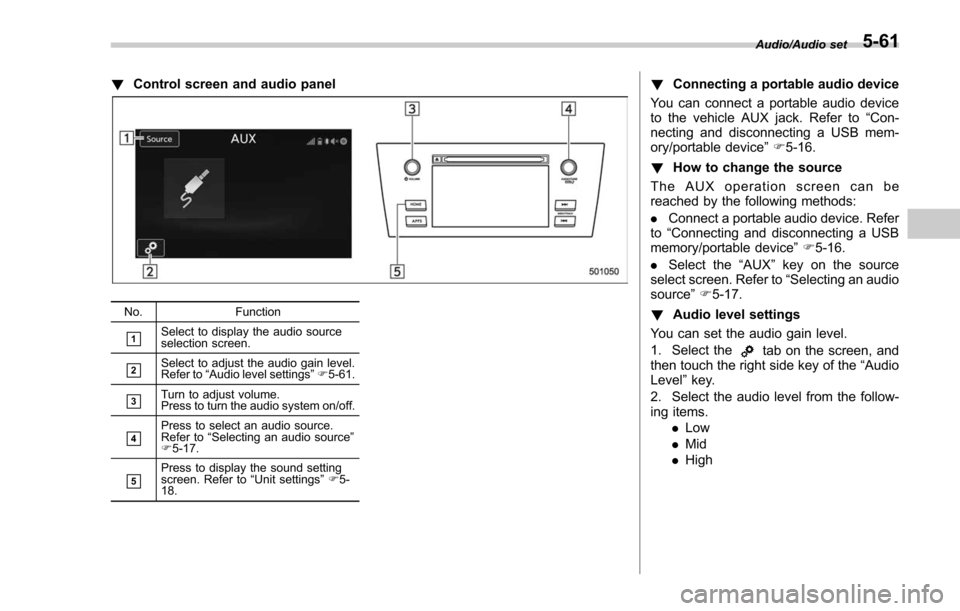
No. Function
&1Select to display the audio source
selection screen.
&2Select to adjust the audio gain level.
Refer to“Audio level settings ”F 5-61.
&3Turn to adjust volume.
Press to turn the audio system on/off.
&4Press to select an audio source.
Refer to “Selecting an audio source ”
F 5-17.
&5Press to display the sound setting
screen. Refer to “Unit settings ”F 5-
18.
! Connecting a portable audio device
You can connect a portable audio device
to the vehicle AUX jack. Refer to “Con-
necting and disconnecting a USB mem-
ory/portable device ”F 5-16.
! How to change the source
The AUX operation screen can be
reached by the following methods:
. Connect a portable audio device. Refer
to “Connecting and disconnecting a USB
memory/portable device ”F 5-16.
. Select the “AUX”key on the source
select screen. Refer to “Selecting an audio
source” F5-17.
! Audio level settings
You can set the audio gain level.
1. Select the
tab on the screen, and
then touch the right side key of the “Audio
Level ”key.
2. Select the audio level from the follow-
ing items. .Low
. Mid
. High
Audio/Audio set5-61