2017 SUBARU FORESTER ESP
[x] Cancel search: ESPPage 124 of 634

&Unlocking
Perform steps 1 to 5 described in “Regis-
tration ”.
NOTE
. You cannot unlock by PIN Code
Access in the following cases.
–when the access key is within the
operating ranges
– when the ignition switch is in the
“ ACC ”or “ON ”position
. If you make an operation error
during the unlocking procedure, start
over with the unlocking procedure after
waiting for 5 seconds or longer.
. To protect your vehicle from theft, a
buzzer will sound if incorrect PIN codes
are entered five times continuously. If
this occurs, you cannot unlock the
doors by PIN Code Access for 5
minutes.
Remote keyless entry system
CAUTION
. Do not expose the remote trans-
mitter to severe shocks, such as
those experienced as a result of
dropping or throwing.
. Do not take the remote transmit-
ter apart except when replacing
the battery.
. Do not get the remote transmitter
wet. If it gets wet, wipe it dry with
a cloth immediately.
. When you carry the remote trans-
mitteronanairplane,donot
press the button of the remote
transmitter while in the airplane.
When any button of the remote
transmitter is pressed, radio
waves are sent and may affect
the operation of the airplane.
When you carry the remote trans-
mitter in a bag on an airplane,
take measures to prevent the
buttons of the remote transmitter
from being pressed.
. FCC WARNING
Changes or modifications not
expressly approved by the party responsible for compliance
could void the user
’s authority
to operate the equipment.
FCC ID: CWTWB1U811
FCC ID: CWTWD1U781
This device complies with Part 15 of
the FCC Rules. Operation is subject to
the following two conditions: (1) This
device may not cause harmful inter-
ference, and (2) this device must
accept any interference received, in-
cluding interference that may cause
undesired operation.
NOTE
This device complies with Industry
Canada licence-exempt RSS standard
(s). Operation is subject to the follow-
ing two conditions: (1) this device may
not cause interference, and (2) this
device must accept any interference,
including interference that may cause
undesired operation of the device.
NOTE
Le présent appareil est conforme aux
CNR d’ Industrie Canada applicables
aux appareils radio exempts de licence.
L ’exploitation est autorisée aux deux
conditions suivantes: (1) l ’appareil ne
doit pas produire de brouillage, et (2)
Keys and doors/Remote keyless entry system
–CONTINUED –2-21
Page 126 of 634

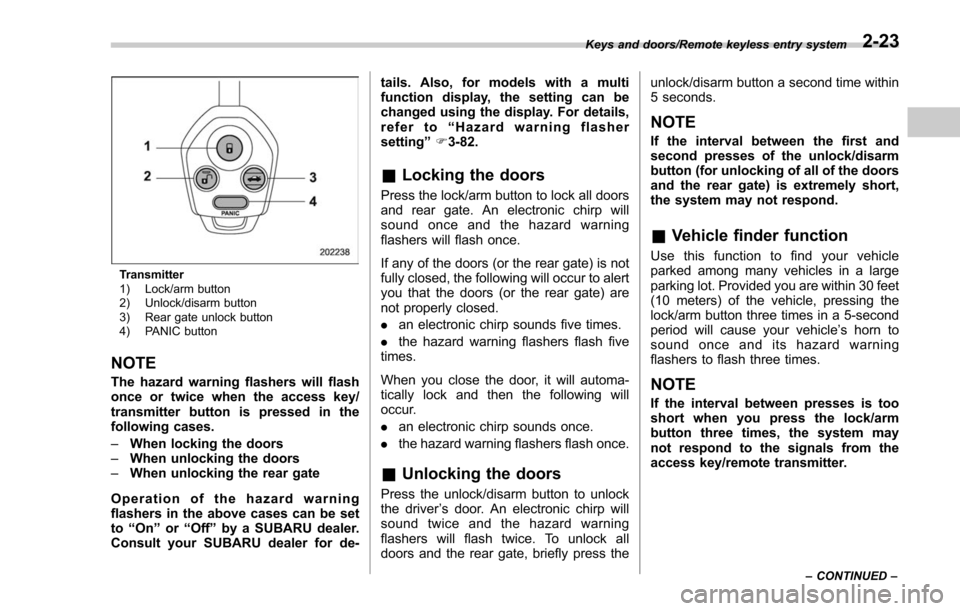
Transmitter
1) Lock/arm button
2) Unlock/disarm button
3) Rear gate unlock button
4) PANIC button
NOTE
The hazard warning flashers will flash
once or twice when the access key/
transmitter button is pressed in the
following cases.
–When locking the doors
– When unlocking the doors
– When unlocking the rear gate
Operation of the hazard warning
flashers in the above cases can be set
to “On ”or “Off ”by a SUBARU dealer.
Consult your SUBARU dealer for de- tails. Also, for models with a multi
function display, the setting can be
changed using the display. For details,
refer to
“Hazard warning flasher
setting ”F 3-82.
& Locking the doors
Press the lock/arm button to lock all doors
and rear gate. An electronic chirp will
sound once and the hazard warning
flashers will flash once.
If any of the doors (or the rear gate) is not
fully closed, the following will occur to alert
you that the doors (or the rear gate) are
not properly closed.
. an electronic chirp sounds five times.
. the hazard warning flashers flash five
times.
When you close the door, it will automa-
tically lock and then the following will
occur.
. an electronic chirp sounds once.
. the hazard warning flashers flash once.
&Unlocking the doors
Press the unlock/disarm button to unlock
the driver ’s door. An electronic chirp will
sound twice and the hazard warning
flashers will flash twice. To unlock all
doors and the rear gate, briefly press the unlock/disarm button a second time within
5 seconds.
NOTE
If the interval between the first and
second presses of the unlock/disarm
button (for unlocking of all of the doors
and the rear gate) is extremely short,
the system may not respond.
&
Vehicle finder function
Use this function to find your vehicle
parked among many vehicles in a large
parking lot. Provided you are within 30 feet
(10 meters) of the vehicle, pressing the
lock/arm button three times in a 5-second
period will cause your vehicle’ s horn to
sound once and its hazard warning
flashers to flash three times.
NOTE
If the interval between presses is too
short when you press the lock/arm
button three times, the system may
not respond to the signals from the
access key/remote transmitter.
Keys and doors/Remote keyless entry system
–CONTINUED –2-23
Page 135 of 634

Keys and doors/Child safety locks
Child safety locks
Each rear door has a child safety lock.
When the child safety lock lever is in the
“LOCK ”position, the door cannot be
opened from inside. The door can only
be opened from the outside.
WARNING
Always turn the child safety locks to
the “LOCK ”position when children
sit on the rear seat. Serious injury
could result if a child accidentally
opens the door and falls out.
Windows
WARNING
To avoid serious personal injury
caused by entrapment, always con-
form to the following instructions
without exception.
. When operating the power win-
dows, be extremely careful to
prevent anyone ’s fingers, arms,
neck, head or other objects from
being caught in the window.
. Always lock the passengers ’win-
dows using the lock switch when
children are riding in the vehicle.
. Always carry the key when you
leave the vehicle for safety rea-
sons and never allow an unat-
tended child to remain in the
vehicle. Failure to follow this
procedure could result in injury
to a child operating the power
window.
. The driver should be aware of
and pay careful attention to his/
her responsibilities.
CAUTION
After fully opening or fully closing a
window, do not continue to press
the switch in the same direction. It
may cause the power window to
malfunction.
NOTE
. Due to the structure of the vehicle
body, the rear seat window cannot be
fully opened.
. When the following operations are
performed, the power window breaker
will operate and it may not be possible
to open or close the window.
–After the driver ’s window and, for
some models, the front passenger ’s
window are fully closed or fully
opened, the switch is continuously
operated in the same direction for a
few seconds.
– After the windows for three or
more seats are fully closed or fully
opened, each switch is continu-
ously operated in the same direc-
tion simultaneously for a few sec-
onds.
. In this case, after the breaker re-
covers, be sure to initialize the power
windows. If they are not initialized, the
2-32
Page 142 of 634

WARNING
.To prevent dangerous exhaust
gas from entering the vehicle,
always keep the rear gate closed
while driving.
. Do not attempt to shut the rear
gate while holding the recessed
grip. Also avoid closing the rear
gate by pulling on the recessed
grip from inside the cargo space.
There is a danger of your hand
being caught and injured.
CAUTION
. Do not jam a plastic bag in or
place cellophane tape on the rear
gate stays or scratch the stays
while loading or unloading cargo.
That could cause leakage of gas
from the stays, which may result
in their inability to hold the rear
gate open.
. Be careful not to hit your head or
face on the rear gate when open-
ing or closing the rear gate and
when loading or unloading car-
go.
& Power rear gate (if equipped)
WARNING
. When opening the rear gate,
make sure there are no people
around it. If the rear gate, by any
chance, should hit a part of the
body, this may result in an injury.
. When closing the rear gate, be
extremely careful to prevent any-
one ’s fingers, arms, neck, head
or other objects from being
caught in the rear gate. Other-
wise, serious personal injury
may be caused by entrapment.
. If either of the operating condi-
tions has not been satisfied while
operating the power rear gate, an
electronic chirp will sound and
the power rear gate will be deac-
tivated. In this case, the rear gate
may open or close suddenly. Be
careful to prevent anyone ’s body
or any objects from being hit
against the rear gate or being
caught in the rear gate.
. After opening the rear gate on a
slope by using the power rear
gate feature, the rear gate may
close. Make sure that the rear
gate has stopped completely after opening it.
. Always carry the key when you
leave the vehicle for safety rea-
sons and never allow an unat-
tended child to remain in the
vehicle. Failure to follow this
procedure could result in injury
to a child operating the power
rear gate.
. The driver should be aware of
and pay careful attention to his/
her responsibilities.
. The power rear gate button
should only be used to open
and close the rear gate when
the area around the rear gate is
clearly visible and when you
have checked that there is no
danger of people being caught in
the gate.
CAUTION
When closing the rear gate after
opening it by using the memory
function, make sure to use the
power rear gate. If you close the
rear gate manually with extra force,
the power rear gate may be da-
maged.
Keys and doors/Rear gate
–CONTINUED –2-39
Page 153 of 634

Instruments and controls
Cruise control indicator light (if equipped).......... 3-32
Cruise control set indicator light (if equipped) ......................................................... 3-32
Automatic headlight beam leveler warning light (if equipped) ......................................................... 3-32
Steering Responsive Headlight warning light/ Steering Responsive Headlight OFF indicator
light (if equipped) ............................................. 3-33
Front fog light indicator light (if equipped) .......... 3-33
Headlight indicator light (if equipped) ................. 3-33
X-mode indicator light (if equipped) .................... 3-33
Hill descent control indicator light (if equipped) ......................................................... 3-33
Steering responsive fog lights warning indicator/ Steering responsive fog lights OFF indicator (if
equipped) ......................................................... 3-33
BSD/RCTA warning indicator (if equipped) .......... 3-33
BSD/RCTA OFF indicator (if equipped) ................ 3-34
RAB warning light (if equipped) .......................... 3-34
RAB OFF indicator light (if equipped) .................. 3-34
Information display (Mexico-spec. models) ...... 3-34Outside temperature indicator............................ 3-34
Driving information display ................................. 3-35
Clock ................................................................. 3-38
Multi information display (models with type
B combination meter) ..................................... 3-39
Basic operation.................................................. 3-40
Welcome screen and Good-bye screen ............... 3-40
Warning screen .................................................. 3-41
Basic screens .................................................... 3-41
Menu screens .................................................... 3-42
Multi function display (if equipped) .................. 3-44Basic operation................................................. 3-45
Welcome screen ................................................ 3-45
Ending screen ................................................... 3-46
Self-check screen .............................................. 3-46
Interruption screen ............................................ 3-48
Basic screens .................................................... 3-48
Selection screen ................................................ 3-56
Date and time settings ....................................... 3-59
Image quality and volume settings ..................... 3-66
Screen settings. ................................................. 3-68
Maintenance settings ......................................... 3-76
Driving history registration ................................. 3-79
Car settings ....................................................... 3-80
Initialize ............................................................. 3-90
Light control switch ........................................... 3-93Headlights......................................................... 3-93
High/low beam change (dimmer) ... ..................... 3-95
Headlight flasher ............................................... 3-98
Daytime running light system ............................. 3-98
Steering Responsive Headlight (SRH) (if
equipped) ........................................................ 3-99
SRH OFF switch ................................................ 3-99
Turn signal lever .............................................. 3-100One-touch lane changer ................................... 3-101
Illumination brightness control ....................... 3-101
Headlight beam leveler (if equipped) ............. 3-102
Automatic headlight beam leveler (models with
LED headlights) ............................................. 3-102
Page 154 of 634

Instruments and controls
Fog light switch (if equipped)......................... 3-102Steering responsive fog lights system (if
equipped) ....................................................... 3-103
Wiper and washer ............................................ 3-104Windshield wiper and washer switches ............. 3-105
Rear window wiper and washer switch .............. 3-106
Mirrors............................................................... 3-107Inside mirror .................................................... 3-107
Auto-dimming mirror/compass (if equipped) ...... 3-108Auto-dimming mirror/compass with HomeLink
®(if equipped)
.................................................. 3-109
Outside mirrors ............................................... 3-115
Defogger and deicer ........................................ 3-116
Tilt/telescopic steering wheel ......................... 3-118
Horn .................................................................. 3-118
Heated Steering Wheel system (if equipped) ...................................................... 3-119
Page 164 of 634

Warning and indicator lights
Several of the warning and indicator lights
illuminate when the ignition switch is
initially turned to the“ON”position. This
permits checking the operation of the
bulbs.
Apply the parking brake and turn the
ignition switch to the “ON”position. For
the system check, several of the following
lights illuminate and then turn off after
several seconds or after the engine has
started.
: Seatbelt warning light (The seatbelt warning light turns off
only when the driver fastens the
seatbelt.)
: Front passenger ’s seatbelt warning
light
(The seatbelt warning light turns off
only when the front seat passenger
fastens the seatbelt.)
: SRS airbag system warning light
ON /
: Front passenger ’s frontal airbag
ON indicator light
/: Front passenger ’s frontal airbag
OFF indicator light
: CHECK ENGINE warning light/Mal- function indicator light
: Coolant temperature low indicator light/Coolant temperature high warn-
ing light
: Charge warning light
: Oil pressure warning light
: Engine low oil level warning light*
: Windshield washer fluid warning light*
: AT OIL TEMP warning light(CVT models)
: Low tire pressure warning light(U.S.-spec. models)
/: ABS warning light
/: Brake system warning light
: Low fuel warning light
: Hill start assist warning light/Hill startassist OFF indicator light
: Door open warning light
: AWD warning light (CVT models)
: Power steering warning light
: Vehicle Dynamics Control warning light/Vehicle Dynamics Control opera-
tion indicator light
: Vehicle Dynamics Control OFF indica-tor light
: Cruise control indicator light(if equipped)
: Cruise control set indicator light(if equipped)
: Headlight indicator light (if equipped)
: Automatic headlight beam leveler warning light (if equipped)
: Steering Responsive Headlight warn-ing light/Steering Responsive Head-
light OFF indicator light (if equipped)*
: High beam assist indicator light (if equipped)
: Access key warning light
(if equipped)
: X-mode indicator light (if equipped)
: Hill descent control indicator light (if equipped)*
*: Applies to models with type A combina- tion meter.
If any lights fail to illuminate, it indicates a
burned-out bulb or a malfunction of the
corresponding system.
Consult your authorized SUBARU dealer
for repair.
Instruments and controls/Warning and indicator lights
–CONTINUED –3-13
Page 170 of 634

.The warning light may illuminate
temporarily in the following conditions
because a low oil level may be detected
as a result of significant oil movement
in the engine.
–when the vehicle is considerably
inclined on an uphill or steep slope
– when the vehicle has continu-
ously accelerated and decelerated
– when the vehicle is continuously
turned
– when the vehicle is driven on a
road that alternates continuously
between uphill and downhill
&Windshield washer
fluid warning light
This light illuminates when the fluid level in
the windshield washer fluid tank de-
creases to the lower limit (approximately
1.1 US qt, 1.0 liter, 0.9 Imp qt).
&AT OIL TEMP warning
light (CVT models)
If this light illuminates when the engine is
running, it may indicate that the transmis-
sion fluid temperature is too hot.
If the light illuminates while driving, im-
mediately stop the vehicle in a safe place
and let the engine idle until the warning light turns off.
!
Transmission control system warn-
ing
If the “AT OIL TEMP ”warning light flashes
after the engine has started, it may
indicate that the transmission control
system is not working properly. Contact
your nearest SUBARU dealer for service
immediately.
&Low tire pressure
warning light (U.S.-spec.
models)
When the ignition switch is turned to the
“ON ”position, the low tire pressure warn-
ing light will illuminate for approximately 2
seconds to check that the tire pressure
monitoring system (TPMS) is functioning
properly. If there is no problem and all tires
are properly inflated, the light will turn off.
Each tire, including the spare (if provided),
should be checked monthly when cold
and inflated to the inflation pressure
recommended by the vehicle manufac-
turer on the vehicle placard or tire inflation
pressure label. (If your vehicle has tires of
a different size than the size indicated on
the vehicle placard or tire inflation pres-
sure label, you should determine the
proper tire inflation pressure for those
tires.) As an added safety feature, your vehicle
has been equipped with a tire pressure
monitoring system (TPMS) that illuminates
a low tire pressure telltale when one or
more of your tires is significantly under-
inflated. Accordingly, when the low tire
pressure telltale illuminates, you should
stop and check your tires as soon as
possible, and inflate them to the proper
pressure. Driving on a significantly under-
inflated tire causes the tire to overheat and
can lead to tire failure. Under-inflation also
reduces fuel efficiency and tire tread life,
and may affect the vehicle
’s handling and
stopping ability.
Please note that the TPMS is not a
substitute for proper tire maintenance,
and it is the driver ’s responsibility to
maintain correct tire pressure, even if
under-inflation has not reached the level
to trigger illumination of the TPMS low tire
pressure telltale.
Your vehicle has also been equipped with
a TPMS malfunction indicator to indicate
when the system is not operating properly.
The TPMS malfunction indicator is com-
bined with the low tire pressure telltale.
When the system detects a malfunction,
the telltale will flash for approximately one
minute and then remain continuously
illuminated. This sequence will continue
upon subsequent vehicle start-ups as long
Instruments and controls/Warning and indicator lights
–CONTINUED –3-19