2017 SUBARU FORESTER fog light
[x] Cancel search: fog lightPage 154 of 634
Instruments and controls
Fog light switch (if equipped)......................... 3-102Steering responsive fog lights system (if
equipped) ....................................................... 3-103
Wiper and washer ............................................ 3-104Windshield wiper and washer switches ............. 3-105
Rear window wiper and washer switch .............. 3-106
Mirrors............................................................... 3-107Inside mirror .................................................... 3-107
Auto-dimming mirror/compass (if equipped) ...... 3-108Auto-dimming mirror/compass with HomeLink
®(if equipped)
.................................................. 3-109
Outside mirrors ............................................... 3-115
Defogger and deicer ........................................ 3-116
Tilt/telescopic steering wheel ......................... 3-118
Horn .................................................................. 3-118
Heated Steering Wheel system (if equipped) ...................................................... 3-119
Page 184 of 634

&Steering Responsive
Headlight warning light/
Steering Responsive
Headlight OFF indicator
light (if equipped)
This light illuminates when the Steering
Responsive Headlight OFF switch is
pressed to deactivate the Steering Re-
sponsive Headlight. Also, the light flashes
when a malfunction occurs in the Steering
Responsive Headlight. Refer to“Steering
Responsive Headlight (SRH) ”F 3-99.
&Front fog light indicator
light (if equipped)
This indicator light illuminates while the
front fog lights are illuminated.
&Headlight indicator
light (if equipped)
This indicator light illuminates under the
following conditions.
. when the light switch is turned to the
“
” or “”position
. when the light control switch is in the
“AUTO ”position and the headlights illumi-
nate automatically
&X-mode indicator light
(if equipped)
This light illuminates while the X-mode is
activated. It will turn off when the X-mode
is deactivated. Refer to “To activate/
deactivate the X-mode ”F 7-43.
&Hill descent control
indicator light (if
equipped)
This indicator illuminates while the hill
descent control function is in standby. It
will flash while the hill descent control
function is operating. It will turn off when
the hill descent control function is not
available. Refer to “Hill descent control
function ”F 7-44.
&Steering responsive
fog lights warning indi-
cator/Steering respon-
sive fog lights OFF in-
dicator (if equipped)
NOTE
For details about the steering respon-
sive fog lights system, refer to “Steer-
ing responsive fog lights system ”F 3-
103. !
Steering responsive fog lights
warning indicator
This indicator starts blinking when the
steering responsive fog lights system
malfunctions. When this indicator is blink-
ing while the system is activated, contact
your SUBARU dealer for an inspection.
! Steering responsive fog lights OFF
indicator
This indicator appears when the steering
responsive fog lights system is deacti-
vated. This indicator disappears when the
system is activated.
&BSD/RCTA warning in-
dicator (if equipped)
This warning indicator appears when the
BSD/RCTA is malfunctioning.
For models with type A combination
meter, the BSD/RCTA warning indicator
will be shown on the combination meter.
For models with type B combination
meter, the BSD/RCTA warning indicator
will be shown on the multi information
display of the combination meter.
When this indicator appears, have your
vehicle inspected by your SUBARU dealer
as soon as possible.
Instruments and controls/Warning and indicator lights
–CONTINUED –3-33
Page 208 of 634
Top menuMenu option DescriptionPage
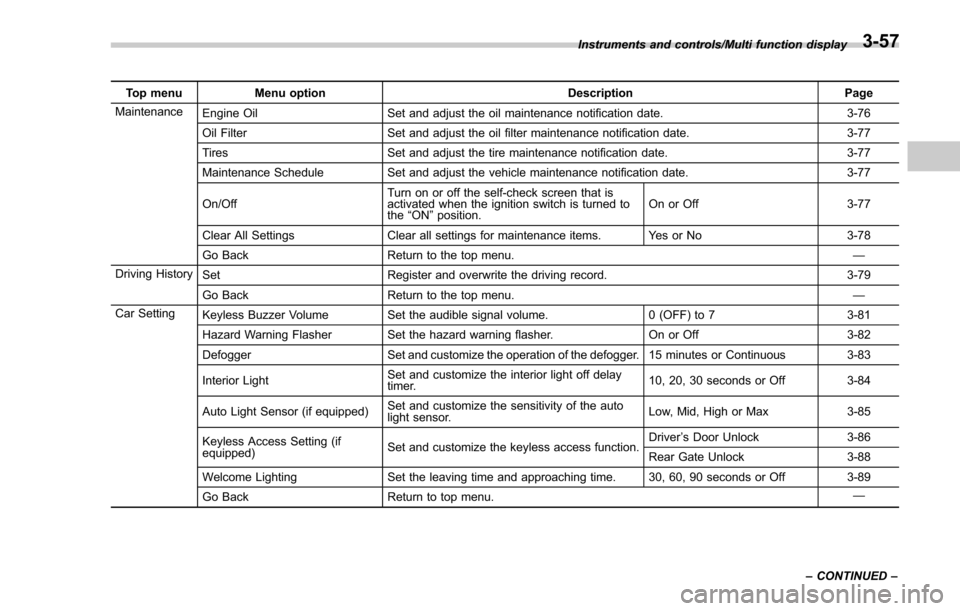
Maintenance Engine Oil Set and adjust the oil maintenance notification date. 3-76
Oil Filter Set and adjust the oil filter maintenance notification date. 3-77
Tires Set and adjust the tire maintenance notification date. 3-77
Maintenance Schedule Set and adjust the vehicle maintenance notification date. 3-77
On/Off Turn on or off the self-check screen that is
activated when the ignition switch is turned to
the
“ON ”position. On or Off
3-77
Clear All Settings Clear all settings for maintenance items. Yes or No 3-78
Go Back Return to the top menu. —
Driving History Set Register and overwrite the driving record. 3-79
Go Back Return to the top menu. —
Car Setting Keyless Buzzer Volume Set the audible signal volume. 0 (OFF) to 73-81
Hazard Warning Flasher Set the hazard warning flasher. On or Off3-82
Defogger Set and customize the operation of the defogger. 15 minutes or Continuous 3-83
Interior Light Set and customize the interior light off delay
timer. 10, 20, 30 seconds or Off
3-84
Auto Light Sensor (if equipped) Set and customize the sensitivity of the auto
light sensor. Low, Mid, High or Max
3-85
Keyless Access Setting (if
equipped) Set and customize the keyless access function. Driver
’s Door Unlock 3-86
Rear Gate Unlock 3-88
Welcome Lighting Set the leaving time and approaching time. 30, 60, 90 seconds or Off 3-89
Go Back Return to top menu. —
Instruments and controls/Multi function display
–CONTINUED –
3-57
Page 248 of 634
NOTE
.After manually changing the head-
light mode to the high beam, if you turn
on the high beam assist function,
return the light control switch to the
“ AUTO ”position.
. When manually changing the head-
light mode to the high beam, if you turn
the light control switch to the “
”
position, the instrument panel illumina-
tion, parking lights, front side marker
lights, rear side marker lights, tail lights
and license plate lights will be on.
! Tips for the high beam assist
system
. The high beam assist function recog-
nizes the condition surrounding the vehi-
cle based on the brightness of illumination
ahead of your vehicle, etc. Therefore, the
headlight mode may switch in some
situations that do not match to the driver ’s
sense.
. A bicycle or cargo cycle may not be
detected.
. Under the following situations, the
brightness of ambient illumination may
not be detected correctly and the high
beam assist function may not work prop-
erly. As a result, the glare of the high beam
may disturb the driving of an oncoming
vehicle or vehicle ahead. Also, the low beam mode may continue although there
are no oncoming vehicles and vehicles
ahead. In the such cases, change the
headlight mode manually.
–In bad weather (fog, snow, sand
storm, heavy rain, etc.)
– When the windshield glass is dirty
or fogged
– When the windshield is cracked or
damaged
– When the stereo camera is de-
formed or the stereo camera lenses
are dirty
– If there are lights similar to the
headlights or the tail lights in the
surrounding area
– When an oncoming vehicle or ve-
hicle ahead is driven without its head-
lights and tail lights on
– If the headlights of an oncoming
vehicle or the tail lights of a vehicle
ahead are dirty or discolored, or if the
light beams are not aimed correctly
– When a rapid change of brightness
continues while driving
– When driving on a road with many
ups and downs or uneven surfaces
– When driving on a road with many
curves
– When there are some objects that
reflect light strongly, such as a road
sign or a mirror in vehicle ahead –
When the rear part of the vehicle
ahead, such as a container, reflects
light strongly
– When the headlights of your vehicle
are damaged or dirty
– When your vehicle is tilted, such as
in case the vehicle has a flat tire or is
being towed
– Immediately after the engine has
started
. In the following conditions, the head-
light mode will not be automatically chan-
ged from the high beam to the low beam.
–When your vehicle passes an on-
coming vehicle suddenly in a blind
curve
– When another vehicle passes in
front of your vehicle
– When an oncoming vehicle or ve-
hicle ahead comes in and out of view
because of continuous curves, median
strips, roadside trees, etc.
. If the stereo camera detects the light of
the front fog lights of an oncoming vehicle,
the headlight mode may change from the
high beam to the low beam automatically.
. The headlight mode may change from
the high beam to the low beam, or the low
beam mode may continue, when affected
by a street light, traffic signal, illumination
of an advertisement board, or a reflective
object such as a road sign and signboard.
Instruments and controls/Light control switch
–CONTINUED –3-97
Page 253 of 634

Instruments and controls/Headlight beam leveler
Headlight beam leveler (if
equipped)
&Automatic headlight beam
leveler (models with LED
headlights)
The LED headlights generate more light
than conventional halogen headlights.
Therefore a driver of an oncoming vehicle
may experience too much glare if your
headlight beam height adjustment is high
when the vehicle is carrying a heavy load.
The automatic headlight beam leveler
adjusts the headlight beam height auto-
matically and optimally according to the
load being carried by the vehicle.
Fog light switch (if equipped)
1) Headlight switch
2) Fog light switch
The front fog lights will turn on when the
fog light switch is placed in the “”
position while the headlights are in the
following condition.
. while the headlight switch is in the “
”
position
. for models with the auto on/off head-
lights, while the headlight switch is in the
“AUTO ”position and the headlights turn
on automatically
To turn off the front fog lights, turn the
switch back down to the “
”position.
Front fog light indicator (type A)
Front fog light indicator (type B)
The indicator light on the combination
meter will illuminate when the front fog
lights are illuminated.
3-102
Page 254 of 634
&Steering responsive fog
lights system (if equipped)
The steering responsive fog lights system
automatically turns the front fog light on
and off based on the steering angle and
vehicle speed when entering a curve or
driving on curved roads. The system is
intended to help prevent accidents by
enabling better visibility of curves ahead
and early recognition of any disabled
vehicles or other obstacles.
The front fog light on the inside of a curve
will turn on if all of the following conditions
are met.
. The light control switch is in the “
”
position, or the light control switch is in the
“AUTO ”position and the low beam head-
lights are turned on automatically
. The fog light switch is in the “
”
position
. The low beam mode is selected
. The select lever is in the “D”position or
the manual mode is selected
. The steering responsive fog lights
system has not been deactivated
. The operating conditions such as the
steering angle and vehicle speed are met
The front fog lights on both sides will turn
on as usual if all of the following conditions
are met. .
The light control switch is in either of
the following positions.
–in the “
”position
– in the “AUTO ”position and the low
beam headlights turn on automatically
. The fog light switch is in the “
”
position
. The low beam mode is selected
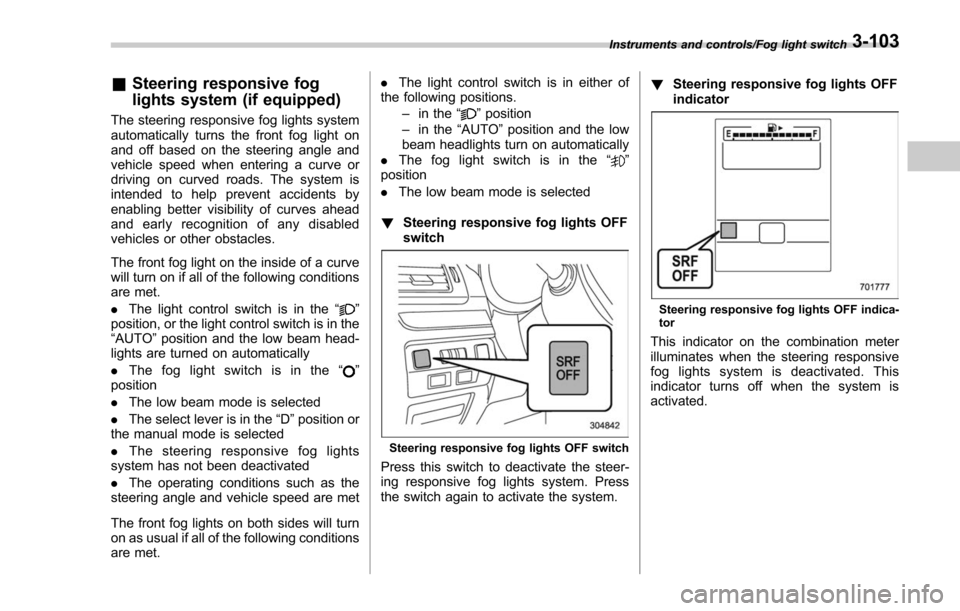
! Steering responsive fog lights OFF
switch
Steering responsive fog lights OFF switch
Press this switch to deactivate the steer-
ing responsive fog lights system. Press
the switch again to activate the system. !
Steering responsive fog lights OFF
indicator
Steering responsive fog lights OFF indica-
tor
This indicator on the combination meter
illuminates when the steering responsive
fog lights system is deactivated. This
indicator turns off when the system is
activated.
Instruments and controls/Fog light switch3-103
Page 268 of 634
located on the climate control panel. The
rear window defogger, outside mirror
defogger and windshield wiper deicer are
activated simultaneously. The indicator
light on the control switch illuminates while
the defogger and deicer system is acti-
vated.
To turn them off, press the control switch
again. They also turn off when the ignition
switch is turned to the“ACC”or “LOCK” /
“ OFF ”position.
The defogger and deicer system will
automatically shut off after approximately
15 minutes. If the rear window and the
outside mirrors have been cleared and the
windshield wiper blades have been deiced
completely before that time, press the
control switch to turn them off. If defrost-
ing, defogging or deicing is not complete,
you have to press the control switch to
turn them on again.
For models with the automatic climate
control system (type B, C and D), it is
possible for the defogger and deicer
system to be set to continuous operation
mode by a SUBARU dealer. Consult your
SUBARU dealer for details. Also, for
models with a multi function display, the
setting can be changed using the display.
For details, refer to “Multi function display ”
F 3-44. If the battery voltage drops below the
permissible level, continuous operation of
the defogger and deicer system is can-
celed and the system stops operating.
CAUTION
.
To prevent the battery from being
discharged, do not operate the
defogger and deicer system con-
tinuously for any longer than
necessary.
. Do not use sharp instruments or
window cleaner containing abra-
sives to clean the inner surface
of the rear window. They may
damage the conductors printed
on the window.
NOTE
. Turn on the defogger and deicer
system if the wipers are frozen to the
windshield.
. If the windshield is covered with
snow, remove the snow so that the
windshield wiper deicer works effec-
tively.
. While the defogger and deicer sys-
tem is in the continuous operation
mode, if the vehicle speed remains at
9 mph (15 km/h) or lower for 15
minutes, the windshield wiper deicer automatically stops operating, though
the rear window defogger and outside
mirror defogger maintain continuous
operation in this condition.
.
While the defogger and deicer sys-
tem is in the continuous operation
mode, if the battery voltage drops
below the permissible level, continu-
ous operation of the defogger and
deicer system is canceled and the
system stops operating.
Instruments and controls/Defogger and deicer3-117
Page 278 of 634
Automatic climate control
operation (type B, C and D)
When this mode is selected, the fan
speed, airflow distribution, air-inlet control,
and air conditioner compressor operation
are automatically controlled. To activate
this mode, perform the following.
NOTE
.Operate the automatic climate con-
trol system when the engine is running.
. Even when cooling is not necessary,
setting the temperature much lower
than the current outlet air temperature
turns on the air conditioner compres-
sor automatically and the “A/C ”indi-
cator light on the control panel illumi-
nates.
& Type B
1. Turn the airflow mode selection dial
and fan speed control dial to the “AUTO”
position.
2. Set the preferred temperature using
the temperature control dial.
NOTE
. Each function can be individually
set to the AUTO mode independently of
the other functions. Any function set to the AUTO mode is controlled automa-
tically. Any function not set to the
AUTO mode can be manually adjusted
as desired.
.
The controllable temperature range
may vary depending on the regional
specifications of the vehicle.
3. To turn off the climate control system,
turn the fan speed control dial to the “OFF”
position. Then the air inlet selection will be
set as follows.
. when the AUTO mode is selected: OFF
(outside air)
. when the AUTO mode is not selected:
the mode that was selected when turning
off the climate system will be selected.
& Type C and D
1. Depress the “AUTO ”button. The
indicator light “FULL AUTO ”on the display
illuminates.
2. Set the preferred temperature using
the temperature control dial.
NOTE
. The controllable temperature range
may vary depending on the regional
specifications of the vehicle.
. During FULL AUTO mode operation,
a small amount of air may flow from the
foot outlets when ventilation mode is displayed.
.
If you operate any of the buttons on
the control panel other than the “OFF ”
button, rear window defogger button
and temperature control dial(s) during
FULL AUTO mode operation, the
“ FULL ”indicator light on the control
panel will turn off and the “AUTO ”
indicator light will remain illuminated.
You can then manually control the
system as desired using the button
you operated. To change the system
back to the FULL AUTO mode, press
the “AUTO ”button.
3. To turn off the climate control system,
press the “OFF ”button. Then the air inlet
selection will be set to OFF (outside air).
Climate control/Automatic climate control operation (type B, C and D)
–CONTINUED –4-7