2017 SUBARU FORESTER change time
[x] Cancel search: change timePage 2 of 634

Foreword
Congratulations on choosing a SUBARU vehicle. This Owner’s
Manual has all the information necessary to keep your SUBARU in
excellent condition and to properly maintain the emission control
system for minimizing emission pollutants. We urge you to read
this manual carefully so that you may understand your vehicle and
its operation. For information not found in this Owner ’s Manual,
such as details concerning repairs or adjustments, please contact
the SUBARU dealer from whom you purchased your SUBARU or
the nearest SUBARU dealer.
The information, specifications and illustrations found in this
manual are those in effect at the time of printing. FUJI HEAVY
INDUSTRIES LTD. reserves the right to change specifications and
designs at any time without prior notice and without incurring any
obligation to make the same or similar changes on vehicles
previously sold. This Owner ’s Manual applies to all models and
covers all equipment, including factory installed options. Some
explanations, therefore may be for equipment not installed in your
vehicle.
Please leave this manual in the vehicle at the time of resale. The
next owner will need the information found herein.
FUJI HEAVY INDUSTRIES LTD., TOKYO, JAPAN
is a registered trademark of FUJI HEAVY INDUSTRIES LTD.
*CCopyright 2016 FUJI HEAVY INDUSTRIES LTD.
Page 23 of 634

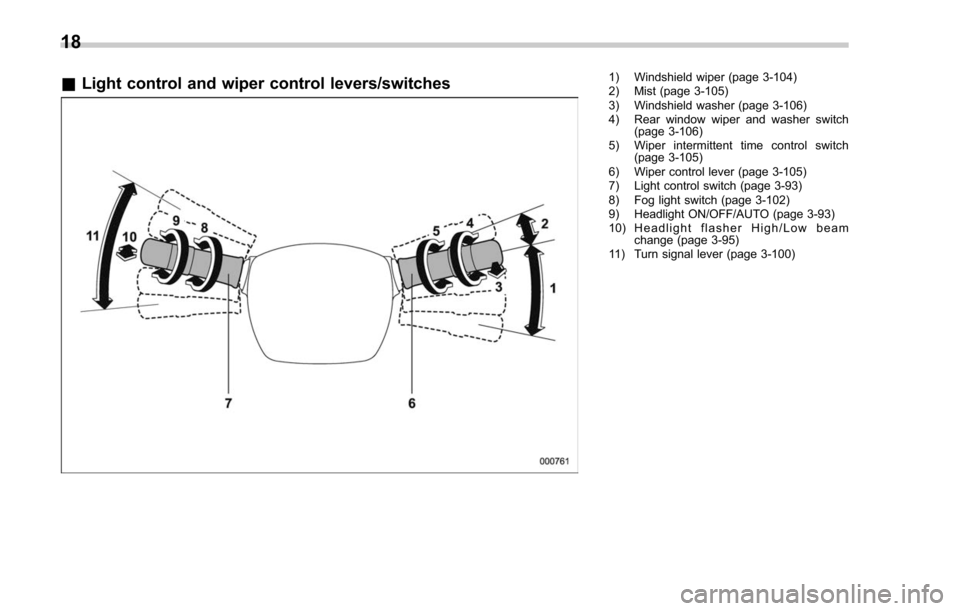
&Light control and wiper control levers/switches1) Windshield wiper (page 3-104)
2) Mist (page 3-105)
3) Windshield washer (page 3-106)
4) Rear window wiper and washer switch
(page 3-106)
5) Wiper intermittent time control switch (page 3-105)
6) Wiper control lever (page 3-105)
7) Light control switch (page 3-93)
8) Fog light switch (page 3-102)
9) Headlight ON/OFF/AUTO (page 3-93)
10) Headlight flasher High/Low beam change (page 3-95)
11) Turn signal lever (page 3-100)
18
Page 30 of 634

Function settings
A SUBARU dealer can change the settings of the functions shown in the following table to meet your personal requirements. Contact
the nearest SUBARU dealer for details. If your vehicle is equipped with a multi function display, the settings for some of these functions
can be changed using the display. For details, refer to“Multi function display”F 3-44.
Item Function Possible settingsDefault setting
Alarm system Alarm system Operation/Non-operation Operation
Monitoring start delay time (after closure of doors) 0 seconds/30 seconds 30 seconds
Impact sensor operation (only models with shock
sensors (dealer option)) Operation/Non-operation Non-operation
Passive arming (models without “keyless access with
push-button start system ”) Operation/Non-operation Non-operation
Dome light and map lights illumination ON/OFFOFF
Keyless access (if equipped) Hazard warning flasher Operation/Non-operation Operation
Audible signal Operation/Non-operation Operation
Audible signal volume Level 1 to 7Level 5
Door unlock selection function (driver ’s door unlock) Driver ’s door only/All doors Driver ’s door only
Door unlock selection function (rear gate unlock) Rear gate only/All doors Rear gate only
Remote keyless entry system Hazard warning flasher Operation/Non-operation Operation
Audible signal Operation/Non-operation Operation
Audible signal volume Level 1 to 7Level 5
Key lock-in prevention Key lock-in prevention Operation/Non-operation Operation
Defogger and deicer system for models
with the automatic climate control system Rear window defogger, outside mirror defogger and
windshield wiper deicer Operation for 15 minutes/
Continuous operationOperation for 15
minutes
– CONTINUED –
25
Page 31 of 634

ItemFunction Possible settingsDefault setting
Dome light Operation of dome light/map light/cargo area light OFF
delay timer OFF/10 seconds/20 sec-
onds/30 seconds30 seconds
Map light
Cargo area light
Battery drainage prevention function Battery drainage prevention function Operation/Non-operation Operation
Seatbelt warning Sounds a chime while driving Operation/Non-operation Operation
Auto on/off headlights (if equipped) Sensitivity of the operation of the auto on/off headlights Low/Mid/High/Max Mid
Reverse gear interlocked rear wiper Reverse gear interlocked rear wiper operation Operation/Non-operation Non-operation*
1
One-touch lane changer Operation of the one-touch lane changer Operation/Non-operation Operation
High beam assist function (if equipped) High beam assist function Operation/Non-operation Operation
Welcome lighting function (if equipped) Welcome lighting function (when approaching) OFF/30 seconds/60 sec- onds/90 seconds30 seconds
Welcome lighting function (when exiting) OFF/30 seconds/60 sec-
onds/90 seconds30 seconds
*1: Except for U.S. model, the default setting will be
“Operation ”.
26
Page 41 of 634

Seat, seatbelt and SRS airbags/Seat heater
or“HIGH ”position on the switch, as
desired, depending on the temperature.
Selecting the “HIGH”position will cause
the seat to heat up quicker.
To turn off the seat heater, lightly press the
opposite side of the current position.
The indicator located on the switch illumi-
nates when the seat heater is in operation.& Rear seat heater (if equipped)
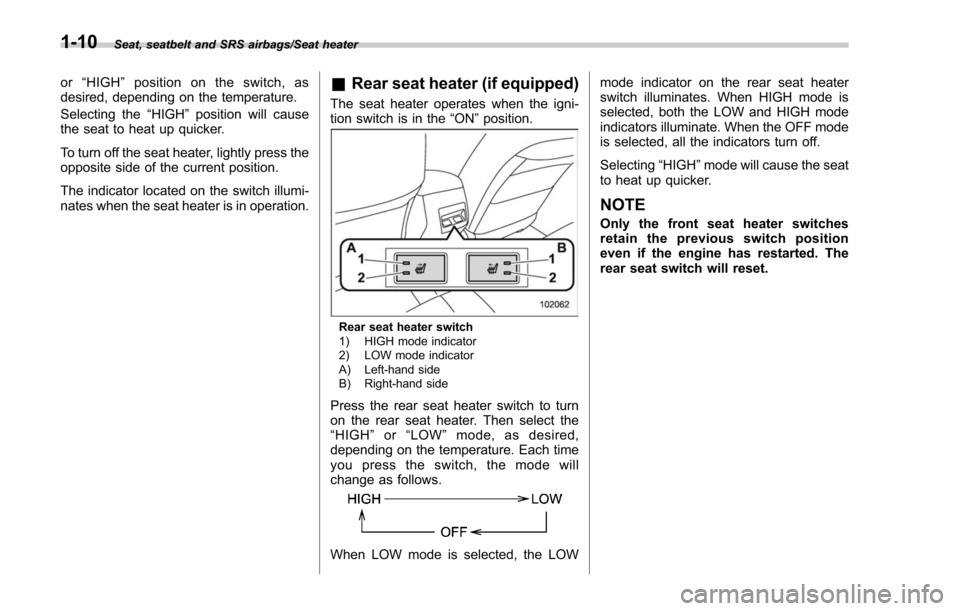
The seat heater operates when the igni-
tion switch is in the “ON”position.
Rear seat heater switch
1) HIGH mode indicator
2) LOW mode indicator
A) Left-hand side
B) Right-hand side
Press the rear seat heater switch to turn
on the rear seat heater. Then select the
“HIGH ”or “LOW ”mode, as desired,
depending on the temperature. Each time
youpresstheswitch,themodewill
change as follows.
When LOW mode is selected, the LOW mode indicator on the rear seat heater
switch illuminates. When HIGH mode is
selected, both the LOW and HIGH mode
indicators illuminate. When the OFF mode
is selected, all the indicators turn off.
Selecting
“HIGH”mode will cause the seat
to heat up quicker.
NOTE
Only the front seat heater switches
retainthepreviousswitchposition
even if the engine has restarted. The
rear seat switch will reset.
1-10
Page 64 of 634

child suffering personal injury in the
event of an accident may be in-
creased.
! Installing a rearward facing child
restraint
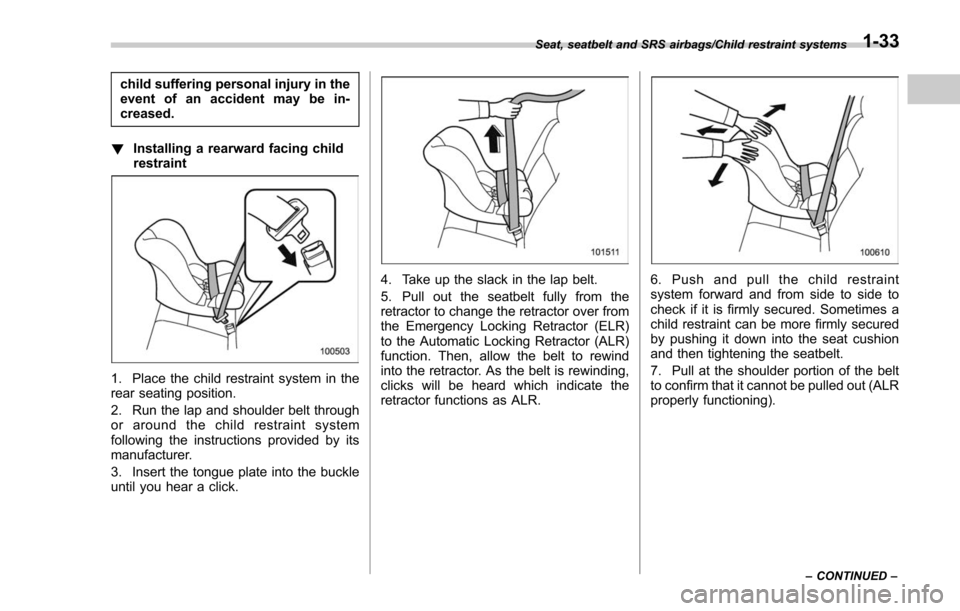
1. Place the child restraint system in the
rear seating position.
2. Run the lap and shoulder belt through
or around the child restraint system
following the instructions provided by its
manufacturer.
3. Insert the tongue plate into the buckle
until you hear a click.
4. Take up the slack in the lap belt.
5. Pull out the seatbelt fully from the
retractor to change the retractor over from
the Emergency Locking Retractor (ELR)
to the Automatic Locking Retractor (ALR)
function. Then, allow the belt to rewind
into the retractor. As the belt is rewinding,
clicks will be heard which indicate the
retractor functions as ALR.6. Push and pull the child restraint
system forward and from side to side to
check if it is firmly secured. Sometimes a
child restraint can be more firmly secured
by pushing it down into the seat cushion
and then tightening the seatbelt.
7. Pull at the shoulder portion of the belt
to confirm that it cannot be pulled out (ALR
properly functioning).
Seat, seatbelt and SRS airbags/Child restraint systems
–CONTINUED –1-33
Page 66 of 634

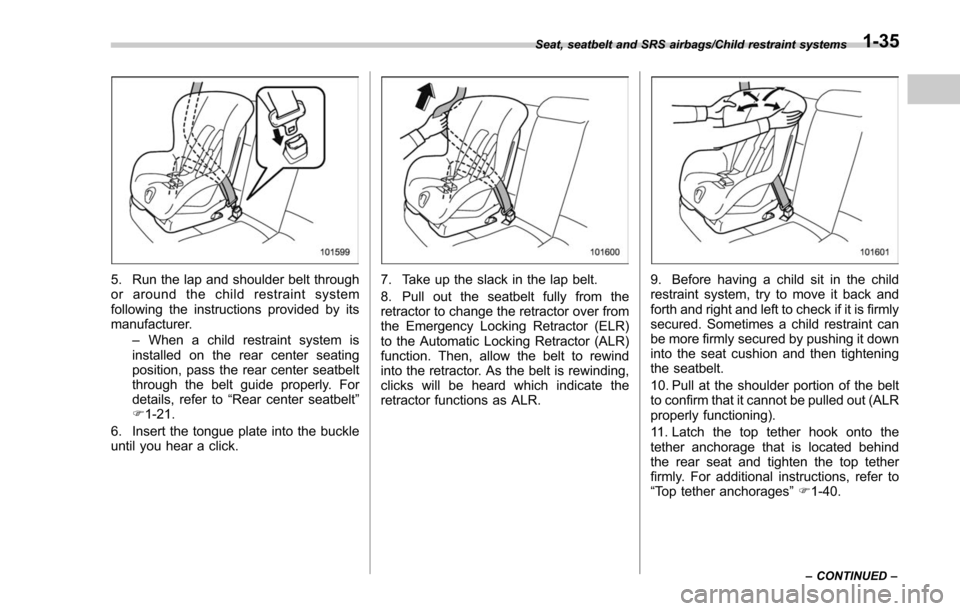
5. Run the lap and shoulder belt through
or around the child restraint system
following the instructions provided by its
manufacturer.–When a child restraint system is
installed on the rear center seating
position, pass the rear center seatbelt
through the belt guide properly. For
details, refer to “Rear center seatbelt ”
F 1-21.
6. Insert the tongue plate into the buckle
until you hear a click.7. Take up the slack in the lap belt.
8. Pull out the seatbelt fully from the
retractor to change the retractor over from
the Emergency Locking Retractor (ELR)
to the Automatic Locking Retractor (ALR)
function. Then, allow the belt to rewind
into the retractor. As the belt is rewinding,
clicks will be heard which indicate the
retractor functions as ALR.9. Before having a child sit in the child
restraint system, try to move it back and
forth and right and left to check if it is firmly
secured. Sometimes a child restraint can
be more firmly secured by pushing it down
into the seat cushion and then tightening
the seatbelt.
10. Pull at the shoulder portion of the belt
to confirm that it cannot be pulled out (ALR
properly functioning).
11. Latch the top tether hook onto the
tether anchorage that is located behind
the rear seat and tighten the top tether
firmly. For additional instructions, refer to
“ Top tether anchorages ”F 1-40.
Seat, seatbelt and SRS airbags/Child restraint systems
–CONTINUED –1-35
Page 117 of 634

Keys and doors/Keyless access with push–button start system
on a cell phone, the operating ranges may
be reduced, or the keyless access func-
tion may not operate.
In such a case, perform the procedure
described in “Locking and unlocking ”F 9-
17.
. When an access key is in the operating
range, if the door handle becomes wet
due to exposure to a significant amount of
water when the vehicle is washed or
during heavy rain, the doors may be
locked or unlocked.
. The keyless access function may not
operate properly depending on the status
of the access key and the radio wave
conditions around the vehicle. In such a
case, perform the procedure described in
“ Locking and unlocking ”F 9-17.
! How to use keyless access func-
tions
! Keyless access function tips
. When you lock the doors and rear gate
using the keyless access function, turn the
push-button ignition switch off. It is not
possible to lock the doors and rear gate
using the keyless access function when
the push-button ignition switch is on the
“ACC ”or “ON ”position. Refer to “Switch-
ing power status ”F 3-7.
. If the door handle is gripped with a
gloved hand, the door lock may not be released.
.
If the door lock sensor is touched three
times or more repeatedly, the system will
ignore the sensor operation.
. When performing the locking proce-
dure too quickly, locking may not have
been completed. After performing the
locking procedure, it is recommended to
pull the REAR door handle to confirm that
the doors have been locked.
. It is possible to lock the doors even
when one of the doors is open. After
performing the locking procedure, close
the opened door or rear gate to lock it.
. Within 3 seconds after locking the
doors and the rear gate by using the
keyless access function, it is not possible
to unlock doors and/or the rear gate by
using the keyless access function.
. When locking, be sure to carry the
access key to prevent locking the access
key in the vehicle.
. The setting of the hazard warning
flasher operation and the volume of the
audible signal can be changed by your
SUBARU dealer. Contact your SUBARU
dealer for details.
. For models with the multi function
display, the setting of the hazard warning
flasher operation can be changed by
operating the multi function display. For
details, refer to “Hazard warning flasher setting
”F 3-82.
! Unlocking
Carry the access key, and grip the door
handle.
. When the driver ’s door handle is
gripped, only the driver ’s door will be
unlocked.
. When the front passenger ’s door han-
dle is gripped, all doors including the rear
gate will be unlocked.
Also, an electronic chirp will sound twice
and the hazard warning flashers will flash
twice.
2-14