2017 SUBARU FORESTER warning
[x] Cancel search: warningPage 249 of 634
Instruments and controls/Light control switch
.The timing of the change of headlight
mode may differ due to the following
factors.
–Color or brightness of the head-
lights of an oncoming vehicle or the tail
lights of a vehicle ahead
– The headlights of the oncoming
vehicle or the tail lights of the vehicle
ahead are covered with mud, snow,
etc.
– Movement and direction of an on-
coming vehicle or a vehicle ahead
– When the headlights of an oncom-
ing vehicle or the tail lights of a vehicle
ahead illuminate on only one side
– When the oncoming vehicle or
vehicle ahead is a motorcycle
– Conditions of a road (slope, curve,
road surface, etc.)
– Number of passengers and weight
of loaded cargo
– Limitation of the detection ability of
the stereo camera& Headlight flasher
CAUTION
Do not hold the lever in the flashing
position for more than just a few
seconds.
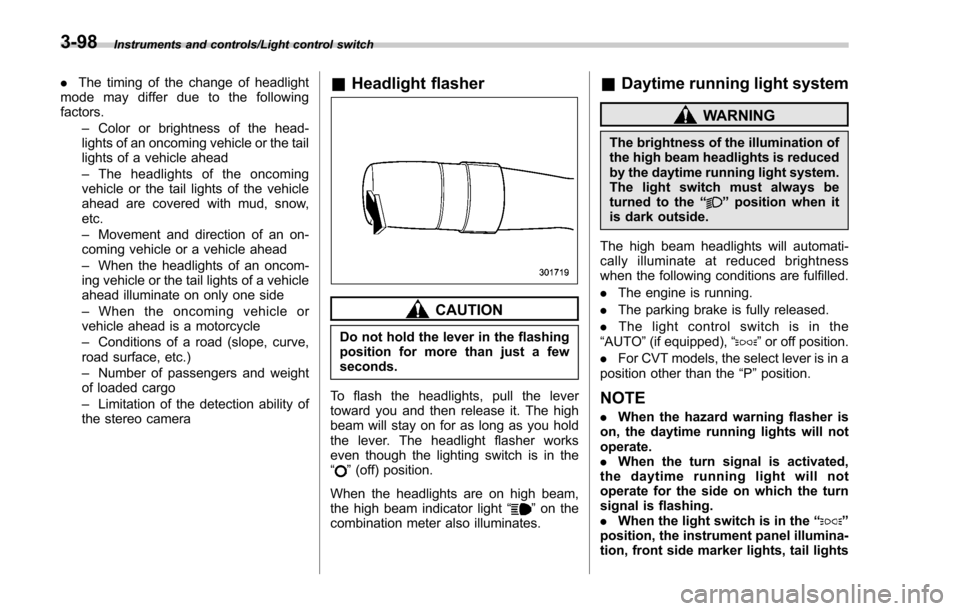
To flash the headlights, pull the lever
toward you and then release it. The high
beam will stay on for as long as you hold
the lever. The headlight flasher works
even though the lighting switch is in the
“
” (off) position.
When the headlights are on high beam,
the high beam indicator light “
”on the
combination meter also illuminates.
& Daytime running light system
WARNING
The brightness of the illumination of
the high beam headlights is reduced
by the daytime running light system.
The light switch must always be
turned to the “
”position when it
is dark outside.
The high beam headlights will automati-
cally illuminate at reduced brightness
when the following conditions are fulfilled.
. The engine is running.
. The parking brake is fully released.
. The light control switch is in the
“AUTO ”(if equipped), “
”or off position.
. For CVT models, the select lever is in a
position other than the “P”position.
NOTE
. When the hazard warning flasher is
on, the daytime running lights will not
operate.
. When the turn signal is activated,
the daytime running light will not
operate for the side on which the turn
signal is flashing.
. When the light switch is in the “
”
position, the instrument panel illumina-
tion, front side marker lights, tail lights
3-98
Page 251 of 634
Instruments and controls/Turn signal lever
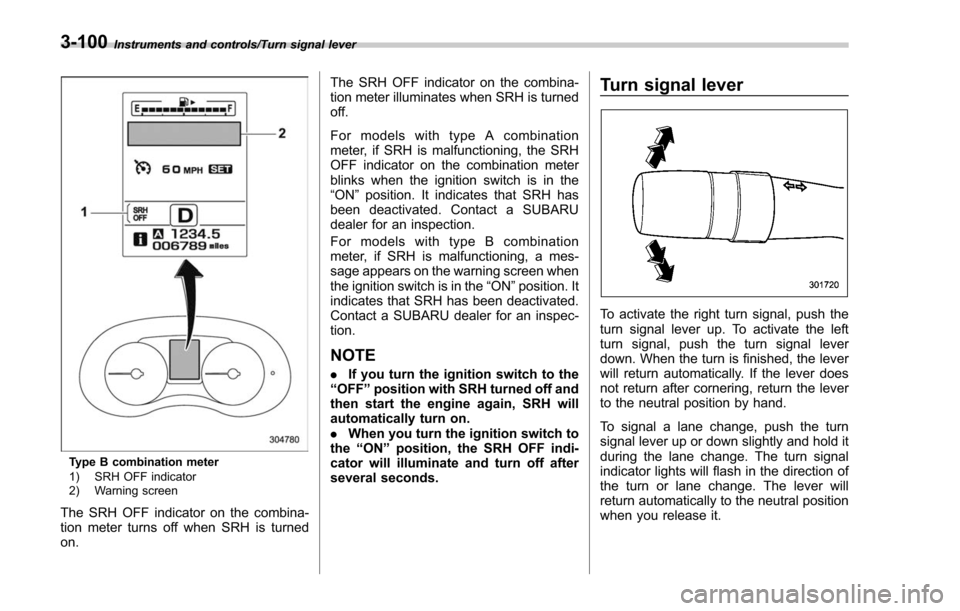
Type B combination meter
1) SRH OFF indicator
2) Warning screen
The SRH OFF indicator on the combina-
tion meter turns off when SRH is turned
on.The SRH OFF indicator on the combina-
tion meter illuminates when SRH is turned
off.
For models with type A combination
meter, if SRH is malfunctioning, the SRH
OFF indicator on the combination meter
blinks when the ignition switch is in the
“ON
”position. It indicates that SRH has
been deactivated. Contact a SUBARU
dealer for an inspection.
For models with type B combination
meter, if SRH is malfunctioning, a mes-
sage appears on the warning screen when
the ignition switch is in the “ON”position. It
indicates that SRH has been deactivated.
Contact a SUBARU dealer for an inspec-
tion.
NOTE
. If you turn the ignition switch to the
“ OFF ”position with SRH turned off and
then start the engine again, SRH will
automatically turn on.
. When you turn the ignition switch to
the “ON ”position, the SRH OFF indi-
cator will illuminate and turn off after
several seconds.
Turn signal lever
To activate the right turn signal, push the
turn signal lever up. To activate the left
turn signal, push the turn signal lever
down. When the turn is finished, the lever
will return automatically. If the lever does
not return after cornering, return the lever
to the neutral position by hand.
To signal a lane change, push the turn
signal lever up or down slightly and hold it
during the lane change. The turn signal
indicator lights will flash in the direction of
the turn or lane change. The lever will
return automatically to the neutral position
when you release it.
3-100
Page 255 of 634
Instruments and controls/Wiper and washer
Wiper and washer
WARNING
In freezing weather, do not use the
windshield washer until the wind-
shield is sufficiently warmed by the
defroster.
Otherwise the washer fluid can
freeze on the windshield, blocking
your view.
CAUTION
.Do not operate the washer con-
tinuously for more than 10 sec-
onds, or when the washer fluid
tank is empty. This may cause
overheating of the washer motor.
Check the washer fluid level
frequently, such as at fuel stops.
. Do not operate the wipers when
the windshield or rear window is
dry. This may scratch the glass,
damage the wiper blades and
might cause the wiper motor to
fail. Before operating the wiper
on a dry windshield or rear
window, always use the wind-
shield washer. .
In freezing weather, be sure that
the wiper blades are not frozen to
the windshield or rear window
before switching on the wipers.
Attempting to operate the wiper
with the blades frozen to the
window glass could cause not
only the wiper blades to be
damaged but also might cause
the wiper motor to fail. If the
wiper blades are frozen to the
window glass, be sure to operate
the defroster, windshield wiper
deicer (if equipped) or rear win-
dow defogger before turning on
the wiper.
. If the wipers stop during opera-
tion because of ice or some other
obstruction on the window, this
might cause the wiper motor to
fail even if the wiper switch is
turned off. If this occurs,
promptly stop the vehicle in a
safe place, turn the ignition
switch to the “LOCK ”/“ OFF ”po-
sition and clean the window
glass to allow proper wiper op-
eration.
. Use clean water if windshield
washer fluid is unavailable. In
areas where water freezes in
winter, use SUBARU Windshield Washer Fluid or the equivalent.
Refer to
“Windshield washer
fluid ”F 11-30.
Also, when driving the vehicle
when there are freezing tempera-
tures, use non-freezing type wi-
per blades.
. Do not clean the wiper blades
with gasoline or a solvent, such
as paint thinner or benzine. This
will cause deterioration of the
wiper blades.
NOTE
. The windshield wiper motor is pro-
tected against overloads by a circuit
breaker. If the motor operates continu-
ously under an unusually heavy load,
the circuit breaker may trip to stop the
motor temporarily. If this happens, park
your vehicle in a safe place, turn off the
wiper switch, and wait for approxi-
mately 10 minutes. The circuit breaker
will reset itself, and the wipers will
again operate normally.
. Clean your wiper blades and win-
dow glass periodically with a washer
solution to prevent streaking, and to
remove accumulations of road salt or
road film. Operate the windshield
washer for at least 1 second so that
3-104
Page 257 of 634
Instruments and controls/Wiper and washer
!Windshield washer
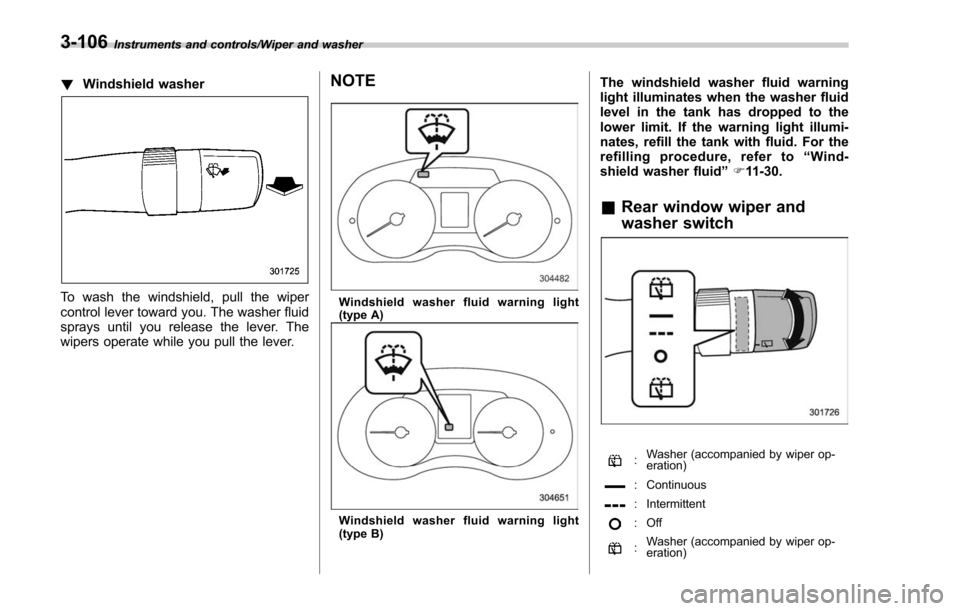
To wash the windshield, pull the wiper
control lever toward you. The washer fluid
sprays until you release the lever. The
wipers operate while you pull the lever.
NOTE
Windshield washer fluid warning light
(type A)
Windshield washer fluid warning light
(type B)
The windshield washer fluid warning
light illuminates when the washer fluid
level in the tank has dropped to the
lower limit. If the warning light illumi-
nates, refill the tank with fluid. For the
refilling procedure, refer to “Wind-
shield washer fluid ”F 11-30.
& Rear window wiper and
washer switch
:Washer (accompanied by wiper op-
eration)
: Continuous
: Intermittent
:Off
:Washer (accompanied by wiper op-
eration)
3-106
Page 266 of 634
by calling the toll-free HomeLink-hotline at
1-800-355-3515.
NOTE
.This device complies with FCC rules
part 15 and Industry Canada RSS-210.
Operation is subject to the following
two conditions: (1) This device may not
cause harmful interference, and (2)
This device must accept any interfer-
ence that may be received including
interference that may cause undesired
operation. WARNING: The transmitter
has been tested and complies with FCC
and IC rules. Changes or modifications
not expressly approved by the party
responsible for compliance could void
the user ’s authority to operate the
device.
. This equipment complies with FCC
radiation exposure limits set forth for
an uncontrolled environment. End
Users must follow the specific operat-
ing instructions for satisfying RF ex-
posure compliance. This transmitter
must be at least 20 cm from the user
and must not be co-located or operat-
ing in conjunction with any other
antenna or transmitter. .
The term “IC: ”before the certifica-
tion/registration number only signifies
that Industry Canada technical specifi-
cations were met.
HomeLink®and the HomeLink House®logo are registered trademarks of Gentex
Corporation.
& Outside mirrors
! Convex mirror (passenger side)
WARNING
Objects look smaller in a convex
mirror and farther away than when
viewed in a flat mirror. Do not use
the convex mirror to judge the
distance of vehicles behind you
when changing lanes. Use the inside
mirror (or glance backwards) to
determine the actual size and dis-
tance of objects that you view in
convex mirror.
Instruments and controls/Mirrors
–CONTINUED –3-115
Page 269 of 634
Instruments and controls/Tilt/telescopic steering wheel
Tilt/telescopic steering wheel
WARNING
.Do not adjust the steering wheel
tilt/telescopic position while driv-
ing. This may cause loss of
vehicle control and result in
personal injury.
. If the lever cannot be raised to
the fixed position, adjust the
steering wheel again. It is dan-
gerous to drive without locking
the steering wheel. This may
cause loss of vehicle control
and result in personal injury.
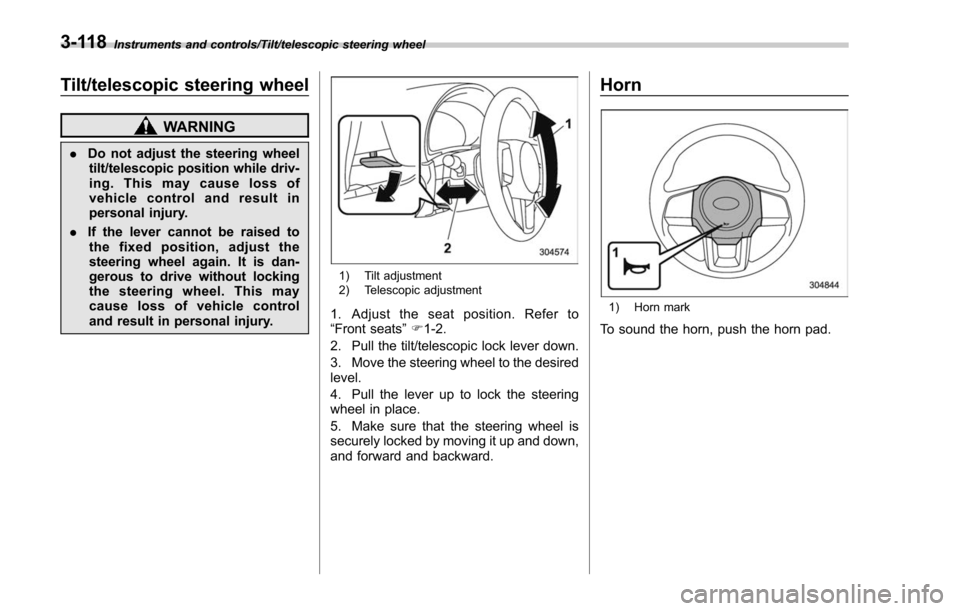
1) Tilt adjustment
2) Telescopic adjustment
1. Adjust the seat position. Refer to
“Front seats ”F 1-2.
2. Pull the tilt/telescopic lock lever down.
3. Move the steering wheel to the desired
level.
4. Pull the lever up to lock the steering
wheel in place.
5. Make sure that the steering wheel is
securely locked by moving it up and down,
and forward and backward.
Horn
1) Horn mark
To sound the horn, push the horn pad.
3-118
Page 281 of 634
Climate control/Manual climate control operation
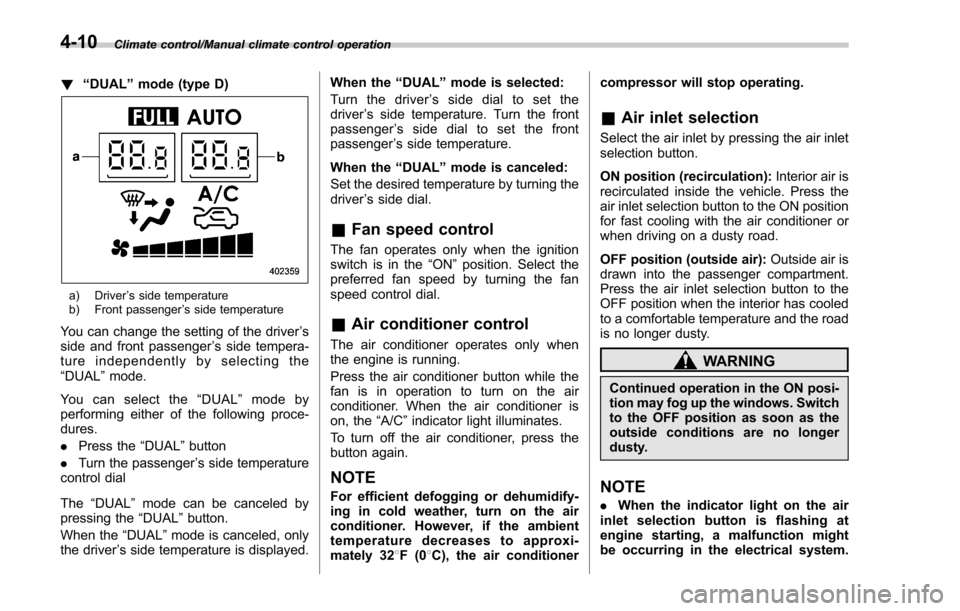
!“DUAL ”mode (type D)
a) Driver ’s side temperature
b) Front passenger ’s side temperature
You can change the setting of the driver ’s
side and front passenger ’s side tempera-
ture independently by selecting the
“DUAL ”mode.
You can select the “DUAL ”mode by
performing either of the following proce-
dures.
. Press the “DUAL”button
. Turn the passenger ’s side temperature
control dial
The “DUAL ”mode can be canceled by
pressing the “DUAL”button.
When the “DUAL”mode is canceled, only
the driver ’s side temperature is displayed. When the
“DUAL ”mode is selected:
Turn the driver ’s side dial to set the
driver ’s side temperature. Turn the front
passenger ’s side dial to set the front
passenger ’s side temperature.
When the “DUAL ”mode is canceled:
Set the desired temperature by turning the
driver ’s side dial.
& Fan speed control
The fan operates only when the ignition
switch is in the “ON”position. Select the
preferred fan speed by turning the fan
speed control dial.
& Air conditioner control
The air conditioner operates only when
the engine is running.
Press the air conditioner button while the
fan is in operation to turn on the air
conditioner. When the air conditioner is
on, the “A/C ”indicator light illuminates.
To turn off the air conditioner, press the
button again.
NOTE
For efficient defogging or dehumidify-
ing in cold weather, turn on the air
conditioner. However, if the ambient
temperature decreases to approxi-
mately 32 8F(0 8C), the air conditioner compressor will stop operating.
&
Air inlet selection
Select the air inlet by pressing the air inlet
selection button.
ON position (recirculation): Interior air is
recirculated inside the vehicle. Press the
air inlet selection button to the ON position
for fast cooling with the air conditioner or
when driving on a dusty road.
OFF position (outside air): Outside air is
drawn into the passenger compartment.
Press the air inlet selection button to the
OFF position when the interior has cooled
to a comfortable temperature and the road
is no longer dusty.
WARNING
Continued operation in the ON posi-
tion may fog up the windows. Switch
to the OFF position as soon as the
outside conditions are no longer
dusty.
NOTE
. When the indicator light on the air
inlet selection button is flashing at
engine starting, a malfunction might
be occurring in the electrical system.
4-10
Page 294 of 634
!CD player and disc
. This CD player is intended for use with
4.7 in. (12 cm) discs only.
. Extremely high temperatures can keep
the CD player from working. On hot days,
use the air conditioning system to cool the
inside of the vehicle before using the
player.
. Bumpy roads or other vibrations may
make the CD player skip.
. If moisture gets into the CD player, the
discs may not be able to be played.
Remove the discs from the player and
wait until it dries.
WARNING
CD players use an invisible laser
beam which could cause hazardous
radiation exposure if directed out-
side the unit. Be sure to operate the
player correctly.
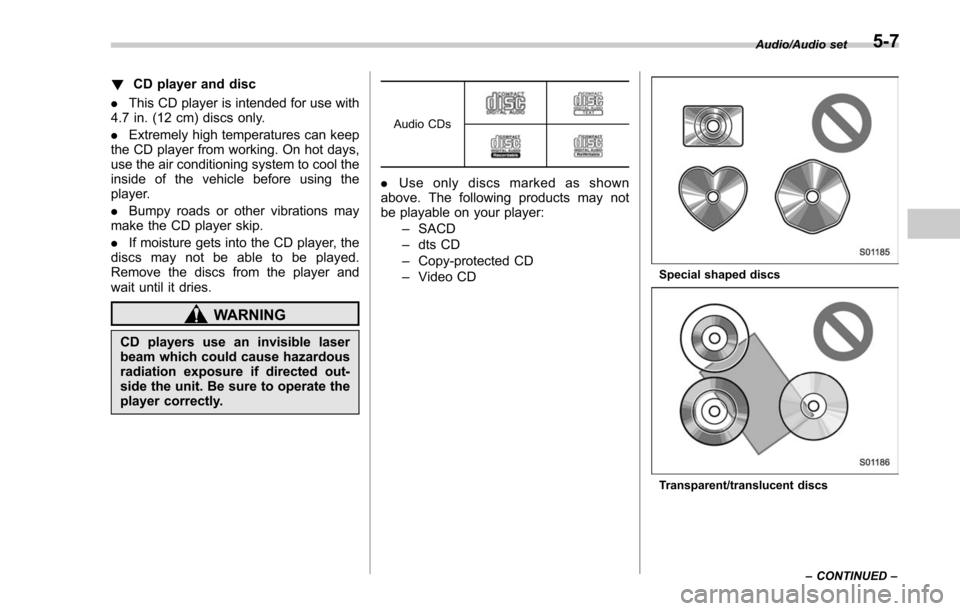
Audio CDs
. Use only discs marked as shown
above. The following products may not
be playable on your player:
–SACD
– dts CD
– Copy-protected CD
– Video CD
Special shaped discs
Transparent/translucent discs Audio/Audio set
–CONTINUED –
5-7