2017 SUBARU FORESTER warning
[x] Cancel search: warningPage 347 of 634
Audio/Audio set
IconFunction
Return to the control screen.
NOTE
If the connected device does not sup-
port the group repeat mode, the group
functions are not available.
&AUX
WARNING
Do not operate the player ’s controls
or connect the portable audio device
while driving. Doing so may result in
loss of control of your vehicle and
cause an accident or serious injury.
CAUTION
. Do not leave portable audio de-
vice in the vehicle. The tempera-
ture inside the vehicle may be-
come high, resulting in damage
to the player.
. Do not push down on or apply
unnecessary pressure to the por-
table audio device while it is
connected as this may damage
the portable audio device or its terminal.
. Do not insert foreign objects into
the port as this may damage the
portable audio device or its term-
inal.
5-60
Page 352 of 634
Bluetooth®settings
WARNING
Be sure to park the vehicle in a safe
location before connecting or oper-
ating a Bluetooth phone or audio
device. Failure to do so may result
in loss of control of your vehicle and
cause an accident or serious injury.
&Regulatory information
The Bluetooth®word mark and logos are
registered trademarks owned by Bluetooth
SIG, Inc.
& Registering/connecting
Bluetooth®device
You can register up to five devices,
regardless of whether they are Bluetooth
phones or audio devices.
NOTE
. Once the phone has been regis-
tered, it is possible to use the hands-
free system or Bluetooth audio.
. Devices cannot be registered during driving.
!
Registering a Bluetooth phone for
the first time
To use the hands-free system, it is
necessary to register a Bluetooth phone
with the system.
For details about registering a Bluetooth
device: Refer to “Registering a Bluetooth
Audio device for the first time ”F 5-66.
1. Turn the Bluetooth connection setting
of your cell phone on. .This function is not available when
Bluetooth connection setting of your
cell phone is set to off.
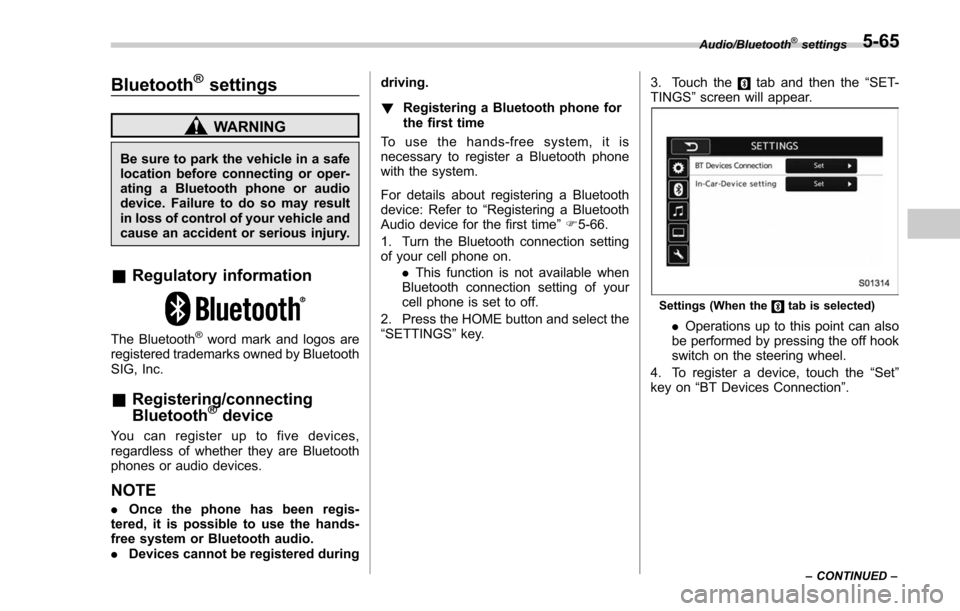
2. Press the HOME button and select the
“SETTINGS ”key. 3. Touch the
tab and then the
“SET-
TINGS ”screen will appear.
Settings (When thetab is selected)
. Operations up to this point can also
be performed by pressing the off hook
switch on the steering wheel.
4. To register a device, touch the “Set”
key on “BT Devices Connection ”.
Audio/Bluetooth®settings
– CONTINUED –5-65
Page 357 of 634
Audio/Hands–free phone system
Hands-free phone system
The hands-free system enables calls to be
made and received without having to take
your hands off the steering wheel.
This system supports Bluetooth. Bluetooth
is a wireless data system that enables cell
phones to be used without being con-
nected by a cable or placed in a cradle.
The operating procedure of the phone is
explained here.
WARNING
. While driving, do not use a cell
phone or connect the Bluetooth
phone. Doing so may result in
loss of control of your vehicle
and cause an accident or serious
injury.
. Your audio unit is fitted with
Bluetooth antennas. People with
implantable cardiac pacemakers,
cardiac resynchronization ther-
apy-pacemakers or implantable
cardioverter defibrillators should
maintain a reasonable distance
between themselves and the
Bluetooth antennas. The radio
waves may affect the operation
of such devices. .
Before using Bluetooth devices,
users of any electrical medical
device other than implantable
cardiac pacemakers, cardiac re-
synchronization therapy-pace-
makers or implantable cardiover-
ter defibrillators should consult
the manufacturer of the device
for information about its opera-
tion under the influence of radio
waves. Radio waves could have
unexpected effects on the opera-
tion of such medical devices.CAUTION
Do not leave your cell phone in the
vehicle. The temperature inside may
rise to a level that could damage the
phone.
NOTE
. If your cell phone does not support
Bluetooth, this system cannot function.
. In the following conditions, the sys-
tem may not function:
–The cell phone is turned off.
– The current position is outside
the communication area.
– The cell phone is not connected.
– The cell phone has a low battery. .
When using the hands free function
and other Bluetooth functions at the
same time, the following problems may
occur:
–The Bluetooth connection may
be cut.
– Noise may be heard when play-
ing back voice with the Bluetooth
function.
. The other party’ s voice will be heard
from the front speakers. The audio/
visual system will be muted during
phone calls or when hands-free voice
commands are used.
. Talk alternately with the other party
on the phone. If both parties speak at
the same time, the other party may not
hear what has been said. (This is not a
malfunction.)
. Keep call volume down. Otherwise,
the other party’ s voice may be audible
outside the vehicle and voice echo may
increase. When talking on the phone,
speak clearly towards the microphone.
. The other party may not hear you
clearly when:
–Drivingonanunpavedroad.
(Making excessive traffic noise.)
– Driving at high speeds.
– The moonroof or windows are
open.
– The air conditioning vents are
5-70
Page 392 of 634
NOTE
When the lid of the center console is
closed, an opening remains between
the center console and the lid to allow
the power outlet in the center console
to be used. Pass the cord of the
electrical appliance through this open-
ing.
&Use with a cigarette lighter (if
equipped)
To use the accessory power outlet as a
cigarette lighter socket, purchase the
cigarette lighter plug, which is an optional
accessory. A cigarette lighter plug is
available from your SUBARU dealer.
The cigarette lighter operates only when
the ignition switch is in the “ON”or “ACC ”
position.
To use the cigarette lighter, push in the
knob and wait a few moments. It will
automatically spring up when ready for
use.
WARNING
To avoid being burned, never grasp
the lighter by the end with the
heating element. Doing so could
result in injury and could also
damage the heating element.
CAUTION
. Do not hold the lighter pushed in,
because it will overheat.
. The electrical power socket is
originally designed to use a gen-
uine SUBARU cigarette lighter
plug. Do not use a non-genuine
cigarette lighter plug in the sock-
et. Doing so may cause a short-
circuit and overheating, resulting
in a fire.
. If the socket is ever used for a
plug-in accessory such as a cell
phone, that may damage the
portion of the socket ’s internal
mechanism that causes a cigar-
ette lighter plug to “pop out ”
after its lighter element is heated.
Therefore, do not place a cigar-
ette lighter plug in a socket that
has been used, even once, to
power a plug-in accessory. Doing
so may cause the plug to stick
and overheat, creating a potential
fire hazard.
Ashtray (if equipped)
CAUTION
. Do not use ashtrays as waste
receptacles or leave a lighted
cigarette in an ashtray. This
could cause a fire.
. Always extinguish matches and
cigarettes before putting them
into the ashtray, and then close
the ashtray securely. If you keep
the ashtray open, the fire of the
cigarette may spread to another
cigarette butt and start a fire.
. Do not put flammable material in
the ashtray.
. Do not leave a lot of cigarette
butts in the ashtray.
NOTE
Particles of ash and tobacco will accu-
mulate around the hinges of the ash-
tray ’s inner lid. Clean them off using a
toothbrush or a similar narrow-ended
implement.
Interior equipment/Ashtray
–CONTINUED –6-11
Page 395 of 634
Interior equipment/Cargo area cover
Cargo area cover (if
equipped)
The cargo area cover is provided for
covering the cargo area and to protect its
contents from direct sunlight. This cover is
detachable to make room for additional
cargo.
&Using the cover
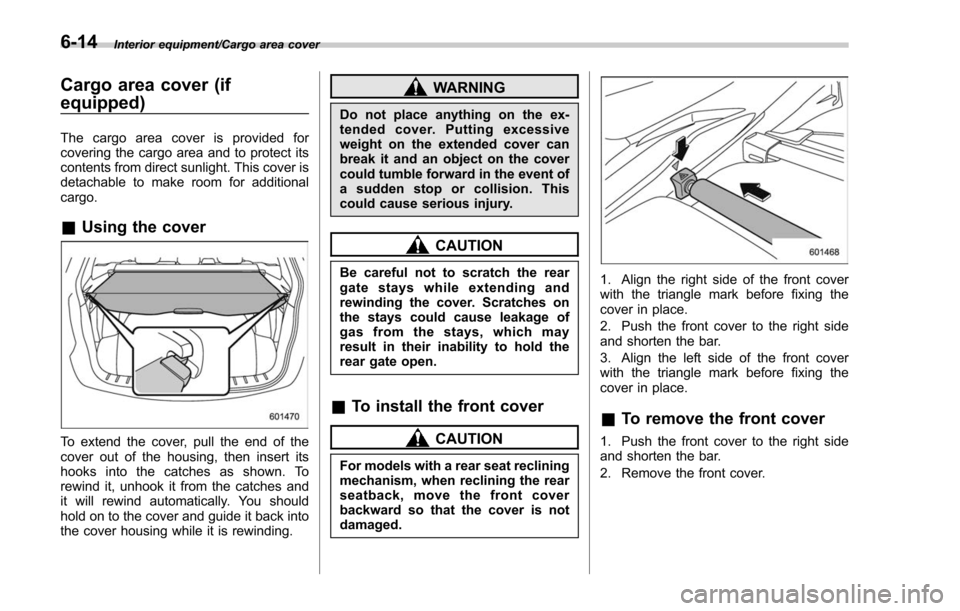
To extend the cover, pull the end of the
cover out of the housing, then insert its
hooks into the catches as shown. To
rewind it, unhook it from the catches and
it will rewind automatically. You should
hold on to the cover and guide it back into
the cover housing while it is rewinding.
WARNING
Do not place anything on the ex-
tended cover. Putting excessive
weight on the extended cover can
break it and an object on the cover
could tumble forward in the event of
a sudden stop or collision. This
could cause serious injury.
CAUTION
Be careful not to scratch the rear
gate stays while extending and
rewinding the cover. Scratches on
the stays could cause leakage of
gas from the stays, which may
result in their inability to hold the
rear gate open.
&To install the front cover
CAUTION
For models with a rear seat reclining
mechanism, when reclining the rear
seatback, move the front cover
backward so that the cover is not
damaged.
1. Align the right side of the front cover
with the triangle mark before fixing the
cover in place.
2. Push the front cover to the right side
and shorten the bar.
3. Align the left side of the front cover
with the triangle mark before fixing the
cover in place.
&To remove the front cover
1. Push the front cover to the right side
and shorten the bar.
2. Remove the front cover.
6-14
Page 398 of 634
Under-floor storage compart-
ment (if equipped)
NOTE
The shape of the storage compartment
may be different depending on the
model.
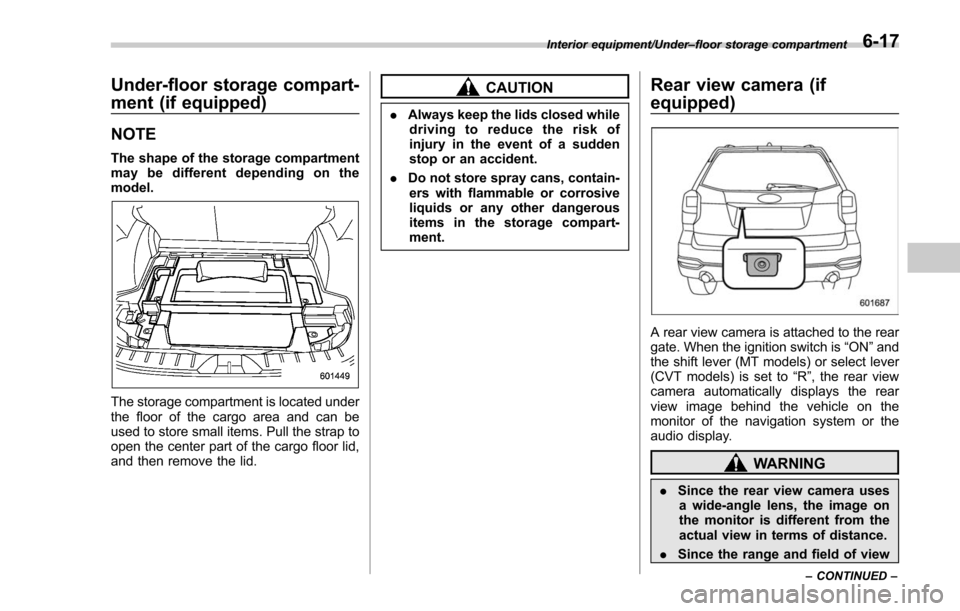
The storage compartment is located under
the floor of the cargo area and can be
used to store small items. Pull the strap to
open the center part of the cargo floor lid,
and then remove the lid.
CAUTION
.Always keep the lids closed while
driving to reduce the risk of
injury in the event of a sudden
stop or an accident.
. Do not store spray cans, contain-
ers with flammable or corrosive
liquids or any other dangerous
items in the storage compart-
ment.
Rear view camera (if
equipped)
A rear view camera is attached to the rear
gate. When the ignition switch is “ON”and
the shift lever (MT models) or select lever
(CVT models) is set to “R”, the rear view
camera automatically displays the rear
view image behind the vehicle on the
monitor of the navigation system or the
audio display.
WARNING
. Since the rear view camera uses
a wide-angle lens, the image on
the monitor is different from the
actual view in terms of distance.
. Since the range and field of view
Interior equipment/Under –floor storage compartment
–CONTINUED –6-17
Page 401 of 634
Interior equipment/Rear view camera
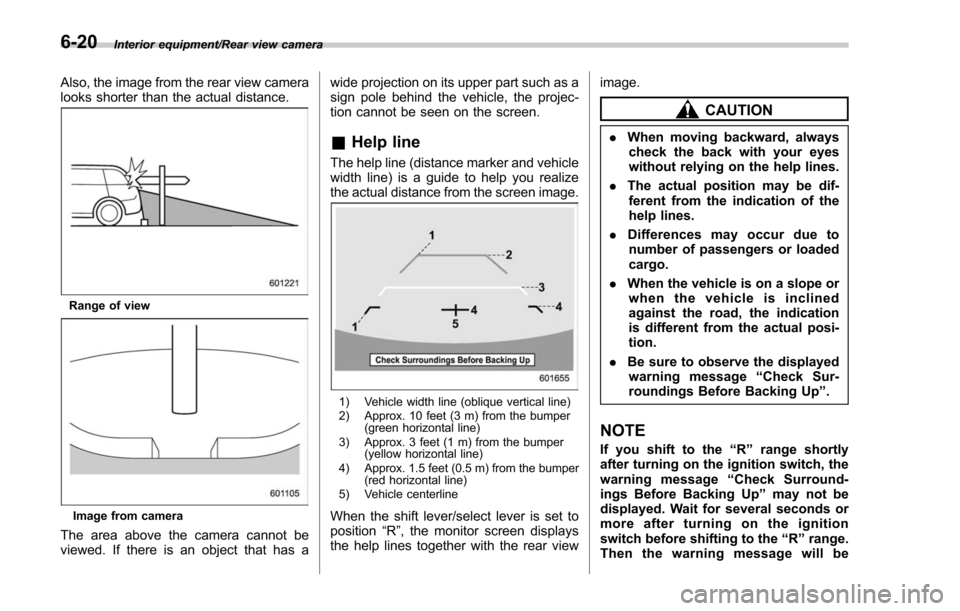
Also, the image from the rear view camera
looks shorter than the actual distance.
Range of view
Image from camera
The area above the camera cannot be
viewed. If there is an object that has awide projection on its upper part such as a
sign pole behind the vehicle, the projec-
tion cannot be seen on the screen.
&
Help line
The help line (distance marker and vehicle
width line) is a guide to help you realize
the actual distance from the screen image.
1) Vehicle width line (oblique vertical line)
2) Approx. 10 feet (3 m) from the bumper
(green horizontal line)
3) Approx. 3 feet (1 m) from the bumper (yellow horizontal line)
4) Approx. 1.5 feet (0.5 m) from the bumper (red horizontal line)
5) Vehicle centerline
When the shift lever/select lever is set to
position “R”, the monitor screen displays
the help lines together with the rear view image.
CAUTION
.
When moving backward, always
check the back with your eyes
without relying on the help lines.
. The actual position may be dif-
ferent from the indication of the
help lines.
. Differences may occur due to
number of passengers or loaded
cargo.
. When the vehicle is on a slope or
when the vehicle is inclined
against the road, the indication
is different from the actual posi-
tion.
. Be sure to observe the displayed
warning message “Check Sur-
roundings Before Backing Up ”.
NOTE
If you shift to the “R ” range shortly
after turning on the ignition switch, the
warning message “Check Surround-
ings Before Backing Up ”may not be
displayed. Wait for several seconds or
more after turning on the ignition
switch before shifting to the “R ” range.
Then the warning message will be
6-20
Page 404 of 634

Fuel...................................................................... 7-3Fuel requirements ............................................... 7-3
Fuel filler lid and cap ........................................... 7-5
State emission testing (U.S. only) ...................... 7-7
Preparing to drive ............................................... 7-8
Starting and stopping the engine (models without push-button start system) .................. 7-9
Starting engine.................................................... 7-9
Stopping the engine ........................................... 7-11
Starting and stopping engine (models with
push-button start system) .............................. 7-12
Safety precautions............................................. 7-12
Operating range for push-button start system ............................................................. 7-12
Starting engine ................................................... 7-12
Stopping engine ................................................. 7-13
When access key does not operate properly ....... 7-14
Remote engine start system (dealer
option) .............................................................. 7-14
Models with “keyless access with push-button
start system ”................................................... 7-14
Models without “keyless access with push-button
start system ”................................................... 7-15
Entering the vehicle while it is running via remote start ................................................................. 7-19
Entering the vehicle following remote engine start shutdown ......................................................... 7-19
Pre-heating or pre-cooling the interior of the vehicle ............................................................. 7-19
Service mode (models without “keyless access
with push-button start system ”)........................ 7-19 Remote transmitter program (models without
“keyless access with push-button start
system ”).......................................................... 7-20
System maintenance .......................................... 7-20
Manual transmission ......................................... 7-22Shifting speeds.................................................. 7-23
Driving tips ........................................................ 7-24
Continuously variable transmission ................. 7-24Select lever....................................................... 7-25
Selection of manual mode (if equipped) .............. 7-27
Selection of “L ” (if equipped) ... .......................... 7-29
Shift lock function ............................................. 7-30
Driving tips ........................................................ 7-31
SI-DRIVE (if equipped) ....................................... 7-32Intelligent (I) mode............................................. 7-32
Sport (S) mode .................................................. 7-32
Sport Sharp (S#) mode. ...................................... 7-33
SI-DRIVE switches ............................................. 7-34
Power steering................................................... 7-34
Braking ............................................................... 7-35
Braking tips ....................................................... 7-35
Brake system .................................................... 7-36
Disc brake pad wear warning indicators ............. 7-36
ABS (Anti-lock Brake System).......................... 7-37ABS self-check.................................................. 7-37
ABS warning light .............................................. 7-37
Electronic Brake Force Distribution (EBD)
system ............................................................. 7-38
Steps to take if EBD system malfunctions .......... 7-38
Vehicle Dynamics Control system.................... 7-39Vehicle Dynamics Control system monitor .......... 7-41
Starting and operating
7