2017 SUBARU FORESTER lock
[x] Cancel search: lockPage 269 of 634
Instruments and controls/Tilt/telescopic steering wheel
Tilt/telescopic steering wheel
WARNING
.Do not adjust the steering wheel
tilt/telescopic position while driv-
ing. This may cause loss of
vehicle control and result in
personal injury.
. If the lever cannot be raised to
the fixed position, adjust the
steering wheel again. It is dan-
gerous to drive without locking
the steering wheel. This may
cause loss of vehicle control
and result in personal injury.
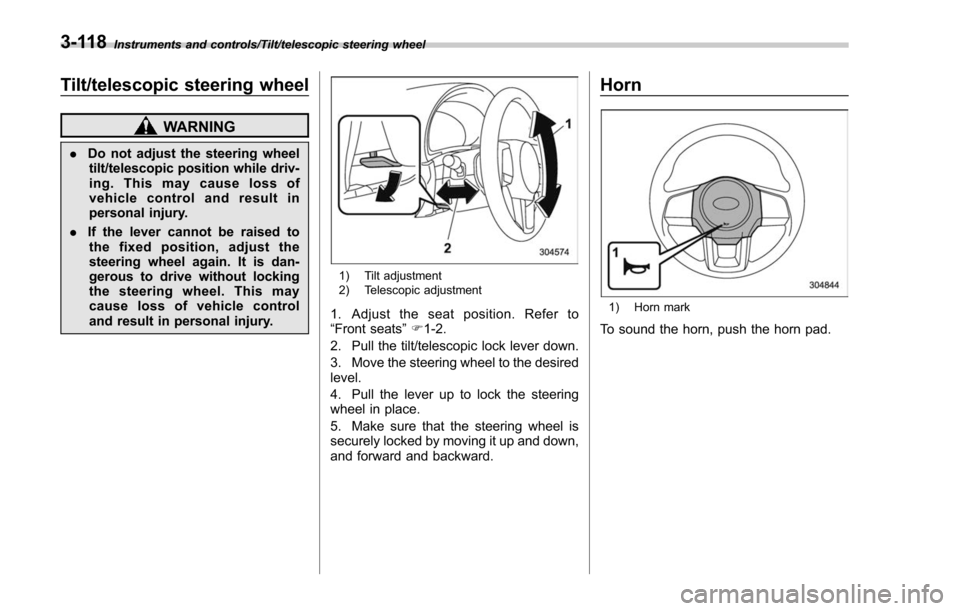
1) Tilt adjustment
2) Telescopic adjustment
1. Adjust the seat position. Refer to
“Front seats ”F 1-2.
2. Pull the tilt/telescopic lock lever down.
3. Move the steering wheel to the desired
level.
4. Pull the lever up to lock the steering
wheel in place.
5. Make sure that the steering wheel is
securely locked by moving it up and down,
and forward and backward.
Horn
1) Horn mark
To sound the horn, push the horn pad.
3-118
Page 280 of 634
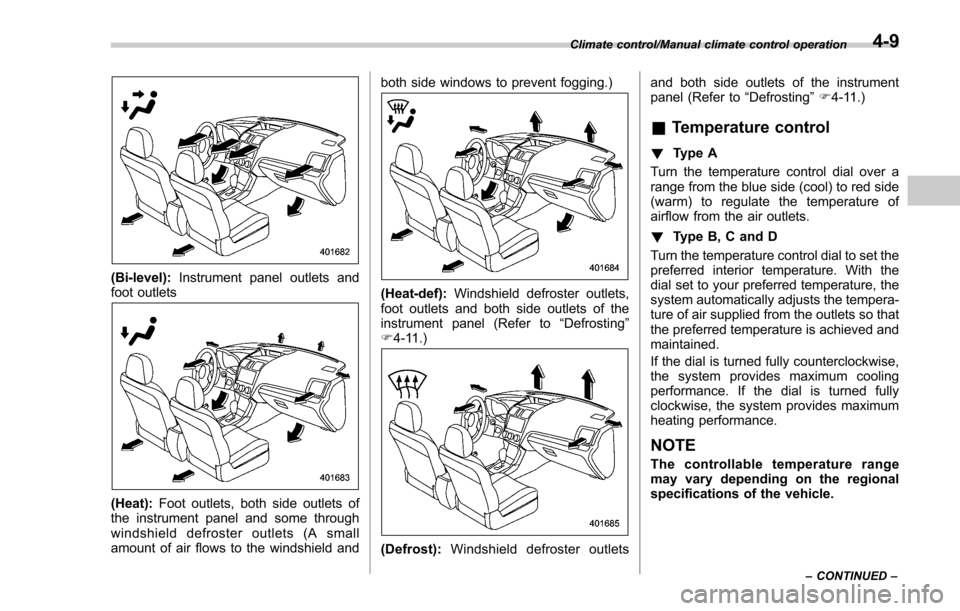
(Bi-level):Instrument panel outlets and
foot outlets
(Heat): Foot outlets, both side outlets of
the instrument panel and some through
windshield defroster outlets (A small
amount of air flows to the windshield and both side windows to prevent fogging.)
(Heat-def):
Windshield defroster outlets,
foot outlets and both side outlets of the
instrument panel (Refer to “Defrosting ”
F 4-11.)
(Defrost): Windshield defroster outlets and both side outlets of the instrument
panel (Refer to
“Defrosting”F 4-11.)
& Temperature control
! Type A
Turn the temperature control dial over a
range from the blue side (cool) to red side
(warm) to regulate the temperature of
airflow from the air outlets.
! Type B, C and D
Turn the temperature control dial to set the
preferred interior temperature. With the
dial set to your preferred temperature, the
system automatically adjusts the tempera-
ture of air supplied from the outlets so that
the preferred temperature is achieved and
maintained.
If the dial is turned fully counterclockwise,
the system provides maximum cooling
performance. If the dial is turned fully
clockwise, the system provides maximum
heating performance.
NOTE
The controllable temperature range
may vary depending on the regional
specifications of the vehicle.
Climate control/Manual climate control operation
–CONTINUED –4-9
Page 285 of 634

Climate control/Air filtration system
1) Stopper
(3) Push in the stoppers located on
both sides of the glove box and then
pull down the glove box as far as it will
go.
(4) Pull out the glove box horizontallyand remove the hinge portion. When
doing this, be careful not to damage
the hinge.
2. Remove the air filter according to the
following procedure in order to prevent
dust on the air cleaner from falling to the
inside of its housing.
(1) Push in the four stoppers to
unlock, and then slowly pull out the
air filter 4 in (10 cm) from the housing.
(2) Completely pull out the air filter by
gently tilting the front side of the air
filter downward.
3. Replace the air filter element with a
new one.
CAUTION
The arrow mark on the filter must
point UP.
4-14
Page 293 of 634
Audio/Audio set
&Tips for operating the audio/
visual system
CAUTION
To avoid damage to the audio/visual
system:
. Be careful not to spill beverages
over the audio/visual system.
. Do not put anything other than an
appropriate disc into the disc
slot.
NOTE
The use of a cell phone inside or near
the vehicle may cause a noise from the
speakers of the audio/visual system
which you are listening to. However,
this does not indicate a malfunction.
! Radio
Usually, a problem with radio reception
does not mean there is a problem with the
radio —it is just the normal result of
conditions outside the vehicle.
For example, nearby buildings and terrain
can interfere with FM reception. Power
lines or phone wires can interfere with AM
signals. And of course, radio signals have
a limited range. The farther the vehicle is from a station, the weaker its signal will
be. In addition, reception conditions
change constantly as the vehicle moves.
Here, some common reception problems
that probably do not indicate a problem
with the radio are described.
!FM
Fading and drifting stations: Generally, the
effective range of FM is about 25 miles (40
km). Once outside this range, you may
notice fading and drifting, which increase
with the distance from the radio transmit-
ter. They are often accompanied by
distortion.
Multi-path: FM signals are reflective,
making it possible for 2 signals to reach
the vehicle’ s antenna at the same time. If
this happens, the signals will cancel each
other out, causing a momentary flutter or
loss of reception.
Static and fluttering: These occur when
signals are blocked by buildings, trees or
other large objects. Increasing the bass
level may reduce static and fluttering.
Station swapping: If the FM signal being
listened to is interrupted or weakened, and
there is another strong station nearby on
the FM band, the radio may tune in the
second station until the original signal can
be picked up again. !
AM
Fading: AM broadcasts are reflected by
the upper atmosphere —especially at
night. These reflected signals can inter-
fere with those received directly from the
radio station, causing the radio station to
sound alternately strong and weak.
Station interference: When a reflected
signal and a signal received directly from
a radio station are very nearly the same
frequency, they can interfere with each
other, making it difficult to hear the broad-
cast.
Static: AM is easily affected by external
sources of electrical noise, such as high
tension power lines, lightening or electrical
motors. This results in static.
!SiriusXM (if equipped)
. Cargo loaded on the roof luggage
carrier, especially metal objects, may
adversely affect the reception of SiriusXM
Satellite Radio.
. Alternation or modifications carried out
without appropriate authorization may in-
validate the user ’s right to operate the
equipment.
5-6
Page 325 of 634

Audio/Audio set
!How to subscribe to SiriusXM Sa-
tellite Radio
To listen to a satellite radio broadcast in
the vehicle, a subscription to the SiriusXM
Satellite Radio service is necessary.
A SiriusXM Satellite Radio is a tuner
designed exclusively to receive broad-
casts provided under a separate subscrip-
tion.
!How to subscribe
It is necessary to enter into a separate
service agreement with SiriusXM Satellite
Radio in order to receive satellite broad-
cast programming in the vehicle. Addi-
tional activation and service subscription
fees apply that are not included in the
purchase price of the vehicle and digital
satellite tuner.
For complete information on subscription
rates and terms, or to subscribe to
SiriusXM Satellite Radio:
. U.S. customers:
Refer to www.siriusxm.com or call
1-866-635-2349
. Canadian customers:
Refer to www.siriusxm.ca or call
1-877-209-0079WARNING
. SiriusXM Satellite Radio Services
— Legal Disclaimers and Warn-
ings
– Fees and Taxes —Subscrip-
tion fee, taxes, one time acti-
vation fee, and other fees may
apply. Subscription fee is con-
sumer only. All fees and pro-
gramming subject to change.
Subscriptions subject to Cus-
tomer Agreement available at
www.siriusxm.com (U.S.) or
www.siriusxm.ca (Canada).
SiriusXM U.S. satellite and
data services are available
only in the contiguous USA
and DC. SiriusXM satellite
service is also available in
Canada: see
www.siriusxm.ca.
Explicit Language Notice —
Channels with frequent expli-
cit language are indicated
with an “XL”preceding the
channel name. Channel block-
ing is available for SiriusXM
Satellite Radio receivers by
notifying SiriusXM at: .
U.S. customers:
Visit www.siriusxm.com or call
1-866-635-2349
. Canadian customers:
Visit www.siriusxm.ca or call
1-877-209-0079
CAUTION
. It is prohibited to copy, decom-
pile, disassemble, reverse engi-
neer, hack, manipulate or other-
wise make available any technol-
ogy or software incorporated in
receivers compatible with the
SiriusXM Satellite Radio System
or that support the XM website,
the Online Service or any of its
content. Furthermore, the
AMBE
®voice compression soft-
ware included in this product is
protected by intellectual property
rights including patent rights,
copyrights, and trade secrets of
Digital Voice Systems, Inc.
. Note: this applies to SiriusXM
Satellite Radio receivers only
and not XM Ready devices.
5-38
Page 328 of 634
In addition, the following messages appear.
Display MessageContents
“ Subscription Update ”
“ Press OK to Continue ” An update to your SiriusXM subscription has
been received by the SiriusXM tuner. Touch
any key to continue.
“ Channel XXX Not Available ”
( “ XXX ”refers to the selected channel number.) This channel is not a valid SiriusXM channel.
The channel number has been entered incor-
rectly, or the channel was removed from the
SiriusXM channel lineup.
“ Channel XXX Not Subscribed Call. ”
“ Call SiriusXM to Subscribed. ”
( “ XXX ”refers to the selected channel number.) This channel is not included in your SiriusXM
subscription plan.
“ Ch Locked ”
“ Lock Code? ” The selected channel has been locked by the
parental controls.
A prompt to enter the unlock code will appear.
“ Check Antenna ” Ensure the SiriusXM antenna cable is con-
nected to the SiriusXM tuner correctly.
Check the SiriusXM antenna wire for breaks or
sharp bends.
Replace the antenna if necessary.
“ No Signal ” The vehicle must be outside, and the antenna
must have a clear view of the southern sky.
NOTEContact SiriusXM
.
Listener Care Center (U.S. customers):
1-866-635-2349
. Listener Care Centre (Canadian customers):
1-877-209-0079 !
Direct Tune
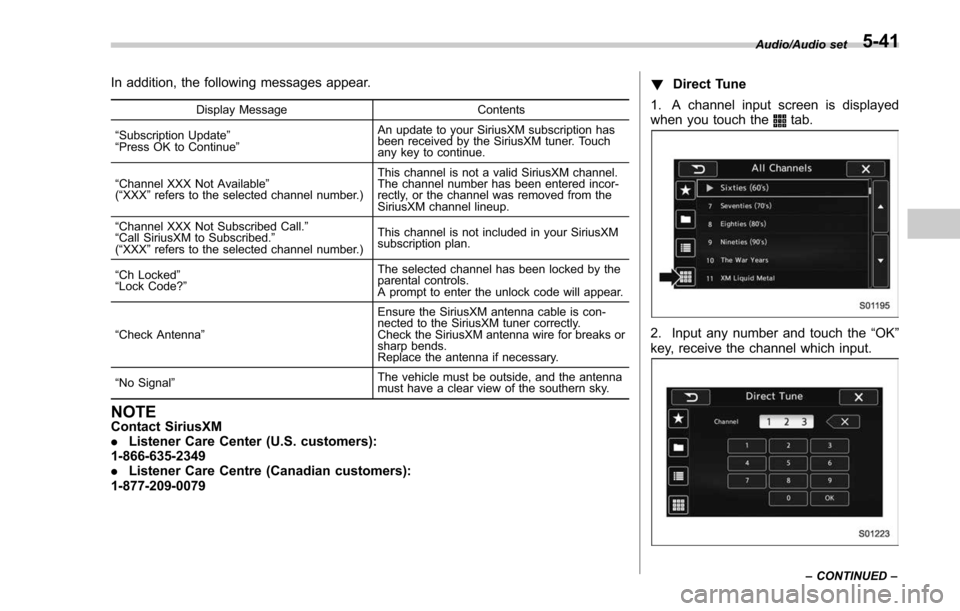
1. A channel input screen is displayed
when you touch the
tab.
2. Input any number and touch the “OK”
key, receive the channel which input.
Audio/Audio set
–CONTINUED –5-41
Page 329 of 634
Audio/Audio set
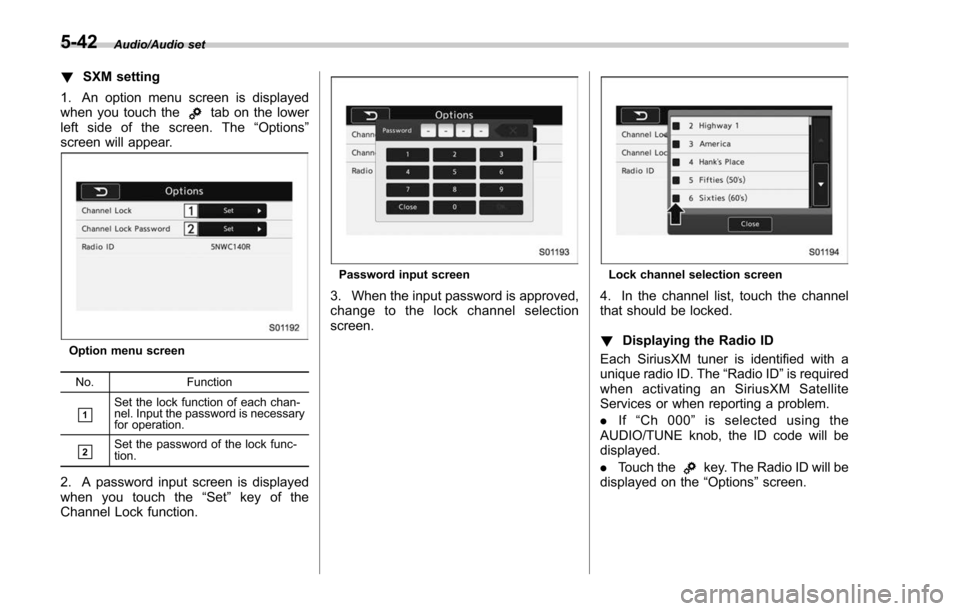
!SXM setting
1. An option menu screen is displayed
when you touch the
tab on the lower
left side of the screen. The “Options ”
screen will appear.
Option menu screen
No. Function
&1Set the lock function of each chan-
nel. Input the password is necessary
for operation.
&2Set the password of the lock func-
tion.
2. A password input screen is displayed
when you touch the “Set”key of the
Channel Lock function.
Password input screen
3. When the input password is approved,
change to the lock channel selection
screen.
Lock channel selection screen
4. In the channel list, touch the channel
that should be locked.
! Displaying the Radio ID
Each SiriusXM tuner is identified with a
unique radio ID. The “Radio ID”is required
when activating an SiriusXM Satellite
Services or when reporting a problem.
. If“Ch 000 ”is selected using the
AUDIO/TUNE knob, the ID code will be
displayed.
. Touch the
key. The Radio ID will be
displayed on the “Options ”screen.
5-42
Page 337 of 634
Audio/Audio set
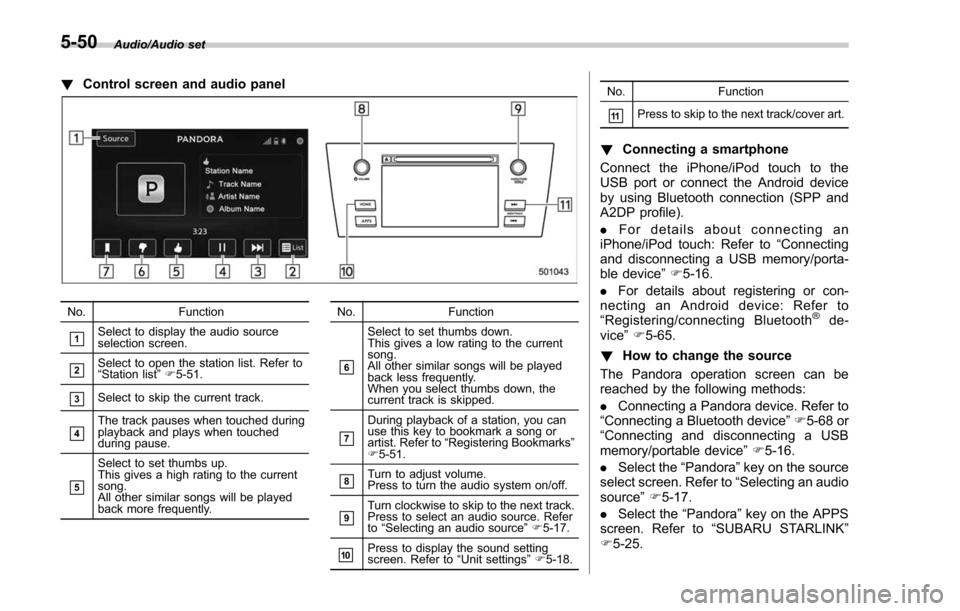
!Control screen and audio panel
No. Function
&1Select to display the audio source
selection screen.
&2Select to open the station list. Refer to
“Station list ”F 5-51.
&3Select to skip the current track.
&4The track pauses when touched during
playback and plays when touched
during pause.
&5
Select to set thumbs up.
This gives a high rating to the current
song.
All other similar songs will be played
back more frequently. No. Function
&6
Select to set thumbs down.
This gives a low rating to the current
song.
All other similar songs will be played
back less frequently.
When you select thumbs down, the
current track is skipped.
&7
During playback of a station, you can
use this key to bookmark a song or
artist. Refer to
“Registering Bookmarks ”
F 5-51.
&8Turn to adjust volume.
Press to turn the audio system on/off.
&9Turn clockwise to skip to the next track.
Press to select an audio source. Refer
to “Selecting an audio source ”F 5-17.
&10Press to display the sound setting
screen. Refer to “Unit settings ”F 5-18. No. Function
&11Press to skip to the next track/cover art.
!
Connecting a smartphone
Connect the iPhone/iPod touch to the
USB port or connect the Android device
by using Bluetooth connection (SPP and
A2DP profile).
. For details about connecting an
iPhone/iPod touch: Refer to “Connecting
and disconnecting a USB memory/porta-
ble device ”F 5-16.
. For details about registering or con-
necting an Android device: Refer to
“ Registering/connecting Bluetooth
®de-
vice” F5-65.
! How to change the source
The Pandora operation screen can be
reached by the following methods:
. Connecting a Pandora device. Refer to
“ Connecting a Bluetooth device ”F 5-68 or
“ Connecting and disconnecting a USB
memory/portable device ”F 5-16.
. Select the “Pandora”key on the source
select screen. Refer to “Selecting an audio
source” F5-17.
. Select the “Pandora”key on the APPS
screen. Refer to “SUBARU STARLINK ”
F 5-25.
5-50