2017 SUBARU FORESTER lock
[x] Cancel search: lockPage 239 of 634
Instruments and controls/Multi function display
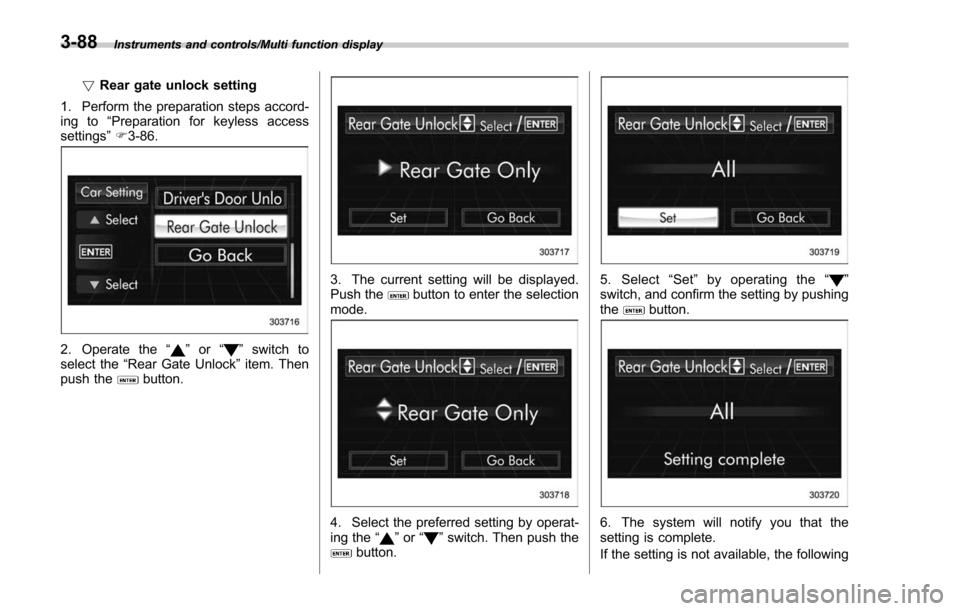
!Rear gate unlock setting
1. Perform the preparation steps accord-
ing to “Preparation for keyless access
settings” F3-86.
2. Operate the “”or “”switch to
select the “Rear Gate Unlock ”item. Then
push the
button.
3. The current setting will be displayed.
Push thebutton to enter the selection
mode.
4. Select the preferred setting by operat-
ing the “”or “”switch. Then push thebutton.
5. Select “Set ”by operating the “”
switch, and confirm the setting by pushing
the
button.
6. The system will notify you that the
setting is complete.
If the setting is not available, the following
3-88
Page 245 of 634

Instruments and controls/Light control switch
“”position: auto on/off headlights (if
equipped)
When the ignition switch is in the “ON ”
position, the instrument panel illumination,
headlights, parking lights, front side mar-
ker lights, rear side marker lights, tail lights
and license plate lights are automatically
on or off depending on the level of the
ambient light.
“
” position
The headlights are all off.
NOTE
The sensitivity of the auto on/off head-
lights can be changed by a SUBARU
dealer. Consult your SUBARU dealer
for details. Also, for models with a multi
function display, the setting can be
changed using the display. For details,
refer to “Auto light sensor sensitivity
setting ”F 3-85.
! Welcome lighting function (if
equipped)
The welcome lighting function turns on the
low beam headlights for smooth ap-
proaching to or exiting from the vehicle
at night or in a dark place.
The function is activated while all of the
following conditions are met.
. The light control switch is in the “AUTO
”position
. It is dark enough to turn on the auto on/
off headlights
When approaching:
While the welcome lighting function is
activated, the low beam headlights will
automatically illuminate when unlocking
the doors (including the rear gate) by
using the remote keyless entry system.
The low beam headlights will remain
illuminated for 30 seconds
*1and then turn
off. However, if any of the following
operations is performed, the low beam
headlights will turn off.
. The doors are locked.
. The light control switch is turned to a
position other than “AUTO”.
. The ignition switch is turned to the “ON”
position.
When exiting:
While the welcome lighting function is
activated, the low beam headlights will
remain illuminated even when either of the
following operations is performed.
. Thepush-buttonignitionswitchis
turned to the “OFF”status (models with
“keyless access with push-button start
system ”)
. The key is pulled out from the ignition switch (models without
“keyless access
with push-button start system ”)
The low beam headlights will turn off
under any of the following conditions.
. 3 minutes have passed since the low
beam headlights were illuminated by the
welcome lighting function.
. 30 seconds have passed since the
door is opened and closed.
*1
. The light control switch is turned to a
position other than “AUTO”.
. The locking procedure is performed
twice. When performing the unlocking
procedure after performing the locking
procedure, perform the locking procedure
twice again.
*1: The setting for the period of time in which
the low beam headlights remain on by the
welcome lighting function can be changed by a
SUBARU dealer. Contact your SUBARU dealer
for details.
3-94
Page 247 of 634

Instruments and controls/Light control switch
For more details, contact a SUBARU
dealer.!How to use the high beam assist
function
The high beam assist function will be
activated when all the following conditions
are met.
. The light control switch is in the
“AUTO ”position and the low beam head-
lights are on automatically.
. The turn signal lever is pushed forward.
High beam assist indicator
When the high beam assist function is
activated, the high beam assist indicator
on the combination meter will illuminate.
NOTE
If the high beam assist function is
malfunctioning or is temporarily
stopped, the headlight will be fixed at
low beam. For details, refer to the
Owner ’s Manual supplement for the
EyeSight system.
! How to temporarily lower the
sensitivity of the high beam
assist function
The sensitivity of the high beam assist
function can be lowered by performing the
following operations.
1. Before turning the ignition switch to the
“ON ”position, set the light control switch
to the “AUTO ”position and push the signal
lever forward (high beam position).
2. Turn the ignition switch to the “ON ”
position and within approximately 15
seconds, press the “
”(following dis-
tance setting) switch more than 10 times
consecutively.
When the sensitivity of the high beam
assist function is lowered, the high beam
assist indicator light “
”on the combina-
tion meter will flash.
NOTE
. The sensitivity of the high beam
assist function cannot be lowered in
the following conditions.
–Cruise control or Adaptive Cruise
Control is in operation
– The EyeSight warning indicator
(yellow) is illuminated
. The sensitivity of the high beam
assist function returns to normal level
the next time the ignition switch is
turned to the “LOCK ”/“ OFF ”position
and the engine is restarted.
! How to change the headlight
mode manually
Change to the low beam:
When you return the turn signal lever to
the center position, the high beam assist
function will turn off and the high beam
assist indicator will turn off.
Change to the high beam:
When you turn the light control switch to
the “
”position, the headlight mode will
be changed to the high beam.
At this time, the high beam assist function
will turn off, the high beam assist indicator
will turn off and the high beam indicator
light will turn on.
3-96
Page 252 of 634
&One-touch lane changer
To flash the turn signal and turn signal
indicator light three times, push the turn
signal lever up or down slightly and
immediately release it.
The operational/non-operational setting of
the one-touch lane changer can be
changed by a SUBARU dealer. Contact
your nearest SUBARU dealer for details.
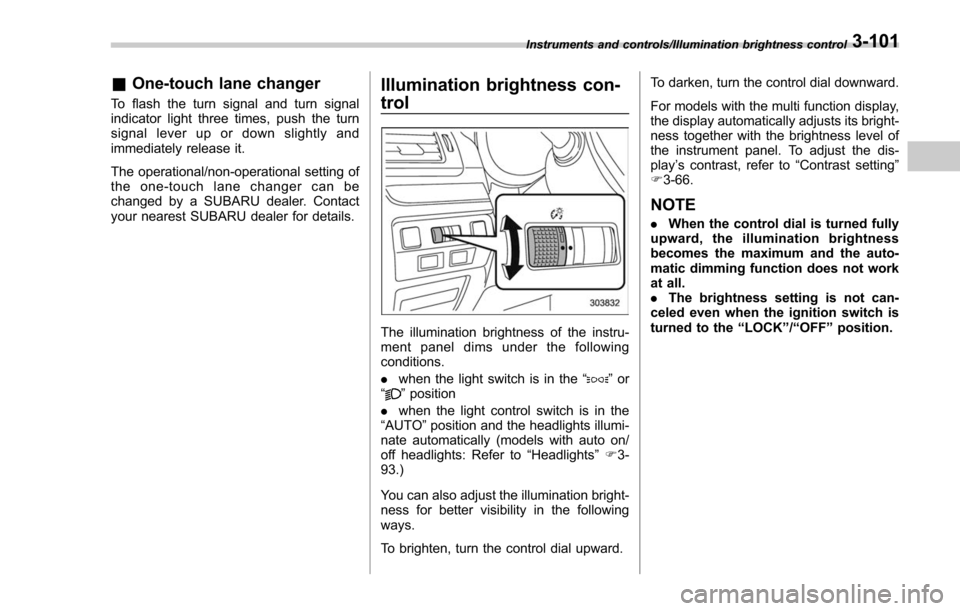
Illumination brightness con-
trol
The illumination brightness of the instru-
ment panel dims under the following
conditions.
. when the light switch is in the “
”or
“” position
. when the light control switch is in the
“AUTO ”position and the headlights illumi-
nate automatically (models with auto on/
off headlights: Refer to “Headlights”F 3-
93.)
You can also adjust the illumination bright-
ness for better visibility in the following
ways.
To brighten, turn the control dial upward. To darken, turn the control dial downward.
For models with the multi function display,
the display automatically adjusts its bright-
ness together with the brightness level of
the instrument panel. To adjust the dis-
play
’s contrast, refer to “Contrast setting”
F 3-66.
NOTE
. When the control dial is turned fully
upward, the illumination brightness
becomes the maximum and the auto-
matic dimming function does not work
at all.
. The brightness setting is not can-
celed even when the ignition switch is
turned to the “LOCK ”/“ OFF ”position.
Instruments and controls/Illumination brightness control3-101
Page 255 of 634
Instruments and controls/Wiper and washer
Wiper and washer
WARNING
In freezing weather, do not use the
windshield washer until the wind-
shield is sufficiently warmed by the
defroster.
Otherwise the washer fluid can
freeze on the windshield, blocking
your view.
CAUTION
.Do not operate the washer con-
tinuously for more than 10 sec-
onds, or when the washer fluid
tank is empty. This may cause
overheating of the washer motor.
Check the washer fluid level
frequently, such as at fuel stops.
. Do not operate the wipers when
the windshield or rear window is
dry. This may scratch the glass,
damage the wiper blades and
might cause the wiper motor to
fail. Before operating the wiper
on a dry windshield or rear
window, always use the wind-
shield washer. .
In freezing weather, be sure that
the wiper blades are not frozen to
the windshield or rear window
before switching on the wipers.
Attempting to operate the wiper
with the blades frozen to the
window glass could cause not
only the wiper blades to be
damaged but also might cause
the wiper motor to fail. If the
wiper blades are frozen to the
window glass, be sure to operate
the defroster, windshield wiper
deicer (if equipped) or rear win-
dow defogger before turning on
the wiper.
. If the wipers stop during opera-
tion because of ice or some other
obstruction on the window, this
might cause the wiper motor to
fail even if the wiper switch is
turned off. If this occurs,
promptly stop the vehicle in a
safe place, turn the ignition
switch to the “LOCK ”/“ OFF ”po-
sition and clean the window
glass to allow proper wiper op-
eration.
. Use clean water if windshield
washer fluid is unavailable. In
areas where water freezes in
winter, use SUBARU Windshield Washer Fluid or the equivalent.
Refer to
“Windshield washer
fluid ”F 11-30.
Also, when driving the vehicle
when there are freezing tempera-
tures, use non-freezing type wi-
per blades.
. Do not clean the wiper blades
with gasoline or a solvent, such
as paint thinner or benzine. This
will cause deterioration of the
wiper blades.
NOTE
. The windshield wiper motor is pro-
tected against overloads by a circuit
breaker. If the motor operates continu-
ously under an unusually heavy load,
the circuit breaker may trip to stop the
motor temporarily. If this happens, park
your vehicle in a safe place, turn off the
wiper switch, and wait for approxi-
mately 10 minutes. The circuit breaker
will reset itself, and the wipers will
again operate normally.
. Clean your wiper blades and win-
dow glass periodically with a washer
solution to prevent streaking, and to
remove accumulations of road salt or
road film. Operate the windshield
washer for at least 1 second so that
3-104
Page 261 of 634
Instruments and controls/Mirrors
until a“C”appears in the display. Once a
“C ”appears in the display, slowly drive the
vehicle in circles until compass is cali-
brated.
! HomeLink
®Wireless Control Sys-
tem
The HomeLink
®Wireless Control System
provides a convenient way to replace up
to three hand-held radio-frequency re-
motes used to activate devices such as
gate operators, garage door openers,
entry door locks, security systems, even
home lighting. The below steps are
generic programming instructions; for
Genie and Sommer garage door openers
please go directly to the HomeLink web-
site. Additional information and program-
ming videos can be found at
www.HomeLink.com and
www.youtube.com/HomeLinkGentex.
CAUTION
. Before programming HomeLink
to a garage door opener or gate
operator, make sure that people
and objects are out of the way of
the device to prevent potential
harm or damage.
. When programming a garage
door opener, it is advised to park outside of the garage.
. Do not use HomeLink with any
garage door opener that lacks
safety stop and reverse features
as required by U.S. federal safety
standards (this includes any gar-
age door opener model manufac-
tured before April 1, 1982). A
garage door that cannot detect
an object signaling the door to
stop and reverse does not meet
current U.S. federal safety stan-
dards.
. It is also recommended that a
new battery be placed in the
hand-held remote (garage door
opener remote) of the device for
quicker and more accurate train-
ing.
. Some vehicles may require the
ignition switch to be turned to the
“ON ”or “ACC ”position for pro-
gramming and/or operation of
HomeLink.
. Keep the hand-held remote (gar-
age door opener remote) of the
device you are programming for
use in other vehicles as well as
for future HomeLink program-
ming. It is also suggested that
upon the sale of the vehicle, the programmed HomeLink buttons
be erased for security purposes.
Refer to
“Erasing HomeLink But-
tons ”F 3-113.
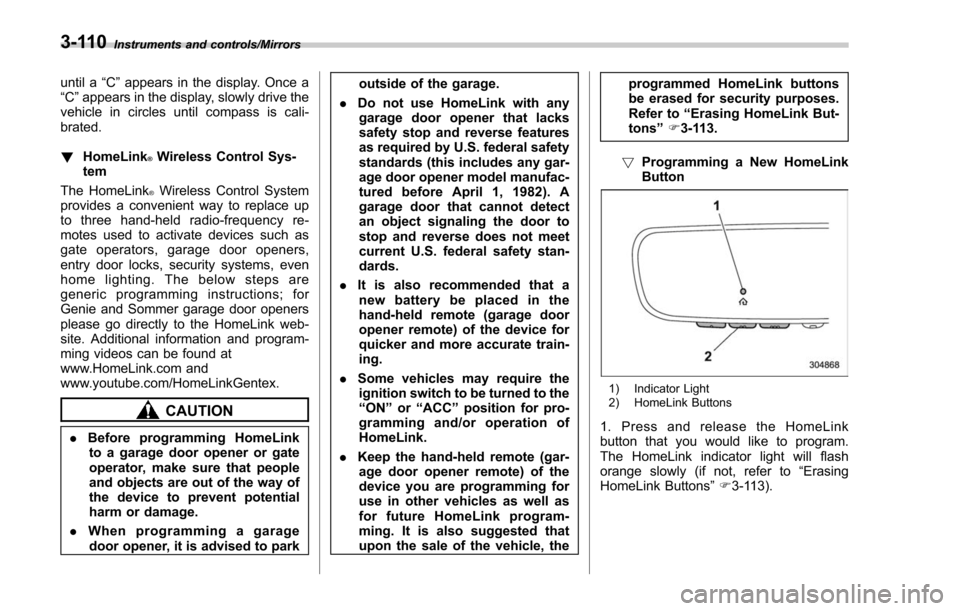
! Programming a New HomeLink
Button
1) Indicator Light
2) HomeLink Buttons
1. Press and release the HomeLink
button that you would like to program.
The HomeLink indicator light will flash
orange slowly (if not, refer to “Erasing
HomeLink Buttons ”F 3-113).
3-110
Page 264 of 634
!Gate Operator / Canadian Pro-
gramming
Canadian radio-frequency laws require
transmitter remote signals to “time-out ”
(or quit) after several seconds of transmis-
sion, which may not be long enough for
HomeLink to pick up the signal during
programming. Similar to this Canadian
law, some U.S. gate operators are de-
signed to “time-out”in the same manner.
The indicator LED on the hand-held
remote will go off when the device times
out, indicating that it has finished transmit-
ting.
If you live in Canada or you are having
difficulties programming a gate operator or
garage door opener by using the program-
ming procedures, replace “Programming a
New HomeLink Button ”step 3 with the
following:
While the HomeLink indicator light is
flashing orange, press and release (“cy-
cle ”) your device ’s hand-held remote
every two seconds until the HomeLink
indicator light changes from orange to
green. You may now release the hand-
held remote button.
NOTE
If programming a garage door opener
or gate operator, it is advised to unplug the device during the
“cycling ”pro-
cess to prevent possible overheating.
Proceed with “Programming a New
HomeLink Button ”step 4 to complete.
! Using HomeLink
To operate, simply press and release the
programmed HomeLink button. Activation
will now occur for the trained device (i.e.
garage door opener, gate operator, secur-
ity system, entry door lock, home/office
lighting, etc.). For convenience, the hand-
held remote of the device may also be
used at any time.
!Erasing HomeLink Buttons
To erase programming from the three
buttons (individual buttons cannot be
erased but can be “reprogrammed”as
outlined below), follow the step noted:
Press and hold the two outer HomeLink
buttons for at least 10 seconds. The LED
indicator will change from continuously lit
to rapidly flashing. Release both buttons.
Do not hold for longer than 20 seconds.
HomeLink is now ready to be programmed
at any time beginning with “Programming
a New HomeLink Button ”- step 1. !
Reprogramming a Single
HomeLink Button
To program a previously trained button,
follow these steps:
1. Press and hold the desired HomeLink
button. DO NOT release the button.
2. The indicator light will begin to slowly
flash orange after 20 seconds. The
HomeLink button can be released at this
point. Proceed with “Programming a New
HomeLink Button ”- step 3.
3. If you do not complete the program-
ming of a new device to the button, it will
revert to the previously stored program-
ming.
!Garage Door Two-Way Commu-
nication
HomeLink has the capability of commu-
nicating with your garage door opener.
HomeLink can receive and display “clos-
ing ”or “opening ”status messages from
compatible garage door opener systems.
At any time, HomeLink can also recall and
display the last recorded status commu-
nicated by the garage door opener to
indicate your garage door being “closed”
or “opened ”.
HomeLink has the capability of receiving
this communication from the garage door
opener at a range up to 820 feet (250 m).
Instruments and controls/Mirrors
–CONTINUED –3-113
Page 268 of 634
located on the climate control panel. The
rear window defogger, outside mirror
defogger and windshield wiper deicer are
activated simultaneously. The indicator
light on the control switch illuminates while
the defogger and deicer system is acti-
vated.
To turn them off, press the control switch
again. They also turn off when the ignition
switch is turned to the“ACC”or “LOCK” /
“ OFF ”position.
The defogger and deicer system will
automatically shut off after approximately
15 minutes. If the rear window and the
outside mirrors have been cleared and the
windshield wiper blades have been deiced
completely before that time, press the
control switch to turn them off. If defrost-
ing, defogging or deicing is not complete,
you have to press the control switch to
turn them on again.
For models with the automatic climate
control system (type B, C and D), it is
possible for the defogger and deicer
system to be set to continuous operation
mode by a SUBARU dealer. Consult your
SUBARU dealer for details. Also, for
models with a multi function display, the
setting can be changed using the display.
For details, refer to “Multi function display ”
F 3-44. If the battery voltage drops below the
permissible level, continuous operation of
the defogger and deicer system is can-
celed and the system stops operating.
CAUTION
.
To prevent the battery from being
discharged, do not operate the
defogger and deicer system con-
tinuously for any longer than
necessary.
. Do not use sharp instruments or
window cleaner containing abra-
sives to clean the inner surface
of the rear window. They may
damage the conductors printed
on the window.
NOTE
. Turn on the defogger and deicer
system if the wipers are frozen to the
windshield.
. If the windshield is covered with
snow, remove the snow so that the
windshield wiper deicer works effec-
tively.
. While the defogger and deicer sys-
tem is in the continuous operation
mode, if the vehicle speed remains at
9 mph (15 km/h) or lower for 15
minutes, the windshield wiper deicer automatically stops operating, though
the rear window defogger and outside
mirror defogger maintain continuous
operation in this condition.
.
While the defogger and deicer sys-
tem is in the continuous operation
mode, if the battery voltage drops
below the permissible level, continu-
ous operation of the defogger and
deicer system is canceled and the
system stops operating.
Instruments and controls/Defogger and deicer3-117