Page 25 of 104

Connectivity
Apple CarPlay™* 3 Valid for compatible iPhone™ mobile telephones.
A l
so, iPhone™ mobile telephones only support Ap-
ple CarPlay™
Apple CarPlay™ is a protocol which enables
communication between a mobile telephone
and the Infotainment system via USB.
This makes it possible to display and operate
the mobile telephone on the Infotainment
system screen.
Requirements
In order to use Apple CarPlay™, the following
requirements must be met:
● Make sure that you do not have Apple
CarPl a
y™ restricted on your device, at: Set-
tings > General > Restrictions > CarPlay > ON.
● The mobile device must be compatible with
Appl
e CarPlay™.
● The mobile device must be connected to
the Infotainment
system via USB.
Initiating the connection
In order to initiate the connection with the
mobile device, it is simply necessary to con-
nect it to the Infotainment system via the
USB connection.
● A pop-up screen will appear, which will re-
quest
that you accept the device. ●
If y
ou start the session using Apple
CarPlay™ technology, it will not be possible
to pair another device via Bluetooth™. The
following message will appear in the main
PHONE menu:
Please disconnect Apple CarPlay
first, before you can connect
another mobile telephone.
Holding down the steering wheel multifunc-
tion button or the VOICE button of the Info-
t ainment
sy
stem will start the Apple™ voice
“engine”.
To return to the basic contents of the Infotain-
ment system, press the SEAT icon.
Android Auto™* 3 V
alid for compatible Android mobile phones.
Andr
oid Auto™ is a protocol which enables
communication between a portable device
and the Infotainment system via USB.
This makes it possible to display and operate
the mobile telephone on the Infotainment
system screen.
Requirements
In order to use Android Auto™, the following
requirements must be met:
● The mobile device must be compatible with
Android Aut o™. ●
The mo
bi
le device must be connected to
the Infotainment system via USB.
● The Android Auto™ application should al-
rea
dy be downloaded and installed on the
mobile device.
Initiating the connection
In order to initiate the connection with the
mobile device, it is simply necessary to con-
nect it to the Infotainment system via the
USB connection, and to be sure to follow the
instructions of the device being paired.
● The first connection to Android Auto™
must
be done while the vehicle is stationary.
● Once the first pop-up window about accept-
ing dat
a transfer between the car and the de-
vice has been accepted, a message will ap-
pear requesting that you check your mobile
device for the confirmations needed to pair it
with the Infotainment system.
● If you are initiating the session using
Android Auto™ t
echnology via USB, the mo-
bile telephone connects automatically via
Bluetooth™ to the Infotainment system tele-
phone and it will not be possible to pair an-
other mobile telephone via Bluetooth™.
Holding down the steering wheel multifunc-
tion button or the VOICE button of the Info-
t ainment
sy
stem will start the Android™
voice “engine”. »
23
Page 26 of 104
Connectivity
To return to the basic contents of the Infotain-
ment sy
s
tem, press the Return to SEAT
button. Note
Some mobile devices require a change in the
USB connection mode in or der t
o use Android
Auto™.
● Make sure that your mobile is in “Media
Tran
sfer Protocol (MTP)” mode before it is
connected by USB to the Infotainment sys-
tem. Note
Android Auto™ requires the use of Google™
serv ic
es, as well as certain basic applications
of the Android system.
● Make sure that you always have Google™
servic
es updated in order to use this technol-
ogy. 24
Page 27 of 104

Connectivity
Frequently asked questions about Full LinkWhat is the connection method?USB cable.
Will the USB cable be supplied with the vehicle?No. The USB cable supplied with the device should be used.
Is navigation possible?Navigation is possible in each one of the Full Link technologies if the technology is available in your coun-
try and if you have the Navigation app.
What is the difference between using the Full Link system navigator (via
telephone) instead of another navigator?Advantages: daily updates.
Disadvantages: data consumption, reception problems.
Can I send voice messages?With certified apps, such as SEAT ConnectApp, you can answer but not send.
What apps will be visible as I am driving?Depending on the technology:
– for MirrorLink ®
: apps certified by SEAT and the CCC,
– for Android Auto™: the Apps selected by Google™,
– for Apple CarPlay™: the Apps selected by Apple™.
Where can I find compatible Apps?The compatible apps are shown at the following
links:www.mirrorlink.com/
www.android.com/auto/
www.apple.com/ios/carplay/
Where can I download the apps?From Google Play™ for Android Auto™/MirrorLink ®
and from the Apple Store™ for Apple CarPlay™.
If Full Link stops working, where can I have it repaired?If the problem is in the car, you should go to the dealer. If the problem is in the mobile device, you should
see your mobile telephone vendor.
Will WhatsApp be certified?This depends on the technology.
Is MirrorLink ®
available in my country?Yes, MirrorLink ®
is available in all the countries and regions where SEAT operates.
What are the differences between MirrorLink ®
, Android Auto™ and Apple
CarPlay™?MirrorLink ®
is not compatible with Android Auto™ and Apple CarPlay™, as they are different technolo-
gies. They all coexist in Full Link, although Android Auto™ is designed for mobile devices with the An-
droid™ operating system, and Apple CarPlay™ for iPhone.
Can MirrorLink ®
be installed in a previous SEAT model?No, that is not possible.
Where can I find more information about Full Link?If in doubt, please refer to the Innovation/Connectivity sections of our website: www.seat.es or
www.seat.com, or send your query to [email protected] 25
Page 28 of 104

app can be used to
remotely operate some partial functions in
Radio mode, Me")
Connectivity
SEAT Media Control Intr oduction 3 Only available for the model: Navi System Plus
The S
EAT Media Control 1)
app can be used to
remotely operate some partial functions in
Radio mode, Media mode and Navigation
mode. Information can be exchanged be-
tween a device and the Infotainment System.
Each one of the functions is operated by
means of a Tablet or partially by means of a
mobile phone.
Operating requirements:
● A tablet or mobile phone.
● The app must be available on the corre-
spondin g dev
ice.
● There must be a WLAN connection between
the Infotainment
System and the device
››› page 51.
Make sure that data transfer for apps is acti-
vated:
● From the SETTINGS menu > Data transfer for
SE
AT apps, there is a checkbox to acti-
vate/deactivate the function and a dropdown
menu called Operation via apps which con-trols the level of interaction between the
apps
and the system ››› table on page 90.
You can obtain information about technical
requirements on the SEAT website or at SEAT
dealerships.
Telephone functions are not part of the func-
tions of this app.
Data transmission and control func-
tions Fig. 19
SEAT Media Control Main menu The Infotainment System can be operated
fr
om other se
ats
in the vehicle as follows,
with the help of SEAT Media Control:
● Radio remote control.
● Multimedia playback remote control. The following information can be exchanged
between a devic
e and the Infotainment Sys-
tem, depending on the country and the
equipment:
● Navigation destinations.
● Traffic information.
● Social media contents.
● Audio transmission.
● Vehicle data.
● Location-specific information, for example,
POIs.
WLAN hotspot
Introduction 3 Only
available for the model: Navi System Plus
The Inf
otainment System can be used as a
WLAN hotspot to connect up to 8 WLAN devi-
ces ››› page 27, Configure WLAN hotspot .
The Infotainment System can also use the
WLAN hotspot of an external wireless device
to provide Internet to the devices connected
to the hotspot (WLAN client) ››› page 27,
Configuring internet access .1)
Availability depends on the country.
26
Page 29 of 104

Connectivity
Note
● Data tr an
smission may incur charges. Due
to the high volume of data exchanged, SEAT
recommends the use of a flat rate mobile
phone deal for data transmission. Mobile
phone operators can provide the relevant in-
formation.
● The exchange of data packages over the in-
ternet m
ay generate additional costs, de-
pending on your mobile phone rate, particu-
larly if you are abroad (for example, roaming
rates). Configure WLAN hotspot
The Infotainment System can be used as a
w
ir
el
ess hotspot to connect up to 8 wireless
devices.
Establishing the connection with the wire-
less network (WLAN)
● Press the Infotainment MENU button and
then pr
ess the SETTINGS menu.
● Activate the wireless network (WLAN) on
the Infotainment
System. To do so, press the
WLAN function button.
● Activate the wireless network (WLAN) on
the wirel
ess device that is to be connected. If
necessary, refer to the manufacturer’s in-
struction manual. ●
Activat
e the mobile device assignment on
the Infotainment System. To do so, press the
Mobile hotspot function button and activate
the checkbox.
● Enter and confirm the network key dis-
pla
yed on the wireless device.
The following hotspot settings can also be
made on the Hotspot settings menu:
WPA2 encryption automatical-
ly generates a network key.
Network key automatically gen-
erated. Press the function button to
manually change the network key. The
network key must have a minimum of 8
characters and a maximum of 63.
WLAN Network name (maximum of 32
characters).
Activate
the checkbox to deactivate the visibility
of the wireless (WLAN) network.
The wireless (WLAN) connection is establish-
ed. To complete the connection, it may be
necessary to enter other data into the wire-
less device.
Repeat this process to connect other wireless
devices. Security level:
Network key:
SSID:
Do not send network name (SSID): Configuring internet access The Infotainment System can use the WLAN
hotspot
of
an external wireless device to es-
tablish an internet connection.
Establishing the connection with the wire-
less network (WLAN)
● Activate the wireless hotspot on the exter-
nal dev
ice. If necessary, refer to the manufac-
turer’s instruction manual.
● Press the Infotainment MENU button and
then pr
ess the SETTINGS menu; OR access
Media or SEAT Media Control mode and
press the SETTINGS menu.
● Press the WLAN menu and then enter IN-
TERNET A
CCESS SETTINGS and activate the
checkbox.
● Press the Find f
unction button and select
the wireless device you want from the list.
● If necessary, enter the network key of the
wirel
ess device in the Infotainment System
and confirm with OK.
To manually enter the net-
work settings of an external wireless
(WLAN) device.
The wireless (WLAN) connection is establish-
ed. To complete the connection, it may be
necessary to enter other data into the wire-
less device. »
Manual settings:
27
Page 30 of 104
Connectivity
Note
Due to the large number of different wireless
devic e
s in existence, it is not possible to
guarantee fault-free operation of all func-
tions. 28
Page 31 of 104
. Press the infotainment
MENU")
Audio and Media Mode
Audio and Media Mode
R a
dio Mode
R
elated video Fig. 20
Radio mode RADIO main menu
Fig. 21
RADIO main menu. Fig. 22
Radio mode: station list (FM). Press the infotainment
MENU button
››
› Fig. 1
1 and then select the
Ra
dio
context to open
the RADIO main menu ››› Fig. 21.
RADIO main menu function buttons
Function button: function
1To change the group of memory buttons
slide a finger over the memory buttons
from left to right or vice-versa
BANDAllows you to select the frequency band.
STATION
LISTOpens the list of currently receivable ra-
dio stations ››› page 33.
MANUALAllows you to select the frequency man-
ually ››› page 33.
VIEW
Allows you to select the information
shown on the screen ››› page 32. The
function button is only available in DAB
mode.
Function button: function
SETTINGSOpens the setup menu of the active fre-
quency band (FM, AM or DAB)
››› page 35.
/
Selects the previous or next stored sta-
tion (or available station). Adjustment of
the arrow buttons in the Settings menu
(FM, AM, DAB).
1 to 18Memory buttons
››› page 32.
SCANStops the scan function (only visible
when the function is under way). Information and possible icons
Display: Meaning
A
View the frequency or the name of the sta-
tion and, where applicable, the radio text.
The name of the radio station and the radio
text will only be displayed if equipped with
RDS and if it is active
››› page 30.
RDS OffThe RDS radio data service is deactivated.
TPTraffic news is available ››› page 34.
No stations with traffic news are available.
The radio station is stored on a memory
button.
AF offThe tracking of alternative frequencies is
disabled.»
29
Page 32 of 104

Audio and Media Mode
Note
● The avai l
ability of AM and DAB bands de-
pends on the country and/or equipment. In
the event that the AM and DAB bands are not
available, the BAND function button text will
not be shown.
● Bear in mind that being underground, in
tunnel
s, in areas with tall buildings or moun-
tains can interfere with radio signals.
● Foil or metal-coated stickers attached to
the window
s may affect reception on vehicles
with a window aerial.
● Radio stations are responsible for the con-
tent of
the information they transmit. RDS radio data services (FM band)
Fig. 23
Standard representation: FM station
li s
t
menu The RDS (Radio Data System) offers addition-
al
inf
orm
ation in FM such as the visualisation of the station name, automatic station track-
ing (AF), te
xt emitted by radio (Radio Text),
traffic reports (TP) and station types (PTY).
Depending on the country and the unit in
question, the RDS can be deactivated in the FM setup menu ››› page 35.
Without RDS it is not possible to use radio
data services.
Name of the station and automatic station
tracking
If equipped with the RDS function, the names
of the stations can be displayed in the main
RADIO menu and in the FM station list .
FM radio stations may occasionally or contin-
uously broadcast different content on differ-
ent regional frequencies under the same sta-
tion name (e.g. Station 3).
By default, automatic station tracking always
switches to the currently selected station's
frequency that offers the best reception, as
the vehicle travels from one area to the next.
As a result, this may cause the regional sig-
nal to be lost.
Automatic frequency changing and automatic
station tracking can be deactivated in FM setup ››› page 35.
Setting a station name
In some cases the name of the station is too
long. This text may be blocked/unblocked by pressing on the station name for 3 seconds
until
hearing an audible signal (a dot will ap-
pear/disappear on the left and right of the
station name).
Radio text
Some RDS-enabled stations also broadcast
additional text information known as radio
text.
Radio Text is displayed in the upper half of
the screen above the memory buttons
››› Fig. 21 A .
The R a
dio
Text display can be deactivated in
FM setup ››› page 35.
Station list order
Stations that are available at a certain time
are displayed on the station list screen ( STA-
TION LIST function button). This list may
be ordered by station group, by genre or al-
phabetically ››› Fig. 23. Note
● Due t o m
atters of infrastructure, RDS func-
tions may be limited in certain countries, and
you may not be able to receive traffic an-
nouncements, automatic station tracking (AF)
or programme types (PTY). 30
 1
1 2
2 3
3 4
4 5
5 6
6 7
7 8
8 9
9 10
10 11
11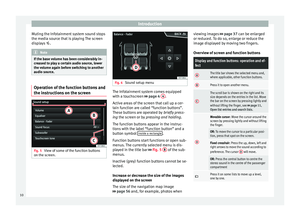 12
12 13
13 14
14 15
15 16
16 17
17 18
18 19
19 20
20 21
21 22
22 23
23 24
24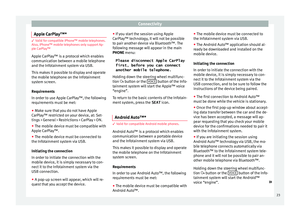 25
25 26
26 27
27 28
28 29
29 30
30 31
31 32
32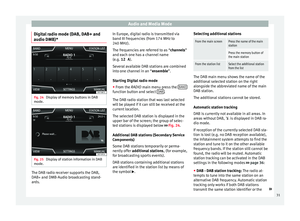 33
33 34
34 35
35 36
36 37
37 38
38 39
39 40
40 41
41 42
42 43
43 44
44 45
45 46
46 47
47 48
48 49
49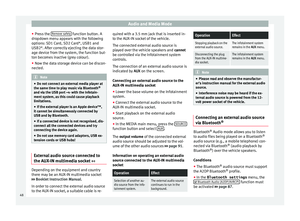 50
50 51
51 52
52 53
53 54
54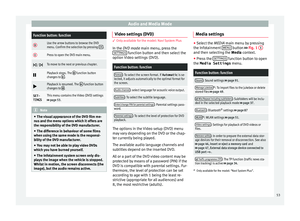 55
55 56
56 57
57 58
58 59
59 60
60 61
61 62
62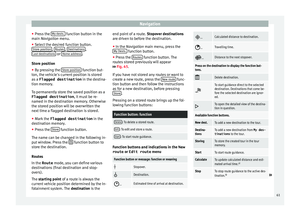 63
63 64
64 65
65 66
66 67
67 68
68 69
69 70
70 71
71 72
72 73
73 74
74 75
75 76
76 77
77 78
78 79
79 80
80 81
81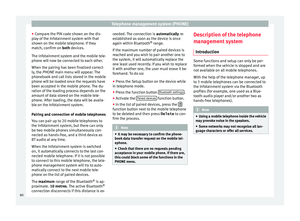 82
82 83
83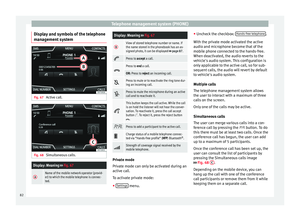 84
84 85
85 86
86 87
87 88
88 89
89 90
90 91
91 92
92 93
93 94
94 95
95 96
96 97
97 98
98 99
99 100
100 101
101 102
102 103
103
