Page 73 of 104
Navigation
●
The gener a
l direction of travel is indicated
straight ahead by direction arrows in the In-
fotainment System pop-up window ››› Fig. 55
A .
Note
If an Offroad tour is being recorded, this is
aut omatic
ally stored if Offroad navigation is
discontinued. 71
Page 74 of 104

CAR menu
CAR menu Intr oduction t
o m
anaging the
CAR menu
CAR menu. Press the Infotainment
MENU button
››› Fig. 1
1 and then select the
Vehicl
e context to ac-
cess the main menu with the following op-
tions:
● VIEW
● MINIPLAYER, in the top right corner (Radio
or Medi a f
unction if the HDC descent control*
is not active).
● PREVIOUS-NEXT (to change screen)
● SETTINGS ›››
Booklet Instruction Manual,
chapter System setup (CAR)
With the function button VIEW you can ac-
c e
s
s the following information:
● SPORT*
● OFFROAD*
● CONSUMERS
● DRIVING DATA ●
ECO
TRAINER*
● VEHICLE STATUS
Sport* Fig. 56
SPORT menu Fig. 57
Lap Timer SPORT menu ●
Pr e
s
s the Infotainment MENU button
› ›
›
Fig. 1 1 and then select the
Vehic
l e con-
text.
● Press the VIEW function button and then
sel ect
S
PORT.
If the corresponding equipment is available,
the information that appears in the Sport op-
tion is the following ››› Fig. 56:
Instantaneous power expressed in kW
G forces
Turbo pressure, expressed in bar
(“bar”), kilopascals (“kPa”) or in pounds
per square inch (“psi”). Press the Setup
button to change the units of pressure
››› page 90
Coolant temperature
Oil temperature
Only three of these items of information can
be displayed at the same time, but the user
chooses which to display, and in what order,
by moving the finger vertically over the dials.
If the NEXT button is pressed, the
Lap timer1)
menu i s
di
splayed; this is described below
››› Fig. 57:
Analogue lap timer.
1.
2.
3.
4.
5.
1 1)
This lap timer is independent of the one that ap-
pear s
on the instrument panel ››› Booklet Instruction
Manual
72
Page 75 of 104

CAR menu
A new lap timer recording is started by
pr e
s
sing on the surface of the digital lap
timer + .
Stop lap timer/Partial time.
The analogue lap timer stops for 5 sec-
onds. After 5 seconds, the analogue lap
timer goes back to showing the real time.
Statistics/delete last lap timer recording.
Offroad* Fig. 58
CAR Menu Offroad. ●
Press the Infotainment MENU button
› ›
›
Fig. 1 1 and then select the
Vehic
l e con-
text.
● Press the VIEW function button and then
sel ect
OFFROAD .
2 3
4
5 If the corresponding equipment is available,
the inf
orm
ation th
at appears is the following:
Compass.
Altimeter: altitude above sea level.
Turning angle of steered wheels.
Coolant temperature.
Lubricating oil temperature
Only the altimeter and 2 more of these items
of information can be displayed at the same
time, but the user chooses which to display,
and in what order, by moving their finger ver-
tically over the dials.
Consumers Fig. 59
Convenience consumers. 1.
2.
3.
4.
5.
By pressing the
C
ONSUMERS button, informa-
tion on the s t
at
us of the vehicle's main con-
sumption devices is obtained. It is shown via
a consumption indicator bar in l/h (gal/h) 1)
.
Driving data Fig. 60
Driving data. The onboard computer is equipped with 3
memorie
s
th
at work automatically. In these
memories you can see the distance travelled,
average speed, time passed, average con-
sumption and autonomy of the vehicle.
1. Since start
Indicates and stores the values of the journey
completed and the consumption from when »1)
In the case of Gas (CNG) vehicles, the units are in
kg/h. 73
Page 76 of 104

CAR menu
the ignition is switched on to when it is
sw it
c
hed off.
2. Since refuelling
Display and storage of the values for the jour-
ney and the consumption. By refuelling, the
memory will be erased automatically.
3. Long-term
The memory records the values for a specific
number of partial trips, up to a total of 19
hours and 59 minutes or 99 hours and 59 mi-
nutes, or 1999.9 km (or miles) for 9999 km
(or miles), depending on the model of instru-
ment panel.
When one of these values is reached (de-
pending on the version of the instrument
panel), the memory is automatically deleted
and it starts counting from 0 again. Ecotrainer* Fig. 61
CAR Menu Ecotrainer. Fig. 62
Driving style symbols. Open ECOTRAINER menu
● When the vehicle is stopped, press the In-
f ot
ainment
MENU button
››
› Fig. 1 1 and
then sel ect
the V
ehicle context.
● Press the VIEW function button and then
sel ect
ECOTRAINER . If
the corresponding equipment is available,
the ECO
TRAINER will provide information on
driving style. The information on driving style
is only evaluated and displayed when mov-
ing forward.
∅ ECO points: Driving style display
This indicates the driving style since starting
the vehicle on a scale of 0 to 100. The higher
the score displayed, the more efficient the
driving style. To see more information, press
the display. It shows statistics for the last 30
minutes of driving since starting the vehicle.
If the car has not yet been driven for 30 mi-
nutes, it shows values from the last trip in
grey.
∅ l/100 km: Average fuel consumption
Shows the average fuel consumption. The
value is calculated by using the kilometres
covered since starting the vehicle. To see
more information, press the display. It shows
statistics for the last 30 minutes of driving
since starting the vehicle. If the car has not
yet been driven for 30 minutes, it shows val-
ues from the last trip in grey.
ECO tips: Tips on how to save fuel
By pressing the ECO tips function button, you
c an
v
iew tips on how to save fuel. These tips
can only be viewed when the vehicle is stop-
ped.
74
Page 77 of 104

CAR menu
Evaluation of efficient driving style
The effic iency
of
the driving style is reflected
by different elements on the display.
Display ››› Fig. 61: Meaning
1Different symbols are shown on the left of the col-
umns that report on the current driving style ››› ta-
ble on page 75.
2
The white column is an indication of where the ef-
ficiency graph begins (from left to right).
It shows the position of the evaluation that is cur-
rently being performed.
3
Bars to represent acceleration.
The position of the car represents the acceleration.
If speed is constant, the car remains in the central
area. When accelerating or braking, the car moves
forward or backward respectively.
4
Columns to show driving style efficiency.
On the horizon, the columns represent the effi-
ciency of the driving style in a retrospective man-
ner and move from left to right every five seconds
or so. The higher the height of the columns, the
more efficient the driving style.
The colour of the sky represents the average of the
last three minutes. The colour changes from grey
(less efficient) to blue (more efficient).
Symbols ››› Fig. 62: Meaning
AForesight when driving. If sudden changes of ac-
celeration occur, driving style efficiency is re-
duced.
BGear-change indicator.
Symbols ››› Fig. 62: Meaning
CThe current vehicle speed is having a negative im-
pact on fuel consumption.
DEcological driving style. Vehicle status
Fig. 63
Standard representation: vehicle sta-
t u
s. Fig. 64
Standard representation: vehicle sta-
tu s. Press the
V
ehic
l
e status button to access infor-
m ation on the Vehicle status
me
s
sages
and Start-Stop System . The Vehicle sta-
tus messages are displayed ››› Fig. 63, in ad-
dition to being specified on the correspond-
ing button.
Depending on the parts affected by these
messages, they will be indicated in different
colours (depending on their significance) in
the vehicle display.
To access the Tyre Pressure Monitor-
ing System you must press the Previous or
Ne xt buttons.
Fr om thi
s
same menu, using the button
SET , the tyre pressures are stored.
Note
The values that appear in the figures
›› ›
Fig. 59, ››› Fig. 60, ››› Fig. 63 and ››› Fig. 64 » 75
Page 78 of 104
CAR menu
are indicative and may vary depending on the
fe
at
ures.76
Page 79 of 104

Telephone management sys-
t em (PHONE)
Intr oduction t
o the telephone
management system
Related video Fig. 65
Telephone man-
agement sy
stem General information")
Telephone management system (PHONE)
Telephone management sys-
t em (PHONE)
Intr oduction t
o the telephone
management system
Related video Fig. 65
Telephone man-
agement sy
stem General information
The Telephone functions described below
c
an be u
sed thr
ough the Infotainment system
if there is a mobile telephone connected to it
via Bluetooth ®
›››
page 79.
In order for the mobile telephone to be able
to connect to the Infotainment system the tel-
ephone must be equipped with Bluetooth®
.
If there is no mobile telephone connected to
the Infotainment system, the telephone man-
agement system will not be available. The instructions shown on the screen for the
telephone menu
s will depend on the mobile
telephone used. There may be variations.
Only use compatible Bluetooth ®
devices. For
further information on compatible Blue-
tooth ®
products, ask your nearest SEAT deal-
er or check on the internet.
Use the instruction manual of the mobile tel-
ephone and of any accessories.
If you detect any operating issues between
your mobile telephone and the Infotainment
system, restart your mobile by switching it off
and on again.
You may experience poor reception or may be
cut off in areas where the signal is weak.
Most electronic devices are shielded against
HF (high-frequency) signals. In any case, the
electronic equipment may not be protected
from the HF signals of the telephone man-
agement system. This may cause interfer-
ence. WARNING
Speaking by telephone and operating the mo-
bi l
e telephone whilst driving can distract you
from the road and cause an accident.
● Always drive carefully and responsibly.
● Select volume settings that allow you to
eas
ily hear signals from outside the vehicle
at all times (e.g. emergency services sirens
and horns). ●
In are a
s of little or no coverage or, in some
cases, in a tunnel, garage or underpass, your
call may be cut off and you may not be able to
make even emergency calls. WARNING
If a mobile telephone is not secured or is in-
c orr ectly
secured in the vehicle, it could move
around the passenger compartment in the
event of a sudden driving manoeuvre or emer-
gency stop, resulting in injury.
● While the vehicle is in motion, always se-
cure the mo
bile telephone properly outside
the airbag deployment zone. WARNING
Mobile telephones may interfere with and al-
ter the c orr
ect operation of pacemakers if
they are carried directly over them.
● Maintain a minimum distance of at least
20 centimetre
s between the aerials of the
mobile telephone and the pacemaker, as mo-
bile phones may affect the functioning of
pacemakers.
● Do not carry your switched-on mobile tele-
phone in your br
east pocket directly over the
pacemaker.
● If you suspect interference, switch off the
mobi
le telephone immediately. » 77
Page 80 of 104

CAUTION
High speeds, poor weather or road conditions
and the quality of
reception can all affect the
quality of a telephone conversation in the ve-
hicle. Note
�")
Telephone management system (PHONE)
CAUTION
High speeds, poor weather or road conditions
and the quality of
reception can all affect the
quality of a telephone conversation in the ve-
hicle. Note
● Re s
trictions on the use of devices using
Bluetooth ®
technology may apply in some
countries. For further information, contact the
local authorities.
● If you wish to connect a device to the tele-
phone manag
ement system via Bluetooth ®
technology, consult the safety warnings in its
instruction manual. Only use compatible
Bluetooth ®
devices. Areas where special regulations apply
Switch off the mobile telephone and the mo-
b
i
l
e Bluetooth function in places with a risk
of explosion. In the majority of cases, these
places are signposted, but not always clearly
››› in General information on page 77.
They
inc lude, f
or example:
● the vicinity of chemical pipelines and tanks
● The lower decks of boats and ferries.
● In the proximity of vehicles that run on liq-
uid gas
(such as propane or butane). ●
plac
es where the air is laden with chemi-
cals or particles such as flour, dust or metal
powder.
● all other places where the vehicle engine
must
be switched off. WARNING
Switch off the mobile phone in areas with a
risk of
explosion! The mobile telephone can
automatically connect to the mobile tele-
phone network again if it loses the Blue-
tooth ®
connection to the telephone manage-
ment system. CAUTION
In areas where special regulations apply or
the use of mo
bile telephones is prohibited,
both the telephone and the telephone man-
agement system must be switched off. The
radiation produced by the mobile telephone
when switched on may interfere with sensi-
tive technical and medical equipment, possi-
bly resulting in a malfunction or damage to
the equipment. Bluetooth
® Bluetooth
®
tec
hno
logy allows a mobile tele-
phone to be connected to your vehicle's tele-
phone management system. In order to use
the telephone management system with a
mobile telephone with Bluetooth ®
technolo-
gy, it is first necessary to pair them. Some Bluetooth
®
mobi
le telephones detect
and automatically connect when turning on
the ignition if a connection has been previ-
ously established. For this to take place the
telephone must be switched on and its Blue-
tooth ®
function activated, and there must be
no active Bluetooth ®
connection with other
devices.
Bluetooth ®
connections are free.
Bluetooth ®
is a registered trademark of
Bluetooth ®
SIG, Inc.
Bluetooth profiles ®
When a mobile phone is connected to the tel-
ephone management system, a data ex-
change takes place via one of the Bluetooth ®
profiles.
● Hands-free Bluetooth profile (HFP): If a mo-
bi
le telephone is connected to the telephone
manager through the HFP, calls can be made
wirelessly through the hands-free device.
This function also requires other Bluetooth
profiles such as the phonebook download
and instant messaging.
● Audio profile (A2DP): Bluetooth profi
le for
transmitting audio signals with stereo quali-
ty. This function can also connect other addi-
tional Bluetooth profiles for viewing tracks
and for controlling playback on the mobile
device.
78
 1
1 2
2 3
3 4
4 5
5 6
6 7
7 8
8 9
9 10
10 11
11 12
12 13
13 14
14 15
15 16
16 17
17 18
18 19
19 20
20 21
21 22
22 23
23 24
24 25
25 26
26 27
27 28
28 29
29 30
30 31
31 32
32 33
33 34
34 35
35 36
36 37
37 38
38 39
39 40
40 41
41 42
42 43
43 44
44 45
45 46
46 47
47 48
48 49
49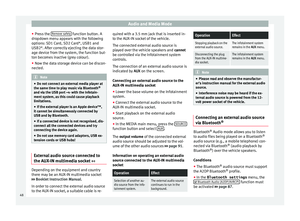 50
50 51
51 52
52 53
53 54
54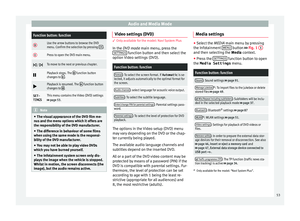 55
55 56
56 57
57 58
58 59
59 60
60 61
61 62
62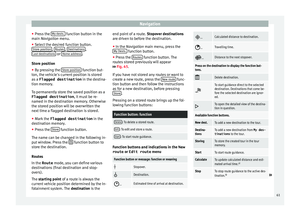 63
63 64
64 65
65 66
66 67
67 68
68 69
69 70
70 71
71 72
72 73
73 74
74 75
75 76
76 77
77 78
78 79
79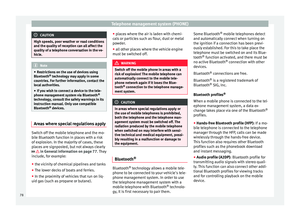 80
80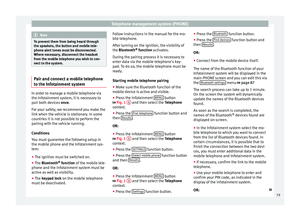 81
81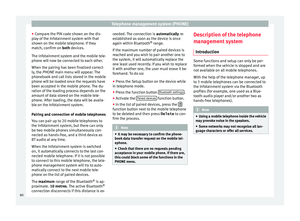 82
82 83
83 84
84 85
85 86
86 87
87 88
88 89
89 90
90 91
91 92
92 93
93 94
94 95
95 96
96 97
97 98
98 99
99 100
100 101
101 102
102 103
103
