Page 137 of 332
.
● Movement of objects inside the vehicle,
such a
s loose papers, items hanging from
the rear vision mirror (air f")
Opening and closing
● Panor
amic/ti
lting sunroof open (partially or
completely).
● Movement of objects inside the vehicle,
such a
s loose papers, items hanging from
the rear vision mirror (air fresheners), etc. Note
● If the v
ehicle is relocked and the alarm is
activated without the volumetric sensor func-
tion, relocking will activate the alarm with all
its functions, except the volumetric sensor.
This function is reactivated when the alarm is
switched on again, unless it is deliberately
switched off.
● If the alarm has been triggered by the volu-
metric sensor
, this will be indicated by a
flashing of the warning lamp on the driver
door when the vehicle is opened. The flash is
different to the flash indicating the alarm is
activated.
● The vibration of a mobile phone left inside
the vehic
le may cause the vehicle interior
monitoring alarm to trigger, as both sensors
react to movements and shakes inside the ve-
hicle.
● If on activating the alarm, any door or the
rear lid i
s open, only the alarm will be activa-
ted. The vehicle interior monitoring and the
anti-tow system will only be activated once
all the doors are closed (including the rear
lid). Deactivating the vehicle interior moni-
t
orin
g and anti-t
ow system* When the vehicle is locked, the alarm will be
trigg
er
ed if movements are detected in the
interior (e.g. by animals) or if the vehicle's in-
clination is changed (e.g. during transport).
You can prevent the alarm from being trig-
gered accidentally by switching off the vehi-
cle interior monitoring and/or tow-away pro-
tection.
● To switch off the interior monitoring and
to w-
away protection, switch off the ignition
and, using the Infotainment system, select: button >
S
ET
TINGS function button > Open-
in g and c
lo
sing > Central locking > Switch off
alarm.
● When the vehicle is locked now, the vehicle
interior monitorin
g and the tow-away protec-
tion are switched off until the next time the
door is opened.
If the anti-theft security system (Safelock)*
››› page 131 is switched off, the vehicle interi-
or monitoring and the tow-away protection
are automatically switched off. WARNING
Observe the safety warnings ›››
in Descrip-
tion on pag e 125
. Rear lid (luggage compart-
ment)
R e
ar lid aut
omatic locking Where the vehicle has been locked by press-
ing the
button on the remote control with
the rear lid open, the rear lid will lock auto-
matically when closed.
The automatic rear lid locking time extension
function can be activated. Where this func-
tion is activated and once the rear lid has
been unlocked by pressing the button on
the remote control key ›››
page 127, the rear
lid can be re-opened for a certain length of
time.
Where required, the automatic tailgate lock-
ing time extension function can be activated
or deactivated at an Authorised SEAT Service,
which will provide all the necessary informa-
tion.
Before the vehicle locks automatically, there
is a risk of intruders getting into the vehicle.
Therefore, we recommend you always lock
the vehicle by pressing the button on the
remote control or by using the central locking
button. WARNING
Observe the safety warnings ›››
in Intro-
duction on pag e 97
. » 135
Technical data
Advice
Operation
Emergencies
Safety
Page 138 of 332

Operation
●
Alw a
ys close the rear lid properly. Risk of
accident or injury.
● The rear lid must not be opened when the
rever
se or rear fog lights are lit. This may
damage the tail lights.
● Do not close the rear lid by pushing it down
with y
our hand on the rear window. The glass
could smash. Risk of injury!
● Ensure the rear lid is locked after closing it.
If not, it m
ay open unexpectedly while driv-
ing.
● Closing the rear lid without observing and
ensurin
g it is clear could cause serious injury
to you and to third parties. Make sure that no
one is in the path of the rear lid.
● Never drive with the rear lid open or half-
closed, e
xhaust gases may penetrate into the
interior of the vehicle. Danger of poisoning!
● If you only open the rear lid, do not leave
the key in
side. The vehicle cannot be opened
if the key is left inside. Controls for the windows
Openin g and c
lo
sing of the electric
windows* Fig. 140
Detail of the driver door: controls for
the w indo
w
s (5-door vehicle with front and
rear electric windows). Read the additional information carefully
› ›
›
page 18
The front and rear electric windows can be
operated by using the controls on the driver
door. The other doors each have a switch for
their own window.
Always close the windows fully if you park
the vehicle or leave it unattended ››› .
Y ou c
an u
se the electric windows for approx.
10 minutes after switching off the ignition if
neither the driver door nor the front passen-
ger door has been opened and the key has
not been removed from the ignition. Safety switch
* (only in 5-door
vehicles)
The safety switch ››› Fig. 140 5 on the driver
door c an be u
sed t
o disable the electric win-
dow buttons on the rear doors.
● Safety switch not pressed : button
s on rear
doors are activated.
● Safety switch pressed : button
s on rear
doors are deactivated.
The safety control symbol lights up in yel-
low if the buttons on the rear doors are
switched off. WARNING
Observe the safety warnings ›››
in Intro-
duction on pag e 97
.
● Incorrect use of the electric windows can
res
ult in injury.
● Never close the rear lid without observing
and ensurin
g it is clear, to do otherwise could
cause serious injury to you and third parties.
Make sure that no one is in the path of a win-
dow.
● The engine may accidentally be started and
be out of c
ontrol.
● If the ignition is switched on, the electric
equipment cou
ld be activated with risk of in-
jury, for example, in the electric windows.
● The doors can be locked using the remote
contro
l key. This could become an obstacle
for assistance in an emergency situation. 136
Page 139 of 332

Opening and closing
●
Theref or
e always take the key with you
when you leave the vehicle.
● The electric windows will work until the ig-
nition has
been switched off and one of the
front doors has been opened.
● If necessary, use the safety switch to disa-
ble the r
ear electric windows. Make sure that
they have been disabled. Note
If the window is not able to close because it
i s s
tiff or because of an obstruction, the win-
dow will automatically open again
››› page 137. If this happens, check why the
window could not be closed before attempt-
ing to close it again. Roll-back function
The roll-back function reduces the risk of in-
jur
y
when the el
ectric windows close.
● If a window is obstructed when closing au-
tomatic
ally, the window stops at this point
and lowers immediately ››› .
● Next, check why the window does not close
bef or
e att
empting it again.
● If you try within the following 10 seconds
and the window c
loses again with difficulty
or there is an obstruction, the automatic clos-
ing will stop working for 10 seconds. ●
If the windo
w is still obstructed, the win-
dow will stop at this point.
● If there is no obvious reason why the win-
dow cannot
be closed, try to close it again by
pulling the tab within ten seconds. The win-
dow closes with maximum force. The roll-
back function is now deactivated.
● If more than 10 seconds pass, the window
wil
l open fully when you operate one of the
buttons. One-touch closing is reactivated. WARNING
Observe the safety warnings ›››
in Opening
and clo s
ing of the electric windows* on
page 136.
● The roll-back function does not prevent fin-
gers
or other parts of the body getting
pinched against the window frame. Risk of
accident. Convenience opening and closing
Use the convenience opening/closing func-
tion t
o e
a
sily open/close all the windows and
the sliding/tilting sunroof* from the outside.
Convenience open function
– Press and hold the button on the r
emote
control key until all the windows and the
sliding/tilting sunroof* have reached the
desired position, or –
First
unlock the vehicle using the button
on the remote control key and then keep
the key in the driver door lock until all the
windows and the sliding/tilting sunroof*
have reached the required position.
Convenience close function
– Press and hold button on the remote
c
ontrol key until all the windows and the
sliding/tilting sunroof* are closed ››› , or
– Keep the key in the driver door in the "lock"
po s
ition u
ntil all the windows and the slid-
ing/tilting sunroof* are closed.
Programming convenience opening in the
Easy Connect*
– Select: button > function button SET-
TINGS > Opening and closing >
Central locking > Opening the
window by holding down button or
Front window on/off or Roof
on/off *. WARNING
● Tak e c
are when closing the sliding/tilting
sunroof* and windows. There is a risk of suf-
fering injury.
● For safety reasons, you should only use the
remote c
ontrol open and close functions with-
in about 2 metres of the vehicle. To avoid in-
juries, always keep an eye on the windows » 137
Technical data
Advice
Operation
Emergencies
Safety
Page 140 of 332

Operation
and the sliding/tilting sunroof* when press-
ing the b
utt
on to close them. The windows
stop moving as soon as the button is re-
leased. One-touch opening and closing*
One-touch opening and closing means you
do not h
av
e to hold down the button.
Buttons ››› Fig. 140 1 ,
2 ,
3 and
4 have
two po s
itions for opening windows and two
for closing them. This makes it easier to open
and close windows to the desired position.
One-touch closing
– Pull up the window button briefly up to the
second po s
ition. The window closes fully.
One-touch opening
– Push down the window button briefly up to
the second pos
ition. The window opens
fully.
Resetting one-touch opening and closing
The automatic open and close function will
not work if the battery has been temporarily
disconnected. The function can be restored
as follows:
– Close the window as far as it will go by lift-
ing and hol
ding the electric window switch. –
Rele
ase the switch and then lift it again for
1 second. This will re-enable the automatic
function.
If you push (or pull) a button to the first
stage, the window will open (or close) until
you release the button. If you push or lift the
button briefly to the second stage, the win-
dow will open (one-touch opening) or close
(one-touch closing) automatically. If you op-
erate the button while the window is opening
or closing, it stops at this position.
Panoramic sliding sunroof*
Opening or clo
sing the panoramic
sliding sunroof Read the additional information carefully
› ›
›
page 18
The panoramic sliding sunroof will only work
with the ignition on. It can be opened or
closed for a few minutes after the ignition
has been switched off, provided the driver
door and the front passenger door are not
opened. WARNING
Careless or uncontrolled use of the panoram-
ic s lidin
g sunroof can cause serious injuries. ●
Only open or c
lose the panoramic sliding
sunroof and the sun blind* when nobody is in
the way.
● The panoramic sliding sunroof can be oper-
ated for up t
o about ten minutes after the ig-
nition has been switched off, provided the
driver door and the front passenger door are
not opened. CAUTION
Check that when the rear lid is opened it does
not bump ag
ainst loads carried on the roof.
When a roof carrier is fitted, DO NOT open the
panoramic roof*. Note
● Le av
es and other loose objects that accu-
mulate on the sun roof rails should be regu-
larly cleaned away either by hand or with a
vacuum.
● In case of a fault in the operation of the
panoramic
sliding sunroof, the anti-trap func-
tion will not operate correctly. Contact a spe-
cialised workshop. 138
Page 141 of 332

Opening and closing
Opening and closing the sun blind* 3 Valid for vehicles: with sun blinds
Fig. 141
On the interior roof lining: switches
f or the s
u
n blind.
FunctionAction
Opening com-
pletely (automatic
function)Press button ››› Fig. 141 1 briefly.
Stop automatic
operationPress button 1 or button 2briefly.
To set the inter-
mediate positionPress button 1 or button 2 until
the correct position is set.
Closing complete-
ly (automatic
function)Press the button 2 briefly.Once the ignition has been switched off, you
c
an s ti
ll open or close the sun blind for a few
minutes provided the driver door and the
front passenger door are not opened. Convenience closing of the panoramic
sliding s
unroof The panoramic sliding sunroof can be
opened or clo
sed fr
om outside the vehicle
using the vehicle key:
● Keep the vehicle unlocking or locking but-
ton pre
ssed. The panoramic sliding sunroof
is adjusted or closes.
● Release the unlock or lock button to stop
the function.
D
uring convenience closing, the windows
and the panoramic sliding sunroof close at
the same time. Note
The rotary button of the panoramic sliding
su nr
oof remains in the last position selected
if the roof is closed using convenience clos-
ing from outside the vehicle, and will have to
be re-positioned the next time you drive. Roll-back function of the panoramic
s
lidin
g s
unroof and the sun blind* The anti-trap function reduces the risk of in-
jur
y
when openin
g and closing the panoram-
ic sliding sunroof and sun blind ››› . When
it enc
ou
nters an obstacle while closing, it
rolls back and opens again. ●
Check wh
y the panoramic sliding sunroof
or the sun blind does not close.
● Try and close them again.
● If the panoramic sliding sunroof or sun
blind is
still obstructed, it will stop at the cor-
responding position. Close it without the an-
ti-trap function.
Closing without the roll-back function
● The switch should be in the “closed posi-
tion” ›››
page 18
1 .
● Panoramic sliding sunroof: Within fiv
e sec
-
onds of triggering the anti-trap function, pull
the control all the way back ›››
page 18
(arrow 5 ) until the panoramic sliding sun-
r oof
c
loses fully.
● Sun blind: Within five sec
onds of triggering
the anti-trap function, press button
››› Fig. 141 2 until the sun blind closes fully.
● The panoramic sliding sunroof and sun
b lind c
lo
se without the anti-trap function.
● If the panoramic sliding sunroof still cannot
be closed,
visit a specialised workshop. WARNING
Closing the panoramic sliding sunroof or sun
blind w ithout
the anti-trap function can cause
serious injuries.
● Always close the panoramic sliding sunroof
caref
ully. » 139
Technical data
Advice
Operation
Emergencies
Safety
Page 142 of 332

Operation
●
Nobody shou
ld be in the way of the panor-
amic sliding sunroof or sun blind, especially
when they are closed without the anti-trap
function.
● The anti-trap function does not prevent fin-
gers
or other parts of the body getting
pinched against the window frame and caus-
ing injury. Note
The anti-trap function is activated if the win-
do ws
and the panoramic sliding sunroof are
closed from the outside of the vehicle using
the ignition key for convenience closing
››› page 137. Lights and visibility
Light s
Side light and dip
ped beam headlight Read the additional information carefully
›› ›
page 30
The driver is personally responsible for the
correct use and adjustment of the lights in all
situations.
Audible warnings to advise the driver that
the lights have not been switched off
If the key is not in the ignition and the driver
door is open, an audible warning signal is
heard in the following cases: this is a remind-
er to turn off the lights.
● When the parking light is on ››
›
page 141.
● When the light switch is in position or
. WARNING
The side lights or daytime running lights are
not bright enough t
o illuminate the road
ahead and to ensure that other road users are
able to see you.
● Always use your dipped beam head lights if
it is
raining or if visibility is poor. WARNING
If the headlights are set too high and not
used c orr
ectly, there is a risk of dazzling or
distracting other road users. This could result
in a serious accident.
● Always make sure that the headlights are
correctly
adjusted. Note
The legal requirements regarding the use of
vehic l
e lights in each country must be ob-
served. Daytime running lights
The daytime running lights consist of individ-
ual
lights, int
e
grated in the front headlights.
With the daylight driving lights on, only these
lights switch on ››› .
The d a
ytime ru
nning lights switch on every
time the ignition is switched on, if the switch
is in positions or , according to the level
of exterior lighting.
When the light switch is in position , a
light sensor automatically switches dipped
beam on and off (including the control and
instrument lighting) or the daytime running
lights depending on the level of exterior
lighting.
140
Page 143 of 332

Lights and visibility
WARNING
● Never driv e w
ith daytime lights if the road
is not well lit due to weather or lighting con-
ditions. Daytime lights do not provide
enough light to illuminate the road properly
or be seen by other road users.
● The rear lights do not come on with the
daytime driv
ing light. A vehicle which does
not have the rear lights on may not be visible
to other drivers in the darkness, in the case
of heavy rain or in conditions of poor visibili-
ty. Turn signal and main beam lever
Read the additional information carefully
› ›
›
page 31
Push the lever all the way down to turn off
the corresponding function.
Convenience turn signals
For the one-touch signalling, when the igni-
tion is switched on, move the lever as far as
possible upwards or downwards and release
the lever. The turn signal will flash three
times.
One-touch signalling is activated and deacti-
vated in the Easy Connect system via the button and the function button SETTINGS >
Lights > One-touch signalling
› ›
›
page 33. In vehicles that do not have the correspond-
ing menu, this
function can be deactivated in
a specialised workshop. WARNING
Improper or lack of use of the turn signals, or
for g
etting to deactivate them can confuse
other road users. This could result in a seri-
ous accident.
● Always give warning when you are going to
chan
ge lane, overtake or when turning, acti-
vating the turn signal in good time.
● As soon as you have finished changing
lane, ov
ertaking or turning, switch the turn
signal off. WARNING
Incorrect use of the headlights may cause ac-
cident s
and serious injury, as the main beam
may distract or dazzle other drivers. Note
● If the c on
venience turn signals are operat-
ing (three flashes) and the other convenience
turn signals are switched on, the active part
stops flashing and only flashes once in the
new part selected.
● The turn signal only works when the igni-
tion is sw
itched on. The hazard warning
lights also work when the ignition is switch-
ed off. ●
If a tr ai
ler turn signal malfunctions, the
control lamp will stop flashing (trailer turn
signals) and the vehicle turn signal will flash
at double speed.
● The main beam headligh
ts can only be
switched on if the dipped beam headlights
are already on.
● In cold or damp weather conditions, the
headlight
s, tail lights and turn signals may
mist up inside temporarily. This is normal and
in no way effects the useful life of the vehicle
lighting system. Automatic dipped beam control
* The automatic dipped beam control is merely
int
ended a
s
an aid and is not able to recog-
nise all driving situations.
When the light switch is in position , the
vehicle lights and the instrument panel and
switch lighting switch on and off automatical-
ly in the following situations ››› in Daytime
ru nnin
g light
s on page 141:
Automatic switching
onAutomatic switching
off
The photo sensor detects
darkness, for example,
when driving through a
tunnel.When adequate lighting is
detected.» 141
Technical data
Advice
Operation
Emergencies
Safety
Page 144 of 332

OperationAutomatic switching
onAutomatic switching
off
The rain sensor detects
rain and activates the
windscreen wipers.When the windscreen wip-
ers have been inactive for
a few minutes.
WARNING
If the road is not well lit and other road users
cannot see the
vehicle well enough or at all,
accidents may occur.
● The automatic dipped beam control ( )
only sw
itches on the dipped beam when
there are no changes in brightness, and not,
for example when it is foggy. Main beam assist*
Main beam assist (Light Assist)
The m
ain be
am a
ssist acts within the limits
of the system and depending on environmen-
tal and traffic conditions. Once switched on,
the system is activated as of a speed of
about 60 km/h (37 mph) and is deactivated
below about 30 km/h (18 mph) ››› .
When the sy s
t
em is activated and the camera
detects other vehicles that may be dazzled,
the main beam is automatically switched off.
Otherwise, the main beam is automatically
switched on.
The main beam assist generally detects illu-
minated areas and deactivates the main beam when passing through a town, for ex-
ample.
Sw
itching the main beam assist on and off
Func-
tionUse
Activate:
– Switch the ignition on and turn the light
switch to position .
– From the base position, move the main
beam and turn signal lever forwards
››› page 141. When the warning lamp
is
displayed on the instrument panel display,
the main beam assist is switched on.
To switch system off:
– Switch off the ignition.
– OR: turn the light switch to a different po-
sition to
››› page 140.
– OR: with main beam on, move the main
beam and turn signal lever backwards.
– OR: move the main beam and turn the
signal lever forwards to manually switch
the main beam on. The main beam assist
will then be deactivated. Malfunctions
The f
o
l
lowing conditions may prevent the
main beam headlight control from turning off
the headlights in time or from turning off al-
together:
● In poorly lit towns with highly reflective
signs.
● Other in
sufficiently lit road users (such as
pedestri
ans or cyclists). ●
On tight bends
and steep slopes (bumps)
and when oncoming vehicles are partially ob-
scured.
● When the drivers of other oncoming vehi-
cle
s (such as a truck) can see over a guard
rail in the centre of the road.
● If the camera is damaged or the power sup-
ply i
s cut off.
● In fog, snow and heavy rain.
● With dust and sand turbulence.
● With loose gravel in the field of vision of
the camera.
● When the fiel
d of vision of the camera is
mist
ed up, dirty or covered by stickers, snow,
ice, etc. WARNING
The convenience features of the main beam
as s
ist should not encourage the taking of
risks. The system is not a replacement for
driver concentration.
● You are always in control of the main beam
and adaptin
g it to the light, visibility and traf-
fic conditions.
● It is possible that the main beam headlight
contro
l does not recognise all driving situa-
tions and is limited under certain circumstan-
ces.
● When the field of vision of the camera is
dirty, c
overed or damaged, operation of the
main beam control may be affected. This also
applies when changes are made to the 142
 1
1 2
2 3
3 4
4 5
5 6
6 7
7 8
8 9
9 10
10 11
11 12
12 13
13 14
14 15
15 16
16 17
17 18
18 19
19 20
20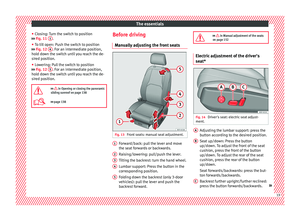 21
21 22
22 23
23 24
24 25
25 26
26 27
27 28
28 29
29 30
30 31
31 32
32 33
33 34
34 35
35 36
36 37
37 38
38 39
39 40
40 41
41 42
42 43
43 44
44 45
45 46
46 47
47 48
48 49
49 50
50 51
51 52
52 53
53 54
54 55
55 56
56 57
57 58
58 59
59 60
60 61
61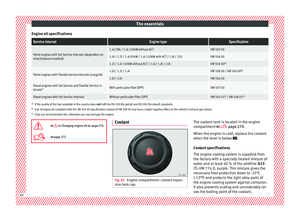 62
62 63
63 64
64 65
65 66
66 67
67 68
68 69
69 70
70 71
71 72
72 73
73 74
74 75
75 76
76 77
77 78
78 79
79 80
80 81
81 82
82 83
83 84
84 85
85 86
86 87
87 88
88 89
89 90
90 91
91 92
92 93
93 94
94 95
95 96
96 97
97 98
98 99
99 100
100 101
101 102
102 103
103 104
104 105
105 106
106 107
107 108
108 109
109 110
110 111
111 112
112 113
113 114
114 115
115 116
116 117
117 118
118 119
119 120
120 121
121 122
122 123
123 124
124 125
125 126
126 127
127 128
128 129
129 130
130 131
131 132
132 133
133 134
134 135
135 136
136 137
137 138
138 139
139 140
140 141
141 142
142 143
143 144
144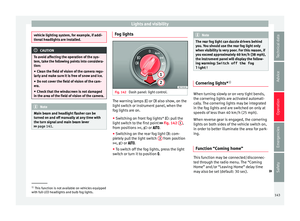 145
145 146
146 147
147 148
148 149
149 150
150 151
151 152
152 153
153 154
154 155
155 156
156 157
157 158
158 159
159 160
160 161
161 162
162 163
163 164
164 165
165 166
166 167
167 168
168 169
169 170
170 171
171 172
172 173
173 174
174 175
175 176
176 177
177 178
178 179
179 180
180 181
181 182
182 183
183 184
184 185
185 186
186 187
187 188
188 189
189 190
190 191
191 192
192 193
193 194
194 195
195 196
196 197
197 198
198 199
199 200
200 201
201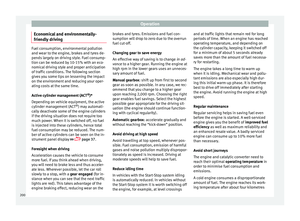 202
202 203
203 204
204 205
205 206
206 207
207 208
208 209
209 210
210 211
211 212
212 213
213 214
214 215
215 216
216 217
217 218
218 219
219 220
220 221
221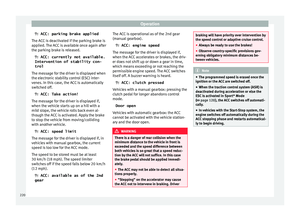 222
222 223
223 224
224 225
225 226
226 227
227 228
228 229
229 230
230 231
231 232
232 233
233 234
234 235
235 236
236 237
237 238
238 239
239 240
240 241
241 242
242 243
243 244
244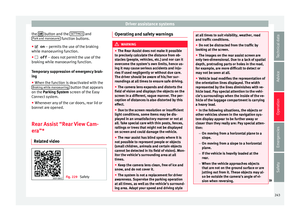 245
245 246
246 247
247 248
248 249
249 250
250 251
251 252
252 253
253 254
254 255
255 256
256 257
257 258
258 259
259 260
260 261
261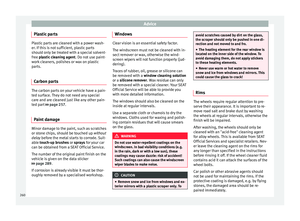 262
262 263
263 264
264 265
265 266
266 267
267 268
268 269
269 270
270 271
271 272
272 273
273 274
274 275
275 276
276 277
277 278
278 279
279 280
280 281
281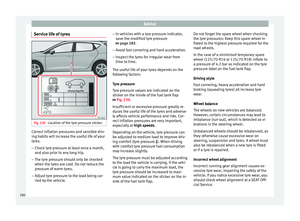 282
282 283
283 284
284 285
285 286
286 287
287 288
288 289
289 290
290 291
291 292
292 293
293 294
294 295
295 296
296 297
297 298
298 299
299 300
300 301
301 302
302 303
303 304
304 305
305 306
306 307
307 308
308 309
309 310
310 311
311 312
312 313
313 314
314 315
315 316
316 317
317 318
318 319
319 320
320 321
321 322
322 323
323 324
324 325
325 326
326 327
327 328
328 329
329 330
330 331
331