Page 273 of 332

Checking and refilling levels
●
Tak e c
are not to cause short circuits in the
electrical system, especially when working
on the battery.
● If working inside the engine compartment,
remember that, ev
en when the ignition is
switched off, the radiator fan may start up au-
tomatically, and therefore there is a risk of in-
jury.
● Never cover the engine with additional in-
sul
ating materials such as a blanket. Risk of
fire!
● Do not unscrew the cap on the coolant ex-
pans
ion tank when the engine is hot. The
cooling system is under pressure.
● Protect face, hands and arms by covering
the cap with a l
arge, thick rag to protect
against escaping coolant and steam.
● If it is necessary to work in the engine com-
partment
while the engine is running, the ro-
tating components (for example, poly-V belt,
alternator, radiator fan) and the high voltage
ignition system are an additional hazard.
● Observe the following additional warnings
if work
on the fuel system or the electrical
system is necessary:
– Always disconnect the battery from the
on-board network.
– Do not smoke.
– Never work near naked flames.
– Always keep an approved fire extinguish-
er immediately available. CAUTION
When topping up fluids make sure the correct
fluid is p
ut into the correct filler opening, oth-
erwise this can cause serious malfunctions or
engine damage. For the sake of the environment
Inspect the ground underneath your vehicle
re gu
larly so that any leaks are detected at an
early stage. If you find spots of oil or other
fluids in the area where it was parked, have
your vehicle inspected at the workshop. Note
In right-hand drive vehicles* some brake flu-
id re ser
voirs are on the other side of the en-
gine compartment ››› Fig. 247. Opening the bonnet
Read the additional information carefully
› ›
›
page 17
The bonnet is released from inside the vehi-
cle.
Check that the windscreen wiper arms are
not unfolded. Otherwise the paint may be
damaged.
The bonnet can only be unlocked when the
driver door is open. WARNING
Never open the bonnet if you see steam or
drips of
coolant being released from the en-
gine compartment. Failure to comply could
result in burns. Wait until no steam or coolant
can be seen before opening the bonnet. Closing the bonnet
–
Slightly lift the bonnet.
– Release the bonnet stay before pressing it
bac k
into its support.
– Carefully close the bonnet.
– Press the bonnet down until it locks into
plac
e.
– Make sure that the bonnet catches onto its
cla
sp. Do not press down too hard ››› .
WARNING
● For s af
ety reasons the bonnet must always
be completely closed when the vehicle is
moving. Therefore, after closing the bonnet,
always check that the locking element is
properly engaged. This is the case if the bon-
net is flush with the adjacent body panels.
● Should you notice that the bonnet is not
safely
secured when the vehicle is moving,
stop the vehicle immediately and close the
bonnet. Failure to follow this instruction
could result in an accident. 271
Technical data
Advice
Operation
Emergencies
Safety
Page 274 of 332

Advice
Engine oil Gener a
l
notesThe engine comes with a special, multi-grade
oil
th
at can be used all year round.
Because the use of high-quality oil is essen-
tial for the correct operation of the engine
and its long useful life, when topping up or
changing oil, use only those oils that comply
with VW standards.
The specifications (VW standards) set out in
the following page should appear on the con-
tainer of the service oil; when the container
displays the specific standards for petrol and
diesel engines together, it means that the oil
can be used for both types of engines.
We recommend that the oil change indicated
in the Maintenance Programme, be per-
formed by a technical service or specialised
workshop.
The correct oil specifications for your engine
are listed in the ›››
page 60, Engine oil
specifications.
Service intervals
Service intervals can be flexible (LongLife
service) or fixed (dependent on time/dis-
tance travelled).
If the PR code that appears on the back of the
Maintenance Programme booklet is PR QI6, this means that your vehicle has the LongLife
serv
ic
e programmed. If it lists the codes QI1,
QI2, QI3, QI4 or QI7, the interval service is
dependent on time/distance travelled.
Flexible service intervals (LongLife service
intervals*)
Special oils and processes have been devel-
oped which, depending on the characteris-
tics and individual driving profiles, enable
the extension of the oil change service (Long-
Life service intervals).
Because this oil is essential for extending the
service intervals, it must only be used ob-
serving the following indications:
● Avoid mixing it with oil for fixed service in-
terv
als.
● Only in exceptional circumstances, if the
engine oil
level is too low ››› page 273 and
LongLife oil is not available, it is permitted to
top up (once) with oil for fixed service inter-
vals ›››
page 60 (up to a maximum of 0.5
litres).
Fixed service intervals*
If your vehicle does not have the “LongLife
service interval” or it has been disabled (by
request), you may use oils for fixed service
intervals, which also appear in
››› page 60, Engine oil specifications
. In
this case, your vehicle must be serviced after
a fixed interval of 1 year/15,000 km (10,000 miles)(whatever comes first)
›››
Booklet
Maintenance Programme.
● In exceptional circumstances, if the engine
oil l
evel is too low ››› page 273 and you can-
not obtain the oil specified for your vehicle,
you can add a small quantity of oil conform-
ing to the specification ACEA A2 or ACEA A3
(petrol engines) or ACEA B3 or ACEA B4 (die-
sel engines) (up to 0.5 l).
Vehicles with diesel particulate filter*
The Maintenance Programme states whether
your vehicle is fitted with a diesel particulate
filter.
Only VW 507 00 engine oil, with reduced ash
formation, may be used in diesel engines
equipped with particulate filter. Using other
types of oil will cause a higher soot concen-
tration and reduce the life of the DPF. There-
fore:
● Avoid mixing this oil with other engine oils.
● Only in exceptional circumstances, if the
engine oil
level is too low ››› page 273,
Checking engine oil level and you cannot ob-
tain the oil specified for your vehicle, you can
use a small quantity of oil (once) conforming
to the VW 506 00, VW 506 01, VW 505 00,
VW 505 01 or ACEA B3/ACEA B4 specification
(up to 0.5 l).
272
Page 275 of 332

Checking and refilling levels
Checking engine oil level Fig. 248
Engine oil dipstick. Read the additional information carefully
› ›
›
page 59
The engine oil dipstick indicates the level of
the oil.
Checking oil level
– Park the vehicle in a horizontal position.
– Briefly run the engine at idle speed until
the operating t
emperature is reached and
then stop.
– Wait for about two minutes.
– Pull out the dipstick. Wipe the dipstick with
a cle
an cloth and insert it again, pushing it
in as far as it will go.
– Then pull it out once more and check the oil
level
››› Fig. 248. Top up with engine oil if
necessary. Depending on how you drive and the condi-
tions in whic
h the vehicle is used, oil con-
sumption can be up to 0.5 l/1000 km. Oil
consumption is likely to be higher for the first
5,000 km. For this reason the engine oil level
must be checked at regular intervals, prefera-
bly when filling the tank and before a jour-
ney. WARNING
Any work carried out in the engine compart-
ment or on the en gine mu
st be carried out
cautiously.
● When working in the engine compartment,
alwa
ys observe the safety warnings
››› page 270. CAUTION
If the oil level is above area A , do not start
the engine. Thi
s could result in damage to the
engine and catalytic converter. Contact a
Technical Service. Topping up engine oil
Fig. 249
In the engine compartment: Engine
oi l
fi
ller cap. Read the additional information carefully
› ›
›
page 59
Before opening the bonnet, read and observe
the warnings ››› in Working in the engine
c omp
ar
tment on page 270.
The position of the oil filler opening is shown
in the corresponding engine compartment il-
lustration ››› page 270.
Engine oil specification ›››
page 60. WARNING
Oil is highly inflammable! Ensure that no oil
come s
into contact with hot engine compo-
nents when topping up. » 273
Technical data
Advice
Operation
Emergencies
Safety
Page 276 of 332

Advice
CAUTION
If the oil level is above area ››› Fig. 248 A , do
not s t
art the engine. This could result in dam-
age to the engine and catalytic converter.
Contact a specialised workshop. For the sake of the environment
The oil level must never be above area
›› ›
Fig. 248 A . Otherwise oil can be drawn in
through the c r
ankcase breather and escape
into the atmosphere via the exhaust system. Note
Before a long trip, we recommend finding an
engine oi l
that conforms to the correspond-
ing VW specifications and recommend keep-
ing it in the vehicle. This way, the correct en-
gine oil will always be available for a top-up if
needed. Changing engine oil
Read the additional information carefully
› ›
›
page 59.
The engine oil must be changed at the inter-
vals given in the service schedule.
We recommend that you have the engine oil
changed by a Technical Service.
The oil change intervals are shown in the
Maintenance Programme. WARNING
Only change the engine oil yourself if you
hav e the s
pecialist knowledge required!
● Before opening the bonnet, read and ob-
serve the w
arnings ››› page 270.
● Wait for the engine to cool down. Hot oil
may
cause burn injuries.
● Wear eye protection to avoid injuries, such
as ac
id burns, caused by splashes of oil.
● When removing the oil drain plug with your
finger
s, keep your arm horizontal to help pre-
vent oil from running down your arm.
● Wash your skin thoroughly if it comes into
contact
with engine oil.
● Engine oil is poisonous! Used oil must be
stor
ed in a safe place out of the reach of chil-
dren. CAUTION
No additives should be used with engine oil.
This c
ould result in engine damage. Any dam-
age caused by the use of such additives
would not be covered by the factory warranty. For the sake of the environment
● Bec au
se of disposal problems and the spe-
cial tools and specialist knowledge required,
we recommend that you have the engine oil
and filter changed by a Technical Service.
● Never pour oil down drains or into the
ground. ●
Use a s uit
able container when draining the
used oil. It must be large enough to hold all
the engine oil. Cooling system
Top pin
g up coolant Read the additional information carefully
›› ›
page 60
Top up coolant when the level is below the
MIN (minimum) mark.
Checking coolant level
– Park the vehicle in a horizontal position.
– Switch the ignition off.
– Read off the coolant level on coolant ex-
pan s
ion tank. When the engine is cold, the
coolant level should be between the marks.
When the engine is hot, it may be slightly
above the upper mark.
Topping up coolant
– Wait for the engine to cool down.
– Cover the coolant expansion tank cap with
a cloth and car
efully unscrew it to the left
››› .
– Top up the coolant only if there is still cool-
ant in the e xp
ansion tank, otherwise you
274
Page 277 of 332

Checking and refilling levels
could d amage the engine. If there is no
c oo
lant in the expansion tank, do not con-
tinue driving. You should obtain professio-
nal assistance ››› .
– If there is still some coolant in the expan-
sion t
ank, t
op up to the upper mark.
– Top up with coolant until the level becomes
stab
le.
– Screw the cap back on correctly.
Any lo
ss of coolant fluid normally indicates a
leak in the cooling system. Take the vehicle
straight to a specialised workshop to have
the cooling system examined. If there are no
leaks in the engine cooling system, a loss of
coolant can only occur if the coolant boils
and is forced out of the system as a result of
overheating. WARNING
● The coo lin
g system is under pressure. Do
not unscrew the cap on the coolant expan-
sion tank when the engine is hot: risk of
burns!
● The antifreeze and coolant fluid can be a
health h
azard. Therefore, the antifreeze
should be stored in the original container in a
safe place out of reach of children. Failure to
comply could result in poisoning.
● If working inside the engine compartment,
remember that, ev
en when the ignition is
switched off, the radiator fan may start up au- tomatically, and therefore there is a risk of in-
jury
. WARNING
If there is not enough anti-freeze in the cool-
ant sys
tem, the engine may fail leading to se-
rious damage.
● Please make sure that the percentage of
additiv
e is correct with respect to the lowest
expected ambient temperature in the zone in
which the vehicle is to be used.
● When the outside temperature is very low,
the cool
ant could freeze and the vehicle
would be immobilised. In this case, the heat-
ing would not work either and inadequately
dressed passengers could die of cold. CAUTION
Do not top up the expansion tank with cool-
ant fluid if it
is empty! Air could enter the
cooling system. In this case, stop driving.
Seek specialist assistance. Otherwise, there
is a risk of engine damage. CAUTION
The original additives should never be mixed
with c oo
lants which are not approved by
SEAT. Otherwise, you run the risk of causing
severe damage to the engine and the engine
cooling system.
● If the fluid in the expansion tank is not pur-
ple b
ut is, for example, brown, this indicates that the G13 additive has been mixed with an
ina
dequat
e coolant. The coolant must be
changed as soon as possible if this is the
case! This could result in serious faults and
engine damage. For the sake of the environment
Coolants and additives can contaminate the
en vir
onment. If any fluids are spilled, they
should be collected and correctly disposed
of, with respect to the environment. Brake fluid
Top up br
ak
e fluid Read the additional information carefully
› ›
›
page 61
Checking the brake fluid level
The brake fluid level must be between the
MIN and MAX markings.
However, if the brake fluid level goes down
noticeably in a short time, or drops below the
MIN mark, there may be a leak in the brake
system. Seek specialist assistance. A warn-
ing light on the instrument panel display
monitors the brake fluid level ››› page 119. »
275
Technical data
Advice
Operation
Emergencies
Safety
Page 278 of 332

Advice
In right-hand drive vehicles the brake fluid
r e
ser
voir is on the other side of the engine
compartment.
Changing brake fluid
The regular intervals at which the brake fluid
should be replaced are listed in the Mainte-
nance Programme. We recommend you have
it replaced at a SEAT Official Service, during
an Inspection Service. WARNING
● Brak e fluid shou
ld be stored in the closed
original container in a safe place out of reach
of children. Risk of poisoning!
● If the brake fluid is left in the system for
too long and the br
akes are subjected to
heavy use, vapour bubbles may form in the
brake system. This would seriously affect the
efficiency of the brakes and the safety of the
vehicle. This may cause an accident. CAUTION
Brake fluid should not come into contact with
the v ehic
le paintwork, as it is abrasive. Windscreen washer reservoir
Chec k
in
g and topping up the wind-
screen washer reservoir Read the additional information carefully
›› ›
page 61
Check the water level in the windscreen
washer reservoir regularly and top up as re-
quired.
The container for the windscreen washer con-
tains the cleaning fluid for the windscreen,
the rear window and the headlight washer
system*.
● Open the bonnet ››
›
page 270.
● The windscreen washer reservoir is marked
with the symbol
on the cap.
● Check there is enough windscreen water in
the reser
voir.
Recommended windscreen wipers
● For the hottest seasons we recommend
summer G 052 184 A1 for c
lear glass. Propor-
tions of the mixture in the washer fluid tank:
1:100 (1 part concentrate per 100 parts wa-
ter).
● All year round, G 052 164 A2 for clear
glas
s. Approximate proportion of the winter
mixture, up to -18°C (0°F): 1:2 (1 part con-
centrate per 2 parts water); otherwise, a 1:4 proportion of mixture in the washer fluid
tank.
Cap
acity
The reservoir holds approximately 3 litres in
versions without headlight washer and 5 li-
tres in versions with headlight washer. WARNING
If the water from the windscreen washer does
not c ont
ain enough anti-freeze, it may freeze
on the windscreen and rear window, reducing
forward and rear visibility.
● In winter, ensure the windscreen washer
contain
s enough anti-freeze.
● In cold conditions, you should not use the
winds
creen wiper system unless you have
warmed the windscreen with the ventilation
system. The antifreeze could freeze on the
windscreen and reduce visibility. WARNING
Never mix an unsuitable antifreeze or other
simi l
ar additives with the windscreen washer
water. A greasy layer may be formed on the
windscreen which will impair visibility.
● Use clean water with a window cleaner rec-
ommended by
SEAT.
● If necessary, add a suitable antifreeze to
the water in the r
eservoir.276
Page 279 of 332

Checking and refilling levels
CAUTION
● Do not mi x
cleaning products recommen-
ded by SEAT with other products. This could
lead to flocculation and may block the wind-
screen washer jets.
● When topping up service fluids, make abso-
lutely c
ertain that you fill the fluids into the
correct reservoirs. Using the wrong fluids
could cause serious malfunctions and engine
damage!
● Not having windscreen wiper fluid reduces
vis
ibility through the windscreen, and leads
to loss of visibility in headlights in models
with headlight washer. Battery
Gener a
l
informationRead the additional information carefully
› ›
›
page 61.
The battery is located in the engine compart-
ment and is almost maintenance-free. It is
checked as part of the Inspection Service.
Nevertheless, check the terminals are clean
and have the correct tightening torque, espe-
cially in summer and winter.
Disconnecting the battery
The battery should only be disconnected in
exceptional cases. When the battery is dis- connected, some of the vehicle's functions
are “los
t” (››› table on page 277). These
functions will require resetting after the bat-
tery is reconnected.
Deactivate the anti-theft alarm* before you
disconnect the battery Otherwise the alarm
will be triggered.
FunctionReprogramming
One-touch function of
the electric windows››› page 138, One-touch
opening and closing*.
Remote control key
If the vehicle does not re-
spond to the key, they
should be synchronised
››› page 132.
Digital clock››› page 116.
ESC warning lampAfter driving for a few me-
tres, the warning lamp goes
out again. If the vehicle is not used for long periods
The
v
ehic
le has a system for monitoring the
current consumption when the engine is left
unused for long periods of time ››› page 201.
Some functions, such as the interior lights, or
the remote door opening, may be temporarily
disabled to prevent the battery from running
flat. These functions will come back on as
soon as the ignition is switched on and the
engine started. Winter conditions
During the w
inter, the starting power may be
reduced, and if necessary, the battery should
be charged ››› in Important safety warn-
in g
s
for handling a vehicle battery on
page 278
Important safety warnings for han-
dling a v
ehicle battery All work on batteries requires specialist
kno
wl
edg
e. Please refer to a SEAT Official
Service or a workshop specialising in batter-
ies: risk of burns or exploding battery!
The battery must not be opened. Never try to
change the fluid level of the battery. Other-
wise explosive gas is released from the bat-
tery that could cause an explosion.
Wear eye protection.
Battery acid is very corrosive and caustic. Wear
protective gloves and eye protection. In the event
of electrolyte splashes, rinse off with plenty of
water.
Fires, sparks, open flames and smoking are pro-
hibited.
The battery should only be charged in a well-ven-
tilated zone. Risk of explosion!
Keep children away from acid and batteries!»
277
Technical data
Advice
Operation
Emergencies
Safety
Page 280 of 332

Advice
WARNING
● When rep airin
g or working on the electrical
system, proceed as follows:
–1. Remove the key from the ignition. The
negative cable on the battery must be
disconnected.
– 2. When the repair is finished, reconnect
the negative pole of the battery.
● Switch off all electrical devices before re-
connecting the b
attery. Reconnect first the
positive cable and then the negative cable.
Never reverse the polarity of the connections.
This could cause an electrical fire.
● Ensure that the vent hose is always connec-
ted to the b
attery.
● Never use damaged batteries. This could
cause an e
xplosion! Replace a damaged bat-
tery immediately. CAUTION
● Never di s
connect the battery if the ignition
is switched on or if the engine is running.
This could damage the electrical system or
electronic components. Charging the battery
Terminals for charging the battery are fitted
in the en
gine comp
artment. –
Note the warnin
gs ››› in Important safety
w arnin
g
s for handling a vehicle battery on
page 278 and ››› .
– Switch off all electrical devices. Remove the
ignition k ey
.
– R
aise the bonnet ›››
page 271.
– Open the battery cover.
– Connect the charger clamps as described
to the po
sitive pole of the battery (+) and
exclusively to an earth on the bodywork
(–).
– Only use a charger which is compatible for
use with 12
V nominal voltage batteries.
The charge must not exceed a voltage of 15
V.
– Now connect the battery charger to the
power soc
ket and switch on.
– After charging the battery: switch off the
batter
y charger and disconnect the power
socket cable.
– Finally disconnect the charger cables from
the batter
y.
– Replace the battery cover correctly.
– Close the bonnet ›››
page 271.
Important: Before you charge the battery
make sure you read the manufacturer's in-
structions for using the battery charger. WARNING
Never charge a battery that has frozen: re-
pl ac
e battery! Failure to do so may lead to an
explosion. Note
Use only the terminals in the engine compart-
ment t o c
harge the battery. Replacing the battery
The new battery should have the same speci-
fic
ation
s
(amperage, load and voltage) as the
used battery.
Your vehicle is equipped with an intelligent
power management system to control the
distribution of electrical energy ›››
page 201.
The power management function ensures
that the battery is charged much more effi-
ciently than on vehicles without a power
management system. To maintain this func-
tion after replacing the battery, we recom-
mend that the replacement battery used is of
the same make and type as the original fitted
battery. To make proper use of the power
management function after the battery has
been changed, have the battery coded to the
power management mode at a specialised
workshop.
278
 1
1 2
2 3
3 4
4 5
5 6
6 7
7 8
8 9
9 10
10 11
11 12
12 13
13 14
14 15
15 16
16 17
17 18
18 19
19 20
20 21
21 22
22 23
23 24
24 25
25 26
26 27
27 28
28 29
29 30
30 31
31 32
32 33
33 34
34 35
35 36
36 37
37 38
38 39
39 40
40 41
41 42
42 43
43 44
44 45
45 46
46 47
47 48
48 49
49 50
50 51
51 52
52 53
53 54
54 55
55 56
56 57
57 58
58 59
59 60
60 61
61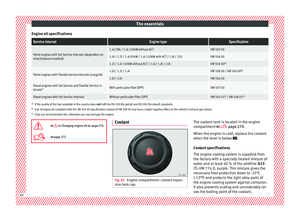 62
62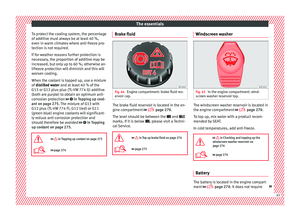 63
63 64
64 65
65 66
66 67
67 68
68 69
69 70
70 71
71 72
72 73
73 74
74 75
75 76
76 77
77 78
78 79
79 80
80 81
81 82
82 83
83 84
84 85
85 86
86 87
87 88
88 89
89 90
90 91
91 92
92 93
93 94
94 95
95 96
96 97
97 98
98 99
99 100
100 101
101 102
102 103
103 104
104 105
105 106
106 107
107 108
108 109
109 110
110 111
111 112
112 113
113 114
114 115
115 116
116 117
117 118
118 119
119 120
120 121
121 122
122 123
123 124
124 125
125 126
126 127
127 128
128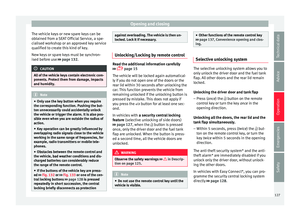 129
129 130
130 131
131 132
132 133
133 134
134 135
135 136
136 137
137 138
138 139
139 140
140 141
141 142
142 143
143 144
144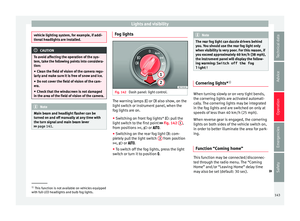 145
145 146
146 147
147 148
148 149
149 150
150 151
151 152
152 153
153 154
154 155
155 156
156 157
157 158
158 159
159 160
160 161
161 162
162 163
163 164
164 165
165 166
166 167
167 168
168 169
169 170
170 171
171 172
172 173
173 174
174 175
175 176
176 177
177 178
178 179
179 180
180 181
181 182
182 183
183 184
184 185
185 186
186 187
187 188
188 189
189 190
190 191
191 192
192 193
193 194
194 195
195 196
196 197
197 198
198 199
199 200
200 201
201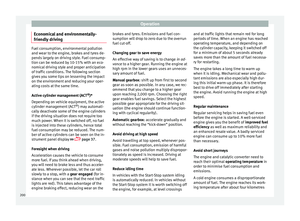 202
202 203
203 204
204 205
205 206
206 207
207 208
208 209
209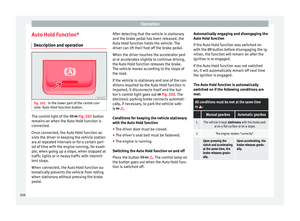 210
210 211
211 212
212 213
213 214
214 215
215 216
216 217
217 218
218 219
219 220
220 221
221 222
222 223
223 224
224 225
225 226
226 227
227 228
228 229
229 230
230 231
231 232
232 233
233 234
234 235
235 236
236 237
237 238
238 239
239 240
240 241
241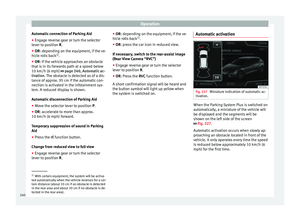 242
242 243
243 244
244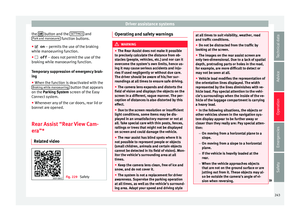 245
245 246
246 247
247 248
248 249
249 250
250 251
251 252
252 253
253 254
254 255
255 256
256 257
257 258
258 259
259 260
260 261
261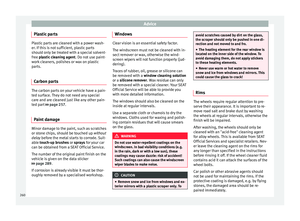 262
262 263
263 264
264 265
265 266
266 267
267 268
268 269
269 270
270 271
271 272
272 273
273 274
274 275
275 276
276 277
277 278
278 279
279 280
280 281
281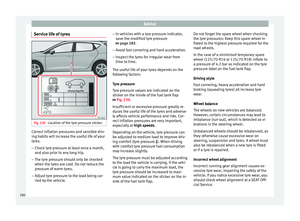 282
282 283
283 284
284 285
285 286
286 287
287 288
288 289
289 290
290 291
291 292
292 293
293 294
294 295
295 296
296 297
297 298
298 299
299 300
300 301
301 302
302 303
303 304
304 305
305 306
306 307
307 308
308 309
309 310
310 311
311 312
312 313
313 314
314 315
315 316
316 317
317 318
318 319
319 320
320 321
321 322
322 323
323 324
324 325
325 326
326 327
327 328
328 329
329 330
330 331
331