2017 Seat Leon 5D oil change
[x] Cancel search: oil changePage 5 of 332

Frequently Asked Ques-
tion
sBefore driving
How do you adjust the seat?
››› page 19
How do you adjust the steering wheel? ››› page 21
How do you adjust the exterior mirrors? ››› page 21
How do you turn on the exterior lights? ››› page 30
How does the automatic gearbox selector lever work?
››› page 50
How do you refuel? ››› page 58
How do you activate the windscreen wipers and wind-
screen washer system? ››› page 32
Emergency situations
A warning lamp lights up or flashes. What does this
mean? ››› page 47
How do you open the bonnet? ››› page 17
How do you perform a jump start? ››› page 70
Where is the vehicle tool kit located? ››› page 66
How do you repair a tyre with the anti-puncture kit?
››› page 65
How do you change a wheel? ››› page 66
How do you change a fuse? ››› page 63
How do you change a light? ››› page 64
How do you tow a vehicle? ››› page 69
Useful tips
How do you set the time? ››› page 115
When should the vehicle inspection should be per-
formed? ››› page 44
What functions do the buttons/thumbwheels on the
steering wheel perform? ››› page 121
How do you remove the luggage compartment cover?
››› page 169
How do you drive in an economical and environmental-
ly-friendly way? ››› page 200
How do you check and top up the engine oil?
››› page 59
How do you check and top up the engine coolant?
››› page 60
How do you top up the windscreen washer fluid?
››› page 61
How do you check and top up the brake fluid?
››› page 61
How do you check and adjust tyre pressure values?
››› page 280
Vehicle washing tips ››› page 257
Functions of interest
Easy Connect, CAR menu ››› page 33
How does the START-STOP system work? ››› page 205
What parking assistants are available? ››› page 237
How does the rear assist work? ››› page 243
How does the adaptive cruise control work?
››› page 214
How can the SEAT driving mode be adjusted?
››› page 230
How does the lane departure warning system work?
››› page 224
How does tyre pressure monitoring work? ››› page 284
How do you open the vehicle without a key (Keyless Ac-
cess)? ››› page 129
Interior lighting and ambient light ››› page 147
Page 37 of 332

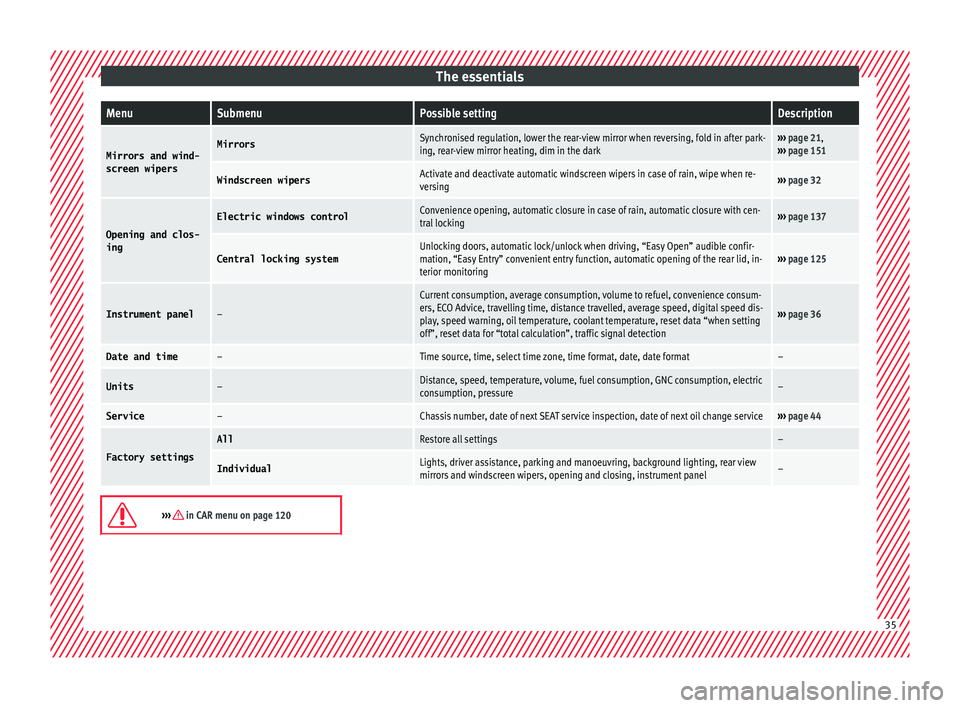
The essentialsMenuSubmenuPossible settingDescription
Mirrors and wind-
screen wipersMirrorsSynchronised regulation, lower the rear-view mirror when reversing, fold in after park-
ing, rear-view mirror heating, dim in the dark››› page 21,
››› page 151
Windscreen wipersActivate and deactivate automatic windscreen wipers in case of rain, wipe when re-
versing››› page 32
Opening and clos-
ing
Electric windows controlConvenience opening, automatic closure in case of rain, automatic closure with cen-
tral locking››› page 137
Central locking systemUnlocking doors, automatic lock/unlock when driving, “Easy Open” audible confir-
mation, “Easy Entry” convenient entry function, automatic opening of the rear lid, in-
terior monitoring››› page 125
Instrument panel–
Current consumption, average consumption, volume to refuel, convenience consum-
ers, ECO Advice, travelling time, distance travelled, average speed, digital speed dis-
play, speed warning, oil temperature, coolant temperature, reset data “when setting
off”, reset data for “total calculation”, traffic signal detection
››› page 36
Date and time–Time source, time, select time zone, time format, date, date format–
Units–Distance, speed, temperature, volume, fuel consumption, GNC consumption, electric
consumption, pressure–
Service–Chassis number, date of next SEAT service inspection, date of next oil change service››› page 44
Factory settings
AllRestore all settings–
IndividualLights, driver assistance, parking and manoeuvring, background lighting, rear view
mirrors and windscreen wipers, opening and closing, instrument panel–
››› in CAR menu on page 120
35
Page 46 of 332

The essentials
● Vehicle
s
with Easy Connect : Press the button and the function button SETTINGS >
Driver assistance > ACC > Dis-
tance .
The w arnin
g limit
can be set from 30 to
240 km/h (20 to 149 mph). The adjustment
is made at 10 km/h (5 mph) intervals. Note
● Ple a
se bear in mind that, even with the
speed warning function, it is still important
to keep an eye on the vehicle speed with the
speedometer and to observe the legal speed
limits.
● The speed limit warning function in the ver-
sion for some c
ountries warns you at a speed
of 120 km/h (75 mph). This is a factory-set
speed limit. Service intervals
Fig. 48
Instrument panel The service interval indication appears on the
in
s
trument
panel display ››› Fig. 48 1 .
S EA
T di
stinguishes between services with en-
gine oil change (e.g. Oil change service) and
services without engine oil change (e.g. In-
spection).
In vehicles with Services established by time
or mileage, the service intervals are already
pre-defined.
In vehicles with LongLife Service , the inter-
vals are determined individually. Thanks to
technological progress, maintenance work
has been greatly reduced. Because of the
technology used by SEAT, with this service
you only need to change the oil when the ve- hicle so requires. To calculate this change
(max. 2 y
ears), the vehicle's conditions of
use and individual driving styles are consid-
ered. The advance warning first appears 20
days before the date established for the cor-
responding service. The kilometres (miles)
remaining until the next service are always
rounded up to the nearest 100 km (miles)
and the time is given in complete days. The
current service message cannot be viewed
until 500 km after the last service. Prior to
this, only lines are visible on the display.
Inspection reminder
When the Service date is approaching, when
the ignition is switched on a Service remind-
er is displayed.
Vehicles without text messages : a span-
ner will be displayed on the instrument
panel plus an indication in km.
The kilometres indicated are the maximum
number of kilometres that can be travelled
until the next service. After a few seconds,
the display mode changes. A clock symbol
appears and the number of days until the
next service is due.
Vehicles with text messages : Service in
--- km or --- days will be shown on the
instrument panel display. 44
Page 100 of 332

Emergencies
they should be changed if they are damaged,
or c l
e
aned if they are dirty ››› .
Dam ag
ed w
iper blades should be replaced
immediately. These are available from quali-
fied workshops. WARNING
Worn or dirty windscreen wiper blades reduce
vi s
ibility and increase the risk of accident
and serious injury.
● Always replace damaged or worn wind-
scr
een wiper blades or blades that no longer
clean the windscreen properly. CAUTION
● Damag ed or dir
ty windscreen wipers could
scratch the glass.
● If products containing solvents, rough
spong
es or sharp objects are used to clean
the blades, the graphite layer will be dam-
aged.
● Never use fuel, nail varnish remover, paint
thinner or simil
ar products to clean the win-
dows.
● In icy conditions, always check that the
wiper bl
ades are not frozen to the glass be-
fore using the wipers. In cold weather, it may
help to leave the vehicle parked with the wip-
ers in service position ›››
page 72. CAUTION
● To pr ev
ent damage to the bonnet and the
wiper arms, only leave them in the service
position.
● Before driving, always lower the wiper
arms. Towing or tow-starting
Genera l
information Read the additional information carefully
› ›
›
page 69.
Tow-starting means starting the engine of
the vehicle while another pulls it.
Towing means one vehicle pulling another
that is not roadworthy.
If the vehicle comes with the Keyless Access
system, towing is only allowed with the igni-
tion on!
The vehicle battery drains if the vehicle is
towed with the engine switched off and the
ignition connected. Depending on the battery
charge status, the drop in voltage may be so
large, even after just a few minutes, that no
electrical device in the vehicle may work e.g.
the hazard warning lights. In vehicles with
the Keyless Access system, the steering
wheel could lock up. WARNING
If the vehicle has no electrical power, the
brak e light
s, turn signals and all other lights
will no longer function. Do not have the vehi-
cle towed away. Failure to follow this instruc-
tion could result in an accident. WARNING
The risk of accidents is high when tow-start-
ing, f or e
xample, the towed vehicle can easily
be driven into the towing vehicle. CAUTION
If there is no oil in the gearbox or no lubricant
in the autom atic
transmission the car may
only be towed with the driven wheels lifted
clear of the road, or transported on a special
car transporter or trailer. CAUTION
Do not tow a vehicle for more than 50 m in at-
tempt t
o start it. There is risk of damage to
the catalytic converter. Note
● Ple a
se observe related legal requirements.
● Switch on the hazard warning lights of both
vehicl
es. However, observe any regulations
to the contrary. 98
Page 274 of 332

Advice
Engine oil Gener a
l
notesThe engine comes with a special, multi-grade
oil
th
at can be used all year round.
Because the use of high-quality oil is essen-
tial for the correct operation of the engine
and its long useful life, when topping up or
changing oil, use only those oils that comply
with VW standards.
The specifications (VW standards) set out in
the following page should appear on the con-
tainer of the service oil; when the container
displays the specific standards for petrol and
diesel engines together, it means that the oil
can be used for both types of engines.
We recommend that the oil change indicated
in the Maintenance Programme, be per-
formed by a technical service or specialised
workshop.
The correct oil specifications for your engine
are listed in the ›››
page 60, Engine oil
specifications.
Service intervals
Service intervals can be flexible (LongLife
service) or fixed (dependent on time/dis-
tance travelled).
If the PR code that appears on the back of the
Maintenance Programme booklet is PR QI6, this means that your vehicle has the LongLife
serv
ic
e programmed. If it lists the codes QI1,
QI2, QI3, QI4 or QI7, the interval service is
dependent on time/distance travelled.
Flexible service intervals (LongLife service
intervals*)
Special oils and processes have been devel-
oped which, depending on the characteris-
tics and individual driving profiles, enable
the extension of the oil change service (Long-
Life service intervals).
Because this oil is essential for extending the
service intervals, it must only be used ob-
serving the following indications:
● Avoid mixing it with oil for fixed service in-
terv
als.
● Only in exceptional circumstances, if the
engine oil
level is too low ››› page 273 and
LongLife oil is not available, it is permitted to
top up (once) with oil for fixed service inter-
vals ›››
page 60 (up to a maximum of 0.5
litres).
Fixed service intervals*
If your vehicle does not have the “LongLife
service interval” or it has been disabled (by
request), you may use oils for fixed service
intervals, which also appear in
››› page 60, Engine oil specifications
. In
this case, your vehicle must be serviced after
a fixed interval of 1 year/15,000 km (10,000 miles)(whatever comes first)
›››
Booklet
Maintenance Programme.
● In exceptional circumstances, if the engine
oil l
evel is too low ››› page 273 and you can-
not obtain the oil specified for your vehicle,
you can add a small quantity of oil conform-
ing to the specification ACEA A2 or ACEA A3
(petrol engines) or ACEA B3 or ACEA B4 (die-
sel engines) (up to 0.5 l).
Vehicles with diesel particulate filter*
The Maintenance Programme states whether
your vehicle is fitted with a diesel particulate
filter.
Only VW 507 00 engine oil, with reduced ash
formation, may be used in diesel engines
equipped with particulate filter. Using other
types of oil will cause a higher soot concen-
tration and reduce the life of the DPF. There-
fore:
● Avoid mixing this oil with other engine oils.
● Only in exceptional circumstances, if the
engine oil
level is too low ››› page 273,
Checking engine oil level and you cannot ob-
tain the oil specified for your vehicle, you can
use a small quantity of oil (once) conforming
to the VW 506 00, VW 506 01, VW 505 00,
VW 505 01 or ACEA B3/ACEA B4 specification
(up to 0.5 l).
272
Page 276 of 332

Advice
CAUTION
If the oil level is above area ››› Fig. 248 A , do
not s t
art the engine. This could result in dam-
age to the engine and catalytic converter.
Contact a specialised workshop. For the sake of the environment
The oil level must never be above area
›› ›
Fig. 248 A . Otherwise oil can be drawn in
through the c r
ankcase breather and escape
into the atmosphere via the exhaust system. Note
Before a long trip, we recommend finding an
engine oi l
that conforms to the correspond-
ing VW specifications and recommend keep-
ing it in the vehicle. This way, the correct en-
gine oil will always be available for a top-up if
needed. Changing engine oil
Read the additional information carefully
› ›
›
page 59.
The engine oil must be changed at the inter-
vals given in the service schedule.
We recommend that you have the engine oil
changed by a Technical Service.
The oil change intervals are shown in the
Maintenance Programme. WARNING
Only change the engine oil yourself if you
hav e the s
pecialist knowledge required!
● Before opening the bonnet, read and ob-
serve the w
arnings ››› page 270.
● Wait for the engine to cool down. Hot oil
may
cause burn injuries.
● Wear eye protection to avoid injuries, such
as ac
id burns, caused by splashes of oil.
● When removing the oil drain plug with your
finger
s, keep your arm horizontal to help pre-
vent oil from running down your arm.
● Wash your skin thoroughly if it comes into
contact
with engine oil.
● Engine oil is poisonous! Used oil must be
stor
ed in a safe place out of the reach of chil-
dren. CAUTION
No additives should be used with engine oil.
This c
ould result in engine damage. Any dam-
age caused by the use of such additives
would not be covered by the factory warranty. For the sake of the environment
● Bec au
se of disposal problems and the spe-
cial tools and specialist knowledge required,
we recommend that you have the engine oil
and filter changed by a Technical Service.
● Never pour oil down drains or into the
ground. ●
Use a s uit
able container when draining the
used oil. It must be large enough to hold all
the engine oil. Cooling system
Top pin
g up coolant Read the additional information carefully
›› ›
page 60
Top up coolant when the level is below the
MIN (minimum) mark.
Checking coolant level
– Park the vehicle in a horizontal position.
– Switch the ignition off.
– Read off the coolant level on coolant ex-
pan s
ion tank. When the engine is cold, the
coolant level should be between the marks.
When the engine is hot, it may be slightly
above the upper mark.
Topping up coolant
– Wait for the engine to cool down.
– Cover the coolant expansion tank cap with
a cloth and car
efully unscrew it to the left
››› .
– Top up the coolant only if there is still cool-
ant in the e xp
ansion tank, otherwise you
274
Page 277 of 332

Checking and refilling levels
could d amage the engine. If there is no
c oo
lant in the expansion tank, do not con-
tinue driving. You should obtain professio-
nal assistance ››› .
– If there is still some coolant in the expan-
sion t
ank, t
op up to the upper mark.
– Top up with coolant until the level becomes
stab
le.
– Screw the cap back on correctly.
Any lo
ss of coolant fluid normally indicates a
leak in the cooling system. Take the vehicle
straight to a specialised workshop to have
the cooling system examined. If there are no
leaks in the engine cooling system, a loss of
coolant can only occur if the coolant boils
and is forced out of the system as a result of
overheating. WARNING
● The coo lin
g system is under pressure. Do
not unscrew the cap on the coolant expan-
sion tank when the engine is hot: risk of
burns!
● The antifreeze and coolant fluid can be a
health h
azard. Therefore, the antifreeze
should be stored in the original container in a
safe place out of reach of children. Failure to
comply could result in poisoning.
● If working inside the engine compartment,
remember that, ev
en when the ignition is
switched off, the radiator fan may start up au- tomatically, and therefore there is a risk of in-
jury
. WARNING
If there is not enough anti-freeze in the cool-
ant sys
tem, the engine may fail leading to se-
rious damage.
● Please make sure that the percentage of
additiv
e is correct with respect to the lowest
expected ambient temperature in the zone in
which the vehicle is to be used.
● When the outside temperature is very low,
the cool
ant could freeze and the vehicle
would be immobilised. In this case, the heat-
ing would not work either and inadequately
dressed passengers could die of cold. CAUTION
Do not top up the expansion tank with cool-
ant fluid if it
is empty! Air could enter the
cooling system. In this case, stop driving.
Seek specialist assistance. Otherwise, there
is a risk of engine damage. CAUTION
The original additives should never be mixed
with c oo
lants which are not approved by
SEAT. Otherwise, you run the risk of causing
severe damage to the engine and the engine
cooling system.
● If the fluid in the expansion tank is not pur-
ple b
ut is, for example, brown, this indicates that the G13 additive has been mixed with an
ina
dequat
e coolant. The coolant must be
changed as soon as possible if this is the
case! This could result in serious faults and
engine damage. For the sake of the environment
Coolants and additives can contaminate the
en vir
onment. If any fluids are spilled, they
should be collected and correctly disposed
of, with respect to the environment. Brake fluid
Top up br
ak
e fluid Read the additional information carefully
› ›
›
page 61
Checking the brake fluid level
The brake fluid level must be between the
MIN and MAX markings.
However, if the brake fluid level goes down
noticeably in a short time, or drops below the
MIN mark, there may be a leak in the brake
system. Seek specialist assistance. A warn-
ing light on the instrument panel display
monitors the brake fluid level ››› page 119. »
275
Technical data
Advice
Operation
Emergencies
Safety
Page 281 of 332

Wheels
CAUTION
● Some v ehic
les, for example those with the
Start-Stop system* are fitted with a special
battery (AGM-type or EFB-type battery). If any
other type of battery is fitted, the Start-Stop
function may be considerably reduced and
the vehicle may not stop on repeated occa-
sions.
● Make sure that the vent hose is always at-
tached t
o the original opening on the side of
the battery. Gases or battery acid can other-
wise escape and possibly cause damage.
● The battery holder and clamps must always
be correctly
secured.
● Before starting any work on the battery, al-
way
s observe the warnings listed under
››› page 277, Important safety warnings for
handling a vehicle battery .
● Do not forget to replace the battery cover-
ings, wher
e applicable. It is a protection for
high temperatures. This in turn extends the
vehicle service life. For the sake of the environment
Batteries contain toxic substances includ-
in g s
ulphuric acid and lead. They must be
disposed of appropriately and must not be
disposed of with ordinary household waste.
Make sure disconnected batteries cannot tip
over. Sulphuric acid could be spilt! Wheels
Wheel s
and ty
res
General notes –
When driving with new tyr e
s, be especially
careful during the first 500 km (300 miles).
– If you have to drive over a kerb or similar
obs
tacle, drive very slowly and as near as
possible at a right angle to the obstacle.
– Check from time to time if the tyres are
dam ag
ed (punctures, cuts, cracks or
dents). Remove any foreign objects embed-
ded in the treads.
– Damaged wheels and tyres must be re-
plac
ed immediately.
– Keep grease, oil and fuel off the tyres.
– Replace any missing valve caps as soon as
poss
ible.
– Mark the wheels before taking them off so
that they
rotate in the same direction when
put back.
– When removed, the wheels or tyres should
be stor
ed in a cool, dry and preferably dark
place.
New tyres
New tyres do not give maximum grip straight
away and should therefore be “run in” by driving carefully and at moderate speeds for
about the firs
t 500 km (300 miles). This will
also increase the useful life of the tyres.
The tread depth of new tyres may vary, ac-
cording to the type and make of tyre and the
tread pattern.
Concealed damage
Damage to tyres and rims is often not readily
visible. If you notice unusual vibration or the
car pulling to one side, this may indicate that
one of the tyres is damaged. Reduce speed
immediately if there is any reason to suspect
that damage may have occurred. Inspect the
tyres for damage. If no external damage is
visible, drive slowly and carefully to the near-
est specialised workshop and have the car
inspected.
Tyres with directional tread pattern
An arrow on the tyre sidewall indicates the di-
rection of rotation on single drive tyres. Al-
ways note the direction of rotation indicated
when mounting the wheel. This guarantees
optimum grip and helps to avoid aquaplan-
ing, excessive noise and wear.
Retrofitting accessories
If you wish to change or fit wheels, rims or
wheel trims, we recommend that you consult
with a SEAT Official Service centre for advice
regarding current techniques.
279
Technical data
Advice
Operation
Emergencies
Safety